
I designed this tote back in early spring when I was flipping through an old notebook filled with color palettes and half-sketched bag ideas. One page had "pastel granny stripes" scribbled next to a doodle of a rounded market bag, and I remember thinking I should actually make that someday. Well, someday finally arrived.
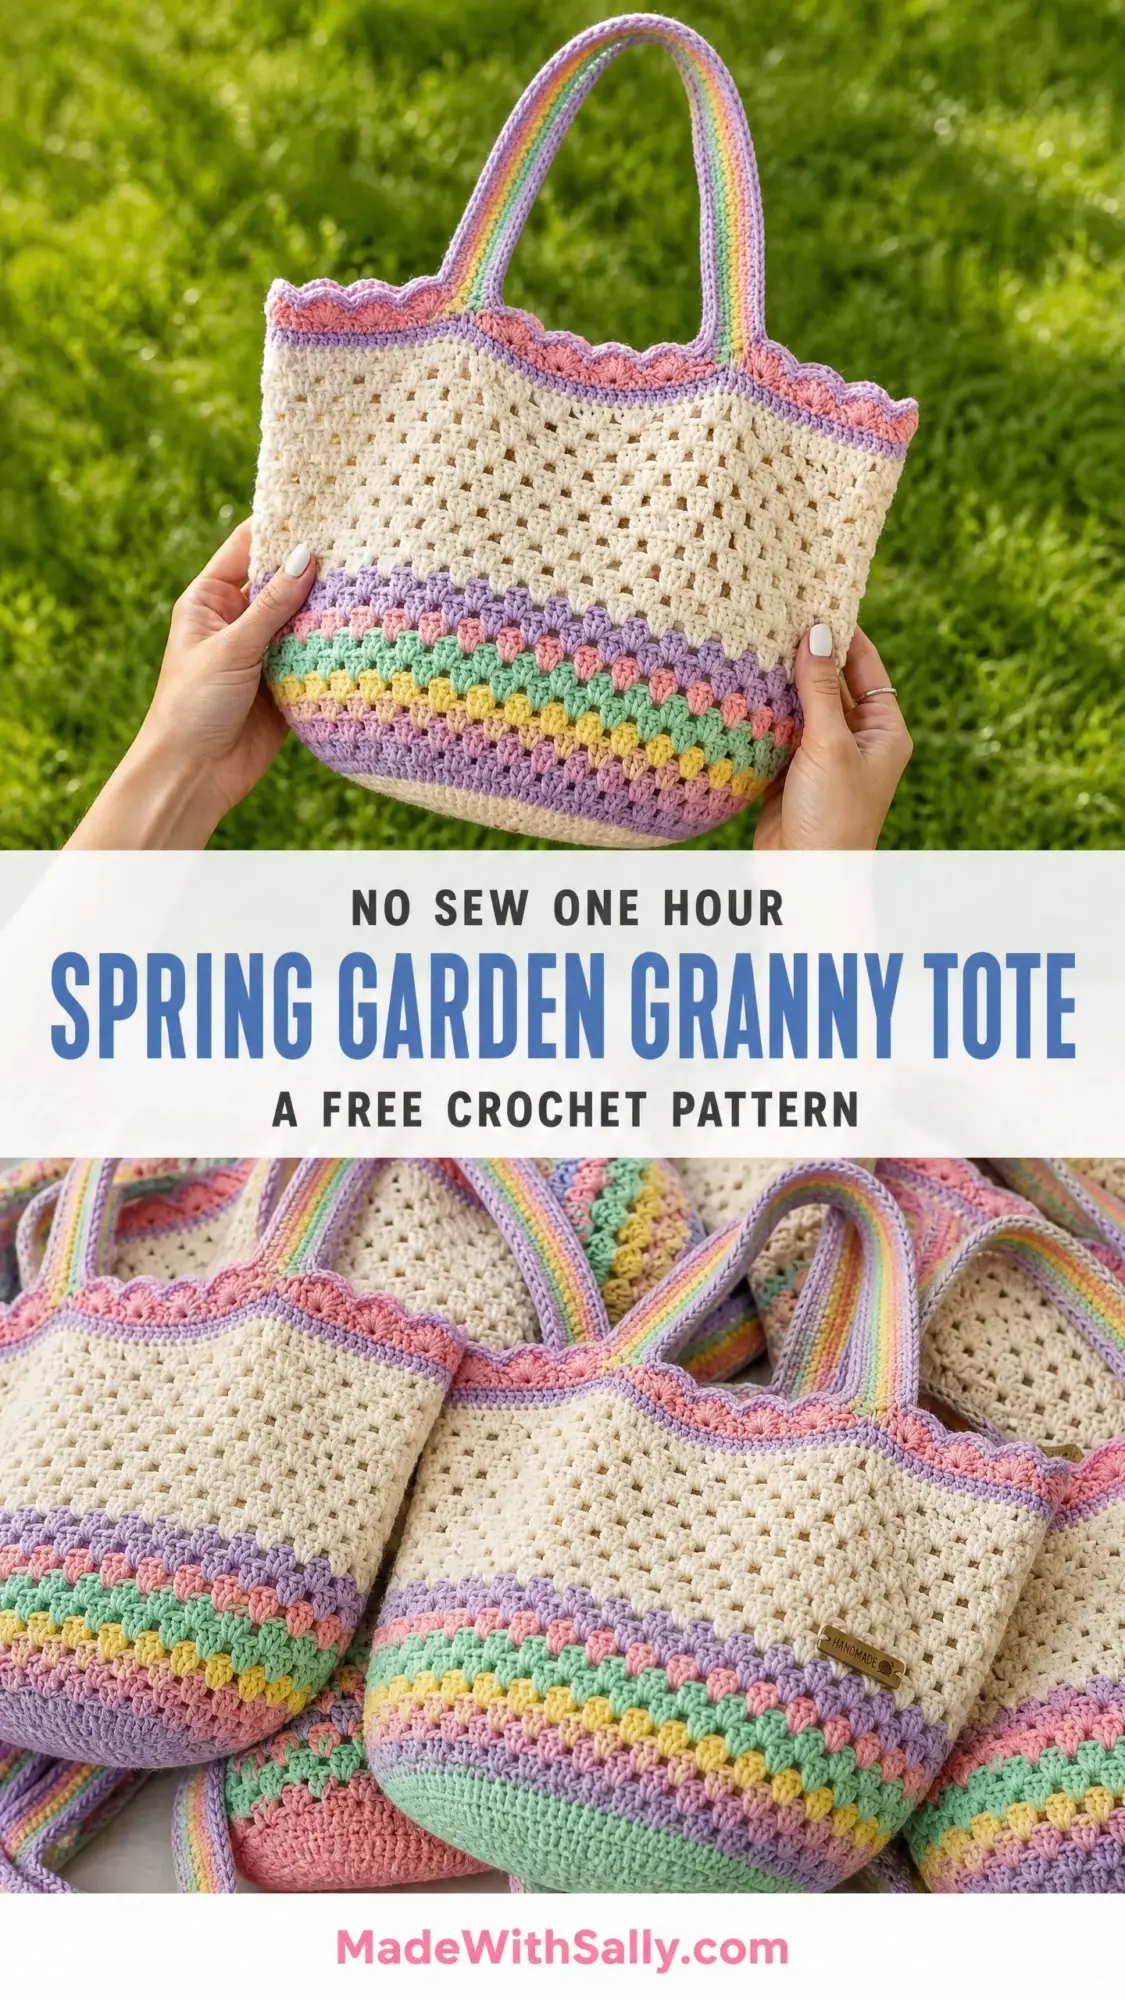
I named it the Spring Garden Granny Tote because the colors reminded me of an Easter egg hunt in my grandmother’s backyard. Soft lavender, coral pink, mint green, and buttery yellow stacked together like tulips in a garden bed. The cream lattice section in the middle feels like sunlight peeking through.
This bag took some trial and error to get right, but I am genuinely proud of how it turned out. The structure holds beautifully, the handles are sturdy enough for a farmers market haul, and the whole thing just makes me happy to look at. If you have been wanting a project that feels both nostalgic and fresh, this one is for you.
About This Crochet Pattern
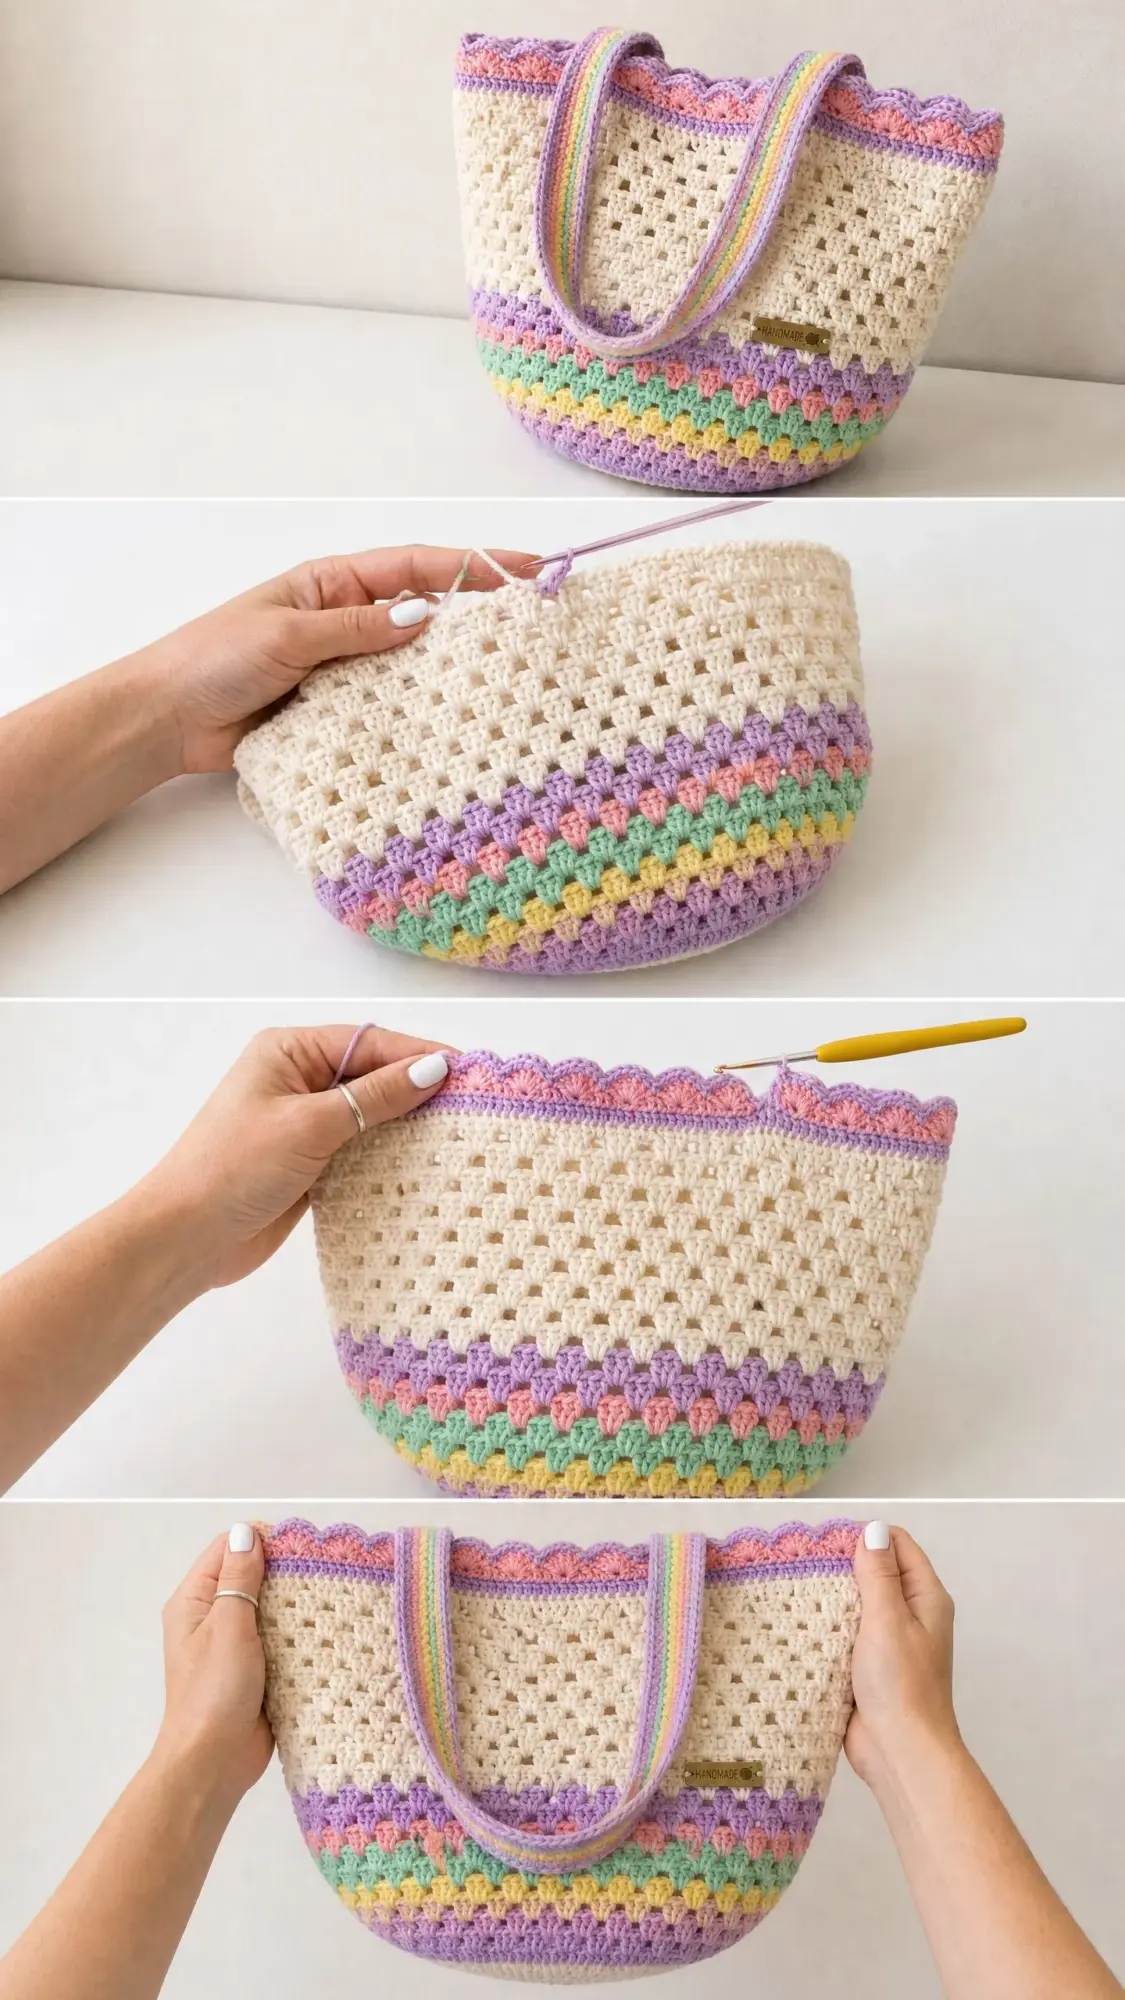
The Spring Garden Granny Tote is a structured, roomy bag worked entirely in the round from the bottom up. You will start with a flat oval base, then build up the body using classic granny cluster stitches arranged in cheerful horizontal stripes. The upper portion transitions into an airy cream lattice section that gives the bag its signature open, breezy look.
The top edge features a pretty scalloped shell border in lavender and pink. Two striped handles are crocheted separately as flat strips, then sewn to the inside. A small metal "Handmade" label finishes the look, though that part is completely optional.
This is an intermediate level crochet project. You should be comfortable working in the round, changing colors, and maintaining consistent tension. Nothing here is terribly complicated, but accurate stitch counts matter for achieving that tidy, polished result.
Expect to spend somewhere between 12 to 18 hours on this project, depending on your pace.
Finished Dimensions
Here is what your completed tote will measure:
Materials Needed
Yarn: Worsted weight (category 4), 100% cotton or cotton blend recommended for structure
Hook: US size J/10 (6.0 mm)
Notions:
Yarn Suggestions
Option 1: Lion Brand 24/7 Cotton in Ecru, Lavender, Pink, Mint, and Lemon. This mercerized cotton gives excellent stitch definition and holds its shape beautifully.
Option 2: Paintbox Yarns Simply DK held double for a softer drape while maintaining durability.
Option 3: Scheepjes Catona (50g balls held double) for a luxurious finish with exceptional color saturation.
Important: Avoid acrylic-only yarns. They lack the stiffness needed for the bag to hold its shape. Cotton or cotton blends work best here.
Gauge
With your J/10 hook and worsted weight cotton:
I strongly recommend making a gauge swatch. Work a flat granny square of 4 rounds and measure after blocking. Adjust your hook size if needed. Gauge matters for this project because you want the bag to hold its shape and fit the intended dimensions.
Abbreviations and Stitch Definitions
Let me walk you through every stitch abbreviation you will encounter. Even if you know these already, a quick refresher never hurts.
Special Stitches
Granny Cluster (granny cl)
Work 3 double crochet stitches into the designated stitch or space. This group of 3 dc counts as one granny cluster unit. When working in rounds with chain-1 spaces between clusters, insert your hook into the ch-1 space (not into the top of a dc) unless otherwise stated.
If you have ever made a granny square, you already know this stitch. It is just a little cluster of 3 dc that creates that classic textured look.
Shell Stitch (for border)
Work 5 dc into the same stitch or space. This forms a fan or shell shape and creates the scalloped top border.
Granny Lattice Pattern
This is simply working (granny cl, ch 1) into each ch-1 space around, then joining at the end of the round with a slip stitch into the top of the first dc of the first cluster. You repeat this pattern to build the open mesh body of the bag.
Pattern Notes Before You Begin
1. The bag is worked in the round throughout. Only the handles are worked flat.
2. When changing colors, drop the old color and pick up the new color to complete the final yarn over of the joining slip stitch. Carry colors loosely up the inside for short repeats (1 to 2 rounds) or cut and rejoin for longer gaps.
3. Do not turn between rounds unless instructed. The granny cluster pattern creates a right-side fabric.
4. Always work into the ch-1 space, not into the top of the dc, unless instructed otherwise.
5. Stitch counts in this pattern refer to the number of granny cluster units per round, not individual dc stitches. Each cluster counts as 1 unit.
6. Weave in all ends securely using a figure-eight pattern. Cotton yarn can loosen over time.
7. Blocking is strongly recommended. Wet blocking will open up the lattice pattern and help your bag hold its shape.
Step by Step Instructions
Base (Flat Oval)
The base is worked in single crochet to create a firm, dense foundation. This is what gives your tote its structure.
Foundation Chain: Using Color A (Cream) and US J/10 hook, ch 25.
Rnd 1: Starting in the 2nd ch from hook, sc 23 across to last ch. Work 3 sc in last ch (this is the first short end). Rotate work and sc 22 along the opposite side of the foundation chain. Work 2 sc in the same stitch as the first sc of the round (this is the second short end). Join with sl st to first sc. (50 sc)
Rnd 2: Ch 1 (does not count as a stitch here or throughout base). 2 sc in first st, sc 23, 2 sc in next st, 2 sc in next st, sc 22, 2 sc in last st. Join with sl st. (54 sc)
Rnd 3: Ch 1. Sc in first st, 2 sc in next st, sc 23, 2 sc in next st, sc 1, sc 1, 2 sc in next st, sc 23, 2 sc in next st, sc in last st. Join with sl st. (58 sc)
Rnd 4: Ch 1. Sc 2, 2 sc in next st, sc 23, 2 sc in next st, sc 2, sc 2, 2 sc in next st, sc 23, 2 sc in next st, sc 2. Join with sl st. (62 sc)
Rnd 5: Ch 1. Sc 3, 2 sc in next st, sc 23, 2 sc in next st, sc 3, sc 3, 2 sc in next st, sc 23, 2 sc in next st, sc 3. Join with sl st. (66 sc)
Rnd 6: Ch 1. Sc 4, 2 sc in next st, sc 23, 2 sc in next st, sc 4, sc 4, 2 sc in next st, sc 23, 2 sc in next st, sc 4. Join with sl st. (70 sc)
Rnd 7: Ch 1. Sc 5, 2 sc in next st, sc 23, 2 sc in next st, sc 5, sc 5, 2 sc in next st, sc 23, 2 sc in next st, sc 5. Join with sl st. (74 sc)
Checkpoint: Your flat oval should measure approximately 9 inches (23 cm) long and 5 inches (12.5 cm) wide. It should lie perfectly flat without cupping or ruffling. If it cups, go up a hook size. If it ruffles, go down a hook size.
Do not fasten off.
Transition to Granny Cluster Pattern
Before beginning the body, you will convert the sc base into a granny cluster starting round.
Set-Up Round: Still using Color A (Cream). Ch 3 (counts as first dc of first cluster now and throughout). Work 2 more dc in the same stitch as ch-3 (first granny cl complete). Ch 1. Sk 2 sts. (Granny cl in next st, ch 1, sk 2 sts) around. Join with sl st to top of ch-3. (25 granny cl)
The 74 sc from the base divides into 24 complete groups of 3 (72 sts) plus 2 sts. Work 23 normal repeats of (granny cl, ch 1, sk 2), then at the end work 1 final granny cl into each of the last 2 sts, ch 1, join. This gives 25 granny clusters with 25 ch-1 spaces.
Lower Body: Striped Granny Cluster Section
The lower body consists of 10 rounds of granny cluster pattern worked in a stripe sequence. Each round is worked into the ch-1 spaces of the previous round.
Color sequence:
Looking at the finished bag from bottom to top, your stripes will read: yellow, mint, pink, lavender.
To join a new color: At the end of the last round of a color, draw the new color through the final sl st join. Continue without turning.
Lower Body Round 1 (Color E, Yellow): Join Color E with sl st in any ch-1 sp. Ch 3, 2 dc in same sp (first granny cl). Ch 1. (Granny cl in next ch-1 sp, ch 1) around. Join with sl st to top of ch-3. (25 granny cl)
Lower Body Round 2 (Color E, Yellow): Sl st into first ch-1 sp. Ch 3, 2 dc in same sp. Ch 1. (Granny cl in next ch-1 sp, ch 1) around. Join with sl st to top of ch-3. (25 granny cl)
Lower Body Round 3 (Color D, Mint): Join Color D. Sl st into first ch-1 sp. Ch 3, 2 dc in same sp. Ch 1. (Granny cl in next ch-1 sp, ch 1) around. Join with sl st to top of ch-3. (25 granny cl)
Lower Body Round 4 (Color D, Mint): Sl st into first ch-1 sp. Ch 3, 2 dc in same sp. Ch 1. (Granny cl in next ch-1 sp, ch 1) around. Join with sl st to top of ch-3. (25 granny cl)
Lower Body Round 5 (Color C, Pink): Join Color C. Sl st into first ch-1 sp. Ch 3, 2 dc in same sp. Ch 1. (Granny cl in next ch-1 sp, ch 1) around. Join with sl st to top of ch-3. (25 granny cl)
Lower Body Round 6 (Color C, Pink): Sl st into first ch-1 sp. Ch 3, 2 dc in same sp. Ch 1. (Granny cl in next ch-1 sp, ch 1) around. Join with sl st to top of ch-3. (25 granny cl)
Lower Body Rounds 7 to 10 (Color B, Lavender): Join Color B. Repeat the same granny cluster round 4 times total. Each round: Sl st into first ch-1 sp. Ch 3, 2 dc in same sp. Ch 1. (Granny cl in next ch-1 sp, ch 1) around. Join with sl st to top of ch-3. (25 granny cl per round)
Checkpoint: After 10 rounds of striped lower body, the bag body from the base top should measure approximately 4.5 to 5 inches (11.5 to 12.5 cm) tall. Your stripes should be even and the bag should sit flat with a consistent oval circumference.
Fasten off Color B. Join Color A.
Upper Body: Cream Granny Lattice Section
The upper body is worked in Color A (Cream) only. This section creates the beautiful open mesh appearance you see in the finished bag.
Upper Body Rounds 1 through 14 (Color A, Cream):
Round 1: Join Color A in any ch-1 sp. Ch 3, 2 dc in same sp. Ch 1. (Granny cl in next ch-1 sp, ch 1) around. Join with sl st to top of ch-3. (25 granny cl)
Repeat this exact round 13 more times for a total of 14 rounds.
Checkpoint: After all 14 cream rounds, your total bag height from base top should be approximately 10.5 inches (26.5 cm). The cream section should look airy and open, with clusters stacking in neat vertical columns.
Scalloped Top Border
The top border adds that pretty finished edge in lavender and pink.
Border Round 1 (Color B, Lavender): Join Color B in any ch-1 sp. Ch 1 (does not count as st). Work 2 sc in each ch-1 sp around. Join with sl st to first sc. (50 sc)
Border Round 2 (Color B, Lavender): Ch 1. Sc in each sc around, increasing 2 sc evenly spaced (1 increase at each short end of oval). Join with sl st to first sc. (52 sc)
Border Round 3 (Color C, Pink/Coral): Join Color C. Ch 1. (Sk 1 sc, 5 dc in next sc, sk 1 sc, sc in next sc) 13 times around. Join with sl st to first sc. (13 shells)
Border Round 4 (Color B, Lavender): Join Color B. Ch 1. Working behind the shells, sl st into each sc of Round 2 (the sc between shells) to create a clean lavender outline behind the scallops. Join with sl st. Fasten off.
This final round is optional but creates that beautiful lavender line visible just below the pink shells.
Handles (Make 2)
Each handle is worked flat as a long strip of single crochet in a matching stripe sequence.
Foundation: Using Color B (Lavender) and US J/10 hook, ch 7.
Row 1: Sc in 2nd ch from hook and in each ch across. Ch 1, turn. (6 sc)
Rows 2 to 4 (Color B, Lavender): Sc in each sc across. Ch 1, turn at end of each row. (6 sc per row)
Rows 5 to 6 (Color C, Pink): Join Color C. Sc in each sc across. Ch 1, turn. (6 sc per row)
Rows 7 to 8 (Color D, Mint): Join Color D. Sc in each sc across. Ch 1, turn. (6 sc per row)
Rows 9 to 10 (Color E, Yellow): Join Color E. Sc in each sc across. Ch 1, turn. (6 sc per row)
Rows 11 to 12 (Color D, Mint): Join Color D. Sc in each sc across. Ch 1, turn. (6 sc per row)
Rows 13 to 14 (Color C, Pink): Join Color C. Sc in each sc across. Ch 1, turn. (6 sc per row)
Rows 15 to 20 (Color B, Lavender): Sc in each sc across. Ch 1, turn. (6 sc per row)
Continue repeating the stripe sequence (Lavender, Pink, Mint, Yellow, Mint, Pink, Lavender) until the handle measures approximately 26 inches (66 cm) total length. Fasten off.
Handle Assembly: Fold the handle strip in half lengthwise with wrong sides together. Using your yarn needle and Color B, whip stitch the long edges together along both sides.
Handle Attachment: Position each handle so the ends are approximately 3 inches (7.5 cm) apart on each side of the bag top opening. Center one handle on the front panel and one on the back. Sew each handle end to the inside of the top border, stitching through multiple layers securely. Work a box stitch pattern for durability: stitch around the perimeter of the handle end, then an X across the middle.
Finishing and Blocking
Step 1: Weave in all yarn ends securely using a tapestry needle, working in a figure-eight motion through the back of stitches. Trim ends close.
Step 2: If attaching a metal "Handmade" label, use a sewing needle and strong thread to stitch it to the front center of the bag, approximately 1 inch (2.5 cm) above where the stripe section meets the cream lattice.
Step 3: Wet block your bag. Submerge the finished bag in cool water for 15 minutes. Gently squeeze out excess water without wringing. Stuff the bag with plastic bags or a towel to hold the oval shape. Shape the top opening so it lies flat and even. Pin the base flat. Allow to dry completely, about 24 to 48 hours.
Step 4: Once dry, the granny lattice should be beautifully open and your bag should hold its shape without sagging.
Size Customization Tips
To make the bag smaller: Reduce the foundation chain by 6 stitches (to ch 19) and omit 2 base increase rounds. This produces a bag approximately 11 inches (28 cm) wide.
To make the bag taller: Add additional rounds to the cream lattice section. Each 2 rounds adds approximately 1 inch (2.5 cm) of height.
To add a lining: Sew a cotton fabric lining to the inside after blocking, stitching around the top edge just below the border. This is especially helpful since the open granny lattice allows small items to slip through.
Care Instructions
Hand wash in cool water with gentle soap. Lay flat to dry. Do not wring or twist. Do not machine dry. If the bag loses its shape after washing, re-stuff and allow to air dry again to reset the form.
You Did It!
Thank you so much for choosing this pattern for your next project. I hope you love making this tote as much as I loved designing it. The colors, the texture, the satisfying rhythm of those granny clusters, it all comes together into something really special.
If you make one, I would absolutely love to see it! Tag me on Instagram or share a photo in my Facebook group. Seeing your finished projects is honestly the best part of sharing patterns.
If this pattern caught your eye, go ahead and save it to your Pinterest boards so you can find it when you are ready to start. And please drop a comment below if you give it a try. I love hearing how it turns out for you!
