
Go dig through your yarn stash right now. I know you have been saving those gorgeous gradient skeins or that collection of warm-toned cotton for something special. This is that project.
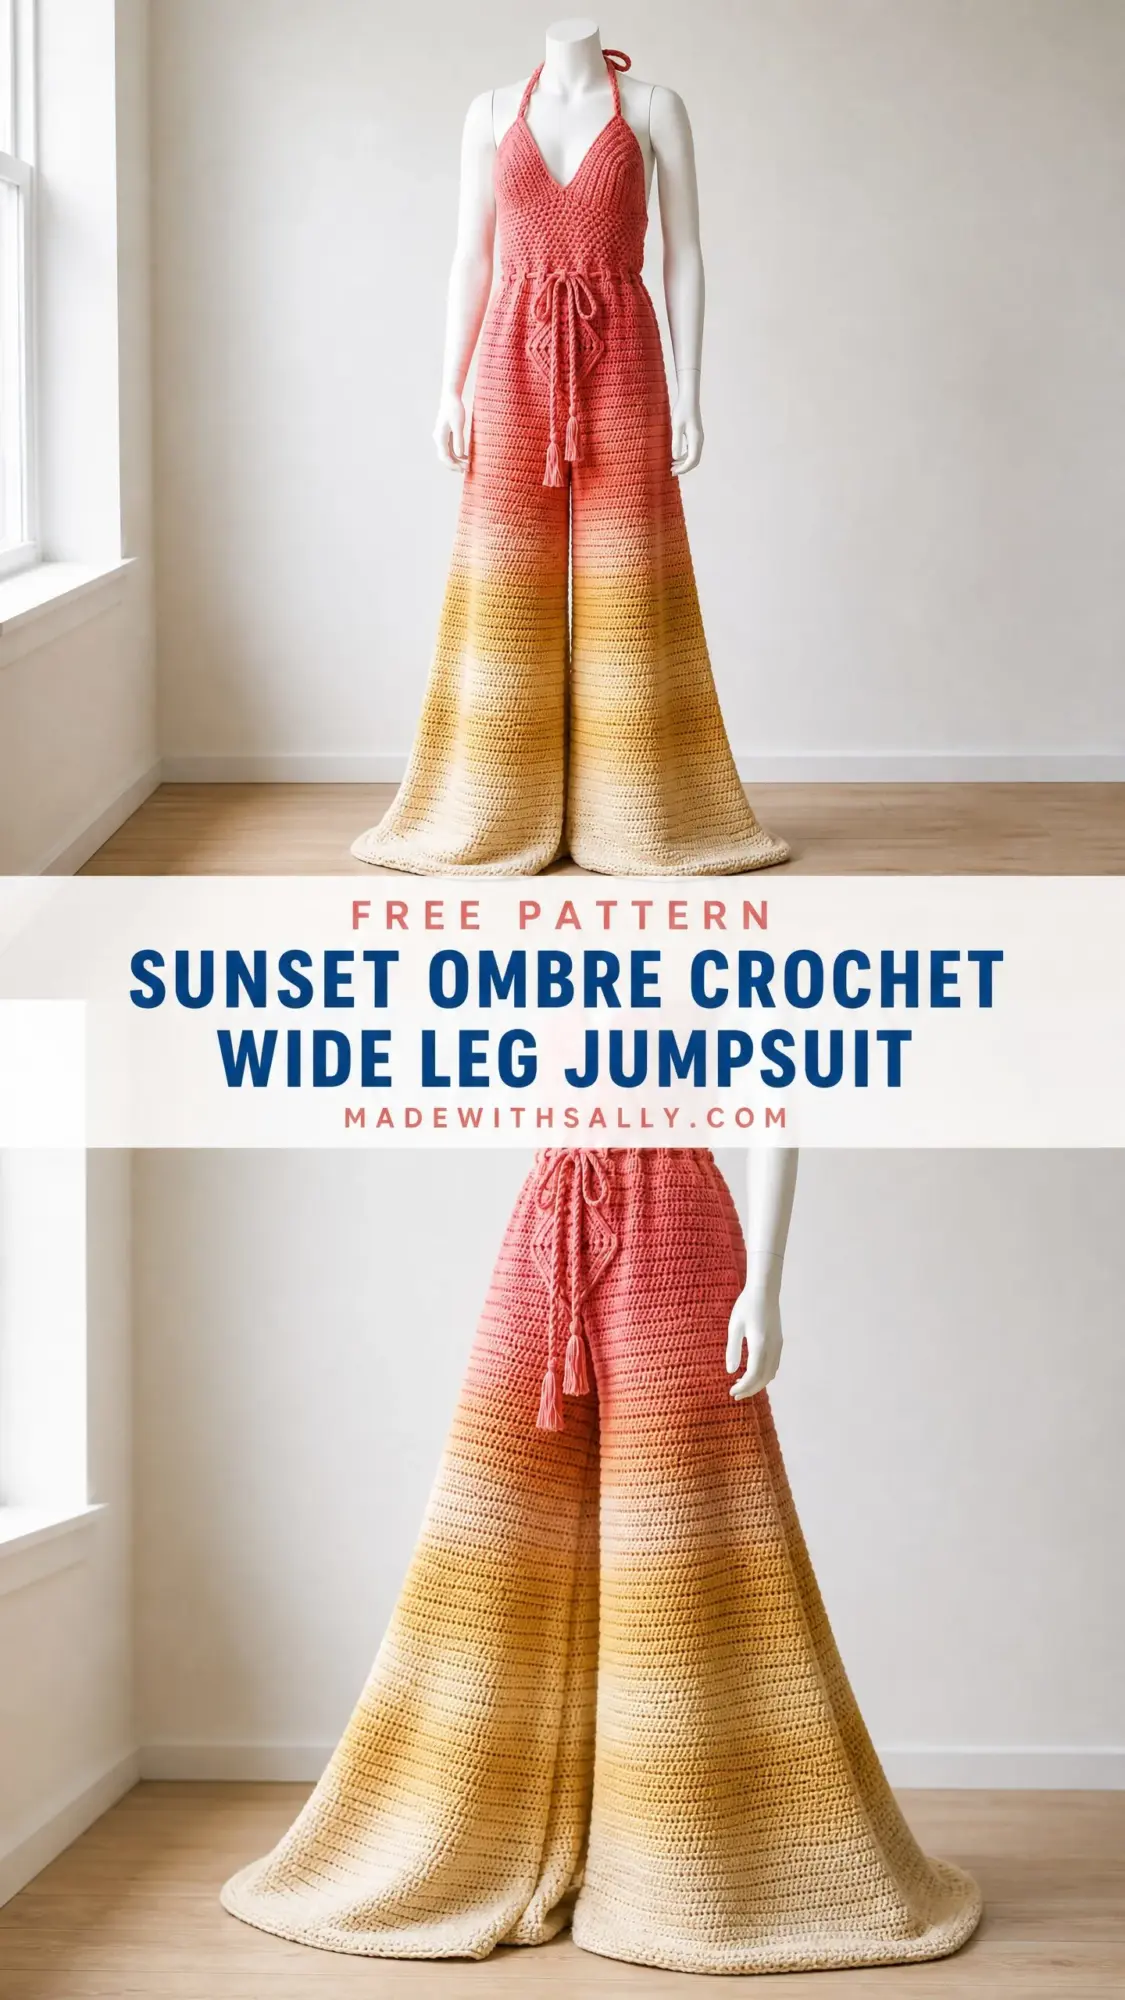
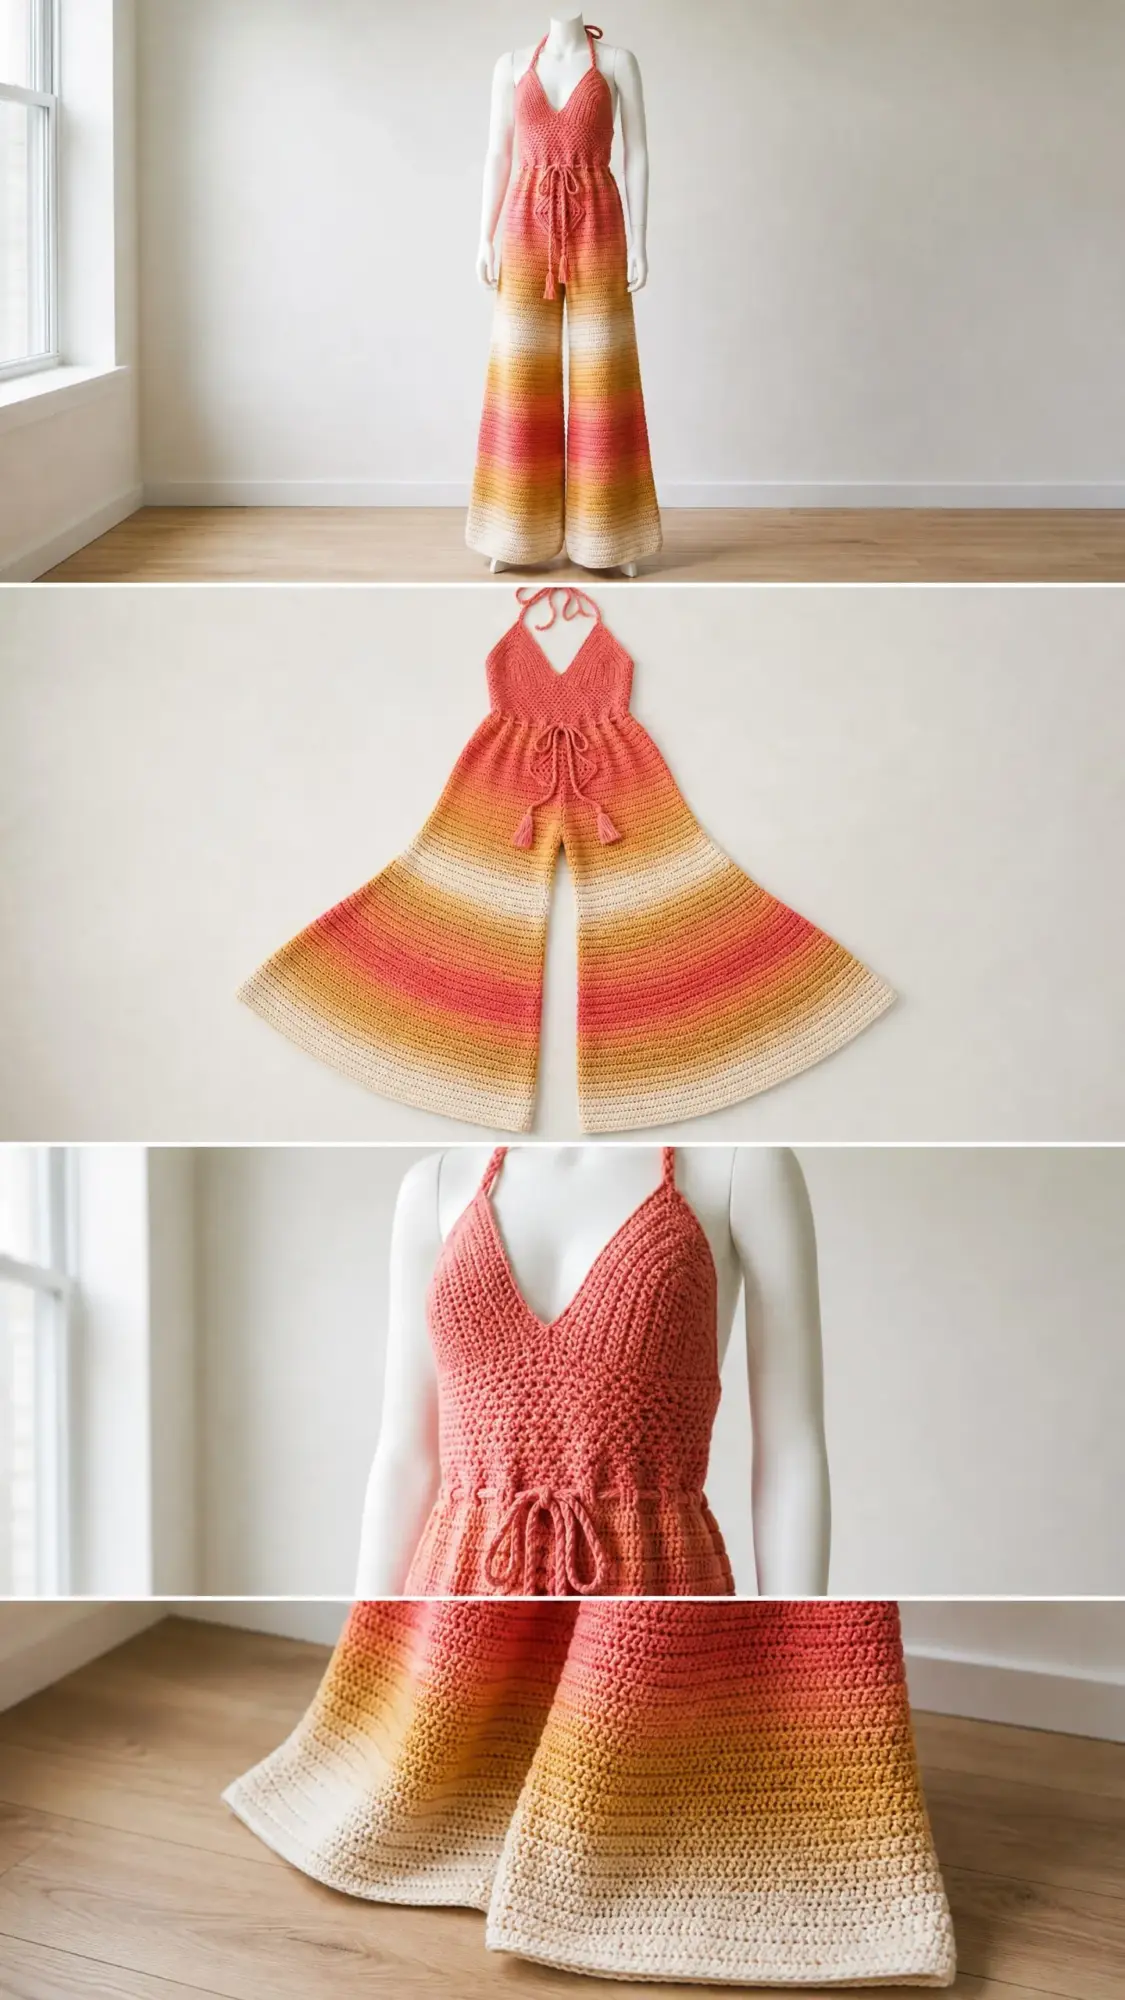
This sunset ombre crochet jumpsuit is a statement piece that combines a fitted halter bodice with dramatically flared palazzo legs. The construction is genuinely interesting. You will work the bodice flat in two triangular panels that form a deep V-neck, then attach a ribbed waistband and work the entire pants section in the round. The color transitions happen gradually through stepped color changes, blending coral-pink down through salmon, orange, golden-yellow, and finally cream at the hem.
I will be honest with you. This is an intermediate to advanced pattern. You need to be comfortable working flat and in the round, managing multiple color changes, shaping a garment with decreases and increases, and assembling pieces. But if you have made a few garments before and you are ready for a challenge, this jumpsuit is absolutely within your reach. The entire fabric is dense single crochet, so the stitches themselves are simple. It is the construction that makes this project special.
Why This Crochet Jumpsuit Pattern Works
The silhouette draws directly from 1970s fashion. A deep V halter neckline leaves the back open and breezy. The waistband sits snug with a drawstring threaded through eyelet rounds for adjustable fit. Then those legs flare out dramatically into wide palazzo pants that pool slightly at the floor.
The ombre effect is what makes this piece truly stunning. You achieve the gradient by working yarn colors in sequence and blending them during transition zones. Instead of harsh stripes, you alternate two rows of the outgoing color with two rows of the incoming color for several rows before fully switching. This creates a smooth sunset fade that looks far more complex than it actually is.
Dense single crochet (sc) creates the entire fabric. This stitch gives you excellent structure and stitch definition, which is exactly what you want for showing off color work. The fabric has enough weight to drape beautifully in those wide legs without being floppy or shapeless.
Materials You Will Need
Yarn
You will need DK weight yarn (CYCA 3) in five gradient colors. I recommend 100% cotton or a cotton-blend for the best drape and stitch definition in those palazzo legs.
Color A, Coral-Pink: approximately 500 yards (457 m) for the bodice and upper pants
Color B, Salmon-Orange: approximately 250 yards (229 m) for the first transition zone
Color C, Warm Orange: approximately 300 yards (274 m) for the mid-gradient section
Color D, Golden-Yellow: approximately 300 yards (274 m) for the lower legs
Color E, Cream-White: approximately 250 yards (229 m) for the leg hems
Total yardage required: approximately 1,600 yards (1,463 m)
Recommended Yarn Brands
Lion Brand 24/7 Cotton in Coral, Tangerine, Gold, and Ecru works beautifully. This 100% mercerized cotton is machine washable and holds stitch definition well.
Paintbox Yarns Simply DK in Coral Blush, Melon Sorbet, Daffodil Yellow, and Paper White offers a smooth cotton-acrylic blend at a budget-friendly price point.
Cascade Ultra Pima in coordinating sunset tones gives you premium quality with a subtle sheen that blocks exceptionally well.
Choose a smooth, plied yarn with low fuzz. Avoid hairy or fuzzy yarns because they will obscure the texture of your dense single crochet fabric.
Tools
Gauge
20 sc x 24 rows = 4 inches (10 cm) worked flat in single crochet with a US G-6 / 4.00 mm hook, blocked.
20 sc x 24 rounds = 4 inches (10 cm) worked in the round in single crochet with a US G-6 / 4.00 mm hook, blocked.
Gauge is critical for garment fit. Please work a 6-inch (15 cm) swatch, block it, and measure before beginning. Adjust your hook size up or down as needed to match gauge exactly. This step will save you hours of frustration later.
Finished Measurements (Size Medium)
Abbreviations and Stitch Definitions
ch: chain. Wrap yarn over hook, pull through loop on hook.
sl st: slip stitch. Insert hook, yarn over, pull through stitch and loop on hook in one motion.
sc: single crochet. Insert hook in stitch, yarn over, pull up a loop (2 loops on hook), yarn over, pull through both loops.
sc2tog: single crochet two together. This is a decrease. Insert hook in next stitch, pull up a loop, insert hook in following stitch, pull up a loop (3 loops on hook), yarn over, draw through all three loops. You have turned 2 stitches into 1.
inc: increase. Work 2 single crochet stitches in the same stitch. You have turned 1 stitch into 2.
st(s): stitch(es)
RS: right side
WS: wrong side
blo: back loop only. Work into only the back loop of the stitch instead of both loops.
pm: place marker
sm: slip marker
rep: repeat
rnd(s): round(s)
Special Techniques
Waist Eyelet Row
This creates the holes for your drawstring cord.
Row 1: Ch 1, turn. Work sc in first st. (Ch 1, skip 1 st, sc in next st) repeat to end of row. Ch 1, turn.
Row 2: Ch 1, turn. Work sc in each sc and 1 sc in each ch-1 space across. Your stitch count stays the same.
Twisted Halter Cord
Cut 8 strands of Color A, each measuring 60 inches (152 cm). Hold all strands together and fold in half. Secure the folded end to a fixed point like a doorknob or drawer handle. Twist the strands tightly in one direction until they begin to kink back on themselves. Fold the twisted length in half and allow it to twist back on itself naturally. Knot both ends. This creates a sturdy decorative cord for tying behind your neck.
Drawstring Tassel Cord
Crochet a chain of 120 stitches in Color A, then slip stitch back along the chain to create a firm rounded cord. Thread through the eyelet round. For tassels, cut 6-inch (15 cm) lengths of Color A, fold in half, and knot at each cord end.
Color Change Method
To change colors cleanly, work the last stitch of the old color until two loops remain on your hook. Drop the old color, pick up the new color, and draw through both loops. This places the new color on the right side for a clean transition.
Pattern Notes Before You Begin
The jumpsuit is constructed in three main pieces: the front bodice panel (two mirrored halves worked flat), the back waistband panel (worked flat), and the pants section (worked in the round from waist down).
The bodice is worked flat, turning at the end of each row. The pants are worked in joined rounds without turning, so the right side always faces you.
Your turning chain (ch 1) does not count as a stitch. Always work your first sc into the first stitch of the previous row.
Stitch counts in parentheses at the end of each row or round show your total stitches after all increases or decreases.
Block the completed jumpsuit by wet blocking before assembling the halter ties. This step is essential for the pants legs to hang correctly.
Step-by-Step Crochet Jumpsuit Instructions
Section 1: Front Bodice Panel
The front bodice consists of two triangular halves that meet at center front to form the V-neck. Each half is worked separately, then joined.
Left Front Bodice Panel
Foundation: With Color A, ch 22.
Row 1 (RS): Sc in 2nd ch from hook and in each ch across. Ch 1, turn. (21 sc)
Row 2 (WS): Sc in each st across. Ch 1, turn. (21 sc)
Row 3: Sc in each st to last 2 sts, sc2tog. Ch 1, turn. (20 sc)
Row 4: Sc in each st across. Ch 1, turn. (20 sc)
Row 5: Sc in each st to last 2 sts, sc2tog. Ch 1, turn. (19 sc)
Row 6: Sc in each st across. Ch 1, turn. (19 sc)
Continue this pattern, decreasing at the end of every odd-numbered row and working even on every even-numbered row.
Row 7: Sc to last 2 sts, sc2tog. Ch 1, turn. (18 sc)
Row 8: Sc across. Ch 1, turn. (18 sc)
Row 9: Sc to last 2 sts, sc2tog. Ch 1, turn. (17 sc)
Row 10: Sc across. Ch 1, turn. (17 sc)
Row 11: Sc to last 2 sts, sc2tog. Ch 1, turn. (16 sc)
Row 12: Sc across. Ch 1, turn. (16 sc)
Row 13: Sc to last 2 sts, sc2tog. Ch 1, turn. (15 sc)
Row 14: Sc across. Ch 1, turn. (15 sc)
Row 15: Sc to last 2 sts, sc2tog. Ch 1, turn. (14 sc)
Row 16: Sc across. Ch 1, turn. (14 sc)
Row 17: Sc to last 2 sts, sc2tog. Ch 1, turn. (13 sc)
Row 18: Sc across. Ch 1, turn. (13 sc)
Row 19: Sc to last 2 sts, sc2tog. Ch 1, turn. (12 sc)
Row 20: Sc across. Ch 1, turn. (12 sc)
Row 21: Sc to last 2 sts, sc2tog. Ch 1, turn. (11 sc)
Row 22: Sc across. Ch 1, turn. (11 sc)
Row 23: Sc to last 2 sts, sc2tog. Ch 1, turn. (10 sc)
Row 24: Sc across. Ch 1, turn. (10 sc)
Row 25: Sc to last 2 sts, sc2tog. Ch 1, turn. (9 sc)
Row 26: Sc across. Ch 1, turn. (9 sc)
Row 27: Sc to last 2 sts, sc2tog. Ch 1, turn. (8 sc)
Row 28: Sc across. Ch 1, turn. (8 sc)
Row 29: Sc to last 2 sts, sc2tog. Ch 1, turn. (7 sc)
Row 30: Sc across. Ch 1, turn. (7 sc)
Row 31: Sc to last 2 sts, sc2tog. Ch 1, turn. (6 sc)
Row 32: Sc across. Ch 1, turn. (6 sc)
Row 33: Sc to last 2 sts, sc2tog. Ch 1, turn. (5 sc)
Row 34: Sc across. Ch 1, turn. (5 sc)
Row 35: Sc to last 2 sts, sc2tog. Ch 1, turn. (4 sc)
Row 36: Sc across. Ch 1, turn. (4 sc)
Row 37: Sc to last 2 sts, sc2tog. Ch 1, turn. (3 sc)
Row 38: Sc across. Ch 1, turn. (3 sc)
Row 39: Sc to last 2 sts, sc2tog. Ch 1, turn. (2 sc)
Row 40: Sc across. Ch 1, turn. (2 sc)
Row 41: Sc2tog. Do not fasten off. (1 sc)
Halter Strap: From this remaining stitch, chain 60 stitches for the halter strap, then sl st back along the chain to create a firm cord. Alternatively, use the twisted cord method. Fasten off and set aside.
Right Front Bodice Panel
Foundation: With Color A, ch 22.
Row 1 (RS): Sc in 2nd ch from hook and in each ch across. Ch 1, turn. (21 sc)
Row 2 (WS): Sc in each st across. Ch 1, turn. (21 sc)
Row 3: Sc2tog, sc in each st to end. Ch 1, turn. (20 sc)
Row 4: Sc in each st across. Ch 1, turn. (20 sc)
Continue this pattern, decreasing at the beginning of every odd-numbered row.
Rows 5-41: Follow the same decrease pattern as the left panel, but work sc2tog at the beginning of odd rows instead of the end. Your stitch counts will mirror the left panel exactly.
Row 41: Sc2tog. Do not fasten off. Chain 60 for halter strap, sl st back along chain, fasten off. (1 sc at apex)
Joining the Front Bodice Panels
Lay both panels with RS facing up. Position them so the long straight edges (the side edges without decreases) meet at center front. The decreasing diagonal edges form the V-neck.
Using Color A and your tapestry needle, whipstitch the two straight center edges together from the bottom (widest point at waist) upward for approximately 2 inches (5 cm) only. This closes the bottom of the V while leaving the upper portion open as your neckline.
Checkpoint: After joining, the piece should measure approximately 14 inches (35.5 cm) from halter apex to bottom waist edge, and approximately 16 inches (40.5 cm) across the bottom waist edge.
Section 2: Back Waistband Panel
The back is open (backless halter), so this section is simply a ribbed waistband that connects the front bodice panels at the sides.
Foundation: With Color A, ch 21.
Row 1: Sc in 2nd ch from hook and in each ch across. Ch 1, turn. (20 sc)
Rows 2-84: Sc in blo of each st across. Ch 1, turn. (20 sc each row)
Fasten off. The panel measures approximately 14 inches (35.5 cm) long and approximately 3.3 inches (8.5 cm) wide.
Seaming Bodice and Waistband
With RS facing, align the short ends of the Back Waistband Panel with the side edges of the Front Bodice Panels. Seam the back waistband to the front panels at the lower 20 rows of each side edge (approximately 3.3 inches). This creates the side seams while leaving the upper portion of the front bodice panels free to drape as the halter.
Checkpoint: After seaming, the bodice with waistband forms a connected piece. Total waist circumference is approximately 30 inches (76 cm).
Section 3: Waistband Drawstring Eyelet
With RS facing and Color A, join yarn at the right side seam at the base of the bodice.
Round 1 (joining round): Sc evenly around the entire waist edge. Adjust your stitch count to reach 150 sc evenly distributed. Join with sl st to first sc. (150 sc)
Round 2 (eyelet round): Ch 1. (Sc in next 2 sts, ch 1, skip 1 st) rep around. Join with sl st. (100 sc and 50 ch-1 spaces)
Round 3: Ch 1. Sc in each sc and 1 sc in each ch-1 sp around. Join with sl st. (150 sc)
Rounds 4-6: Ch 1. Sc in each st around. Join with sl st. (150 sc each round)
Fasten off and weave in ends.
Section 4: Pants Section
The pants are worked in joined rounds from the waist down. Follow this color transition schedule:
Pants Body (Hip to Crotch)
Foundation Round: Join Color A at right side seam. Sc in each of the 150 waist sts around. Join with sl st. (150 sc)
Rounds 1-2: Ch 1. Sc in each st around. Join. (150 sc)
Round 3: Ch 1. (Sc in next 14 sts, inc in next st) rep 10 times. Join. (160 sc)
Rounds 4-5: Ch 1. Sc in each st around. Join. (160 sc)
Round 6: Ch 1. (Sc in next 15 sts, inc in next st) rep 10 times. Join. (170 sc)
Rounds 7-8: Ch 1. Sc in each st around. Join. (170 sc)
Round 9: Ch 1. (Sc in next 16 sts, inc in next st) rep 10 times. Join. (180 sc)
Rounds 10-11: Ch 1. Sc in each st around. Join. (180 sc)
Round 12: Ch 1. (Sc in next 17 sts, inc in next st) rep 10 times. Join. (190 sc)
Rounds 13-14: Ch 1. Sc in each st around. Join. (190 sc)
Round 15: Ch 1. (Sc in next 18 sts, inc in next st) rep 10 times. Join. (200 sc)
Rounds 16-22: Ch 1. Sc in each st around. Join. (200 sc each round)
Round 23: Ch 1. (Sc in next 19 sts, inc in next st) rep 10 times. Join. (210 sc)
Rounds 24-30: Ch 1. Sc in each st around. Join. (210 sc each round)
Round 31: Ch 1. (Sc in next 20 sts, inc in next st) rep 10 times. Join. (220 sc)
Rounds 32-48: Ch 1. Sc in each st around. Join. (220 sc each round)
Checkpoint: After Round 48, your pants body measures approximately 8 inches from waist. This is the crotch depth.
Dividing for Legs
Mark two points exactly opposite each other (110 stitches apart) at front center and back center. These are your crotch division points.
Crotch Gusset: With Color A, ch 10. This creates the inner crotch seam.
First Leg
Round 1: Starting at first crotch marker, sc in next 110 sts, then sc in each of 10 gusset chain sts. Join with sl st. Pm at join. (120 sc)
Rounds 2-10: Ch 1. Sc in each st around. Join. (120 sc)
Place markers at stitches 30 and 90 for your increase points.
Round 11: Ch 1. Sc to 1 st before first marker, inc, sm, sc to 1 st before second marker, inc, sm, sc to end. Join. (122 sc)
Round 12: Ch 1. Sc in each st around. Join. (122 sc)
Continue alternating increase rounds and even rounds, adding 2 stitches every other round, until your leg reaches 220 sc. Work even until leg measures 30 inches from crotch division or desired length. Fasten off.
Second Leg
Join yarn at remaining crotch point. Work the second leg identically to the first, attaching to the opposite side of the gusset chain.
Finishing
Thread your drawstring cord through the eyelet round at the waist. Bring both ends to center front and tie with a decorative bow, allowing tassels to hang.
Wet block the entire jumpsuit. This step is essential for the legs to hang correctly. Lay flat on blocking mats, pin to measurements, and allow to dry completely.
Weave in all remaining ends securely.
Time Estimate
Expect this crochet jumpsuit to take approximately 40 to 60 hours depending on your working speed and experience with garment construction. The leg sections are the most time-intensive due to their length and circumference. Break the project into sections and celebrate each completed piece along the way.
Tips for Success
Work your gauge swatch in the round as well as flat. Some yarns behave differently between the two methods, and your pants are worked entirely in the round.
Count your stitches frequently, especially during the increase sections. Losing or gaining stitches will affect your fit significantly.
Try the bodice on (or hold it up to yourself) before attaching the waistband to check the fit. Adjustments are much easier at this stage.
Keep your color changes consistent. Always change colors on the same side of your work for the cleanest appearance.
I hope this sunset ombre crochet jumpsuit brings as much joy to make as it does to wear. The gradient is absolutely mesmerizing as it develops, and those wide legs are going to turn heads everywhere you go.
If you found this pattern helpful, save it to your Pinterest boards so you can find it when you are ready to cast on. And please leave a comment below if you make one. I would love to hear how it turns out for you!
