
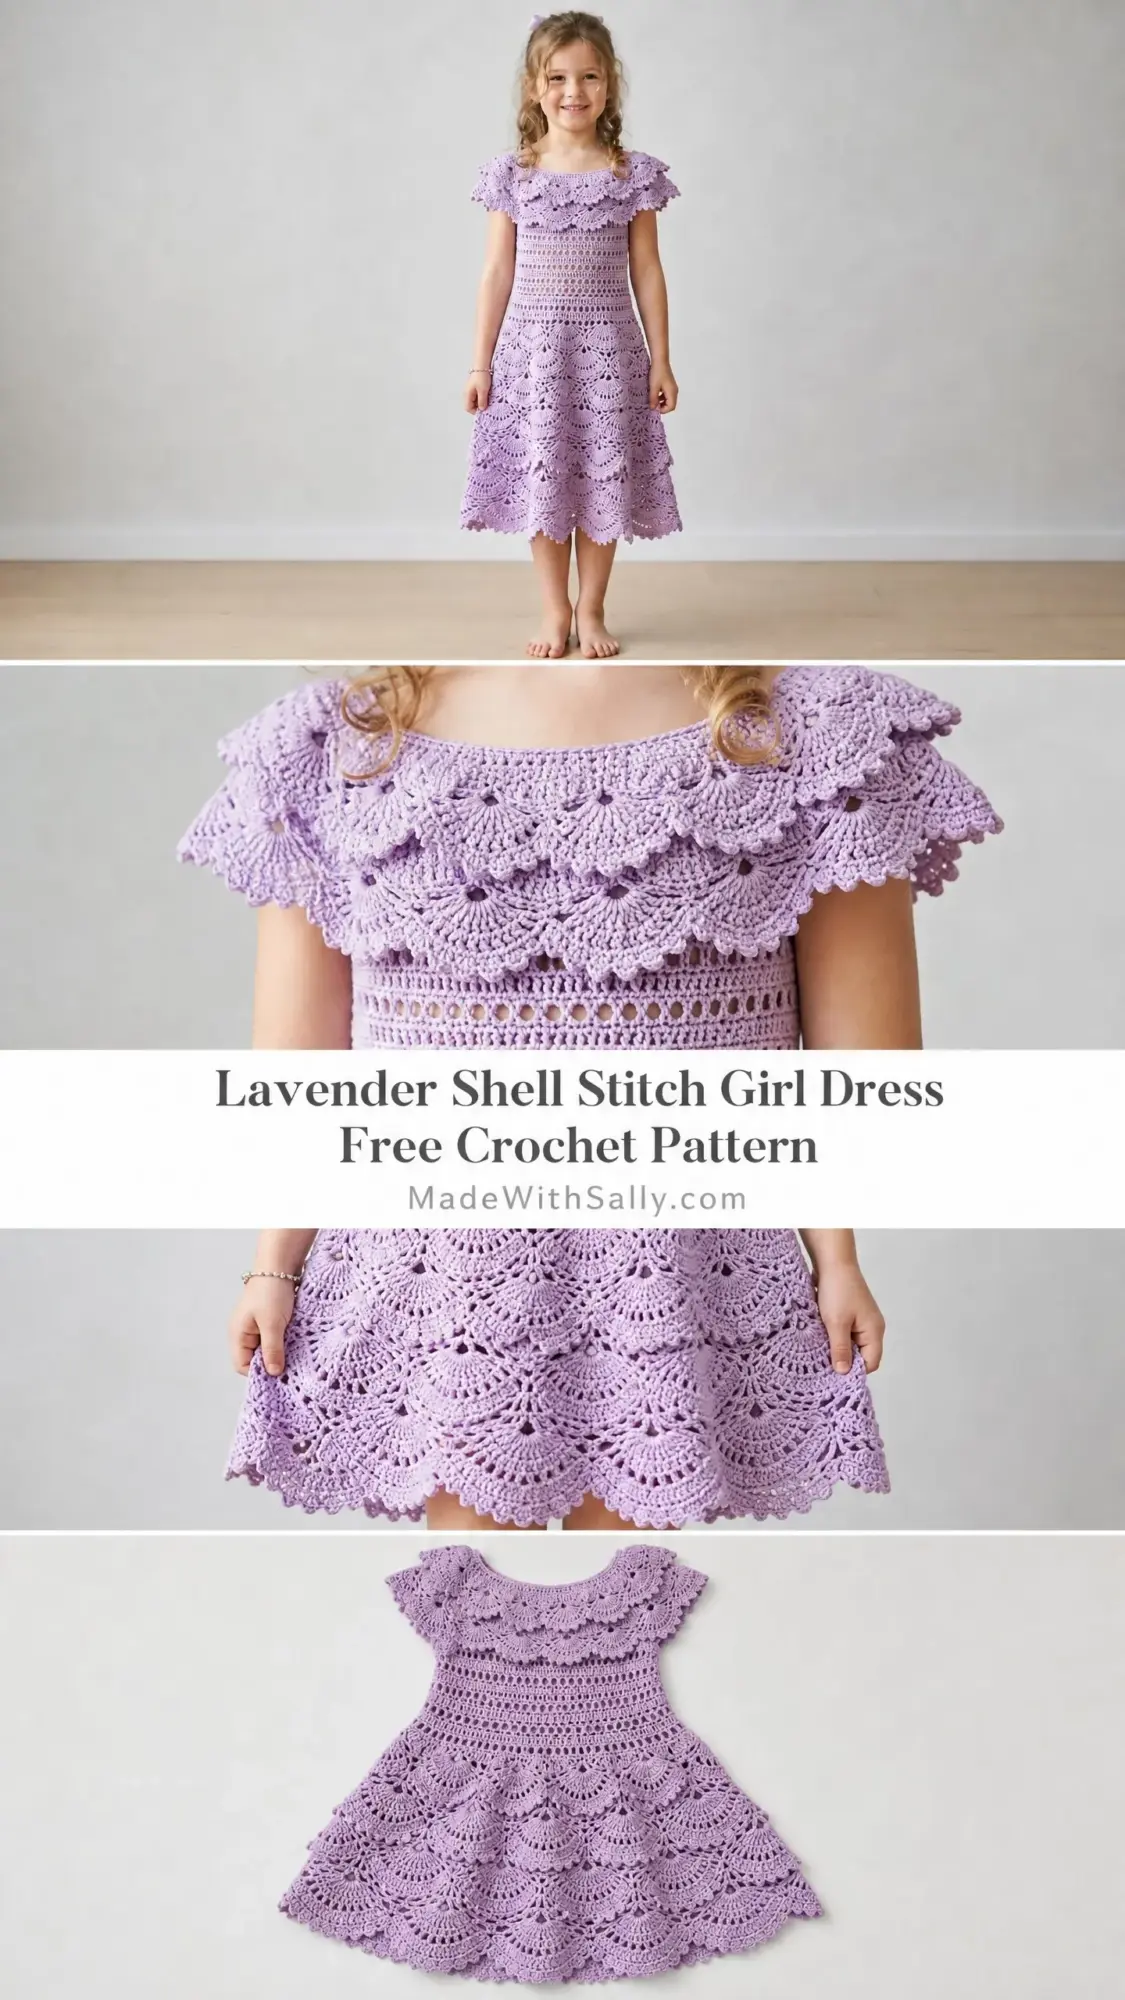
If you need a special occasion dress for a portrait session, flower girl ceremony, or garden party, this lavender shell stitch girl dress delivers heirloom quality with stunning lace detail. The pattern combines a ruffled yoke collar, a fitted mesh bodice, and a dramatic fan and shell skirt that flows beautifully when worn. It works up in fingering weight cotton, fits girls sizes 4 through 8, and makes an unforgettable handmade gift that families will treasure for years.
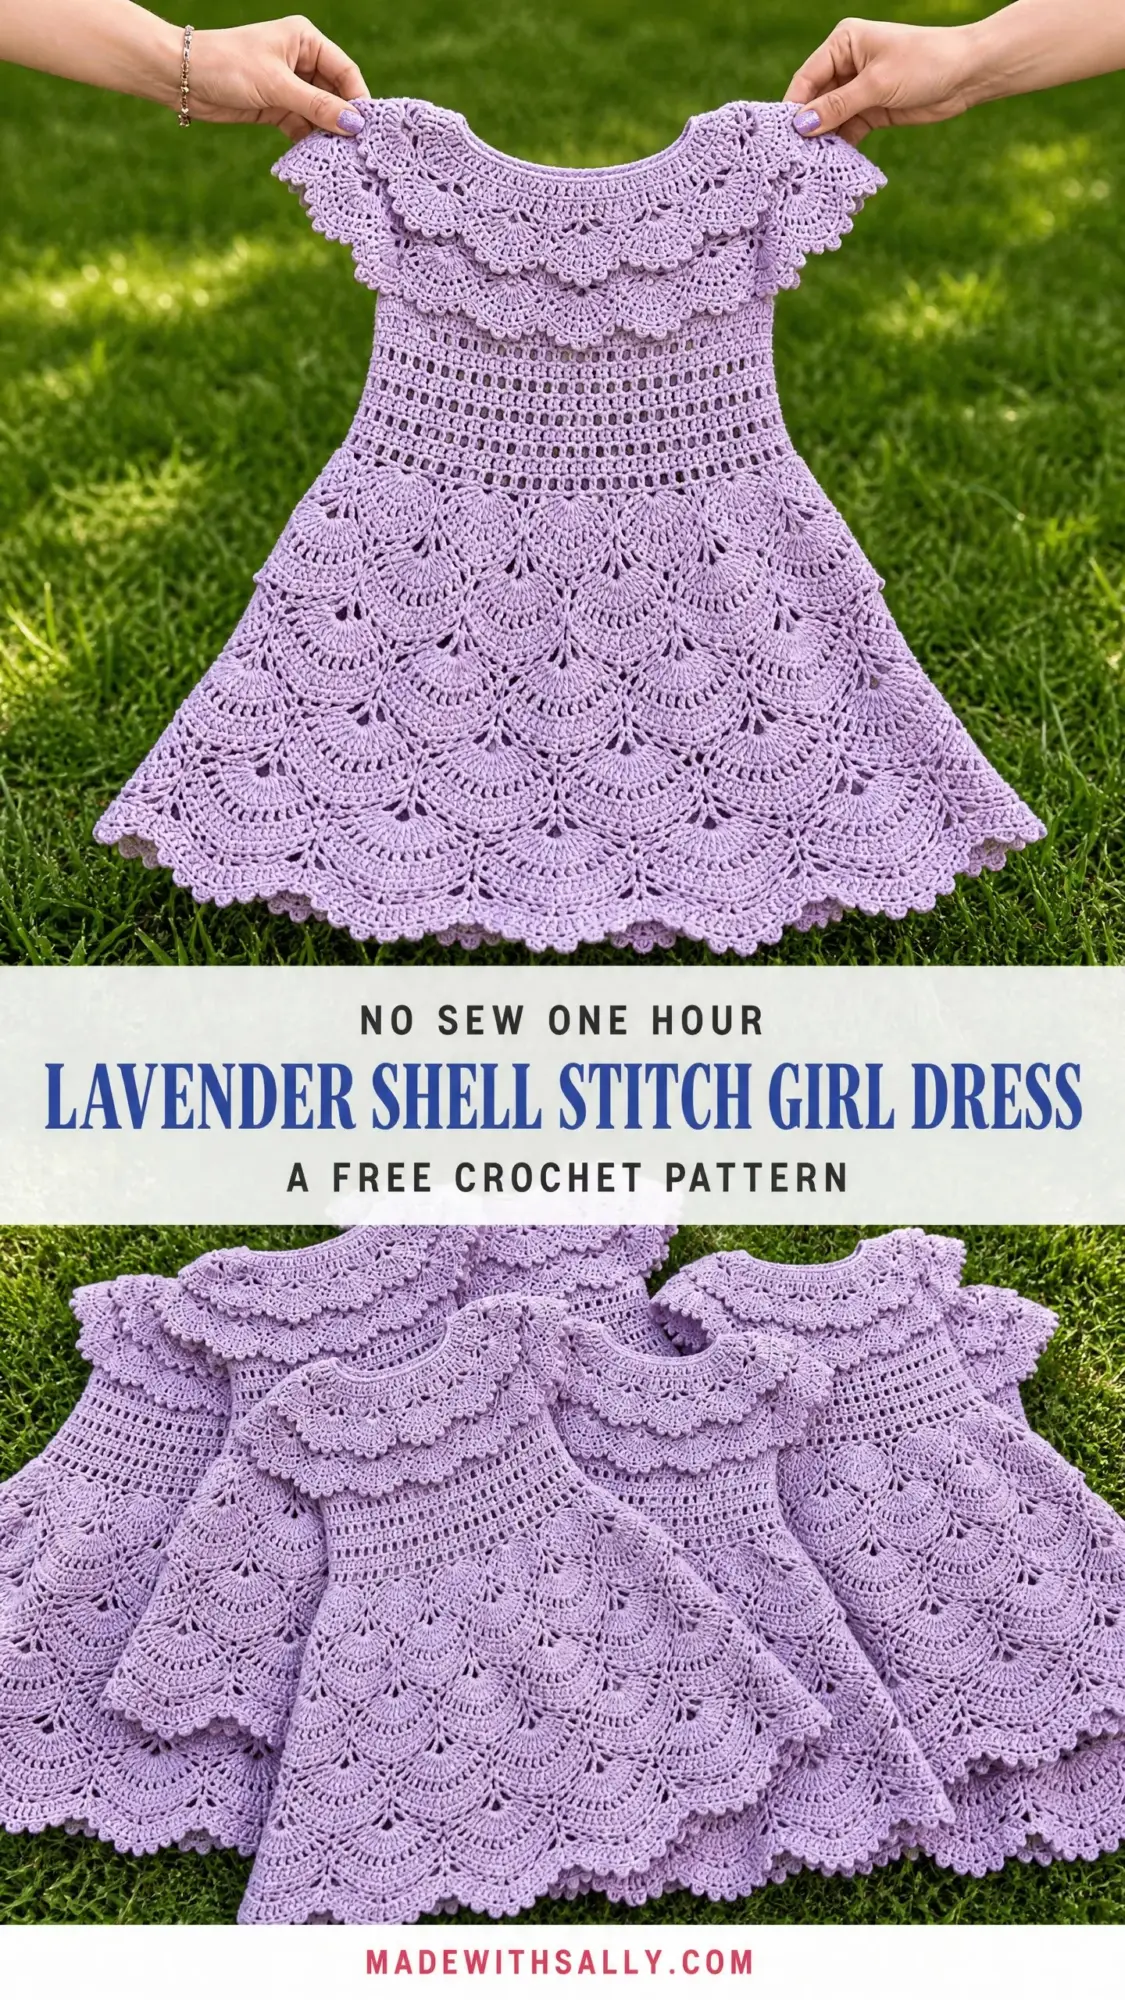
This is an advanced pattern. I want to be upfront about that. You will work with pineapple stitch variations, multiple textures in one garment, and strategic shaping within lace repeats. But if you have completed a couple of lace projects before, you absolutely have the skills to make this dress. The construction is logical, the instructions are detailed, and the finished piece is worth every hour you put into it.
Expect to spend 30 to 45 hours on this project depending on your chosen size and working speed. The collar alone adds about 3 to 4 hours. Plan this as a labor of love rather than a quick weekend make. The result is a dress that looks like it belongs in a boutique window.
About This Girl Dress Crochet Pattern
This dress is constructed top down in joined rounds, starting with a neckband and working through the bodice, waist, and skirt in one continuous piece. The collar is the only section worked separately. You will seam it to the neckband after completing it.
The silhouette is A-line, landing at approximately mid-calf on the intended wearer. A keyhole opening at center back closes with a small button, making it easy to dress a wiggly child.
Key design features include:
The dress uses two hook sizes intentionally. A smaller hook for the bodice creates structure, while a larger hook for the skirt allows beautiful drape. Same yarn, different feel.
Finished Sizes
All instructions are written for size 6, with size 4 adjustments in parentheses and size 8 adjustments in brackets.
Size 4: Chest 23 in / 58 cm, waist 22 in / 56 cm, length shoulder to hem 24 in / 61 cm
Size 6: Chest 25 in / 63.5 cm, waist 23.5 in / 60 cm, length 26 in / 66 cm
Size 8: Chest 27 in / 68.5 cm, waist 25 in / 63.5 cm, length 28 in / 71 cm
Materials Needed
Yarn: Fingering weight or lace weight cotton or cotton blend, approximately 2 to 3 ply with 400 to 500 meters per 100 g skein. You will need approximately 700 (600) [850] meters total in a single lavender or lilac colorway.
Recommended yarns:
1. Drops Safran (100% Egyptian cotton, 160 m per 50 g): 5 (4) [6] skeins
2. Paintbox Yarns Cotton DK worked at tight fingering gauge (100% cotton, 125 m per 50 g): 6 (5) [7] skeins
3. Scheepjes Catona shade 520 Lavender (100% mercerized cotton, 125 m per 25 g): 6 (5) [7] balls
Choose a smooth, plied cotton with minimal halo. Avoid wool dominant yarns, which will felt and obscure the lace openwork.
Hooks:
Notions:
Gauge
Bodice gauge with US B-1 / 2.25 mm hook:
22 dc (double crochet) = 4 in / 10 cm
10 rows of dc = 4 in / 10 cm
Skirt fan stitch gauge with US C-2 / 2.75 mm hook:
1 complete fan repeat (17 sts) = 3 in / 7.5 cm
4 rows of fan pattern = 2.5 in / 6.35 cm
Gauge is critical for a fitted garment. Swatch in the round when possible and adjust hook size as needed.
Abbreviations
beg = beginning
BLO = back loop only
ch = chain (wrap yarn over hook and pull through loop on hook)
ch-sp = chain space (the gap created by a chain in the previous row)
dc = double crochet (yarn over, insert hook, pull up loop, yarn over and pull through 2 loops twice)
hdc = half double crochet
join = slip stitch to join round
lp(s) = loop(s)
MC = main color (lavender)
pm = place marker
rem = remaining
rep = repeat
rnd = round
RS = right side
sc = single crochet (insert hook, pull up loop, yarn over and pull through both loops)
sk = skip
sl st = slip stitch
sp = space
st(s) = stitch(es)
t-ch = turning chain
tog = together
WS = wrong side
yo = yarn over
Special Stitches for This Crochet Tutorial
Fan Stitch (5-dc fan)
In the designated stitch or space, work: dc, ch 1, dc, ch 1, dc, ch 1, dc, ch 1, dc. This creates 5 dc with 4 ch-1 spaces between them.
Large Fan Stitch (7-dc fan)
In the designated space, work: (dc, ch 1) 6 times, then dc. This creates 7 dc with 6 ch-1 spaces between them.
Scallop Edging
Sl st to next st. Ch 3 (counts as 1 dc), work 4 more dc in same st to form a 5 dc shell. Sl st in next st. Repeat across.
Picot
Ch 3, sl st in 3rd ch from hook.
Picot Scallop (hem edging)
Sl st to next st, ch 3, work 4 dc in same st, ch 3, sl st in 3rd ch from hook (picot made), work 1 dc back into the same original st, sl st to next st. Each picot scallop = 6 dc with a picot at the top.
V-Stitch
In designated st or sp, work: dc, ch 1, dc.
Chainless Foundation Double Crochet (cfdc)
Make a slip knot, ch 4. Yarn over, insert hook in 4th ch from hook, yarn over, pull up a loop, yarn over, pull through 1 loop (this forms the chain of the foundation), yarn over, pull through 2 loops, yarn over, pull through 2 loops. For each subsequent cfdc: yarn over, insert hook under the 2 loops of the chain bottom of the previous cfdc, yarn over, pull up a loop, yarn over, pull through 1 loop, yarn over, pull through 2 loops, yarn over, pull through 2 loops.
Pattern Notes Before You Begin
1. The dress is constructed in this order: neckband, bodice top down in rounds, collar worked separately and attached, waist mesh, skirt Tier 1, skirt Tier 2, hem edging.
2. All rounds join with a slip stitch to the top of the beginning ch-3 unless noted otherwise.
3. The beginning ch-3 ALWAYS counts as a dc. Do not work an extra dc into the same stitch as the ch-3.
4. Right side always faces you on joined rounds. Do not turn unless instructed.
5. Block aggressively after finishing. Cotton lace does not open up without blocking. Expect the dress to be 15 to 20 percent smaller before blocking.
6. Size adjustments: adding or removing one full fan repeat (17 sts) changes chest circumference by approximately 3 in / 7.5 cm.
Step by Step Instructions
Section 1: Neckband
The neckband is worked flat and then seamed into a ring.
With US B-1 / 2.25 mm hook and MC, make a cfdc strip of 130 (118) [142] cfdc. Do not join yet.
The strip should measure approximately 23.5 in / 59.5 cm (21.3 in / 54 cm) [25.6 in / 65 cm] when relaxed.
Row 1 (RS): Ch 3 (counts as dc), dc in each cfdc across, turn. (130 (118) [142] dc)
Row 2 (WS): Ch 3, dc in each dc across, turn. (130 (118) [142] dc)
Row 3 (RS): Ch 3, dc in each dc across. Do not turn. (130 (118) [142] dc)
Fold the strip so RS faces outward. Sl st the last stitch of Row 3 to the first cfdc to form a ring. This seam sits at center back. Place marker at center back seam.
Section 2: Bodice
The bodice works downward from the neckband ring in joined rounds.
Attach yarn to the bottom (foundation cfdc) edge of the neckband ring at the center back marker.
Round 1: Ch 3, dc in each cfdc around. Join. (130 (118) [142] dc)
Round 2 (Mesh Round): Ch 4 (counts as dc plus ch 1), sk next dc, (dc in next dc, ch 1, sk next dc) around, dc in last dc, join to 3rd ch of beg ch-4. (65 (59) [71] dc, 65 (59) [71] ch-1 sps)
Round 3 (Solid DC Round): Ch 3, dc in each ch-1 sp and each dc around. Join. (130 (118) [142] dc)
Round 4 (Mesh Round): Rep Round 2. (65 (59) [71] dc, 65 (59) [71] ch-1 sps)
Round 5 (Solid DC Round): Rep Round 3. (130 (118) [142] dc)
Round 6 (Mesh Round): Rep Round 2. (65 (59) [71] dc, 65 (59) [71] ch-1 sps)
Round 7 (Solid DC Round): Rep Round 3. (130 (118) [142] dc)
Round 8 (Mesh Round): Rep Round 2. (65 (59) [71] dc, 65 (59) [71] ch-1 sps)
Round 9 (Solid DC Round): Rep Round 3. (130 (118) [142] dc)
Round 10 (Mesh Round): Rep Round 2. (65 (59) [71] dc, 65 (59) [71] ch-1 sps)
Round 11 (Solid DC Round): Rep Round 3. (130 (118) [142] dc)
Checkpoint: After Round 11, the bodice panel should measure approximately 4.5 in / 11.5 cm tall. Total garment from top of neckband should be approximately 5.5 in / 14 cm (5 in / 12.5 cm) [6 in / 15 cm].
Section 3: Collar (Worked Separately)
The collar is a double-layered ruffle that attaches to the neckband.
With US B-1 / 2.25 mm hook and MC, make a cfdc strip of 130 (118) [142] cfdc.
Collar Row 1: Ch 3, dc in each cfdc across, turn. (130 (118) [142] dc)
Collar Row 2: Ch 1, sc in first dc, (sk next 2 dc, 5 dc in next dc, sk next 2 dc, sc in next dc) across, ending with sc in top of t-ch, turn.
For size 6, work 21 full scallops with adjusted end scallops. Size 4: 19 main scallops. Size 8: 23 main scallops.
Collar Row 3 (WS): Ch 3, turn, work 2 dc in sc at base, sc in center dc of each 5-dc shell, 5 dc in each sc between shells, end 3 dc in last sc, turn.
Collar Row 4 (RS): Ch 1, sc in first dc, (sk 2, 5 dc in next dc, sk 2, sc in next st) across, ending sc in top of t-ch.
Collar Row 5: Ch 1, do not turn, work scallop edging across the foundation cfdc edge: Sl st in first cfdc, (5 dc in next cfdc, sl st in next cfdc) across. Fasten off, leaving a 24 in / 60 cm tail.
Collar Attachment: Hold the collar against the top edge of the neckband, RS facing outward. Whipstitch the foundation edge of the collar to the top edge of the neckband, matching center back seams.
Button Loop: At center back at the top of the neckband, attach yarn and ch 8, sl st to the same point to form a loop. Sew the button to the opposite side, approximately 0.5 in / 1.25 cm from center back edge.
Section 4: Waist Mesh Transition
Return to the working edge after Round 11 of the bodice.
Round 12: Ch 4 (counts as dc plus ch 1), sk next dc, (dc in next dc, ch 1, sk next dc) around. Join. (65 (59) [71] dc, 65 (59) [71] ch-1 sps)
Round 13: Ch 3, (dc in ch-1 sp, dc in dc) around. Join. (130 (118) [142] dc)
Round 14: Rep Round 12. (65 (59) [71] dc, 65 (59) [71] ch-1 sps)
Round 15: Rep Round 13. (130 (118) [142] dc)
Round 16: Rep Round 12. (65 (59) [71] dc, 65 (59) [71] ch-1 sps)
Round 17: Ch 3, (dc in ch-1 sp, dc in next dc) around, placing an extra dc every 3rd worked dc to add 20 increases evenly. Join. (150 (135) [170] dc)
Round 18: Ch 3, dc in each dc around, placing 1 additional dc every 7th dc to add 20 (15) [22] more sts. Join. (170 (150) [187] dc)
Checkpoint: After Round 18, total dress length should be approximately 9 in / 23 cm (8 in / 20 cm) [10 in / 25 cm].
Section 5: Skirt Tier 1
Switch to US C-2 / 2.75 mm hook.
Round 19 (Setup): Ch 1, sc in same st, (ch 3, sk 4 dc, sc in next dc, ch 3, sk 4 dc, sc in next dc, ch 9, sk 8 dc, sc in next dc) rep across. Join to first sc.
For size 4, adjust chains: ch 2 instead of ch 3, ch 7 instead of ch 9, sk 3 instead of sk 4, sk 6 instead of sk 8.
Round 20 (Fan Round): Ch 3, in first ch-9 sp work 7-dc fan (dc, ch 1, dc, ch 1, dc, ch 1, dc, ch 1, dc, ch 1, dc). Sc in next sc, sc in ch-3 sp, sc in next sc, sc in ch-3 sp, sc in next sc, work 7-dc fan in ch-9 sp. Rep from around. Join. (10 (10) [11] fans)
Round 21 (Open Fan Round): Sl st to first ch-1 sp, ch 3, work across fan maintaining 7-dc width, sc in sc between fans. Rep around. Join.
Round 22: Ch 5 (counts as dc plus ch 2), sk 3 sts, sc in next ch-1 sp (middle of fan), ch 2, sk 3 sts, dc in next sc between fans, ch 5, sk 3 sts, sc in next ch-1 sp, ch 5, sk 3 sts, dc in next sc. Rep around. Join.
Rounds 23-26: Continue in established fan and arch pattern, expanding fan width by 1 ch-1 sp at each side every 2 rounds.
Round 23: Work 8-dc fans with 7 ch-1 sps in ch-5 sps, sc in each sc sp. Join.
Round 24: Maintain 8-dc fan structure, sc between fan tips. Join.
Round 25: Work 9-dc fans with 8 ch-1 sps in center arch sp, sc between fans. Join.
Round 26: Maintain 9-dc fans, sc between fans. Join.
Checkpoint: After Round 26, Tier 1 should measure approximately 5 in / 12.7 cm tall. Total dress length should be approximately 14 in / 35.5 cm (12 in / 30.5 cm) [15 in / 38 cm].
Section 6: Skirt Tier 2
Round 27 (Tier 2 Setup): Ch 1, sc in first sc connector between fans, ch 5, sc in 3rd ch-1 sp of fan, ch 5, sc in 6th ch-1 sp of fan, ch 5, sc in last sc connector between fans, ch 9. Rep around. Join.
Round 28: Ch 3, 10-dc fan with 9 ch-1 sps in each ch-9 arch, sc in each ch-5 arch. Join. (10 (10) [11] 10-dc fans)
Round 29: Sl st to first ch-1 sp, work across fan maintaining 10-dc width, sc between fans. Join.
Round 30: Ch 3, dc in sc connector, ch 5, sk to center ch-1 sp of fan, sc, ch 5, dc in sc connector. Join.
Round 31: Ch 3, 11-dc fan with 10 ch-1 sps in arch, sc in ch-5 sp between each fan. Join.
Rounds 32-34: Continue working 11-dc fans, maintaining sc connectors between fans.
Round 35: Ch 1, work as for Round 27 but use ch 11 for new arch and ch 5 for side connectors. Join.
Round 36: Ch 3, 13-dc fan with 12 ch-1 sps in each ch-11 arch, sc in each ch-5 sp. Join.
Rounds 37-38: Maintain 13-dc fan structure, sc between fans. Join after each.
Checkpoint: After Round 38, total dress length should be approximately 22 in / 56 cm (20 in / 51 cm) [24 in / 61 cm].
Section 7: Hem Edging
Round 39 (Pre-Hem Stabilizer): Ch 1, sc in sc connector, ch 3, sc in 2nd ch-1 sp of fan, ch 3, sc in 4th ch-1 sp of fan, ch 3, sc in 6th ch-1 sp of fan, ch 3, sc in 8th ch-1 sp of fan, ch 3, sc in 10th ch-1 sp of fan, ch 3, sc in 12th ch-1 sp of fan, ch 3, sc in next sc connector. Rep around. Join. (70 (70) [77] ch-3 sps)
Round 40 (Picot Scallop Hem): In each ch-3 sp, work Picot Scallop: sl st to ch-3 sp, ch 3, 4 dc in same sp, ch 3, sl st in 3rd ch from hook (picot formed), 1 dc back in same ch-3 sp, sl st to next ch-3 sp. Rep around. Join. Fasten off.
Finishing Your Shell Stitch Dress
Weave in all ends using a tapestry needle, running each tail through at least 1 in / 2.5 cm of matching stitches before trimming.
Check the keyhole at center back. If the opening is wider than 1.5 in / 3.8 cm, whipstitch the lower portion closed from the wrong side, leaving 1.5 in open at the top for the button closure.
Sew the button securely to the right side of the center back neckband.
Blocking
This step is not optional. Cotton lace absolutely requires blocking to open up and show its full beauty.
Soak the dress in lukewarm water for 15 to 20 minutes. Gently squeeze out excess water without wringing. Lay flat on blocking mats and pin the skirt open, stretching each fan to show its full width. Pin the hem scallops into points. Allow to dry completely before removing pins.
The finished dress will be 15 to 20 percent larger after blocking. This is normal and expected.
Tips for Success
For the collar: Work the scallop rows loosely to allow the ruffle to drape naturally. If your scallops feel stiff, go up a hook size just for Rows 2 through 4.
For the skirt transitions: The jump from one tier to the next can feel confusing. Trust the pattern and use stitch markers liberally. Mark every fan base arch before working the new fans.
For the increases at the waist: Spread them evenly. Do not cluster all increases in one section or the skirt will hang unevenly.
If you need to lengthen the bodice: Add 2 row repeats (one mesh round plus one solid dc round) before Round 12. This adds approximately 0.8 in / 2 cm per repeat.
Thank you so much for choosing this pattern for your next project. I know it is a commitment, but the finished dress is genuinely breathtaking. If you make one, I would absolutely love to see it. Tag me on Instagram or share a photo in our Facebook group.
If this pattern inspired you, go ahead and pin it to your crochet boards so you can find it when you are ready to start. And please drop a comment below if you make this dress or have any questions along the way. I read every single one and love seeing your finished projects come to life.
