
A Stunning Two-Piece Coastal Ensemble You’ll Love Creating
I have been dreaming about designing a nautical-inspired crochet set for ages. Something that captures that breezy seaside feeling while still looking polished enough to wear out. When I finally sat down to create this navy blue nautical crochet ruffle set, I knew exactly what I wanted: dramatic ruffles, a flattering silhouette, and those gorgeous anchor button details that make everything feel more special.
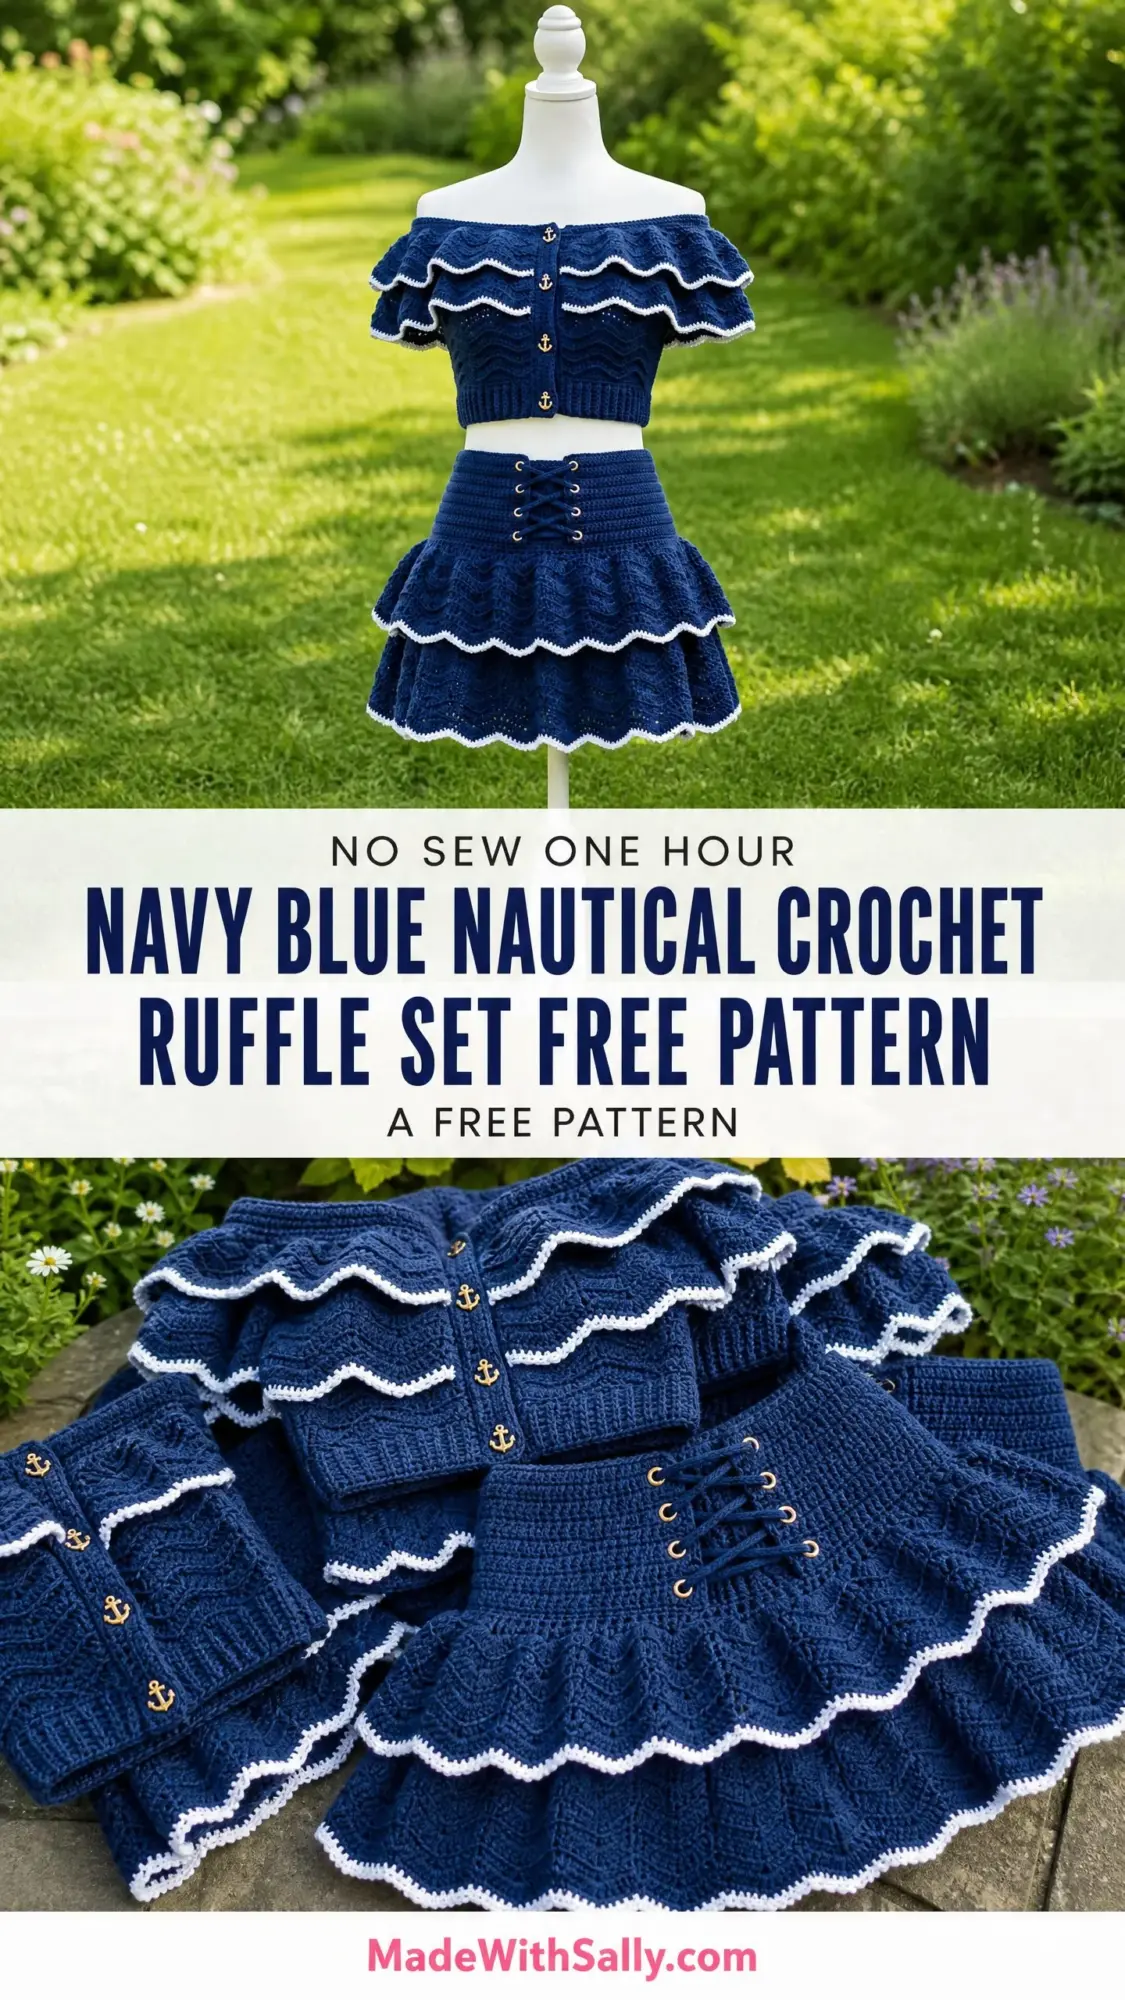
The design decisions were so fun to make. I went with a double-ruffle construction on both pieces because single ruffles just didn’t have enough drama. The chevron ripple texture throughout gives that wave-like effect that screams coastal vibes. And that corset lacing on the skirt waistband? It adds adjustability while looking absolutely stunning.
I am SO pleased with how this turned out. The way the white picot edging pops against the navy blue, the way the ruffles cascade and move, the overall cohesion between the crop top and skirt. This crochet pattern brings together everything I love about summer fashion and handmade style.
About This Navy Blue Nautical Crochet Pattern
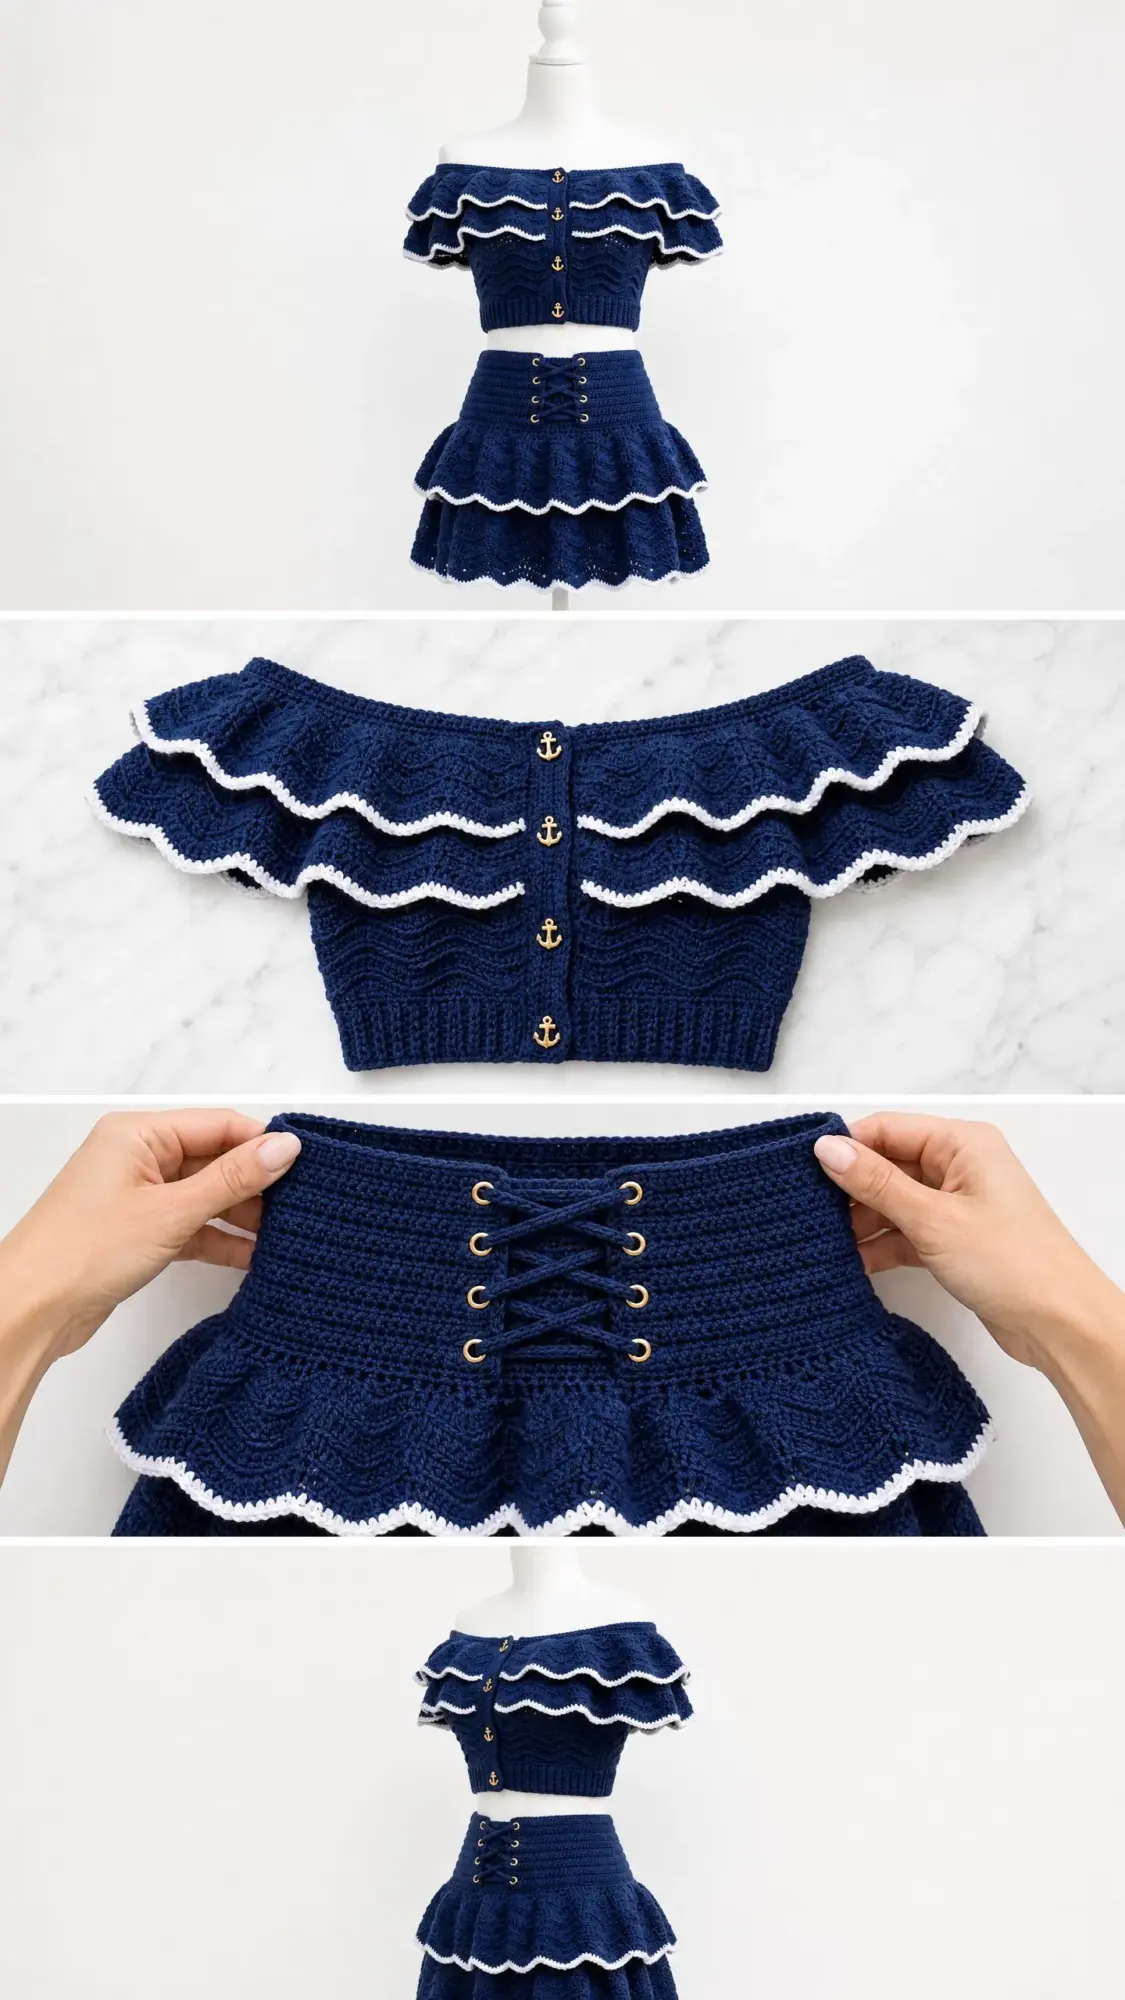
This gorgeous two-piece set features an off-the-shoulder crop top with a double-layered ruffle and a high-waist mini skirt with matching tiered ruffles. Both pieces share the same chevron ripple stitch texture and crisp white picot trim, creating a perfectly coordinated look.
The crop top opens at the center front with five decorative anchor-shaped buttons. It has a stretchy ribbed band at the bottom and those showstopping ruffles along the neckline that create the romantic off-the-shoulder effect.
The skirt features a wide ribbed waistband with metal grommets for corset-style lacing. This means you can adjust the fit, which is honestly such a practical touch. Below the waistband, two cascading ruffle tiers create beautiful movement and volume.
This crochet tutorial walks you through every step of creating both pieces. Don’t worry if the finished project looks intimidating. We’ll break it down into manageable sections.
Skill Level
Advanced Beginner to Intermediate
The ripple chevron pattern requires attention to stitch placement, but uses only basic stitches. You’ll be working with chains, single crochet (sc), half double crochet (hdc), and double crochet (dc). Managing multiple ruffle layers and the off-the-shoulder shaping adds moderate complexity. Basic sewing skills are needed for button placement and grommet installation.
If you’ve made a few projects and feel comfortable reading patterns, you can absolutely tackle this.
Time Estimate
Plan for approximately 18 to 25 hours for the complete set. The crop top takes roughly 8 to 12 hours. The skirt takes roughly 10 to 13 hours. Your actual time will depend on your working speed and how often you stop to admire your progress (no judgment here).
Finished Measurements
This pattern is written for size Small/Medium.
Crop Top:
Skirt:
Materials Needed
Yarn
Main Color (MC) in Navy Blue:
Approximately 800 yards (732 m) of DK weight yarn (light worsted, CYCA 3). Choose a smooth cotton or cotton-blend yarn for best stitch definition.
Contrast Color (CC) in White:
Approximately 120 yards (110 m) of the same weight yarn.
Recommended Yarn Options
Paintbox Yarns Simply DK (100% cotton, 137 yards per 50g ball): Excellent stitch definition for showing off the chevron texture. You’ll need approximately 6 balls navy and 1 ball white.
Lion Brand 24/7 Cotton DK (100% mercerized cotton, 273 yards per 100g ball): Widely available with a smooth finish that displays the ripple pattern beautifully. Approximately 3 balls navy and 1 ball white.
Drops Safran (100% Egyptian cotton, 175 yards per 50g ball): A finer gauge cotton that creates a lighter, more drapey hand. Approximately 5 balls navy and 1 ball white.
Substitution Note: Choose a smooth, tightly spun DK weight cotton or cotton-blend. Avoid fuzzy or hairy fibers as they obscure the chevron texture.
Hooks
Notions
Gauge
Getting gauge right matters a lot for a fitted garment like this. Please make a swatch before diving in.
With E-4 (3.5 mm) hook and MC, in chevron ripple pattern:
18 stitches = 4 inches (10 cm)
8 rows = 4 inches (10 cm)
With E-4 (3.5 mm) hook and MC, in single crochet ribbing worked through back loops only:
20 stitches = 4 inches (10 cm)
24 rows = 4 inches (10 cm)
Make a gauge swatch of at least 5 inches (13 cm) square in the chevron ripple pattern before beginning. Adjust hook size as needed.
Abbreviations and Stitch Definitions
Let me walk you through every stitch you’ll use in this step by step crochet pattern.
BLO (back loop only): Insert your hook under only the back loop of the stitch instead of both loops. Creates ribbed texture.
ch (chain): Yarn over, pull through loop on hook. The foundation for most crochet work.
dc (double crochet): Yarn over, insert hook into stitch, yarn over and pull up a loop (3 loops on hook), yarn over and pull through 2 loops (2 loops remain), yarn over and pull through remaining 2 loops. A taller stitch that creates the flowing ruffle fabric.
dc2tog (double crochet two together): A decrease stitch. Yarn over, insert hook into next stitch, yarn over, pull up a loop, yarn over, pull through 2 loops (2 loops remain on hook). Yarn over, insert hook into following stitch, yarn over, pull up a loop, yarn over, pull through 2 loops (3 loops on hook). Yarn over, pull through all 3 loops. This counts as 1 stitch and creates the valleys in our chevron pattern.
hdc (half double crochet): Yarn over, insert hook into stitch, yarn over and pull up a loop (3 loops on hook), yarn over and pull through all 3 loops at once.
sc (single crochet): Insert hook into stitch, yarn over and pull up a loop (2 loops on hook), yarn over and pull through both loops. The basic building block stitch.
sc2tog (single crochet two together): A decrease. Insert hook into next stitch, pull up a loop, insert hook into following stitch, pull up a loop (3 loops on hook), yarn over and pull through all 3 loops.
sk (skip): Pass over the indicated stitch without working into it.
sl st (slip stitch): Insert hook into stitch, yarn over and pull through both the stitch and the loop on your hook in one motion. Used for joining and moving yarn position.
sp (space): The gap or hole created by chain stitches.
st/sts (stitch/stitches): The individual units of crochet fabric.
t-ch (turning chain): Chain stitches worked at the beginning of a row to bring your hook up to the height of the stitches you’ll be working.
RS (right side): The front, public-facing side of your work.
WS (wrong side): The back side of your work that won’t show.
Special Stitches Explained
Ripple Chevron Pattern
This creates the beautiful wave effect throughout the set. The pattern works on a multiple of 12 stitches plus 2 edge stitches.
Each 12-stitch repeat consists of:
Peak increase: Work 3 double crochets into the same stitch. This creates the upward point of the chevron.
Valley decrease: Work dc2tog over two stitches. This creates the downward dip.
Picot Edging
This creates the pretty scalloped white trim along each ruffle hem.
1. Join CC to edge stitch with a sl st.
2. Ch 1. Work 1 sc into same stitch.
3. Work 1 sc into each of the next 2 stitches.
4. Ch 3, sl st into the first of these 3 chains to form a small picot loop.
5. Work 1 sc into each of the next 3 stitches.
6. Repeat steps 4 and 5 across the entire edge.
7. Fasten off and weave in ends.
The picot falls every 3 stitches, creating that lovely scalloped effect.
Back Loop Ribbing
Work all single crochets through the back loop only on every row. This creates stretchy horizontal ridges that give the ribbing its characteristic texture and elasticity. You’ll use this for both the crop top band and skirt waistband.
Important Pattern Notes Before You Begin
1. The crop top opens at center front with buttons. The body is worked flat (not in the round), then seamed at the sides.
2. The skirt is worked in the round from the waistband downward.
3. All ruffle tiers are worked by picking up stitches from a completed edge and working outward.
4. Turning chains for double crochet rows count as 1 stitch throughout this pattern.
5. For a tighter fit, reduce the starting stitch count by 12 (one full repeat). For a looser fit, add 12 stitches. Adjust yarn requirements accordingly.
6. Block both pieces before assembly to open up the chevron texture and even the fabric.
7. Apply grommets after blocking using a grommet setter tool. Reinforce the fabric with interfacing or stabilizer on the wrong side before setting grommets to prevent tearing.
8. When working picot edging, do not pull the yarn too tightly or the edge will curl. Work loosely and block the edge flat.
Crop Top Instructions
Section 1: Bottom Ribbed Band
The bottom band is worked flat in rows lengthwise, then seamed to form a tube.
With E-4 hook and MC, ch 13.
Row 1 (WS): Sc in 2nd ch from hook and in each ch across. Turn. (12 sc)
Row 2 (RS): Ch 1, sc in BLO of each st across. Turn. (12 sc)
Repeat Row 2 until the band measures 32 inches (81 cm) in length. This is approximately 148 to 152 rows. The ribbing is stretchy, so the finished band will sit snugly at the underbust.
Do not fasten off. Fold the band so the short ends meet with RS facing outward. Slip stitch the two short ends together, creating a tube. This seam will sit at the left side seam.
Fasten off and weave in ends.
Checkpoint: Your ribbed band should form a comfortable tube fitting around the underbust with slight compression. It should measure approximately 32 inches (81 cm) in circumference and 2.5 inches (6.5 cm) in height.
Section 2: Crop Top Body (Chevron Main Panel)
The body is worked flat in rows to allow for the center front button opening.
With E-4 hook and MC, ch 146.
Foundation Row: Dc in 4th ch from hook (the skipped 3 chs count as 1 dc). Dc in next ch. Now begin the chevron pattern: dc2tog over next 2 chs, dc in each of next 4 chs, 3 dc in next ch (peak), dc in each of next 4 chs. Continue this 12-stitch repeat across, working dc2tog at each valley and 3 dc at each peak. End with dc in last 2 chs. Turn.
The foundation row yields 144 working stitches. This represents 12 complete chevron repeats.
Rows 2 through 12: Continue working in the established chevron pattern. At the beginning of each row, ch 3 (counts as first dc). Work dc2tog at each valley, 4 dc on each slope, and 3 dc at each peak. Maintain the pattern alignment by keeping valleys directly above valleys and peaks above peaks.
Continue until the body measures approximately 4.5 inches (11.5 cm) from the foundation row.
Section 3: Attaching Body to Band
With RS facing, align the bottom edge of the chevron body panel with the top edge of the ribbed band tube. The center of the flat body panel should align with the center front of the band, leaving the button band opening at center front.
Using MC and yarn needle, whip stitch the body to the band, easing any fullness evenly.
Section 4: Double Ruffle Construction
The ruffles are worked directly onto the top edge of the body panel.
First Ruffle Tier:
With F-5 hook and MC, join yarn to the top right corner of the body panel with RS facing.
Round 1: Ch 3 (counts as dc). Work 2 dc in each st across the top edge, creating fullness for the ruffle. Join with sl st to top of beginning ch 3.
Continue working in the chevron ripple pattern for 6 more rounds, maintaining the increased stitch count.
Second Ruffle Tier:
The second ruffle is worked into the foundation row of the first ruffle, creating a layered effect.
Repeat the ruffle instructions, attaching to the base of the first ruffle tier.
Section 5: Picot Edging on Ruffles
Using CC (white) and E-4 hook, work the picot edging along the bottom hem of each ruffle tier following the special stitch instructions above.
Section 6: Button Band Finishing
Along the center front opening, work a row of sc to create a stable button band on each side. On the right side (as worn), mark placement for 5 buttonholes evenly spaced. Create buttonholes by working ch 2 and skipping 2 sts at each marked location.
Sew anchor buttons to the left button band, aligning with buttonholes.
Skirt Instructions
Section 1: Ribbed Waistband
With E-4 hook and MC, ch 17.
Row 1 (WS): Sc in 2nd ch from hook and in each ch across. Turn. (16 sc)
Row 2 (RS): Ch 1, sc in BLO of each st across. Turn. (16 sc)
Repeat Row 2 until the waistband measures 26 to 28 inches (66 to 71 cm). This is approximately 120 to 130 rows.
Join the short ends with sl st to form a tube, leaving the seam at center back.
Section 2: Grommet Placement
Mark 8 evenly spaced positions for grommets along the center front of the waistband, 4 on each side of center. The grommets should be approximately 1 inch apart.
Reinforce each marked position with a small square of stabilizer on the WS. Install grommets following manufacturer instructions.
Section 3: First Ruffle Tier
With F-5 hook and MC, join yarn to the bottom edge of the waistband.
Round 1: Ch 3. Work 2 dc in each st around to create fullness. Join with sl st.
Continue working in chevron ripple pattern for 8 rounds.
Section 4: Second Ruffle Tier
Attach a second ruffle tier to the bottom of the first tier, working 10 rounds in the chevron pattern for additional length and drama.
Section 5: Picot Edging
Using CC, work picot edging along the hem of each ruffle tier.
Section 6: Corset Lacing
Thread ribbon or cord through the grommets in a criss-cross pattern, starting from the bottom and working upward. Tie at the top in a bow.
Finishing Your Nautical Crochet Set
Blocking: Wet block both pieces by soaking in cool water, gently squeezing out excess moisture, and pinning to measurements on a blocking mat. Allow to dry completely.
Weave in all remaining ends securely.
Add decorative anchor buttons to the skirt waistband if desired, spacing them evenly for visual balance.
Sizing Adjustments
For a smaller size, reduce the starting chain by 12 stitches (one full chevron repeat) on both pieces. Adjust the ribbed band lengths accordingly.
For a larger size, add 12 stitches to each starting chain and lengthen the ribbed bands to match your measurements.
Always make a gauge swatch and measure as you go.
Care Instructions
Hand wash in cool water with mild detergent. Lay flat to dry, reshaping the ruffles while damp. Store folded to prevent stretching. The cotton yarn will soften with each wash while maintaining its shape.
You Did It!
I hope you love making this navy blue nautical crochet ruffle set as much as I loved designing it. The combination of the structured chevron texture, dramatic ruffles, and those adorable anchor details creates something truly special. Whether you’re wearing it to a beach party, summer brunch, or just feeling like a coastal queen at home, this set is guaranteed to turn heads.
Thank you so much for choosing this pattern for your next project. I genuinely appreciate you trusting me to guide you through creating something this beautiful. If you make it, I would absolutely love to see your finished set! Tag me on Instagram or share a photo in my Facebook group. Seeing your creations is honestly the best part of my day.
If you enjoyed this pattern, go ahead and save it to your Pinterest boards so you can find it easily when you’re ready to start. And please drop a comment below if you make this set. I love hearing about your color choices, any modifications you made, and how the finished pieces fit. Happy crocheting!
