
I don’t know about you, but I have a serious weakness for accessories that look store-bought but are actually handmade. There’s something deeply satisfying about wearing something intricate and beautiful that you created yourself, stitch by stitch.
Get the Ad-Free PDF Pattern
You can find the free pattern below, or you can purchase the ad-free printable PDF from my shop.
Get the Printable PDF →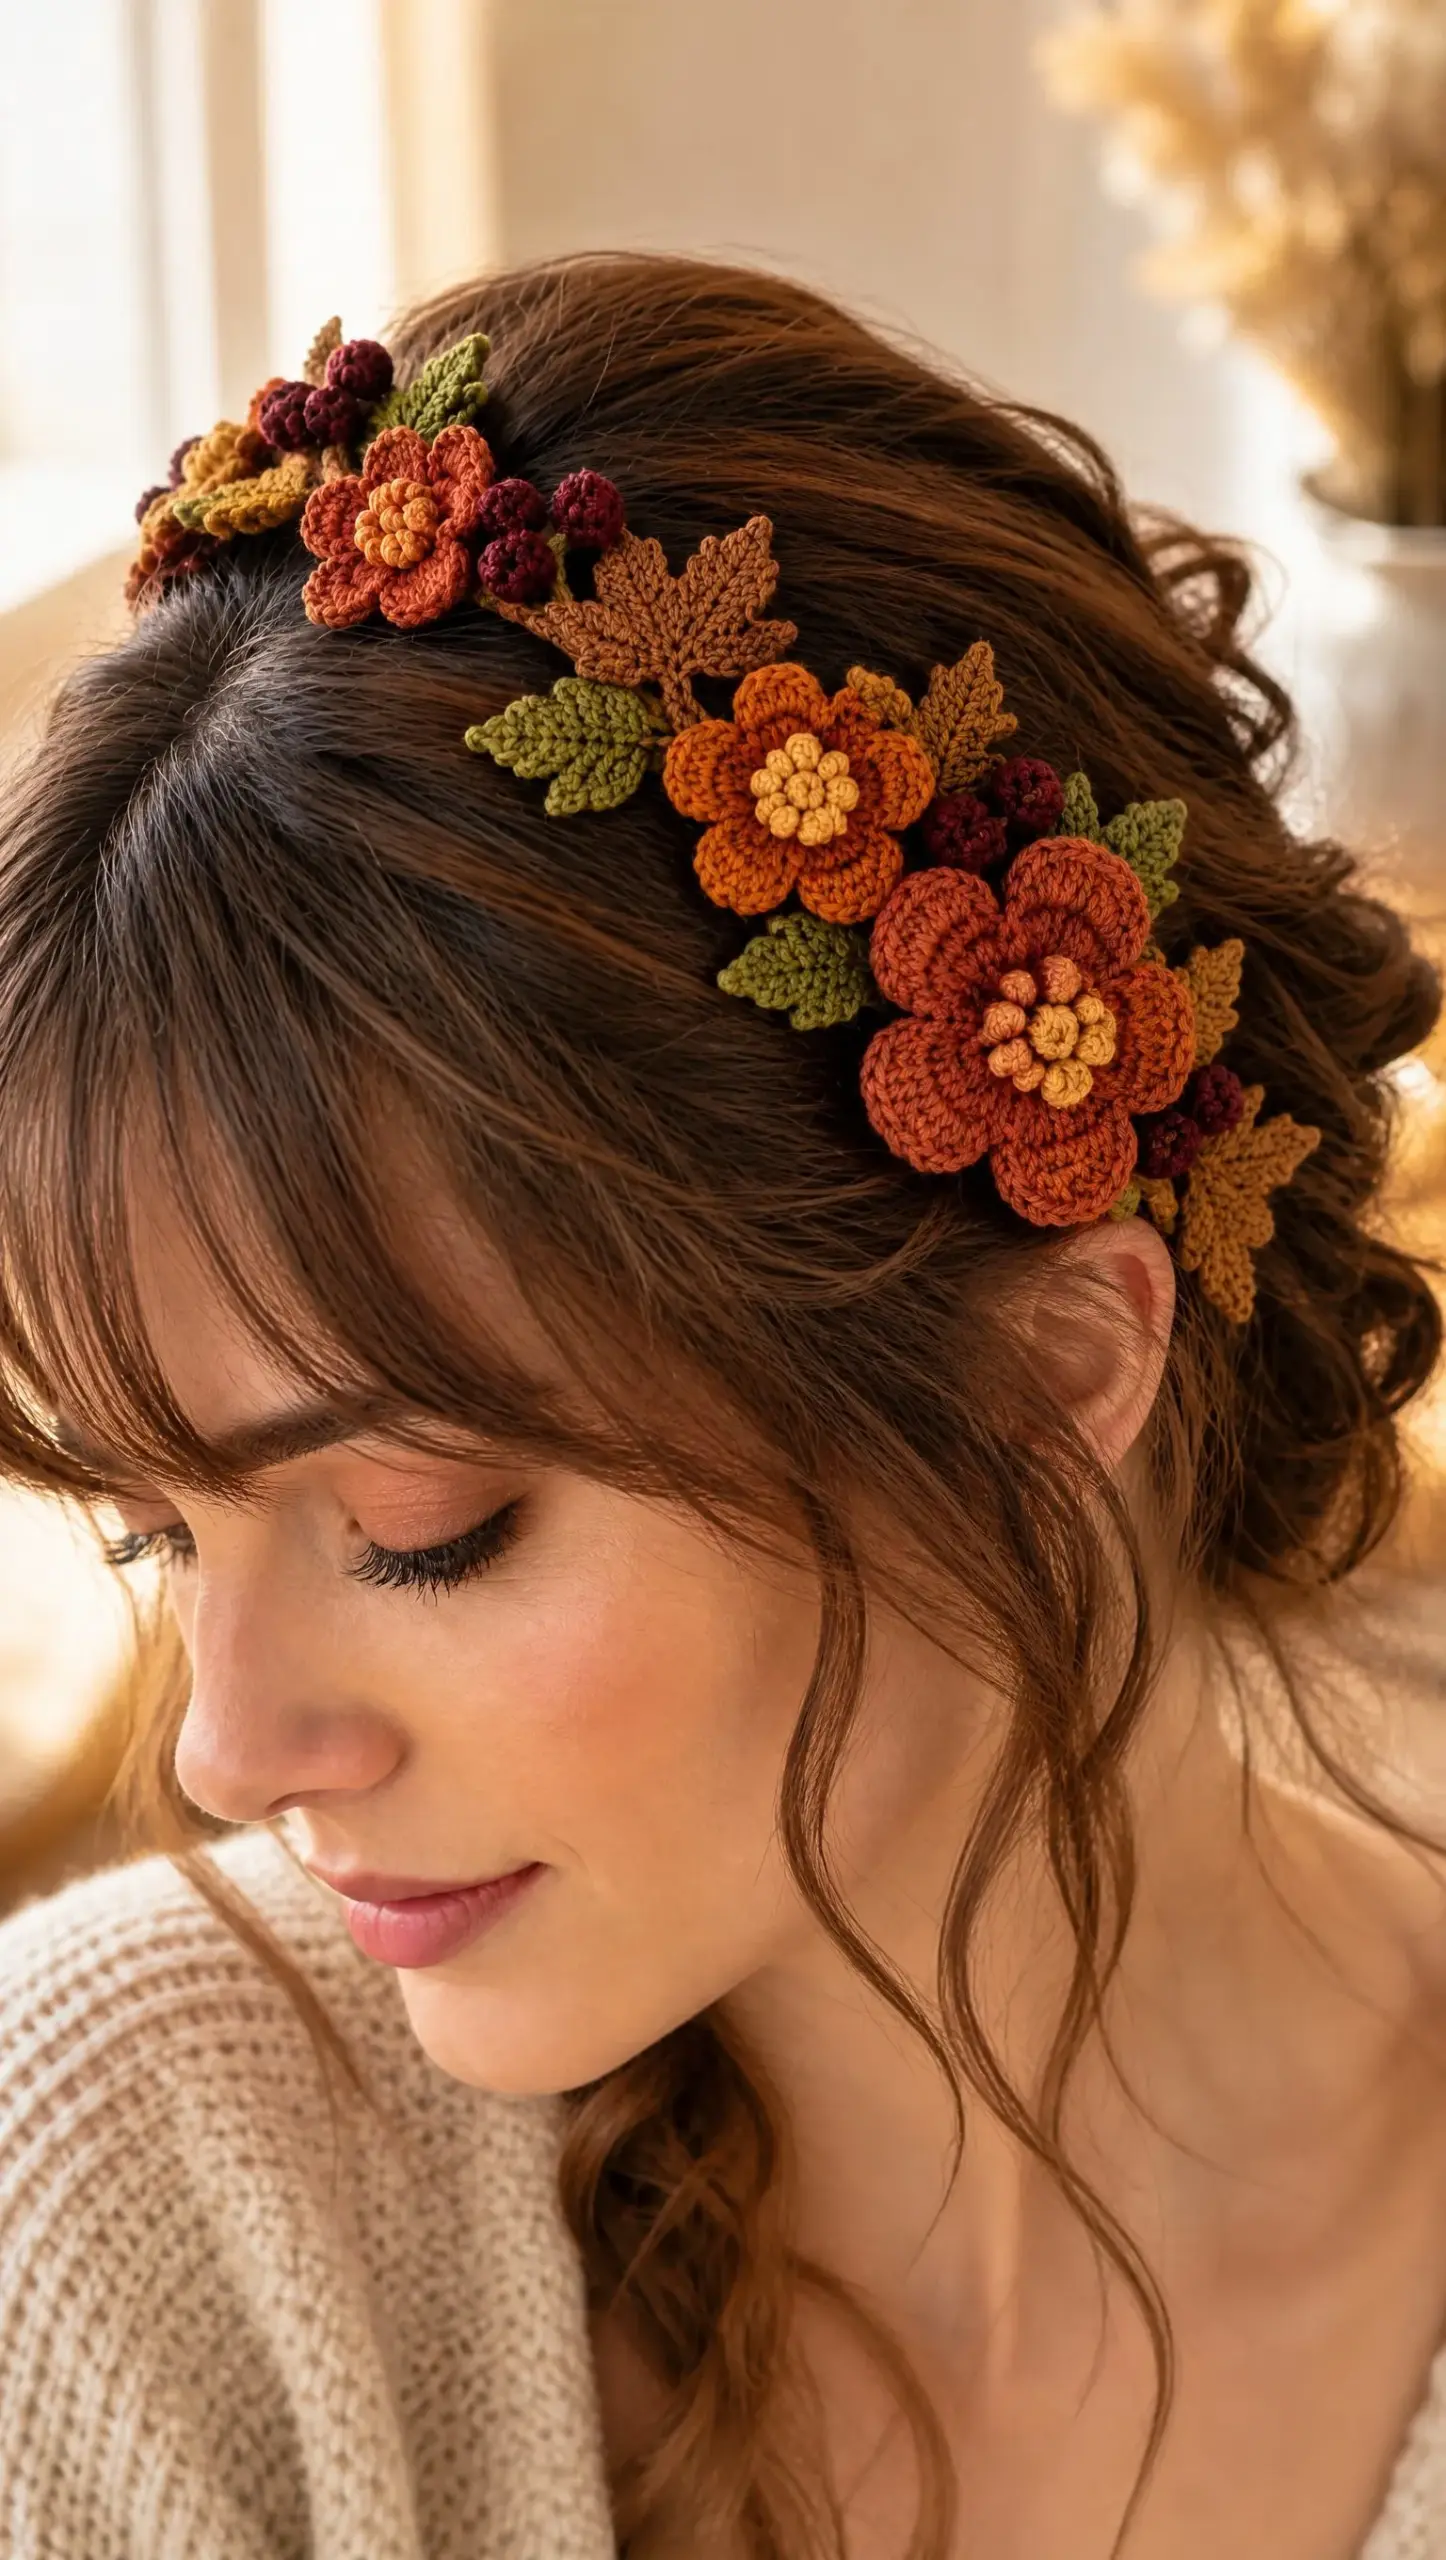
This Autumn Berry Headband scratches that exact itch. It’s got all the charm of a high-end botanical accessory with none of the price tag. Plus, you get to raid your yarn stash for those gorgeous autumn shades you’ve been hoarding.
The moment I saw this design, I knew I had to figure out how to recreate it. Burnt orange five-petal flowers, tiny burgundy berries, copper maple leaves, and a delicate vine that trails across the crown. It’s the kind of piece that makes people stop and ask, "Wait, you MADE that?"
About This Autumn Berry Headband Crochet Pattern
This headband brings together several small crochet motifs: flowers, leaves, and berries, all attached to a vine that wraps around a flexible commercial headband. The construction is modular, meaning you make each piece separately and then sew everything together at the end.
The skill level is intermediate. If you’re comfortable with basic stitches and have made a few small motifs before, you can absolutely handle this project. The individual components are straightforward. The real work comes in the assembly, where you’ll arrange and sew everything into place.
Finished size fits an adult head measuring approximately 21 to 23 inches (53 to 58.5 cm) in circumference. The largest flowers measure about 1 3/4 to 2 inches (4.5 to 5 cm) across, while the smaller flowers come in at 1 1/4 to 1 1/2 inches (3 to 4 cm).
Materials You’ll Need
The yarn requirements for this project are surprisingly small. You’ll need roughly 55 to 75 yards (50 to 70 meters) total across all colors. Here’s the breakdown:
Yarn (Fine cotton, size 2 sport or fine DK weight, smooth but softly textured):
Tools:
Gauge and Fabric Notes
Motif gauge matters more than row gauge here. A five-petal flower made with the large flower instructions should measure about 1 3/4 to 2 inches (4.5 to 5 cm) across after gentle blocking.
Crochet tightly enough that petals hold their shape without becoming stiff. If your flower is much larger, switch to a smaller hook or finer yarn. If it’s much smaller, move up one hook size.
Abbreviations
Before we dive in, let’s cover the abbreviations you’ll encounter:
Special stitch, the bobble: Work 4 incomplete double crochets (dc) into the same stitch or ring, leaving the last loop of each dc on the hook (5 loops total). Yarn over and pull through all loops. Chain 1 to close. For a smaller center, use a 3-dc bobble instead.
Section 1: Concealed Headband Sleeve
The flexible commercial band provides structure. The crochet sleeve hides it and gives the motifs a secure base. You can make the sleeve first and slide it onto the band, or work it as a narrow strip and seam it around the band.
1. With copper brown yarn, chain enough stitches to match the length of your headband from tip to tip, stretching the chain very lightly as you measure. For an average adult band, this is often 15 to 17 inches (38 to 43 cm).
2. Row 1: Starting in 2nd ch from hook, sc across. Ch 1, turn.
3. Rows 2 and 3: Sc across. Ch 1, turn. The strip should wrap around the band with a small seam allowance.
4. Fasten off with a long tail. Wrap the strip lengthwise around the band and whipstitch the long edges together along the underside. Keep the seam centered underneath.
5. At each band tip, fold the sleeve inward neatly and stitch closed. Do not pull so tightly that the band loses flexibility.
Alternative: If your band is very narrow, use 2 rows of sc instead of 3. The sleeve should disappear beneath the vine and motifs.
Section 2: Branching Crown Vine
Make one main vine long enough to span from above the left crown to the right temple. For most adult bands, make the decorative vine about 12 to 13 inches (30 to 33 cm) long, leaving the final inches near each band tip mostly undecorated.
1. With copper brown yarn, ch 72 to 82. This is the main vine. Turn and sl st loosely in the 2nd ch from hook and in each ch back to the start. Fasten off, leaving a 12 inch (30 cm) sewing tail.
2. To create branch 1, join yarn around the main vine roughly 2 1/2 inches (6 cm) from the left crown end. Ch 8, turn, sl st back down the chain, sl st around the main vine to anchor. Fasten off.
3. Create branch 2 about 4 inches (10 cm) farther along: ch 10, sl st back. Anchor and fasten off.
4. Create branch 3 nearer the right temple: ch 12, sl st back. Anchor and fasten off.
5. Add one or two short ch-5 to ch-7 twigs near the largest flower cluster if needed. Vary branch angles so the foliage looks botanical rather than symmetrical.
Important: Do not sew the vine to the band yet. First make all motifs and audition the layout on a flat surface.
Section 3: Large Five-Petal Flower (Make 2)
Make one in terracotta and one in burnt orange. These form the dominant right temple cluster.
1. With flower color, make a magic ring (MR). Ch 1. Work 10 sc into ring. Join with sl st to first sc. Pull ring closed.
2. Petal 1: Sl st in next sc, ch 2, work 2 dc in next sc, ch 2, sl st in same sc.
3. Repeat the petal sequence around, using each pair of sc to form one petal, for 5 petals total. Join with sl st at base of first petal.
4. For a fuller rounded petal, surface crochet one loose round of sl st around each petal edge, or simply block the petals outward. Fasten off with a long sewing tail.
5. Ochre center: Join ochre in the front of the magic ring center. Work 5 small bobbles evenly around the center, or make one separate ch-2 bobble cluster and sew it over the flower center for a raised pollen look.
Section 4: Small Five-Petal Flower (Make 2 to 3)
1. With burnt orange or terracotta yarn, make a MR and work 5 sc into ring. Join.
2. In each sc around work: (sl st, ch 2, 2 hdc, ch 2, sl st) all in the same stitch. Repeat for 5 petals.
3. Fasten off with a long tail. Add an ochre center using one 3-dc bobble, a French knot like yarn bundle, or 3 tiny bobbles worked into the center.
Use at least one small flower along the crown vine and reserve the remaining small flower(s) for the outer edge of the right temple cluster.
Section 5: Burgundy Crocheted Berries (Make 8 to 12)
1. With burgundy yarn, make a MR. Ch 1, work 6 sc into ring. Do not join.
2. Round 2: 2 sc in each st around. (12 sc)
3. Round 3: Sc2tog around. (6 sts) Lightly stuff with the yarn tail or a tiny pinch of fiberfill if you want a plumper berry.
4. Cut yarn leaving a 6 inch (15 cm) tail. Thread tail through the front loops of the 6 remaining sts, pull closed, knot securely, and leave tail for sewing.
5. For visual variation, make a few tiny berries by stopping after Round 1 and drawing the ring closed around a small knot of yarn.
Section 6: Olive Pointed Leaf (Make 8 to 10)
These are slender pointed leaves for the crown vine and for filling gaps between flowers.
1. Ch 7. Starting in 2nd ch from hook work: sl st, sc, hdc, dc, hdc, sc.
2. Do not turn. Rotate and work down the unused loops on the opposite side of the foundation chain: sc, hdc, dc, hdc, sc, sl st at tip.
3. For a crisp point, ch 1 at the tip before the final sl st. Fasten off, leaving a sewing tail.
4. Optional vein: With copper yarn, surface sl st from base to tip along the center chain.
Section 7: Copper Maple-Shaped Leaf (Make 5 to 7)
This stylized three-point maple leaf is worked around a short branching chain foundation. It is deliberately small so it reads as foliage rather than overpowering the flowers.
1. Ch 9. Sl st in 2nd ch, sc in next, hdc in next, dc in next. This reaches the leaf center.
2. First side point: Ch 4; sl st in 2nd ch, sc in next, hdc in next. Sl st into the center chain stitch.
3. Top point: Ch 5; sl st in 2nd ch, sc in next, hdc in next, dc in next. Sl st into the same center stitch.
4. Second side point: Ch 4; sl st in 2nd ch, sc in next, hdc in next. Sl st into the center stitch.
5. Continue down the remaining foundation chain with dc, hdc, sc, sl st. Ch 2 for a tiny stem. Fasten off.
6. Pin the leaf flat and lightly steam block from a distance or damp block. Shape the three points while drying.
Optional Small Rounded Leaf (Make 2 to 4):
Ch 5. Starting in 2nd ch work sl st, sc, hdc, dc. Rotate and work down the opposite side: dc, hdc, sc, sl st. Fasten off. These help soften the cluster edge near the ear.
Section 8: Layout and Assembly
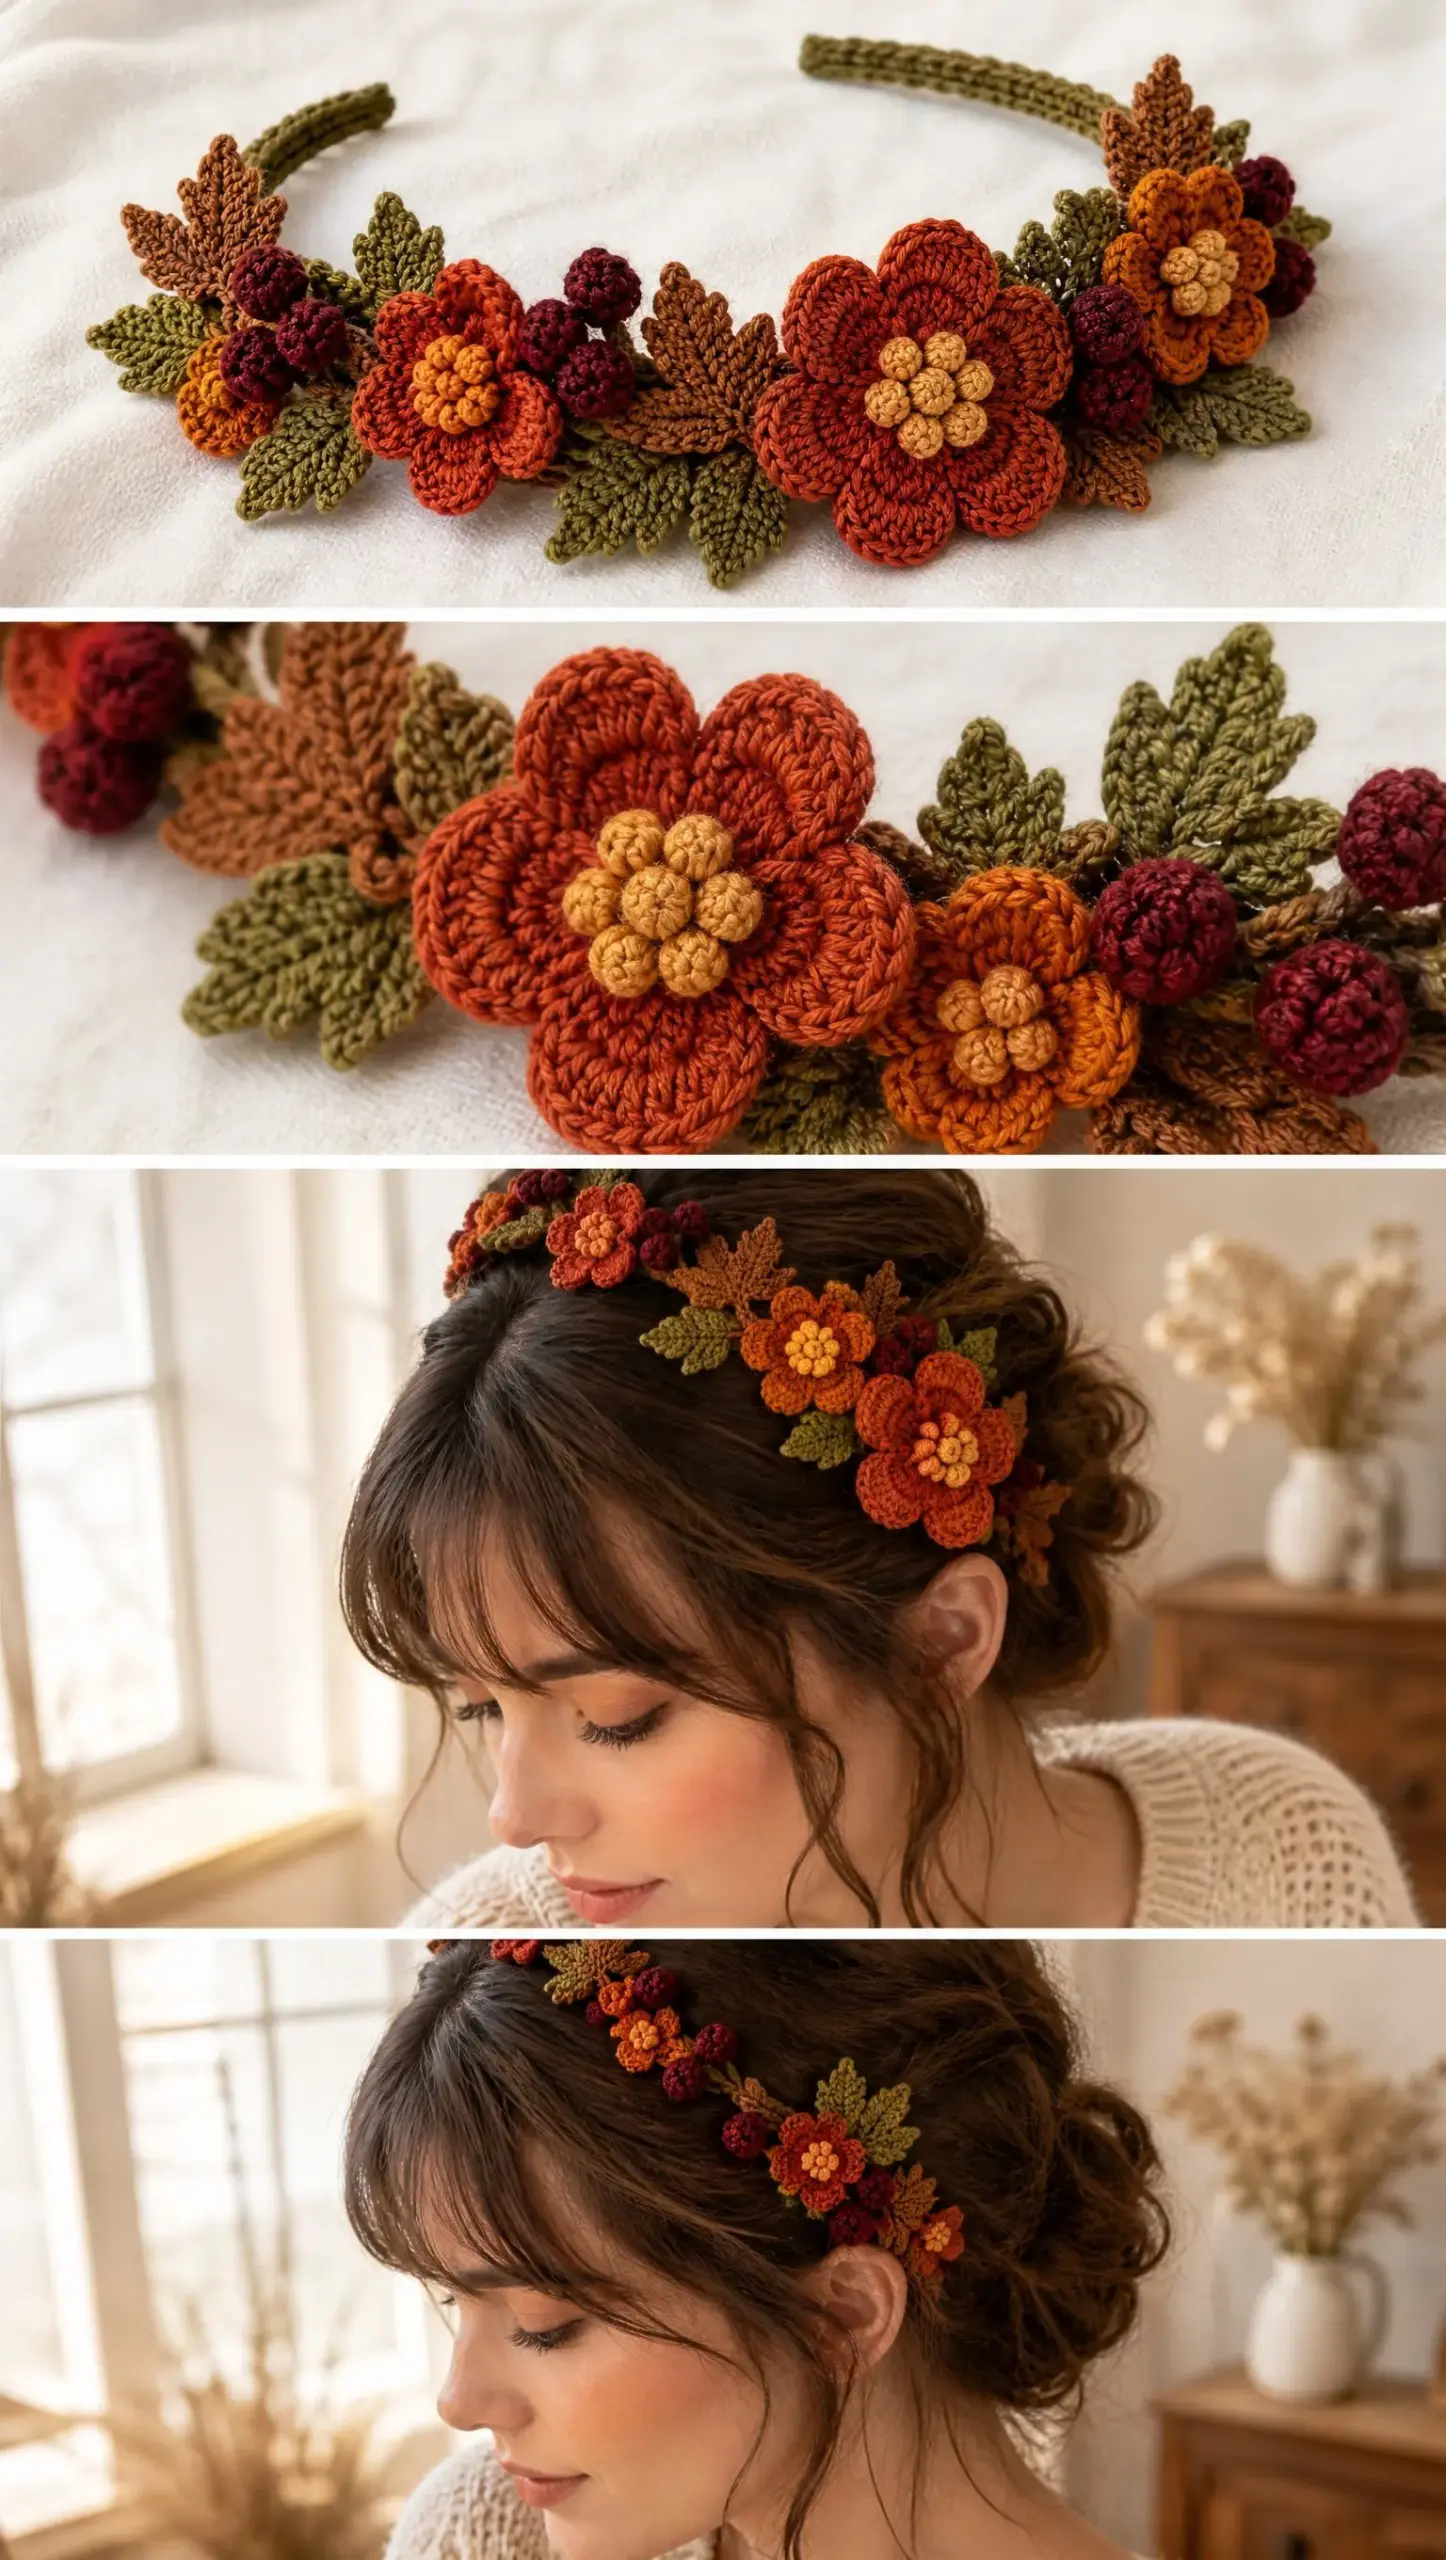
The finished headband should look intentionally asymmetric: airy over the left crown, then increasingly abundant toward the right temple.
1. Place the sleeved band on a table in the orientation it will be worn. Mark the right temple area about 2 to 3 inches (5 to 7.5 cm) above the band end.
2. Lay the main vine diagonally across the top of the band. Position it so the sparse end begins near the upper left crown and the branchiest section reaches the right temple mark.
3. Pin or clip the vine to the sleeve. Sew it down with matching sewing thread or fine yarn using small hidden stitches every 1/2 to 3/4 inch (1.25 to 2 cm). Keep the vine flexible.
4. Place the largest terracotta flower closest to the right temple, slightly forward of center. Overlap the burnt orange large flower above and behind it by about 1/3 of the flower width.
5. Nestle 3 to 5 burgundy berries between and around the two large flowers. Do not line them up; use small clusters of 2 or 3.
6. Tuck copper maple leaves behind the large flowers so their points extend outward. Alternate them with olive pointed leaves.
7. Continue leftward along the crown with one small flower, then a berry pair, then leaves, leaving visible sections of bare vine between motifs.
8. At the upper left crown, finish with a small flower and 1 to 2 leaves rather than another dense cluster. This preserves the slender vine effect.
9. Sew each motif individually to the vine and sleeve. Catch only the back loops or central ring of each motif so the front stays dimensional.
10. After all motifs are attached, flex the band several times. Reinforce any motif that lifts excessively, but avoid over sewing the petals and leaf tips.
Suggested Motif Map
| Zone | Placement |
|---|---|
| Upper left crown | 1 small flower + 1 olive leaf + 1 berry |
| Mid crown | 2 olive leaves + 1 copper leaf + berry pair |
| Approaching right side | 1 small flower + 2 leaves + 2 berries |
| Right temple focal cluster | 2 large flowers + 3 copper maple leaves + 3 to 5 olive leaves + 4 to 6 berries |
Section 9: Finishing
1. Weave all yarn ends toward the underside of motifs and trim closely only after the arrangement is secure.
2. Use matching sewing thread to tack down visible yarn tails and any leaf bases that want to twist.
3. Block only the motifs, not the headband core. Cover the band with a towel and mist the flowers and leaves lightly. Shape petals and points with fingers and allow to dry completely.
4. Check the underside. Add a few tiny whipstitches where the crochet sleeve seam is visible. The interior should feel smooth against the hair and scalp.
5. Optional: Sew a narrow strip of velvet ribbon over the underside seam for extra grip and comfort, keeping the final 1/2 inch (1.25 cm) at each tip uncovered if the original band has protective end caps.
Fit Adjustments
Color Placement Guide
| Motif | Recommended Color |
|---|---|
| Large flower 1 | Terracotta |
| Large flower 2 | Burnt orange |
| Small flowers | Mix terracotta and burnt orange |
| Centers | Ochre or mustard |
| Berries | Deep burgundy |
| Pointed leaves | Olive |
| Maple shaped leaves | Copper brown |
| Vine and sleeve | Copper brown or deep chestnut |
Troubleshooting Tips
Petals curl inward: Loosen tension on the ch-2 arches or add one extra dc to each petal.
Petals flop: Use a smaller hook, firmer cotton, or surface slip stitch the petal edge.
Leaves twist: Steam block lightly and sew the base plus one hidden stitch halfway up the center vein.
Berries look too large: Use the tiny berry version or a 2.0 to 2.25 mm hook.
Band feels bulky: Replace the 3-row sleeve with a 2-row sleeve and attach motifs using sewing thread instead of yarn.
Cluster slides toward the ear: Add extra hidden tacking stitches through the sleeve and vine immediately before and after the focal cluster.
Motifs catch in hair: Shorten exposed yarn tails, flatten knots to the underside, and line only the focal cluster underside with a small matching felt oval if necessary.
Care Instructions
Spot clean whenever possible. For a washable plastic core headband, hand wash briefly in cool water with mild detergent, press between towels, reshape motifs, and dry flat. Do not wring. If the internal band is metal or unknown, avoid soaking to reduce the risk of rust or adhesive failure.
Pattern Checklist
Before you call this project complete, run through this list:
The Finished Look
The visual goal is a warm botanical headband with individually resolved crochet motifs: rounded five-petal flowers, nubby ochre centers, tiny burgundy berries, and pointed leaves. Keep the crown vine airy and the right temple cluster lush. The concealed band should provide structure while remaining visually secondary to the crochet work.
You are absolutely encouraged to adjust motif count, vine length, and placement to suit your headband base, yarn thickness, and preferred fit. This is your creation, and small variations will only make it more uniquely yours.
I hope you love making this Autumn Berry Headband as much as I loved putting together this pattern. If you give it a try, save this page to your Pinterest boards so you can find it again easily. And please drop a comment below when you finish yours. I would love to see how your autumn colors turned out!
Want a Quick & Easy Printable Version?
Get a clean, beautifully formatted PDF of this pattern — easy to follow step by step, ready to print or save on any device. No scrolling, no distractions, just the pattern.
Get the Printable PDF →