
A crocheted dress keeps you cool while looking absolutely stunning at summer weddings, garden parties, or beach vacations. This Peach Blossom Lace Dress combines fitted bodice construction with a dramatically flared lace skirt, making it a showstopper that works for sizes XS through 3X.
Get the Ad-Free PDF Pattern
You can find the free pattern below, or you can purchase the ad-free printable PDF from my shop.
Get the Printable PDF →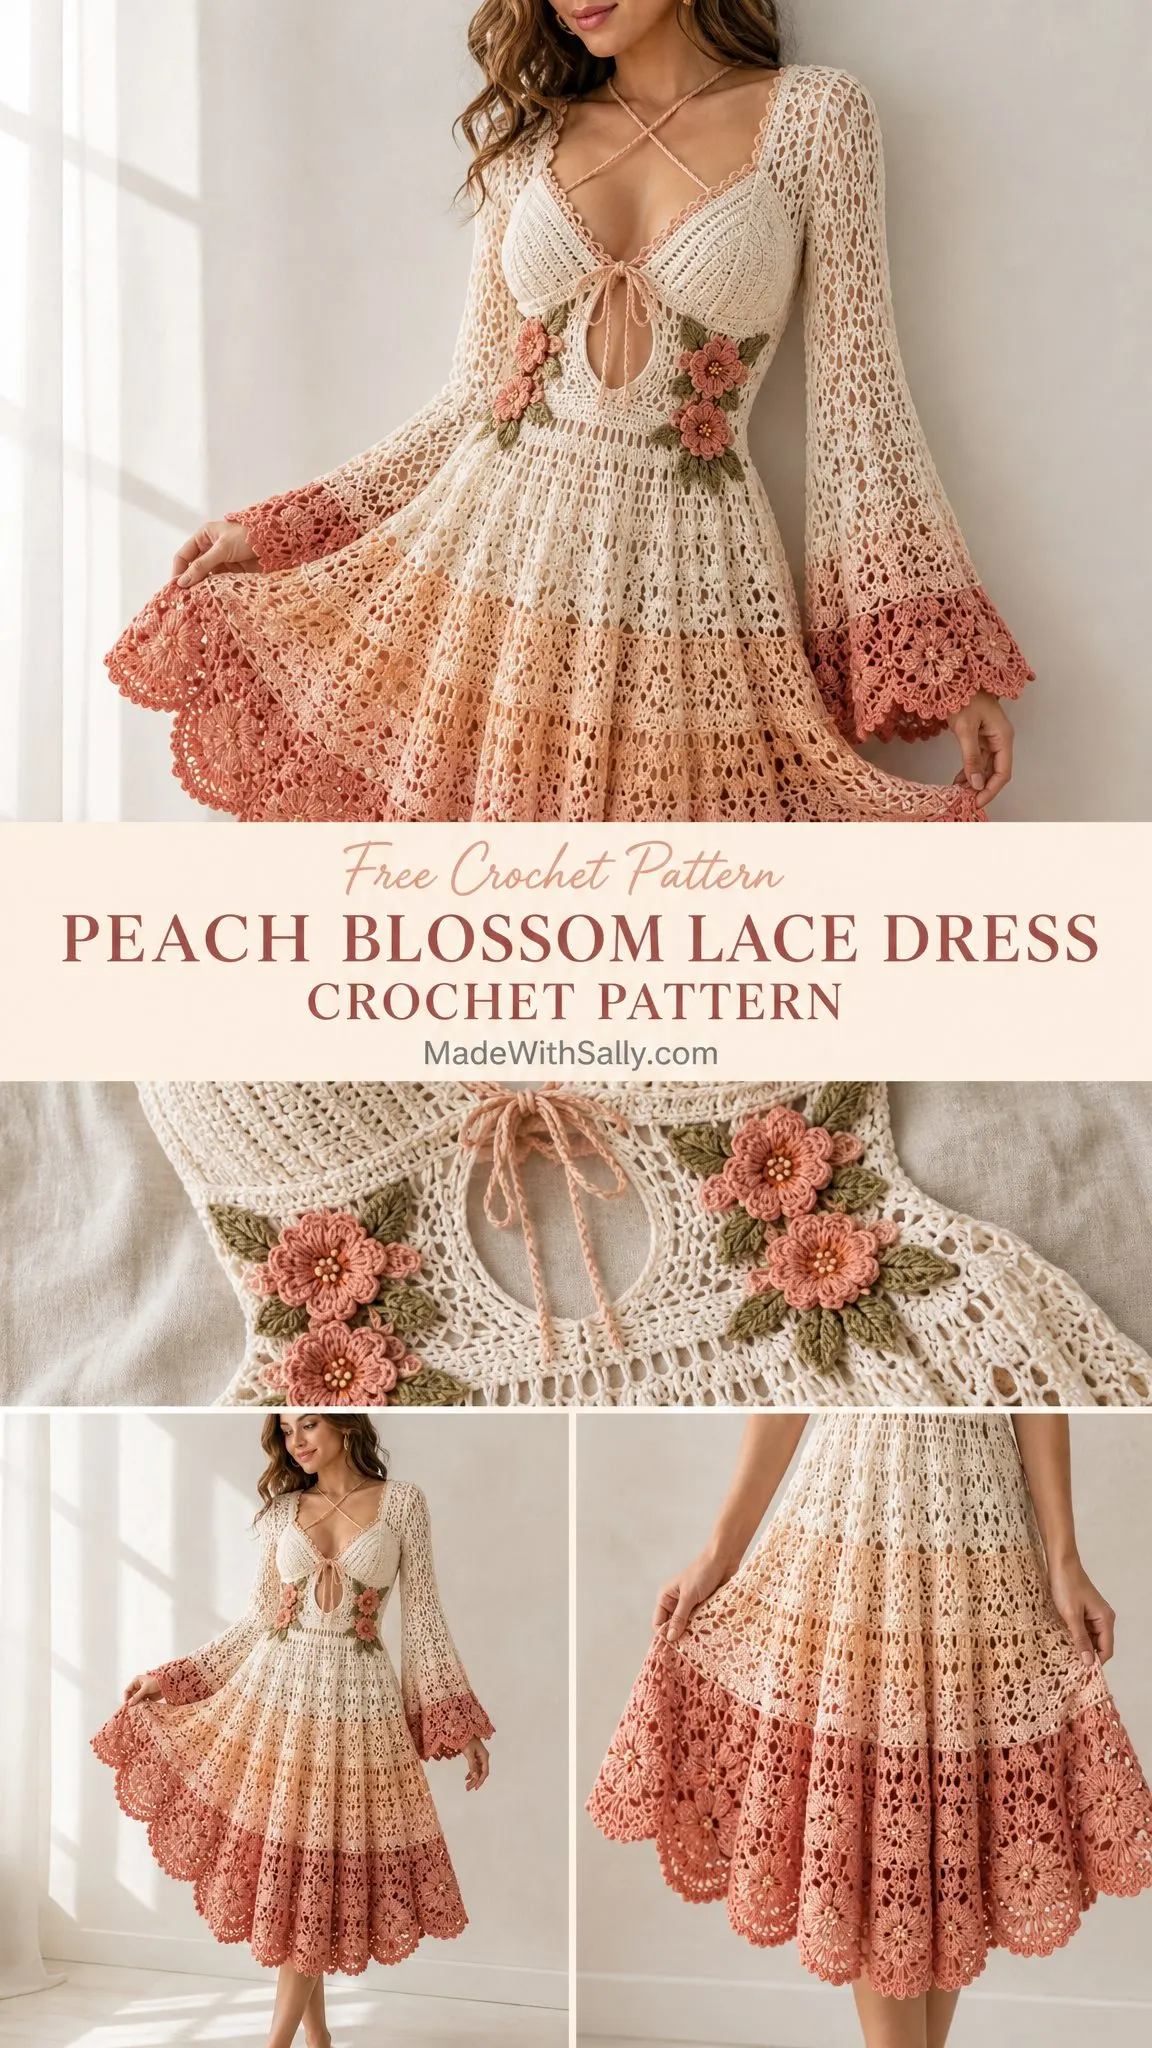
The pattern uses familiar stitches like double crochet and treble crochet, but brings them together in a way that creates professional-looking results. If you have been wanting to try garment making beyond basic tops, this dress teaches you cup shaping, circular lace increases, and dimensional appliqué work all in one gorgeous project.
I will be honest with you. This is an intermediate to advanced pattern that requires patience and fitting as you go. But I have broken everything down into manageable sections, and the modular construction means you can take breaks between pieces without losing your place.
About This Pattern
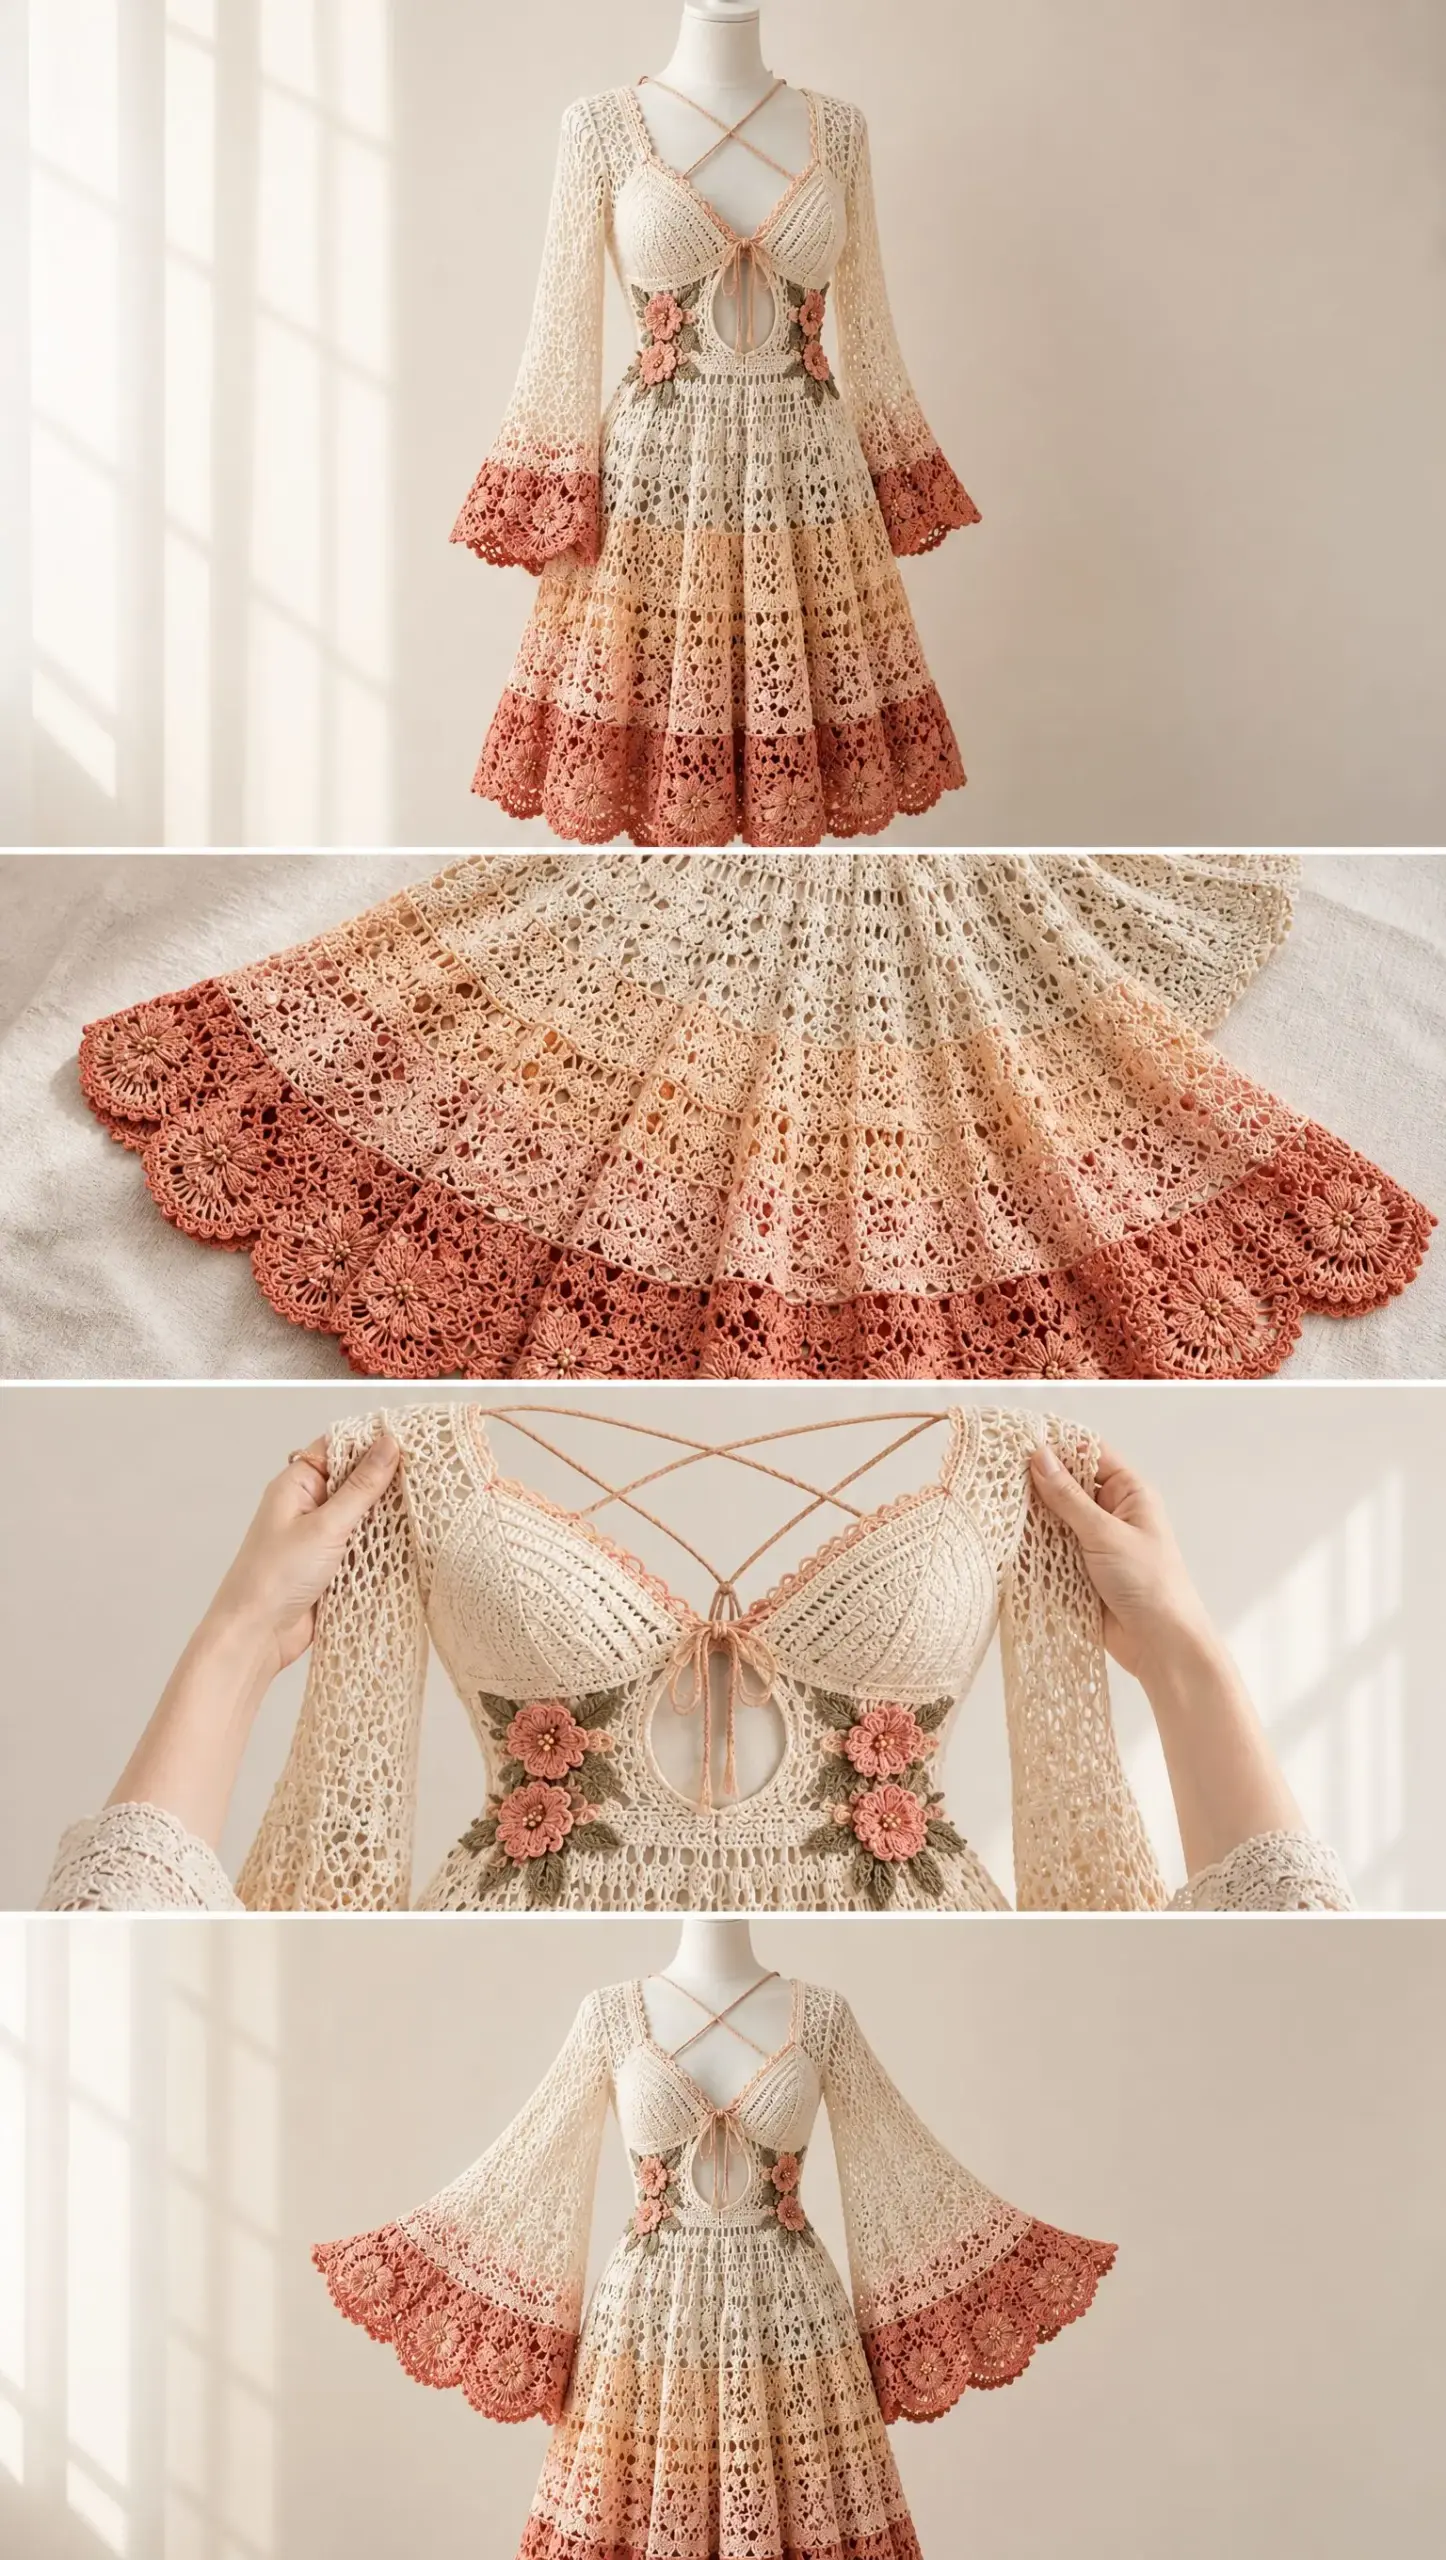
The Peach Blossom Lace Dress features a fitted cream bodice with shaped cups, an underbust frame, and a centered oval cutout at the midriff. Airy mesh sleeves end in coral scalloped bell cuffs. The skirt graduates from cream lace at the waist through pale apricot to a deep coral floral border at the hem.
Skill Level: Intermediate to advanced
Finished Sizes: XS, S, M, L, XL, 2X, 3X
The dress is worked in modular sections. You will make the cups separately, join them to an underbust band, build the front frame with its oval opening, create the back bodice, add sleeves, then work the skirt downward in progressively wider lace bands. Floral appliqués get sewn on after blocking.
Materials Needed
Yarn: Fine sport or heavy fingering weight cotton with matte or low sheen, approximately 300 to 340 meters per 100 grams. Choose a soft yarn with good stitch definition.
Colors:
Approximate Yarn Requirements by Size:
| Size | Cream MC | Peach A | Apricot B | Coral C | Sage D | Gold E | Total |
|---|---|---|---|---|---|---|---|
| XS | 950 m | 170 m | 180 m | 260 m | 45 m | 10 m | 1615 m |
| S | 1030 | 185 | 200 | 285 | 50 | 10 | 1760 |
| M | 1120 | 200 | 220 | 310 | 55 | 10 | 1915 |
| L | 1220 | 220 | 245 | 345 | 60 | 10 | 2100 |
| XL | 1330 | 240 | 270 | 380 | 65 | 10 | 2295 |
| 2X | 1460 | 265 | 300 | 420 | 75 | 10 | 2530 |
| 3X | 1600 | 290 | 330 | 465 | 85 | 10 | 2780 |
Purchase 10 to 15 percent extra if you are tall, want a fuller or longer skirt, plan extensive swatching, or are using yarn with less than 300 meters per 100 grams.
Hooks:
Adjust hook sizes as needed to obtain gauge.
Notions:
Gauge
Bodice Gauge: 22 dc x 11 rows = 10 cm / 4 inches in double crochet after light blocking using the smaller main hook.
Lace Gauge: One 8-stitch shell repeat = approximately 3.6 cm / 1.4 inches wide. 6 lace rounds = approximately 5.5 cm / 2.2 inches tall using the larger hook. Lace gauge is intentionally flexible.
Always make a gauge swatch before starting. Wash and block your swatch the same way you will treat the finished dress.
Finished Measurements
| Size | Bust | Underbust | Waist | Upper Arm | Armhole Depth | Dress Length |
|---|---|---|---|---|---|---|
| XS | 81 cm / 32 in | 69 / 27 | 64 / 25 | 27 / 10.5 | 19 / 7.5 | 92 / 36 |
| S | 86 / 34 | 74 / 29 | 69 / 27 | 29 / 11.5 | 20 / 8 | 94 / 37 |
| M | 94 / 37 | 81 / 32 | 76 / 30 | 32 / 12.5 | 21 / 8.25 | 96 / 38 |
| L | 102 / 40 | 89 / 35 | 84 / 33 | 35 / 13.75 | 22 / 8.75 | 98 / 38.5 |
| XL | 112 / 44 | 99 / 39 | 94 / 37 | 38 / 15 | 23.5 / 9.25 | 100 / 39.5 |
| 2X | 122 / 48 | 109 / 43 | 104 / 41 | 42 / 16.5 | 25 / 9.75 | 102 / 40 |
| 3X | 132 / 52 | 119 / 47 | 114 / 45 | 46 / 18 | 26.5 / 10.5 | 104 / 41 |
Dress length is measured from high shoulder to hem. Customize freely by adding or removing complete lace repeats in the skirt.
A fitted crochet bodice looks best with 0 to 5 cm (0 to 2 inches) of negative ease at the bust and 0 to 2 cm (0 to 3/4 inch) at the waist, depending on yarn elasticity.
Abbreviations
Special Stitch Patterns
Mesh V: Work (dc, ch 2, dc) in the same space. This creates an open V-shaped unit.
Small shell: Work 5 dc in one space.
Large shell: Work (3 dc, ch 2, 3 dc) in one space.
Leaf cluster: Work (2 tr, ch 2, 2 tr) in one space. This is used as a pointed leaf unit.
3-dc cluster: Yarn over, insert hook and pull up loop, yarn over and pull through 2 loops. Repeat twice more in the same space. Yarn over and pull through all 4 loops on hook.
Cup Starting Counts
The cup dimensions depend more on bust shape than clothing size. Use this table as a starting point, then try the cup against the body or a well-fitting bra before joining to the frame.
| Size | Foundation ch | Cup Rows Before Edging | Approx. Cup Width | Approx. Cup Depth |
|---|---|---|---|---|
| XS | 18 | 11 | 14 cm | 14 cm |
| S | 20 | 12 | 15 | 15 |
| M | 22 | 13 | 16.5 | 16 |
| L | 24 | 14 | 18 | 17 |
| XL | 26 | 15 | 19 | 18 |
| 2X | 28 | 16 | 20.5 | 19 |
| 3X | 30 | 17 | 22 | 20 |
Bodice Cups (Make 2 in Cream)
Each cup is made as a shaped wedge worked from the lower inner edge upward around a turning point. The center increase line forms the bust apex. Keep the first and last 3 to 4 stitches relatively firm so the edges do not flare.
Step 1: With smaller hook and MC, ch the foundation count for your size. Dc in 4th ch from hook and in each ch to last ch. Work 5 dc in last ch. Rotate the work and continue along the unused loops on the underside of the foundation chain, dc in each loop to end. Turn. You now have a shallow U-shaped row with 5 dc at the apex.
Row 2 (WS): Ch 3 (counts as dc), dc in each dc to the center stitch of the 5-dc group, 5 dc in center stitch, dc in each dc to end. Turn.
Rows 3 and beyond: Repeat Row 2 until the cup reaches the row count shown in the cup table. At each row, the middle stitch of the 5-dc group remains the apex stitch. Place a marker there if helpful.
Fitting check: Try the cup over the intended bra or cup area. The lower inner edge should sit near the sternum and the outer edge should reach the side of the bust without wrapping far into the underarm. Add or remove one row if required.
Edging row (RS): Ch 1, sc evenly along the entire outer edge, placing 2 sc in each row-end corner as needed so the fabric lies flat. Do not sc across the lower foundation edge yet. Fasten off.
Optional Decorative Cup Texture
For the radiating texture visible in the concept image, substitute every third cup row with this relief-style eyelet row: ch 3, dc in next 2 sts, ch 1, sk 1 st to 2 sts before apex, dc in next 2 sts, 5 dc in apex, mirror the sequence to the opposite edge. On the next row, work dc in every dc and 1 dc in each ch-1 space.
Join Cups at Center Front
1. Lay cups RS up with inner lower corners nearly touching. The top inner edges should angle upward to create the V neckline.
2. With MC, join yarn at the lower inner corner of the right cup. Sc 6 to 10 sts up the inner edge (depending on size), ch 1, then sc the corresponding number of stitches down the inner edge of the left cup. This creates a short bridge but deliberately leaves the neckline open above.
3. Fasten off. The remaining open inner edges will later receive peach edging and crisscross ties.
Underbust Frame and Oval Front Opening
Underbust Band
1. Measure the combined lower edge of both cups. With MC, join yarn at the outer lower corner of one cup. Work 1 row sc evenly across both cup foundations, including the small center bridge. Aim for an even count and note it.
2. Row 2: Ch 3, dc in each st across. If needed, decrease 2 to 6 sts evenly across this row so the band sits snugly under the bust without puckering the cups.
3. Rows 3 to 5: Ch 3, dc across. For extra visual texture, work Row 4 in BLO. Fasten off after Row 5.
The underbust band should be about 4.5 to 5.5 cm (1-3/4 to 2-1/4 inches) deep. Short-waisted wearers may prefer 3 rows. Fuller busts often benefit from 5 to 6 rows.
Lower Front Frame with Oval Opening
1. Work two narrow vertical side panels downward from the left and right ends of the underbust band. Each panel should be approximately 5 to 7 cm (2 to 2-3/4 inches) wide: about 12 (12, 14, 14, 16, 18, 20) dc for XS (S, M, L, XL, 2X, 3X).
2. Work each side panel in dc for 6 (6, 7, 7, 8, 8, 9) rows, shaping the inner edge by decreasing 1 st every second row twice, then increasing back 1 st every second row twice. This creates the curved sides of the opening.
3. At the bottom, join both side panels with a center lower bridge: ch enough stitches to span the opening while keeping the waist level, then dc across the chain and continue across the opposite panel. The opening should be oval or teardrop shaped, about 8 to 12 cm (3 to 4-3/4 inches) tall and 5 to 8 cm (2 to 3 inches) wide depending on size.
4. Work 2 additional full-width dc rows across the lower front to create a stable waist edge. Do not fasten off if you are ready to continue into the side and back panel.
Peach Trim Around Opening
With Color A and smaller hook, work 1 round sc evenly around the oval opening. At the upper point work (sc, ch 2, sc) to sharpen the point. At the bottom curve add a few extra sc so the trim lies flat. Optional second round: sl st in next sc, ch 2 around for a tiny picot-loop edge.
Back Bodice and Side Seams
Work the back as a simple fitted rectangle or trapezoid to the same waist depth as the front. The upper back may be slightly lower than the front cup edge for comfort and to emphasize the open neckline.
| Size | Back Foundation sts | Back Rows to Underarm | Approx. Back Width |
|---|---|---|---|
| XS | 68 | 18 | 31 cm |
| S | 74 | 19 | 34 |
| M | 82 | 20 | 37 |
| L | 91 | 21 | 41 |
| XL | 101 | 22 | 46 |
| 2X | 112 | 23 | 51 |
| 3X | 123 | 24 | 56 |
1. With MC and smaller hook, foundation-dc the back foundation count. Turn.
2. Work dc rows, decreasing 1 st at each edge every 4th row twice if you want stronger waist shaping. Otherwise keep the sides straight.
3. When the back panel reaches the same vertical distance from waist to underarm as the front side seam, place markers for armholes. Continue the center back section alone for 3 to 5 cm (1-1/4 to 2 inches) to create a modest upper-back band.
4. Block the front and back lightly. With RS together, seam side edges from waist to armhole using mattress stitch. Leave armholes open.
5. Check that the waist circumference is correct before proceeding. If slightly loose, thread 6 to 10 mm clear elastic through the final waist row or work one firm round of sc around the waist.
Shoulder and Strap Connection
Create narrow cream shoulder bands: join MC at each cup outer top corner, foundation-dc or ch and sc a strap long enough to reach the corresponding upper-back edge (typically 18 to 26 cm or 7 to 10 inches), and seam it securely. The sleeve cap will later be sewn around this shoulder structure.
Peach Neckline Edging and Crisscross Ties
1. With Color A and 2.75 to 3.0 mm hook, join at the outer upper corner of the right cup. Sc evenly up the neckline edge, around the inner V edge, across the center join, and up the opposite cup neckline. Fasten off.
2. Make 2 ties: Ch 85 to 115 (or long enough to cross the chest and tie comfortably), then sl st back through every chain for a neat cord. Fasten off, leaving a 10 cm tail.
3. Sew one tie securely to each upper outer cup corner or to the first 2 cm of the shoulder band. Cross the ties over the upper chest and thread them through small spaces at the opposite neckline edge if desired.
4. For the lower center bow: Make another peach cord 70 to 90 cm long. Thread it through the inner cup edges just above the oval opening and tie in a bow. Alternatively, divide it into two separate cords sewn to each cup.
Do not rely on the decorative peach cords as the sole structural support for a heavy dress. Keep cream shoulder bands and the underbust frame load-bearing. Use the peach cords mainly for fit refinement and appearance.
Airy Mesh Sleeves (Make 2)
Work flat from cuff to upper arm, then seam and set in.
Base mesh repeat (multiple of 4 + 1):
For a slightly denser sleeve, use dc instead of tr.
| Size | Cuff Foundation | Upper-Arm Target | Approx. Sleeve Length Before Cuff |
|---|---|---|---|
| XS | 49 sts | 29 cm / 11.5 in | 43 cm / 17 in |
| S | 53 | 31 / 12.25 | 44 / 17.25 |
| M | 57 | 34 / 13.5 | 45 / 17.75 |
| L | 61 | 37 / 14.5 | 46 / 18 |
| XL | 65 | 40 / 15.75 | 47 / 18.5 |
| 2X | 69 | 44 / 17.25 | 48 / 19 |
| 3X | 73 | 48 / 19 | 49 / 19.25 |
1. With MC and larger hook, foundation-sc the cuff foundation count. Turn. This edge will later be covered by the coral cuff.
2. Begin mesh pattern. Work 8 rows even.
3. Sleeve increase row: Increase one mesh unit at each edge by working (tr, ch 1, tr) into the first and last usable stitch or space. Repeat this increase every 4th row until the piece reaches the target upper-arm width plus 2 to 4 cm (3/4 to 1-1/2 inches) ease.
4. Continue even until sleeve reaches the wearer’s underarm. For a full-length sleeve, the mesh section usually measures 43 to 49 cm (17 to 19-1/4 inches) before cuff.
5. Shape a shallow sleeve cap: Over the next 8 to 12 rows, slip stitch across 1 mesh space at the start of each row, then work the mesh pattern to 1 space before the opposite edge. Continue until cap height is approximately 8 to 11 cm (3 to 4-1/4 inches).
6. Fasten off. Block gently to measurements. Fold lengthwise with RS together and seam from cuff to cap using mattress stitch.
Coral Scalloped Bell Cuffs
The cuff is worked directly into the sleeve edge and flares by increasing shell size. Aim for a finished cuff depth of 10 to 14 cm (4 to 5-1/2 inches).
1. With sleeve RS out, join Color C at the seam. Round 1: Sc evenly around the cuff edge, adjusting to a multiple of 6. Join with sl st.
2. Round 2: Ch 1, sc in next 2 sts, ch 3, sk 1 st around. Join.
3. Round 3: Sl st to first ch-3 sp, ch 3, 4 dc in same sp, 5 dc in next ch-3 sp around. Join. This forms small shells.
4. Round 4: Ch 5, sc in center dc of next shell, ch 4 around. Join.
5. Round 5: Into each ch-4 sp work (3 dc, ch 2, 3 dc). Join.
6. Round 6: Ch 1, sc in ch-2 sp, ch 5 around. Join.
7. Round 7: Into each ch-5 sp work (4 dc, ch 2, 4 dc). Join.
8. Round 8: Sc in each dc to ch-2 sp, (sc, picot, sc) in ch-2 sp, sc in remaining dc of shell around. Join and fasten off.
For a deeper bell, repeat Rounds 6 and 7 once more before final edging, using ch-6 spaces and (5 dc, ch 2, 5 dc) shells.
Set Sleeves
Pin the sleeve cap into the armhole with the sleeve seam aligned to the bodice side seam. Distribute fullness across the upper third of the cap. Sew with a firm whipstitch through both loops of the bodice edge and stable parts of the mesh. Reinforce the shoulder area with a second pass of stitches.
Waist Join and Skirt Foundation
1. With MC and larger hook, join yarn at the left side seam at the waist. Work 1 round sc evenly around the entire waist, adjusting the count to a multiple of 8. Join.
2. Foundation lace Round 1: Ch 3, dc in each sc around. Join.
3. Round 2: Ch 4 (dc + ch 1), sk 1, dc in next st, ch 1 around. Join.
4. Round 3: Sl st into first ch-1 sp, ch 3, 2 dc in same sp, ch 1, 3 dc in next ch-1 sp, ch 1 around. Join.
5. Round 4: Ch 1, sc in same sp, ch 5, sc in next ch-1 sp around. Join. This creates the first openwork transition into the skirt.
For a gently flared skirt, increase the number of arches or shells by about 12 to 15 percent every 8 to 10 rounds. For the dramatic fanned silhouette in the image, increase 15 to 20 percent at each color-band transition.
Cream Lace Band
This band is approximately 18 to 22 cm (7 to 8-3/4 inches) deep.
Six-Round Lace Repeat
1. Round 1: Sl st into first ch-5 sp. Ch 3, 4 dc in same sp, 5 dc in next ch-5 sp around. Join.
2. Round 2: Ch 1, sc in same st, ch 5, sc in center dc of next 5-dc shell around, ending ch 5, join.
3. Round 3: Into each ch-5 sp work (3 dc, ch 2, 3 dc). Join.
4. Round 4: Sl st to ch-2 sp, ch 1, sc in sp, ch 6, sc in next ch-2 sp around. Join.
5. Round 5: Into each ch-6 sp work (2 dc, ch 1, 2 dc, ch 1, 2 dc). Join.
6. Round 6: Ch 1, sc in first ch-1 sp of motif, ch 4, sc in second ch-1 sp, ch 4 around. Join.
Repeat Rounds 1 through 6 two or three times. On the final repeat, add flare in Round 4 by occasionally working two ch-6 arches into one ch-2 space: approximately every 8th motif for XS/S, every 7th for M/L, and every 6th for XL through 3X. Keep increases evenly distributed.
Pale-Apricot Transition Band
This band is approximately 9 to 12 cm (3-1/2 to 4-3/4 inches) deep.
1. Join Color B in any arch. Round 1: Ch 3, 2 dc in same arch, ch 2, 3 dc in same arch, large shell in next arch around. Join.
2. Round 2: Sl st to ch-2 sp, (sc, ch 5, sc) in ch-2 sp, ch 2 around. Join.
3. Round 3: In each ch-5 loop work (3 dc, ch 1, 3 dc), ch 1 between motifs. Join.
4. Round 4: Ch 1, sc in first ch-1 center sp, ch 6, sc in next center sp around. Join.
5. Round 5: In each ch-6 sp work (2 dc, ch 2, 2 dc, ch 2, 2 dc). Join.
6. Round 6: Sc in first ch-2 sp, ch 4, sc in second ch-2 sp, ch 4 around. Join.
Repeat Rounds 3 through 6 once if more apricot depth is desired. Add one extra arch every 7 to 10 motifs on the final round to prepare for the coral section.
Coral Lace Band and Deep Floral Border
The final section creates the strongest flare and scalloped hem.
Coral Body Band
1. Join Color C. Work one round of large shells: (3 dc, ch 2, 3 dc) in each arch around.
2. Next round: Sc in ch-2 sp, ch 7 around.
3. Next round: In each ch-7 arch work (3 dc, ch 2, 3 dc, ch 2, 3 dc).
4. Next round: Sc in first ch-2 sp, ch 5, sc in second ch-2 sp, ch 5 around.
Repeat these 4 rounds once, increasing by adding a second arch into every 6th to 8th motif if additional flare is needed.
Deep Floral Scallop (5 Rounds)
1. Flower base round: In each ch-5 arch work [sc, ch 3, 3-dc cluster, ch 3, 3-dc cluster, ch 3, sc]. Each arch now holds two petal clusters.
2. Petal round: In each ch-3 loop surrounding a cluster work (sc, 5 dc, sc). This produces four rounded petal lobes across every two-cluster base.
3. Openwork round: Sl st to the valley between neighboring floral units, ch 8, sc in center of next flower, ch 8, sc in next valley around.
4. Fan round: In each ch-8 loop work 9 dc, sc into each flower-center sc. Join.
5. Final scallop: Sc in first dc of fan, hdc in next, dc in next, (2 tr, picot, 2 tr) in center dc, dc in next, hdc in next, sc in last dc, sl st in flower-center sc around. Fasten off and weave ends securely.
Stop when the skirt reaches the desired knee-length before beginning the final floral border. The deep border adds approximately 8 to 12 cm (3 to 4-3/4 inches) depending on yarn and hook.
Peach Blossoms, Golden Centers, and Sage Leaves
Five-Petal Peach Blossom (Make 6 to 10)
1. With Color A and 2.5 to 2.75 mm hook, make a magic ring. Round 1: Ch 1, work 10 sc in ring, join, tighten ring.
2. Round 2: Sl st in next sc, ch 3, 3 tr in next sc, ch 3, sl st in same sc five times, using 2 base sc per petal. Fasten off. This forms five broad petals.
3. For more dimension, make a smaller inner layer: into a magic ring work ch 2, 2 dc, ch 2, sl st five times. Sew the small flower centered on the larger one.
4. With Color E, work 5 to 7 French knots with yarn or tiny bullion-like wrapped stitches in the center. Secure firmly on the back.
Muted-Sage Leaf (Make 8 to 14)
1. With Color D, ch 10. Sc in 2nd ch from hook, hdc in next, dc in next 2, tr in next 2, dc in next, hdc in next, 3 sc in last ch.
2. Working along the opposite side of the foundation chain: hdc in next, dc in next, tr in next 2, dc in next 2, hdc in next, sc in last. Join to first sc.
3. Optional vein: sl st loosely through the center ridge from base to tip. Fasten off with a 15 cm tail for sewing.
Arrange Appliqués
1. Block flowers and leaves lightly with steam held above the work or wet block flat. Do not flatten the petal dimension.
2. On each side waist, arrange 3 to 5 blossoms in a loose vertical cluster extending from the lower cup or underbust area to the upper skirt. Tuck sage leaves behind flowers at varied angles.
3. Pin from the front. From the inside, sew each motif down only at its center and at 2 to 3 strategic petal or leaf points. Keep the outer petal edges free for dimension.
4. Mirror the general mass on the opposite side but vary exact flower and leaf placement so the arrangement looks botanical rather than mechanical.
Assembly Sequence
Follow this recommended order from swatch to finished garment:
1. Swatch bodice and lace, wash and block the swatches, and confirm gauge.
2. Make and fit both cream cups.
3. Join cups and work underbust band.
4. Build lower front frame with centered oval opening.
5. Make back bodice, shoulder bands, and seam bodice sides.
6. Add peach neckline trim and decorative ties.
7. Make both mesh sleeves and coral cuffs, block, seam, and set sleeves.
8. Stabilize and count waist stitches, adjust to a multiple of 8.
9. Work skirt foundation and cream lace band.
10. Work apricot transition band.
11. Work coral lace band and deep floral hem.
12. Make blossoms and leaves, block and sew appliqués.
13. Weave all ends, reinforce structural seams, and perform final wet block.
14. Optional: add a removable nude or cream slip or lining for coverage.
Final Blocking and Finishing
1. Weave ends along the direction of stitches for at least 5 to 7 cm (2 to 2-3/4 inches). Split plies on the final pass to reduce slippage in
Want a Quick & Easy Printable Version?
Get a clean, beautifully formatted PDF of this pattern — easy to follow step by step, ready to print or save on any device. No scrolling, no distractions, just the pattern.
Get the Printable PDF →