
Last summer, I was getting ready for a friend’s garden party when I realized I had absolutely nothing to wear that felt special enough. Everything in my closet was too casual or too stuffy. I wanted something feminine, a little romantic, and definitely eye-catching from every angle.
Get the Ad-Free PDF Pattern
You can find the free pattern below, or you can purchase the ad-free printable PDF from my shop.
Get the Printable PDF →
That’s when I started sketching what would eventually become this Peach Daisy Lace-Up Top. I kept imagining how stunning it would look to turn around and reveal that dramatic open back with the crisscross lacing and delicate daisy yoke. The kind of piece that makes people stop and ask, "Wait, you made that?"
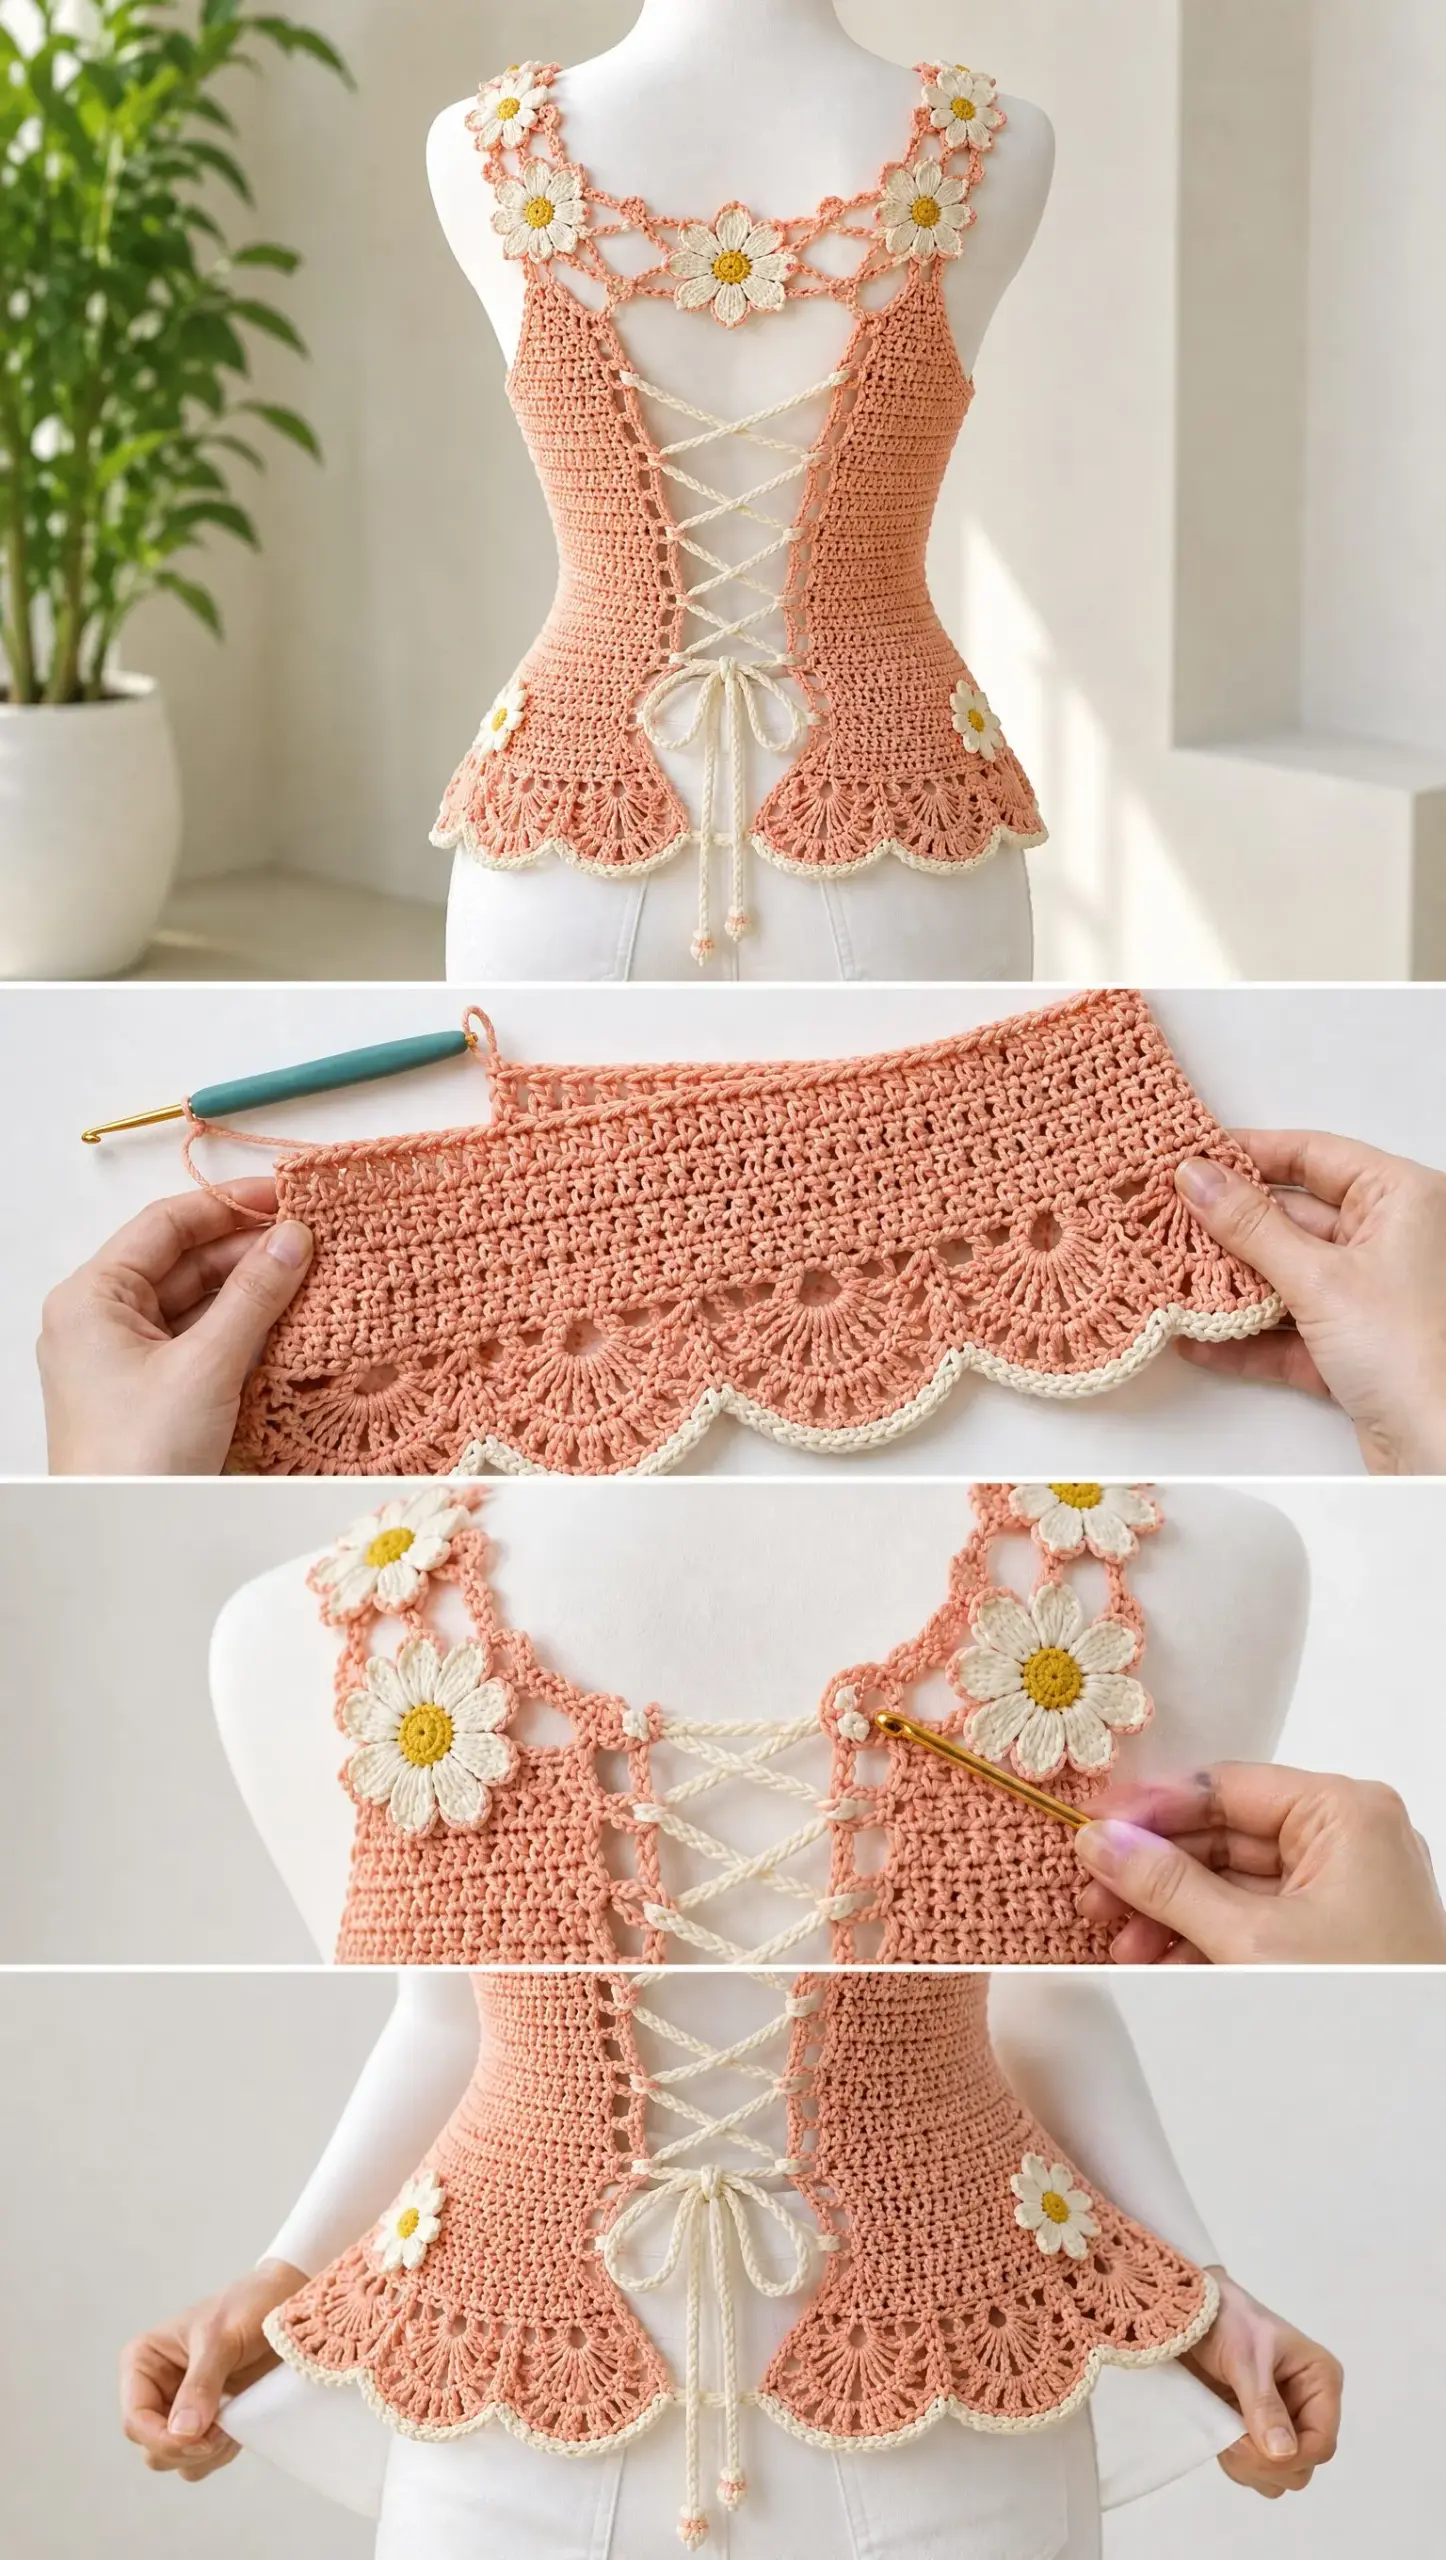
Well, now you can make it too. This fitted camisole-style top features solid double crochet fabric, a five-daisy lace yoke across the shoulder blades, reinforced eyelets with ivory lacing, and broad shell scallops along the hem. It’s intermediate level, but I promise the construction is more straightforward than it looks. Let me walk you through every single step.
About This Peach Daisy Lace-Up Top Crochet Pattern
This top is worked flat from one center-back edge, around the front, to the opposite center-back edge. That means the back stays completely open, which is the whole point of this design. The dramatic lace-up closure runs from just below the daisy yoke all the way down to the lower back.
The five-petal daisy motifs are worked separately, then joined with peach chain arches to create an airy lace panel across the shoulder blades. Two miniature daisies sit at the back hips as sweet finishing details. The broad shell scallops at the hem are outlined in ivory for that polished, finished look.
Fit note: This top is designed with 0 to 2 inches (0 to 5 cm) of negative ease through the bust. That means you want the finished bust measurement to be equal to or slightly smaller than your actual bust. The lacing allows you to adjust the fit, so if you’re between sizes, work the larger body and tighten the lacing.
Sizing and Finished Measurements
This pattern includes six sizes from XS through 2XL. Here’s the breakdown:
| Size | To Fit Bust | Finished Bust Path* | Body Length** |
|---|---|---|---|
| XS | 30-32 in | 30 in | 16.5 in |
| S | 34-36 in | 34 in | 17 in |
| M | 38-40 in | 38 in | 17.5 in |
| L | 42-44 in | 42 in | 18 in |
| XL | 46-48 in | 46 in | 18.5 in |
| 2XL | 50-52 in | 50 in | 19 in |
*The finished bust path includes the approximately 3 inch (7.5 cm) center-back opening when laced to fit.
**Body length is measured from the lower shell point to the top of the shoulder. You can adjust this to your preference.
Materials Needed
Yarn:
Hooks:
Notions:
Gauge
20 dc x 10 rows = 4 x 4 inches (10 x 10 cm) after wet blocking.
One full daisy measures approximately 2.75 to 3 inches (7 to 7.5 cm) across.
Gauge really matters here. If your stitches are larger, the top will grow quickly around the body and won’t fit properly. I strongly recommend making a swatch in double crochet (dc), washing and blocking it, then re-measuring before you begin the actual project.
Abbreviations and Special Stitches
Let me define all the stitches and techniques you’ll use:
Special Techniques
Foundation edge: Chain 2 at the beginning of a dc row does not count as a stitch unless stated otherwise.
Invisible color finish: After your last stitch, cut the yarn and pull the tail through. Thread the tail onto your yarn needle, pass under both loops of the first stitch, then back down through the last stitch. This creates a seamless join.
Picot: Chain 3, slip stitch in the first chain.
Cord: Chain to the required length, then slip stitch in the second chain from hook and in every remaining chain for a firm, rounded cord.
Eyelet edge: (Sc in edge space, ch 3, skip approximately one row-end space) repeated evenly. On the return pass, work 4 sc into each ch-3 loop for strength.
Shell: 7 dc in the same stitch or space. The broad shell edging uses sc anchors between shells.
Five-Petal Daisy Motif
You’ll make 5 full daisies for the upper-back yoke and 2 miniature daisies for the back hips. The raised petals are worked into front loops and chain spaces so they stay dimensional after blocking.
Full Daisy (Make 5)
Round 1: With CB (gold), make a magic ring. Ch 1, work 10 sc into the ring. Join with sl st to the first sc. Tighten the ring firmly. Fasten off. (10 sc)
Round 2: Join CA (ivory) in any sc. Ch 6. Working back along the chain: sl st in 2nd ch from hook, sc in next ch, hdc in next ch, dc in next ch, tr in next ch. Sl st in the next center sc. Repeat from * 4 more times, spacing each petal over two center stitches. You should have 5 pointed petals.
Round 3: Without turning, loosely sl st behind the petal bases to the first petal. For a slightly raised petal ridge, surface sl st around the base of each petal. Fasten off and weave in the ivory tail.
Round 4: Join MC (peach) behind any petal base. Ch 5, sl st behind next petal base. Repeat around. Join. This creates 5 peach joining arches. Fasten off unless joining immediately.
Mini Hip Daisy (Make 2)
Round 1: With CB, make a magic ring. Ch 1, 5 sc in the ring. Join and fasten off. (5 sc)
Round 2: Join CA in any sc. Ch 4, sl st in 2nd ch from hook, sc in next ch, hdc in next ch. Sl st in the same center sc. Repeat once in each of the remaining 4 sc. Fasten off.
Block these mini daisies to approximately 1.5 to 1.75 inches (4 to 4.5 cm) across.
Pro tip: Make all five full daisies before assembly. Steam or wet block them to the same diameter so the yoke sits level across the shoulders.
Main Body: Worked Flat from Center Back to Center Back
The lower body is one flat strip. The two short ends become the center-back opening. The middle section becomes the front, and the outer sections become the back-side panels.
Here are the stitch counts for each size:
| Size | Body Sts | Left Back | Front | Right Back | Approx. Width |
|---|---|---|---|---|---|
| XS | 135 | 30 | 75 | 30 | 27 in |
| S | 155 | 35 | 85 | 35 | 31 in |
| M | 175 | 40 | 95 | 40 | 35 in |
| L | 195 | 45 | 105 | 45 | 39 in |
| XL | 215 | 50 | 115 | 50 | 43 in |
| 2XL | 235 | 55 | 125 | 55 | 47 in |
Foundation and Lower Torso
With MC and your 3.5 mm hook, ch 137 (157, 177, 197, 217, 237).
Row 1 (RS): Dc in 3rd ch from hook and in each ch across. You have 135 (155, 175, 195, 215, 235) dc. Turn.
Rows 2-30: Ch 2, dc in each st across. Turn. Work more or fewer rows here if you want the underarm to sit higher or lower. 30 rows is approximately 12 inches (30.5 cm) at gauge.
Optional waist contour: On Rows 10 and 16, decrease 1 stitch near each side seam position (4 decreases total across both rows). On Rows 22 and 26, increase in the same four positions to restore the original stitch count. This produces subtle shaping without changing the center-back edges.
After Row 30, place markers to divide the strip into Left Back / Front / Right Back using the stitch counts in the table above. Do not cut yarn until you have checked that the center-back opening is centered when the strip is wrapped around you.
Fit checkpoint: Wrap the strip around the torso with the two back edges approximately 3 inches (7.5 cm) apart. The front should lie flat without stretching more than about 10%. Adjust by adding or removing 5-stitch increments before beginning the upper sections.
Upper Back-Side Panels
Work the two outer sections separately. Each panel tapers toward the shoulder blade while keeping the center-back edge straight enough to support the lacing eyelets.
Left Back-Side Panel
Join MC at the outer center-back edge of the Left Back section. Work dc across the marked Left Back stitches only. Turn.
Next row: Ch 2, dc2tog over the first 2 sts (center-back edge), dc to last 2 sts, dc2tog (armhole edge). Turn.
Repeat the decrease row every other row 5 (6, 7, 8, 9, 10) more times. Keep the open-back edge smooth and the armhole edge gently sloped.
Continue straight in dc until the top of the panel reaches approximately 4.5 (5, 5.5, 6, 6.5, 7) inches / 11.5 (12.5, 14, 15, 16.5, 18) cm above the split row, or sits just below the shoulder blade when tried on.
Fasten off, leaving a 12 inch (30 cm) tail for yoke assembly.
Right Back-Side Panel
Work as for the Left Back, mirroring the decreases. Match the row count exactly so both upper edges are level.
Front Bib and Shoulder Straps
The front is deliberately simple so the open back remains the feature. Work the center section upward, then divide for two straps that pass over the shoulders and join the outer daisies.
| Size | Front Start | After Armhole Shaping | Each Strap | Center Neckline Left Unworked |
|---|---|---|---|---|
| XS | 75 | 67 | 12 | 43 |
| S | 85 | 77 | 13 | 51 |
| M | 95 | 87 | 14 | 59 |
| L | 105 | 97 | 15 | 67 |
| XL | 115 | 107 | 16 | 75 |
| 2XL | 125 | 117 | 17 | 83 |
Join MC at one edge of the marked Front section.
Row 1: Ch 2, dc across all 75 (85, 95, 105, 115, 125) front sts. Turn.
Rows 2-5: Ch 2, dc2tog over first 2 sts, dc to last 2 sts, dc2tog. Turn. After four shaping rows you have 67 (77, 87, 97, 107, 117) sts.
Work 3-5 rows straight, trying on as needed. The top edge should reach the desired front neckline level, usually 1.5 to 2.5 inches (4 to 6 cm) below the collarbones.
Next row: Work 12 (13, 14, 15, 16, 17) dc for the first strap. Leave the center 43 (51, 59, 67, 75, 83) sts unworked. Join a second ball of MC to the final 12 (13, 14, 15, 16, 17) sts for the other strap.
Work each strap separately in dc until it reaches comfortably over the shoulder to the upper back, approximately 7 to 9 inches (18 to 23 cm). End both straps after the same number of rows. Do not fasten permanently until the daisy yoke is pinned in place.
Front Neckline Finishing
Join CA at one front strap corner. Sc evenly across the neckline and up the opposite strap edge.
For a delicate edge, work sc in next 3 sts, picot across the neckline only. Keep strap edges plain sc so they remain comfortable.
If extra support is desired, lay clear elastic thread along the wrong side of the neckline and crochet a final loose sc row over it. Do not pull the elastic tight enough to pucker.
Five-Daisy Upper-Back Yoke Assembly
Arrange five daisies in a shallow arc: one centered between the shoulder blades, one on either side, and one at each outer shoulder. The motif chain arches are connected with peach chains to create the airy lace panel.
Lay the top flat, RS up, with the back opening centered. Pin the center daisy approximately 1 to 1.5 inches (2.5 to 4 cm) below the desired upper-back line.
Pin one daisy to each side of the center motif, slightly higher by about 0.25 to 0.5 inches (0.5 to 1.25 cm). Pin the two outer daisies near the shoulder line so all five form a balanced shallow arc.
Using MC, join a chain arch of the center daisy to the nearest chain arch of the next daisy: sl st into first arch, ch 5-8 (adjust length so motifs lie flat), sl st into the neighboring arch. Repeat between all five daisies.
Add a second line of peach chain arches between motifs where needed for stability. Use shorter chains toward the outer shoulder motifs and slightly longer chains near the center.
Attach the outer daisy on each side to the corresponding shoulder strap with 2-3 secure whipstitches through the peach joining arch, not through the ivory petal tips.
Attach the lower joining arch of the second daisy from each side to the top of the corresponding back-side panel. Attach the center daisy to a short peach chain bridge between the two panels rather than sewing it to skin-side fabric.
Try on. Adjust strap length until the front neckline is level and the yoke rests flat without pulling the daisies inward. Seam or whipstitch straps permanently to the outer motifs. Weave in all structural tails securely.
Yoke adjustment tip: The chain-arch lengths are intentionally adjustable. A rigid stitch-count formula cannot fit every shoulder width. Use enough chains that each daisy remains flat and its petals do not curl under tension.
Reinforced Back Eyelets
The eyelets run down both center-back edges from just below the daisy yoke to the lower back. They should be matched in pairs so the lacing makes clean, even X-shapes.
With RS facing, join MC at the top of one center-back edge. Work sc evenly down the edge, aiming for approximately 2 sc per dc row-end over every 2 rows. Keep the edge flat.
Next pass: Sc in next 2-3 sts, ch 3, skip 2 edge sts. Repeat evenly to the lower back. End with the same number of eyelets on both sides. 7-10 eyelets per side works well for most sizes.
Return pass: Sc in each sc and work 4 sc into each ch-3 eyelet. Fasten off.
Repeat on the opposite back edge, placing every eyelet directly across from its partner.
Optional reinforcement: Work one final row of sl st along the fabric side of the eyelets, keeping the loops loose enough that the edge does not shrink.
Ivory Lace-Up Cord
With CA and your 3.0 or 3.5 mm hook, ch approximately 80 (85, 90, 95, 100, 105) inches / 203 (216, 229, 241, 254, 267) cm, or about 2.5 times the vertical length of the eyelet section.
Sl st in 2nd ch from hook and each ch across. Keep the slip stitches loose and even. Fasten off, leaving 4 inch (10 cm) tails.
Thread the cord from the top pair of eyelets. Center it so both ends are equal.
Cross the ends into the next lower pair of eyelets, alternating left-over-right and right-over-left to create symmetrical Xs. Continue to the lowest pair.
Tie a neat bow at the lower back. Trim or shorten the cord so the two free ends finish approximately 3 to 5 inches (7.5 to 12.5 cm) below the bow. Secure the cord ends with tiny knots or wrapped yarn caps if desired.
Comfort note: The lacing should hold the top close to the body, not compress the rib cage. You should be able to slide two fingers under the side panel near the lowest rib while breathing normally.
Broad Peach Shell-Scallop Hem
Work the hem after the torso and back opening fit correctly. The shells are anchored into the original foundation edge and outlined in ivory.
With RS facing and MC, join at one lower center-back corner. Work 1 sc in each foundation stitch across the full lower edge. Adjust by 1-3 stitches if necessary so the edge lies flat.
Shell row: Ch 1. Sc in next 2 sts, skip 2 sts, 7 dc in next st, skip 2 sts. Repeat across, spacing the last repeat as evenly as possible. If your stitch count does not divide perfectly, distribute the extra sc stitches near the side seams.
Outline row with CA: Join ivory at the lower back corner. Sc in each of the 7 dc of a shell. Picot in the 4th dc. Sl st in the sc anchor between shells. Repeat across. For a simpler image-matching outline, omit the picot and work plain sc over every shell.
Fasten off invisibly. Steam or wet block each shell into a broad rounded fan.
Hip Daisies and Final Finishing
Put the top on or place it on a dress form. Mark one point on each back hip, approximately 1.5 to 2.5 inches (4 to 6 cm) above the shell edging and 2 to 3 inches (5 to 7.5 cm) from the center-back edge.
Pin one miniature daisy at each mark. Sew through the golden center and petal bases only, leaving the ivory petal tips slightly raised.
Weave in every yarn tail on the wrong side for at least 1.5 inches (4 cm), changing direction once. Structural yoke and lacing-edge tails should be woven farther.
Blocking Method
Soak in cool water with a small amount of wool-safe or delicate detergent for 10-15 minutes.
Press water out gently. Do not wring. Roll in a towel.
Pin to measurements on a blocking mat. Shape daisies by hand. Do not flatten their raised petals.
Air dry away from direct heat. Cotton can lengthen when wet, so re-check body length before unpinning.
After blocking, thread the lacing again and try on. Adjust the shoulder strap joins if the front neckline tilts or the center daisy pulls upward.
Fit Adjustments and Troubleshooting
Here are solutions for common issues:
Back gap is too wide: Lengthen the ivory cord and lace more loosely, or add 1-2 sc rows to each center-back edge before the eyelets.
Back gap is too narrow: Remove one edge row or lace tighter. Do not force the two edges to touch. The open gap is part of the design.
Front neckline gapes: Shorten shoulder straps by 1-2 rows, or add hidden elastic under the neckline edging.
Armholes feel tight: Add rows before the upper split or reduce the number of armhole decreases.
Body is too loose: Add a waist-shaping decrease round/row or work a smaller size. Lacing alone should not carry all the fit.
Daisy yoke buckles: Shorten connecting chain arches. Block the motifs individually before reassembling.
Daisy yoke pulls petals flat: Lengthen chain arches or shoulder straps. The motifs should sit slightly raised, not stretched.
Hem flares too much: Use 6 dc per shell instead of 7, or place one extra sc between shells.
Care Instructions
Hand wash or machine wash cold in a mesh bag on a delicate cycle if your yarn label allows.
Reshape and dry flat. Avoid hanging the wet top. Cotton can stretch under its own weight.
Untie the lacing before washing so the eyelets are not pulled out of shape.
Store folded, with daisies lying flat and the shell hem uncompressed.
You Did It!
Thank you so much for choosing this Peach Daisy Lace-Up Top crochet pattern for your next project. I really hope you love making it as much as I loved designing it. That moment when you first lace up the back and see it all come together? Pure magic.
If you make this top, I would absolutely love to see it! Tag me on Instagram or share a photo in my Facebook group. Seeing your creations is honestly the best part of my day.
And hey, if you want to come back to this pattern later, go ahead and save it to your Pinterest boards so it’s easy to find when you’re ready to start. I’d also love to hear from you in the comments below. Let me know if you have any questions, or just drop a note when you finish yours. Happy crocheting!
Want a Quick & Easy Printable Version?
Get a clean, beautifully formatted PDF of this pattern — easy to follow step by step, ready to print or save on any device. No scrolling, no distractions, just the pattern.
Get the Printable PDF →