
This one is STUNNING, and I am so excited to share it with you! If you have been dreaming of a show-stopping summer top that looks way harder than it actually is, this luna moth design is about to become your new favorite project.
Get the Ad-Free PDF Pattern
You can find the free pattern below, or you can purchase the ad-free printable PDF from my shop.
Get the Printable PDF →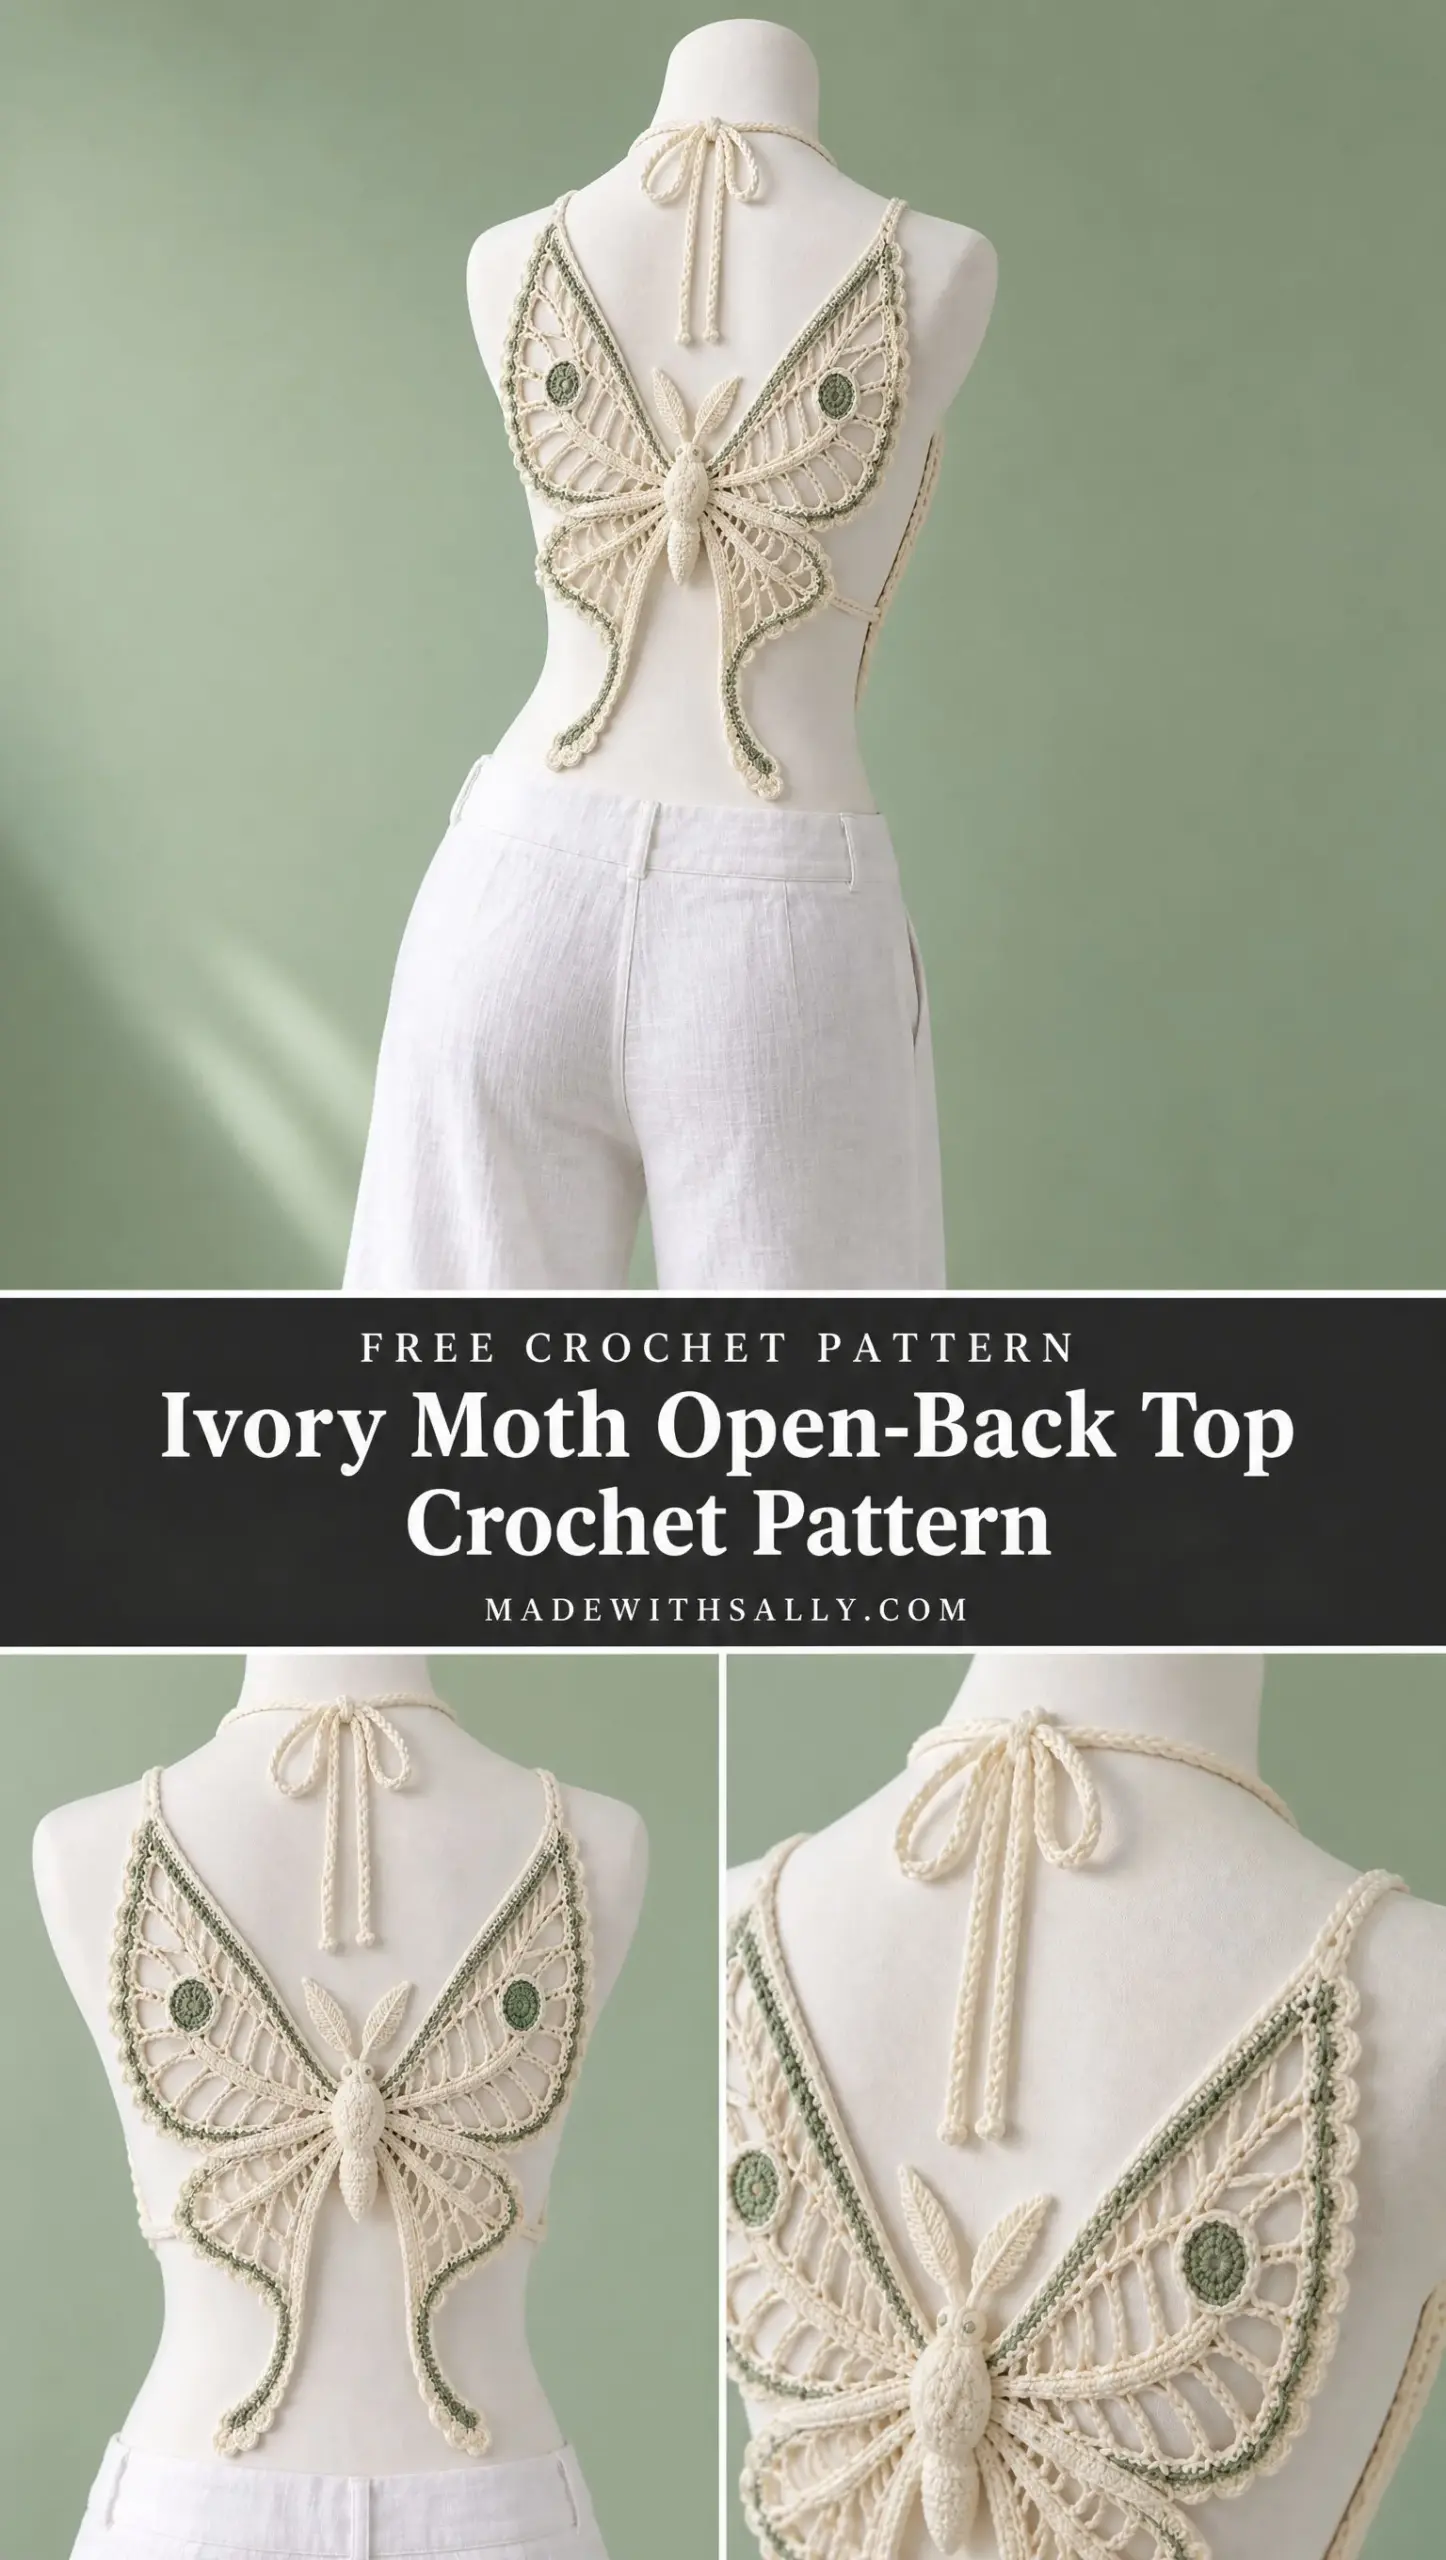
The intricate lace wings, the sculptural thorax, those elegant trailing tails. It looks like something straight out of a high-end boutique. But here is the thing: once you break it down into individual pieces, this top is completely achievable for intermediate crocheters who are ready for a beautiful challenge.
Whether you are making this for yourself or as an unforgettable gift, the Ivory Moth Open-Back Top will turn heads every single time you wear it. Let me walk you through everything you need to know to bring this gorgeous design to life.
About This Luna Moth Crochet Top
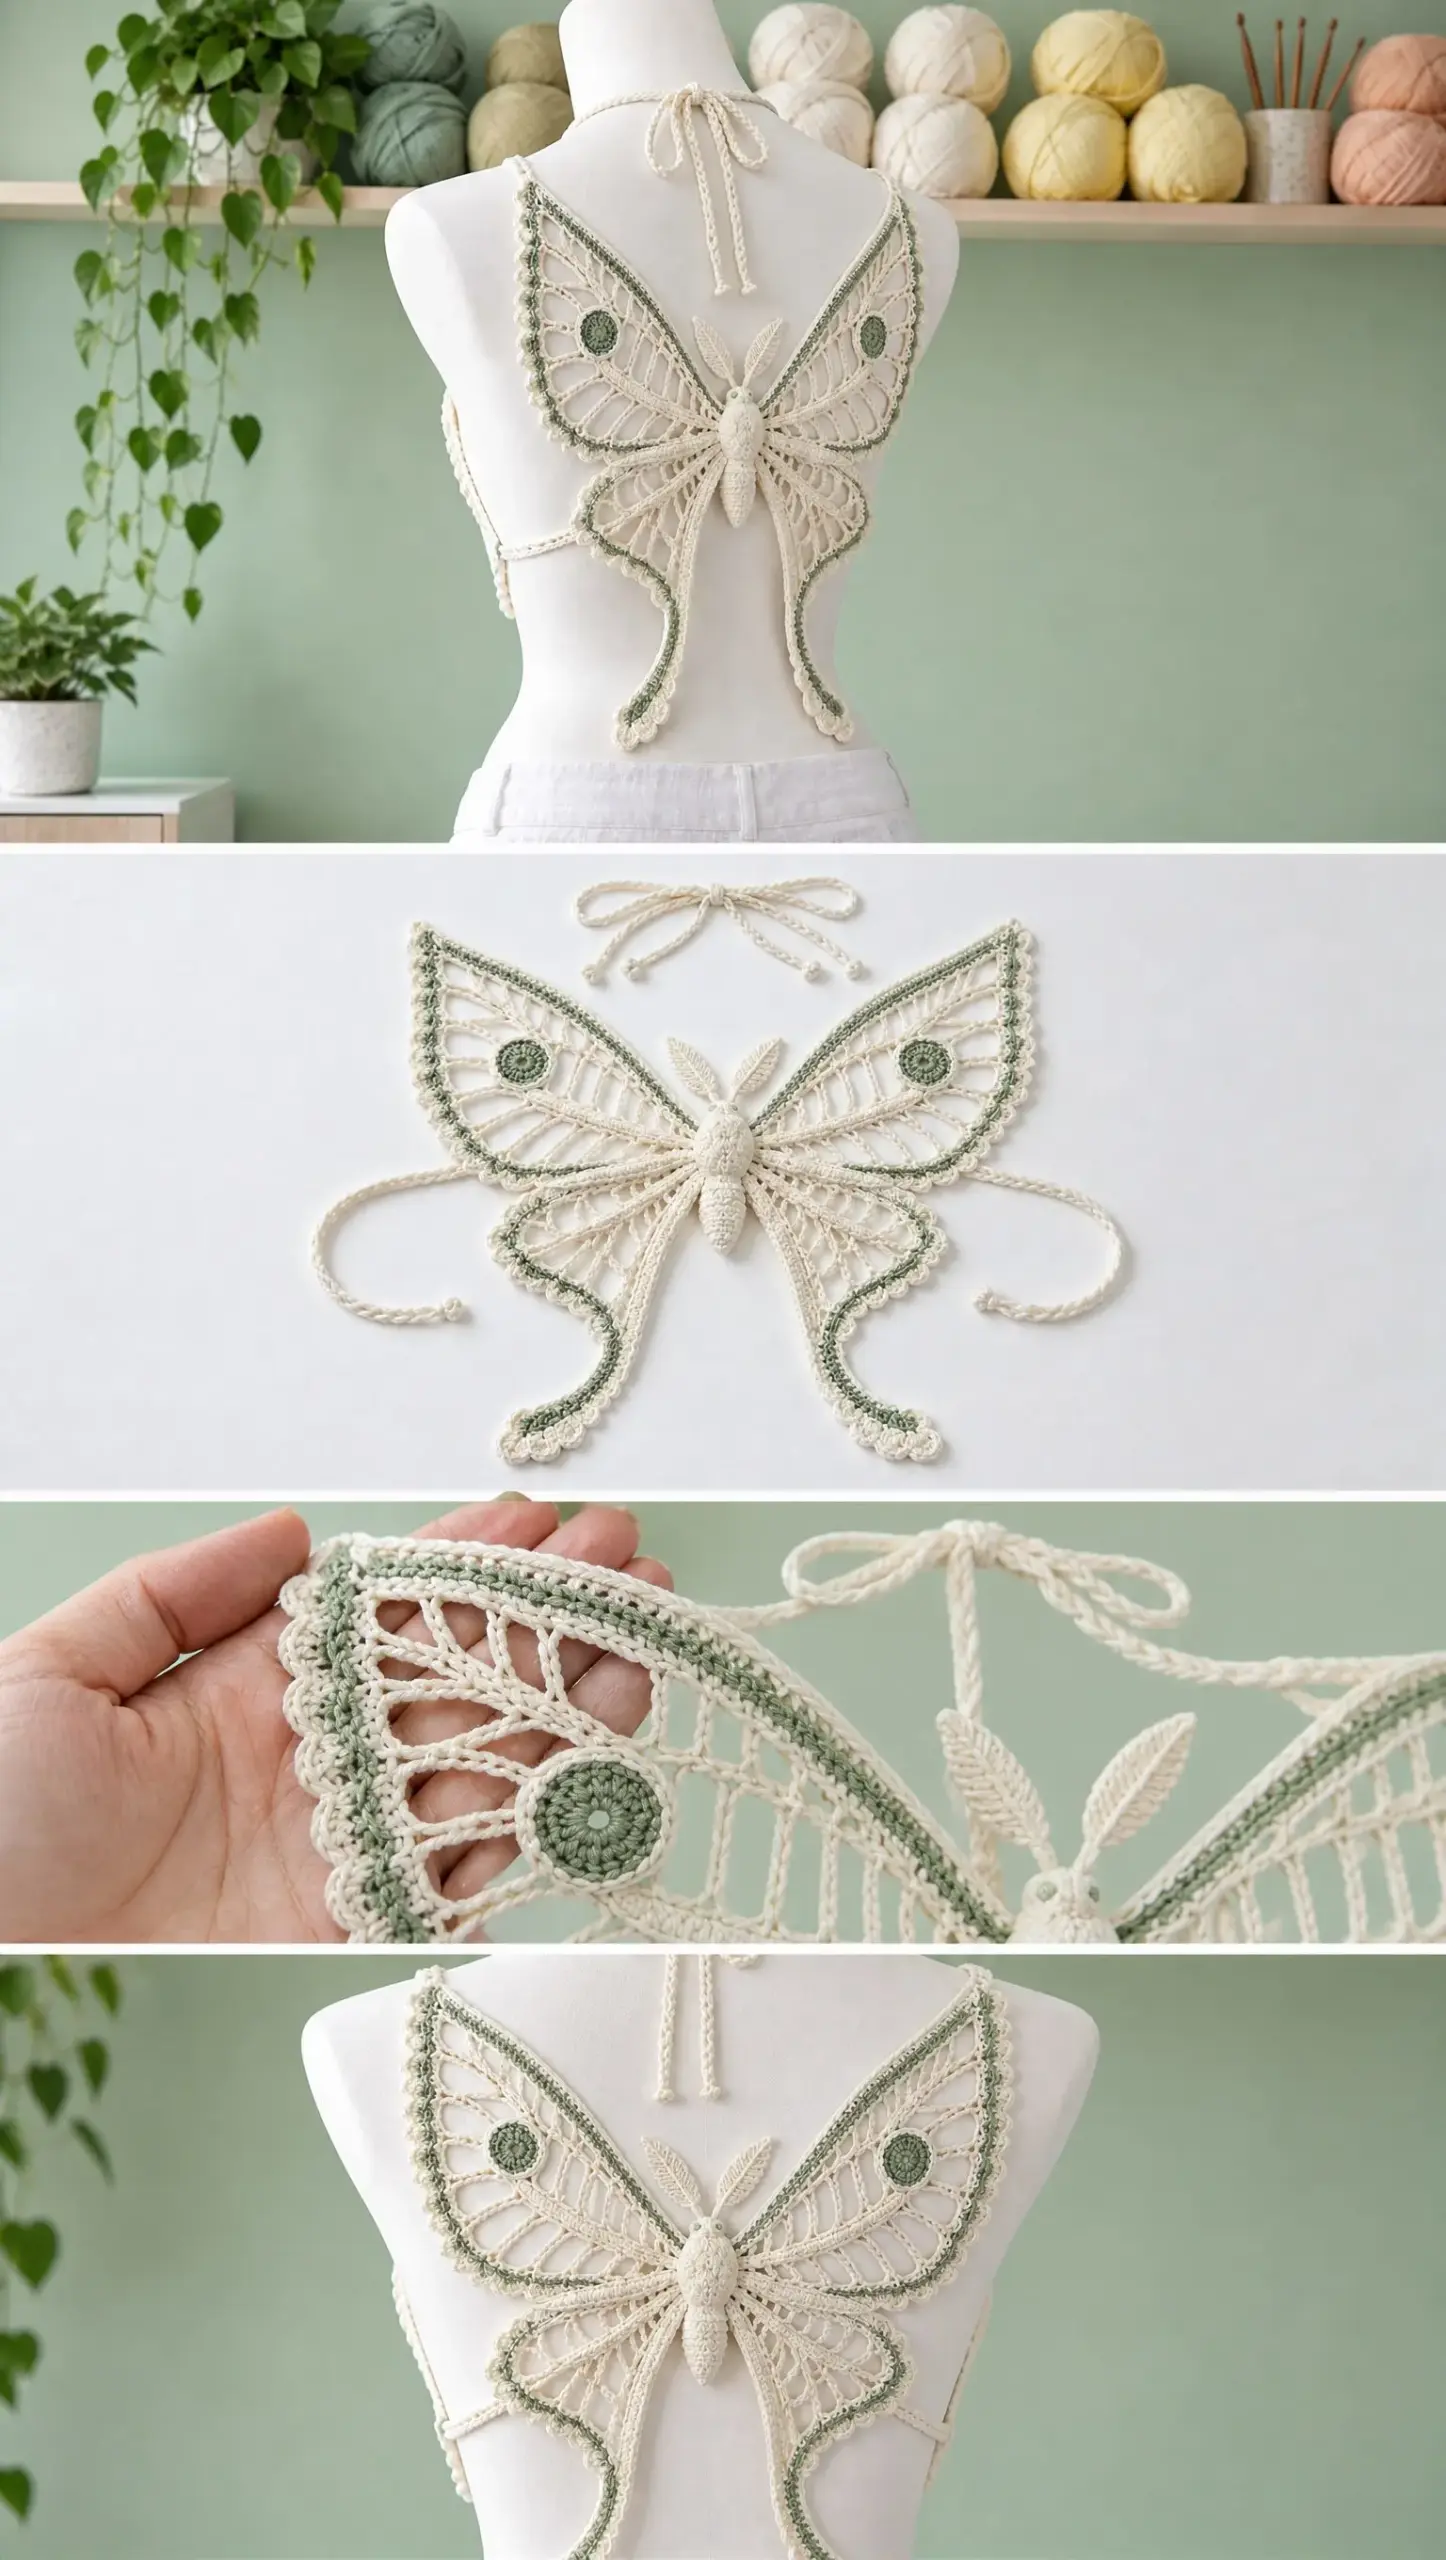
This top is built around one large openwork luna moth motif that spans your entire upper back. The upper wings rise toward your shoulders while the lower wings flare outward and taper into those beautiful long curved tails that make luna moths so distinctive.
A dense central thorax (that is the moth’s body section) anchors the entire motif. Separate ivory side panels wrap around your ribcage and connect to the wing edges for coverage and structure. Simple ties at the neck create an adjustable halter closure.
The pale sage surface edging and two small oval eyespots sharpen the moth silhouette and add that perfect touch of contrast. The result is a wearable work of art that drapes beautifully against your body.
Skill Level
This pattern is rated intermediate to advanced. You should be comfortable with basic crochet stitches, working in the round, and following multi-step construction. If you have made a few garments before and feel confident reading patterns, you are ready for this project.
Do not let the "advanced" label scare you off though! The construction is modular, meaning you work each piece separately before joining them together. This makes it much more manageable than trying to work the entire motif in one go.
Materials You Will Need
Gathering your supplies before you start makes the whole process smoother. Here is everything the pattern calls for:
Main Yarn: Fine mercerized cotton in sport or light DK weight. You will need approximately 250 to 430 yards (230 to 395 meters) depending on your size. The color is ivory.
Contrast Yarn: Same weight cotton in pale sage. You only need 30 to 55 yards (27 to 50 meters) for the edging and eyespots.
Hook: 3.0 mm for the lace sections. You may want a 2.75 mm to 3.0 mm hook for the denser side panels if needed.
Notions: 6 locking stitch markers, tapestry needle, scissors, rustproof pins, blocking mat, and measuring tape.
Optional: Clear elastic thread or narrow cotton tape for reinforcing the side band joins.
Gauge Information
Getting your gauge right matters for fit. Here are the numbers to aim for:
Dense fabric: 20 half double crochet (hdc) x 15 rows = 4 inches / 10 cm after blocking.
Openwork: One 5-dc fan plus adjacent chain space = approximately 1.5 inches / 3.8 cm wide.
The exact openwork row gauge is less critical than matching the blocking dimensions. Use a hook that creates firm, tidy stitches without making the lace stiff. Your finished motif should hold its outline after wet blocking but still drape nicely against your body.
Size Chart and Finished Measurements
This pattern is size-inclusive with six size options. Choose a size with 0 to 2 inches (0 to 5 cm) of negative ease for the best fit.
XS: Bust 30-32 inches, Side panel width 4.5 inches, Moth span 15 inches, Top length 12.5 inches
S: Bust 33-35 inches, Side panel width 5.0 inches, Moth span 16 inches, Top length 13 inches
M: Bust 36-38 inches, Side panel width 5.5 inches, Moth span 17 inches, Top length 13.5 inches
L: Bust 39-42 inches, Side panel width 6.25 inches, Moth span 18.5 inches, Top length 14 inches
XL: Bust 43-46 inches, Side panel width 7.0 inches, Moth span 20 inches, Top length 14.5 inches
2XL: Bust 47-50 inches, Side panel width 7.75 inches, Moth span 21.5 inches, Top length 15 inches
For fuller busts, keep the moth span based on your back width and add width to the side panels instead of enlarging the central motif. This keeps the moth looking proportional.
Abbreviations and Special Stitches
Let me break down all the abbreviations you will encounter:
beg = beginning
ch = chain
ch-sp = chain space
dc = double crochet (yarn over, insert hook, pull up loop, yarn over and pull through 2 loops twice)
hdc = half double crochet (yarn over, insert hook, pull up loop, yarn over and pull through all 3 loops)
sc = single crochet (insert hook, pull up loop, yarn over and pull through both loops)
sl st = slip stitch
st(s) = stitch(es)
tr = treble crochet
dtr = double treble crochet
RS = right side
WS = wrong side
rep = repeat
sk = skip
inc = increase
Special Stitches:
Fan = 5 dc in indicated space
Small fan = 3 dc in indicated space
Picot = ch 3, sl st in first ch
Long-loop = ch 7-11 as specified, anchored with sc
Construction Overview
Before you dive into the stitching, it helps to understand how all the pieces fit together. Here is what you will make:
| Piece | Quantity | Purpose |
|---|---|---|
| Central thorax + abdomen | 1 | Dense backbone and anchor for all four wings |
| Upper wings | 2 mirrored | Shoulder-spanning lace with sage eyespot |
| Lower wings + tails | 2 mirrored | Waist flare and long luna moth tails |
| Side panels | 2 | Dense coverage wrapping toward the front |
| Neck ties | 2 | Adjustable halter closure |
| Side bands | 2-4 | Join side panels to moth edge |
| Antennae | 2 | Decorative finishing detail |
Pro tip: Before beginning, trace a simple paper template of your intended moth silhouette at the finished span for your size. Divide the template vertically so both sides stay symmetrical. Pin your pieces to this template during blocking for perfect results.
Step-by-Step Pattern Instructions
Central Thorax and Abdomen
This dense section forms the backbone of your moth and anchors all four wings.
Row 1: With ivory, ch 9. Hdc in 2nd ch from hook and across. (8 hdc)
Rows 2-4: Ch 1, turn. Hdc across. On Row 4, place a marker at each side for upper wing attachment.
Rows 5-8: Ch 1, turn. Hdc2tog at both ends every other row until 4 sts remain. This narrows the upper thorax.
Rows 9-12: Increase back to 6 sts by working 2 hdc in first and last st on Rows 9 and 11. Place markers at both sides of Row 11 for lower wing attachment.
Rows 13-20: Continue in hdc, decreasing 1 st at one end every 2 rows until 3 sts remain. This forms the tapered abdomen.
Row 21: Hdc3tog. Fasten off. Block to approximately 5.5 to 7 inches long depending on your size.
Body edging: Join ivory at top edge. Sc evenly around, working 2 sc in lower tip. Fasten off.
Size note: For XL to 2XL, add 2 to 4 straight hdc rows through the middle of the thorax before beginning the abdomen taper.
Upper Wings (Make 2 Mirrored)
Each upper wing is worked outward from the thorax in widening openwork rows. Make the left wing first. For the right wing, reverse all edge placements so the outer scalloped edge mirrors the first.
Foundation: Join ivory at the upper side marker of the thorax. Ch 7, sc into the next side stitch/row-end down the thorax; ch 9, sc 1 row lower; ch 11, sc 1 row lower. Turn. These three long loops become the main ribs.
Row 1: Work into the three loops: (small fan in first loop, ch 3), (fan in second loop, ch 4), (fan in third loop). End with sc at lower attachment point.
Row 2: Ch 5, turn. In each fan center work (dc, ch 2, dc); ch 4 between fan centers. At outer edge add ch 5 before turning back toward thorax.
Row 3: Work a fan into each ch-2 space. Between fans make ch 3, sc around the ch-4 bridge, ch 3. At outer edge work 7 dc in the outer ch-5 space.
Rows 4-6: Continue the same logic, increasing one open chain window at the outer edge on each row. Keep the thorax edge stable and allow all extra width to grow toward the shoulder.
Row 7 (upper arc): Across the outer half only, alternate [tr, ch 2] and [dtr, ch 3] into successive spaces, then return to tr and dc toward the thorax. This creates the high rounded shoulder arc.
Rows 8-9: Fill the tall-stitch ribs with fans and open ch-3/ch-4 windows. Stop when the wing reaches the target half-span from the center back.
Final ivory edge: Sc along the outer wing curve, then work [sc, ch 3, sc] in every second or third space for soft scallops. Do not edge the thorax join yet.
Pale Sage Wing Outline
With RS facing, surface sl st or crochet a narrow line just inside the outer ivory scallop. Keep the sage line flat and relaxed. If it draws in, use a hook 0.25 to 0.5 mm larger.
Oval Eyespot (Make 2)
These little details really make the moth come alive.
Rnd 1: With sage, ch 6. Sc in 2nd ch, hdc in next, dc in next 2, 5 dc in last ch; working along opposite side of foundation ch: dc in next 2, hdc in next, sc in last; join.
Rnd 2: Ch 1. Sc around, working 2 sc in each of the three end stitches at both ends to maintain an oval. Join and fasten off.
Attach: Sew one eyespot inside each upper wing approximately one-third of the way in from the outer edge. Tack through multiple points without closing the open chain windows.
Lower Wings and Luna Tails (Make 2 Mirrored)
Foundation: Join ivory at the lower wing marker beside the thorax. Ch 9, sc 1 row lower; ch 11, sc 1 row lower; ch 13, sc near the start of the abdomen. Turn.
Row 1: Small fan in first loop, ch 4, fan in second loop, ch 4, 7 dc in third loop.
Row 2: Ch 5, turn. Work (dc, ch 2, dc) in each fan center. Across the outermost 7-dc group work [dc, ch 2] in every other dc to create extra spread.
Rows 3-5: Alternate fan rows and rib rows as for upper wings. Increase only along the lower outside edge so the wing sweeps outward while remaining attached cleanly to the thorax.
Tail setup: At the lowest outside point, ch 18 (20, 22, 24, 26, 28) for XS (S, M, L, XL, 2XL). Turn and sl st in first 4 ch, sc in next 4, hdc in next 4, dc in remaining ch. Join back into the wing edge.
Tail shaping row: Work down the tail with sc along the inside curve, 3 sc in the tip, then hdc/dc along the outer side. Add one ch-3 picot near the tip if desired.
Wing finishing: Sc around the lower wing and tail. Along the broad wing edge, work soft ivory scallops [sc, ch 3, sc] every 2-3 spaces. Keep the long tail edge simpler so it stays narrow.
Sage outline: Surface sl st just inside the outer edge, continuing down both sides of the tail. Ease the contrast yarn through the curve without tightening.
Blocking target: Each lower wing should curve out from the center, then turn gently inward at the tail. Pin the final 2-3 inches of each tail into a shallow crescent rather than a straight line.
Side Panels (Make 2)
The side panels provide coverage and fit. Work them in dense hdc from the underarm downward.
Foundation: Ch enough stitches to equal the side panel width for your size at 20 sts = 4 in / 10 cm. Approximate starting counts: XS 23, S 25, M 28, L 32, XL 35, 2XL 39. Add 1 turning ch.
Rows 1-4: Hdc across. Ch 1 and turn each row.
Waist shaping: Decrease 1 st at the back edge every 4th row, 2-4 times depending on size. Continue straight until panel reaches 8.5 (9, 9.5, 10, 10.5, 11) inches tall.
Upper shaping: Over the final 2 inches, decrease 1 st at the back edge every other row to angle the panel toward the lower part of the upper wing.
Edging: Sc around all four sides. Along the back edge, place a ch-2 loop every 0.75-1 inch for later joining. Fasten off.
Side Bands and Assembly
Block first. Wet block the thorax, four wings, side panels, and eyespots before assembly. Pin the moth to your paper template so the two sides match.
Join upper wings: With ivory and RS facing, whipstitch or slip-stitch the inner edges of both upper wings to the marked thorax section. Keep the attachment flexible.
Join lower wings: Attach the lower wings to the lower thorax/upper abdomen markers. The top of each lower wing should nest just beneath the upper wing without a gap.
Attach side panels: Position each panel so the top back corner sits near the base of the upper wing and the lower back corner meets the outside of the lower wing. Lace or crochet between the panel loops and wing edge using ch-2 to ch-4 bridges. Try on frequently.
Reinforce: Where the side panel meets the wing, work a second pass of sl sts or hand-sewn cotton stitches through the connection points. This prevents the lace from stretching under tension.
Check symmetry: Lay the top flat and compare the two sides from center back to each underarm. Adjust one or two bridge lengths if needed before weaving in ends.
Neck Ties
Tie 1: Join ivory at the top outer corner of the left upper wing. Ch 75-95 depending on preferred tie length. Sl st back along the chain for a firm cord. Fasten off.
Tie 2: Repeat on the right upper wing.
Optional softer cord: Instead of slip-stitch cord, make a 2-stitch Romanian cord to the desired length.
Finish: Steam or wet block the ties straight, then tie behind the neck in a bow. The upper wing tips should sit flat rather than pulling upward.
Antennae
Base: Join ivory at the top center of the thorax. Ch 11.
Feathering: Working back toward the body, repeat: sl st in next ch, ch 3, sl st in same ch, then sl st in next ch. Make the feather branches on only one side of the chain.
Second antenna: Repeat from the adjacent thorax stitch, angling outward in the opposite direction.
Shape: Lightly block each antenna into a shallow curve. For a very crisp shape, sew the antenna to the upper wing at one discreet point near its base only.
Front and Underarm Finishing
The photographed garment focuses on the back motif, so you can customize the front. The easiest matching front is a simple dense crop panel: work a rectangle or shallow V in hdc to your bust measurement, then seam or crochet it to the front edges of the two side panels.
For a halter-style front, decrease toward the neckline over the final 3-4 inches and continue the neck ties from the upper corners.
Design tip: If you want the back to remain the focal point, keep the front plain and use the same ivory yarn without sage embellishment.
Final Border and Blocking
Perimeter border: With ivory, sc evenly around any exposed garment edges. Work 2 sc in convex corners and sc2tog in tight concave corners.
Scallops: Along selected wing arcs only, add [sc, ch 3, sc] every 2-3 spaces. Avoid heavy scalloping on side panels and tail tips.
Sage detail: Add a single fine sage surface line inside the upper and lower wing borders if not already completed.
Wash: Soak in cool water with a small amount of wool/cotton wash for 10-15 minutes. Do not wring.
Block: Roll in a towel, then pin to final measurements. Shape both wings simultaneously, matching every major rib and scallop from side to side.
Dry: Allow to dry completely before unpinning. Re-block after laundering whenever the wing tails lose their curve.
Fit Adjustment Guide
Here are solutions for common fitting issues:
Wing span too narrow: Add one openwork repeat to the outside edge of each upper wing before the final border.
Wing span too wide: Omit the final increase row or shorten the outer tall-stitch arc.
Back gapes at side panel: Shorten the joining bridges by 1-2 chains or move the panel connection one space inward.
Moth pulls upward: Lengthen neck ties or lower the top wing attachment point slightly.
Tails curl excessively: Re-block flatter and use a lighter sage edging tension.
Tails droop: Use a slightly smaller hook on the final tail edging or add clear elastic thread invisibly along the inner curve.
Need more bust room: Add width at side/front panels; preserve the moth dimensions so the motif does not distort.
Assembly Checklist
Use this checklist to make sure you have completed every step:
Care Instructions
Hand wash or use a delicate cycle in a mesh bag with cool water. Reshape while damp and dry flat. Avoid hanging the wet garment, because the moth tails and openwork may lengthen under their own weight. Store folded.
Final Pattern Notes
This design is intentionally modular. The exact number of openwork repeats can be adjusted as long as the left and right sides remain mirrored and the blocked dimensions are respected. Always fit the garment before adding the final edging, because edging can reduce stretch slightly.
For best visual balance, keep the upper wings broad, the lower wings slightly smaller, and the tails narrow. The dense thorax should remain centered on the spine.
Thank you so much for choosing this pattern! I cannot wait to see your finished luna moth top. If you make one, please save this pattern to your Pinterest boards so you can find it again easily. And I would absolutely love to see your creations, so drop a comment below or tag me on Instagram when you finish yours. Happy crocheting!
Want a Quick & Easy Printable Version?
Get a clean, beautifully formatted PDF of this pattern — easy to follow step by step, ready to print or save on any device. No scrolling, no distractions, just the pattern.
Get the Printable PDF →