
Let me guess. You saw this stunning fitted dress with those incredible 3D flowers cascading down the shoulder and thought, "There is absolutely no way I could make that." I get it. I really do.
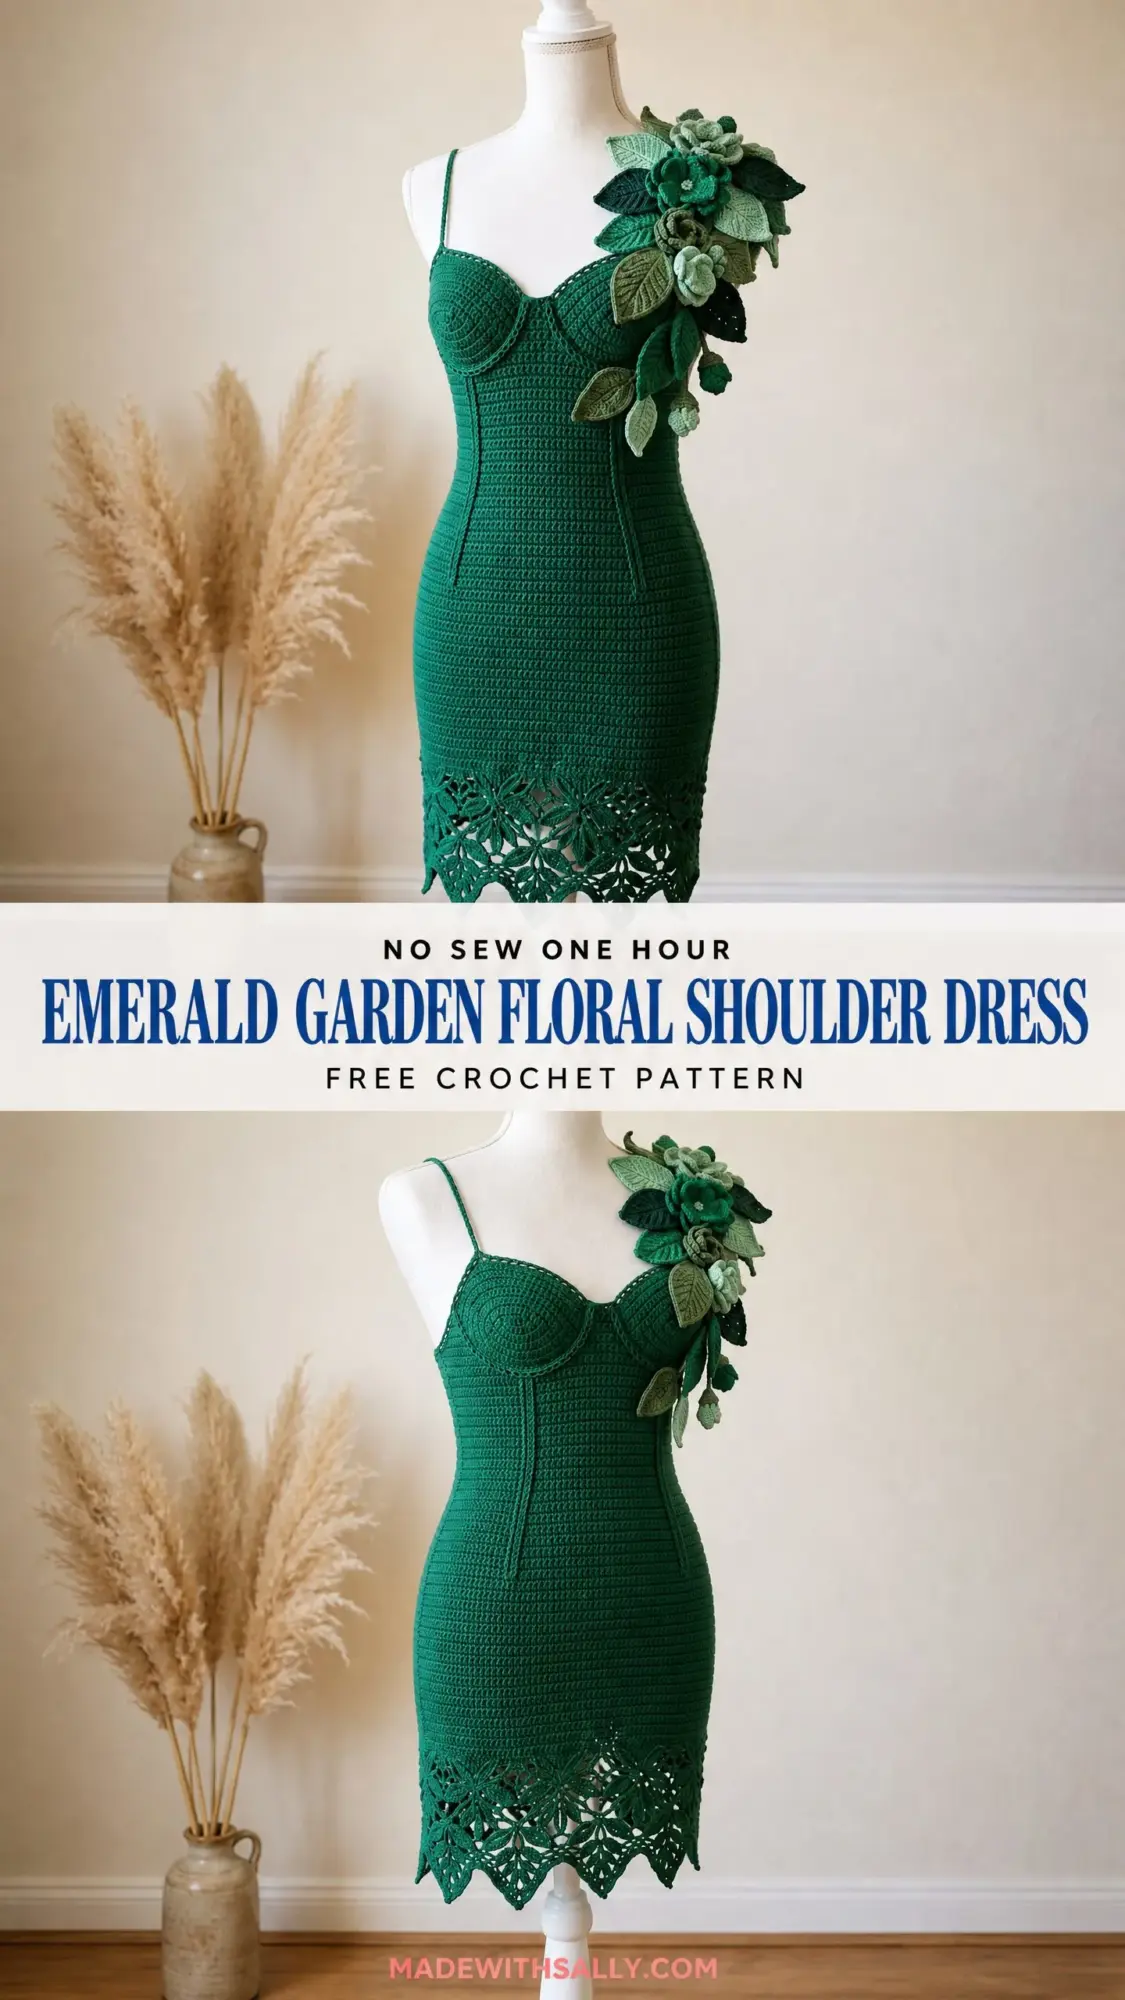
But here is the truth. This dress looks wildly complicated, and yes, it is an advanced project. However, every single element breaks down into techniques you probably already know. Single crochet? You have done that a thousand times. Working in the round? Easy. Making flowers and leaves? Just small motifs you can practice separately before committing to the full dress.
The secret is that this Emerald Garden Floral Shoulder Dress is not one impossible garment. It is a collection of manageable pieces that come together into something absolutely show-stopping. If you can follow instructions carefully and you are ready to level up your skills, this crochet pattern will walk you through every single step.
Why This Dress Works
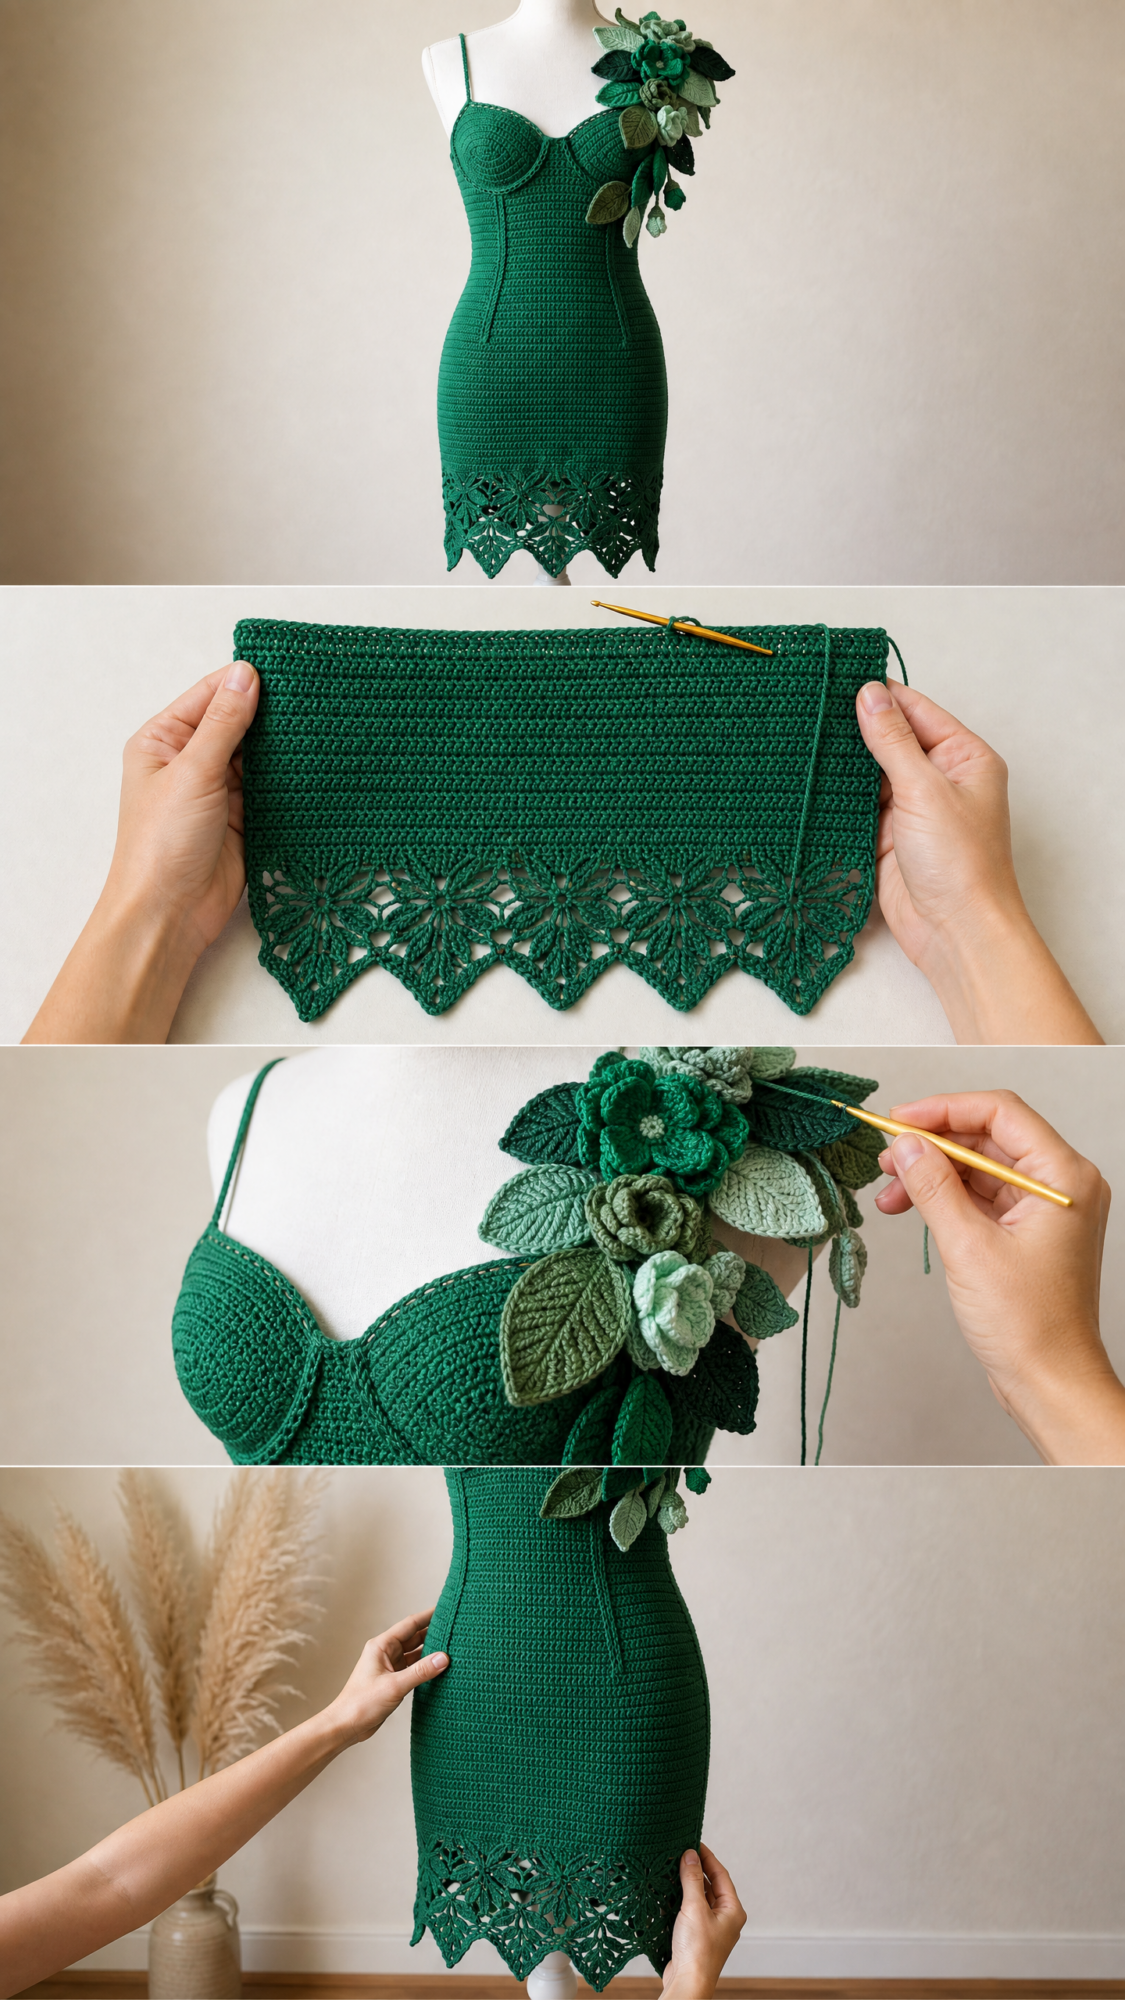
This form-fitting mini dress creates its structured, body-conscious silhouette through tight single crochet (sc) fabric. The dense stitch pattern holds its shape without stretching out, which is exactly what you need for a fitted garment. The bodice features integrated bust cups shaped with increases and short rows, thin spaghetti straps, and a sweetheart neckline that flatters beautifully.
The real showstopper is that floral corsage on the left shoulder. Full roses, small bud flowers, textured leaves in varying green tones, and delicate details all come together into a botanical arrangement that transforms this from a simple dress into wearable art. The best part? The corsage is assembled separately and can be pinned or stitched on, so you have complete control over placement.
The hem features a pointed lace border with picot tips that echo the leaf shapes in the shoulder arrangement. Everything ties together visually while each component remains totally achievable on its own.
Skill Level and Time Investment
I will be honest with you. This is an advanced project. You need comfort with short-row shaping, working tight single crochet in the round, constructing freeform 3D botanical elements, and precise seaming. If any of those terms feel unfamiliar, I recommend practicing on smaller projects first.
That said, nothing here is technically impossible for an ambitious intermediate crocheter willing to learn. Each component is straightforward in isolation. The challenge comes from combining everything with precision and attention to fit.
Time estimate: Approximately 60 to 90 hours for a size Small/Medium, including all corsage elements and finishing. This is not a weekend project. This is a labor of love that will give you an absolutely incredible finished piece.
Materials You Will Need
Main Color Yarn (MC):
Approximately 1,400 yards (1,280 meters) of DK weight yarn in deep emerald green for size S. Adjust yardage based on your size:
Choose 100% cotton or a cotton blend for structure and stitch definition. Avoid acrylic or stretchy blends because the fitted silhouette depends on stable, non-stretching fabric.
Corsage Yarns:
Hooks:
Notions:
Yarn Suggestions
Option 1: Lion Brand 24/7 Cotton in Evergreen
DK weight, 100% cotton, 186 yards per 3.5 oz skein. Excellent stitch definition and shape retention. Requires approximately 8 skeins for size S.
Option 2: Paintbox Yarns Cotton DK in Grass Green
DK weight, 100% cotton, 273 yards per 3.5 oz skein. More economical with higher yardage. Slightly softer hand. Requires approximately 6 skeins for size S.
Option 3: We Are Knitters Pima Cotton in Emerald
DK weight, 100% pima cotton, 218 yards per 3.5 oz skein. Premium drape and sheen perfect for evening wear. Requires approximately 7 skeins for size S.
Gauge
22 sc x 26 rows = 4 inches / 10 cm worked flat in single crochet with MC and E-4 / 3.5 mm hook, after wet blocking.
Gauge swatch instructions: Chain 28. Row 1: Sc in second chain from hook and in each chain across. (27 sc) Rows 2 through 28: Chain 1, turn, sc in each stitch across. (27 sc) Fasten off. Wet block your swatch and measure only the center 4 inches, avoiding edges.
This gauge is non-negotiable for a fitted garment. Even half a stitch per inch difference will significantly alter your finished measurements. Adjust hook size as needed and do not proceed without matching gauge.
Finished Measurements
| Size | Bust | Waist | Hip | Length |
|---|---|---|---|---|
| XS | 32 in / 81 cm | 24 in / 61 cm | 34 in / 86 cm | 33 in / 84 cm |
| S | 34 in / 86 cm | 26 in / 66 cm | 36 in / 91 cm | 33.5 in / 85 cm |
| M | 36 in / 91 cm | 28 in / 71 cm | 38 in / 97 cm | 34 in / 86 cm |
| L | 38 in / 97 cm | 30 in / 76 cm | 40 in / 102 cm | 34.5 in / 88 cm |
| XL | 40 in / 102 cm | 32 in / 81 cm | 42 in / 107 cm | 35 in / 89 cm |
Pattern is written for size S with changes for XS, M, L, XL in parentheses throughout, in that order.
Abbreviations
Special Stitches
Picot: Chain 3, slip stitch in first chain made. This creates a small decorative knot at the tip of lace points.
Shell: Work (dc, ch 1, dc, ch 1, dc) all in the same stitch or space. This creates a fan of 5 stitches plus 2 chain spaces.
V-stitch (V-st): Work (dc, ch 2, dc) in the same stitch or space.
Sc2tog: Insert hook in next stitch, yarn over, pull up loop (2 loops on hook). Insert hook in following stitch, yarn over, pull up loop (3 loops on hook). Yarn over, draw through all 3 loops. One decrease made.
Puff stitch: Yarn over, insert hook in stitch, yarn over, pull up loop to height of half double crochet. Repeat from yarn over and insert 2 more times in the same stitch (7 loops on hook). Yarn over, draw through all 7 loops, chain 1 to close. Used in corsage rose petals.
Reverse sc (crab stitch): Working from left to right (for right-handers), insert hook in next stitch to the right, yarn over, pull up loop, yarn over, draw through 2 loops. Creates a firm decorative edging.
Pattern Instructions
Section 1: Front Bust Cups (Make 2)
The cups are worked flat, then attached to the front panel.
Foundation: Make a magic ring (MR).
Round 1: Ch 1, 6 sc in ring, pull tail to close. (6 sc)
Round 2: Ch 1, 2 sc in each st around. (12 sc)
Round 3: Ch 1, (sc in next st, 2 sc in next st) 6 times. (18 sc)
Round 4: Ch 1, (sc in next 2 sts, 2 sc in next st) 6 times. (24 sc)
Round 5: Ch 1, (sc in next 3 sts, 2 sc in next st) 6 times. (30 sc)
Round 6: Ch 1, (sc in next 4 sts, 2 sc in next st) 6 times. (36 sc)
For size XS: Stop here. Cup circumference equals approximately 6.5 inches / 16.5 cm. (36 sc)
For size S: Work Round 7. (42 sc)
For size M: Work Rounds 7 and 8. (48 sc)
For size L: Work Rounds 7, 8, and 9. (54 sc)
For size XL: Work Rounds 7, 8, 9, and 10. (60 sc)
Round 7: Ch 1, (sc in next 5 sts, 2 sc in next st) 6 times. (42 sc)
Round 8: Ch 1, (sc in next 6 sts, 2 sc in next st) 6 times. (48 sc)
Round 9: Ch 1, (sc in next 7 sts, 2 sc in next st) 6 times. (54 sc)
Round 10: Ch 1, (sc in next 8 sts, 2 sc in next st) 6 times. (60 sc)
After completing the final round for your size, do not join. Work back and forth across the TOP half of the cup only for short-row shaping:
Short row 1 (RS): Ch 1, sc in next 18 (21, 24, 27, 30) sts, turn.
Short row 2 (WS): Ch 1, sc in next 18 (21, 24, 27, 30) sts, turn.
Short row 3 (RS): Ch 1, sc2tog, sc to last 2 sts, sc2tog, turn. (16, 19, 22, 25, 28 sts)
Short row 4 (WS): Ch 1, sc in each st across, turn. (16, 19, 22, 25, 28 sts)
Short row 5 (RS): Ch 1, sc2tog, sc to last 2 sts, sc2tog, turn. (14, 17, 20, 23, 26 sts)
Short row 6 (WS): Ch 1, sc in each st across. Fasten off, leave long tail for seaming. (14, 17, 20, 23, 26 sts)
Checkpoint: Each cup, when measured across its widest point, should be approximately 6.5 (7, 7.5, 8, 8.5) inches / 16.5 (18, 19, 20, 21.5) cm in diameter before short-row shaping.
Section 2: Front Panel
The front panel is worked flat from the top of the sweetheart neckline down to the waist. Two halves are worked separately then joined.
Right Half of Sweetheart (as worn):
Foundation chain: Ch 22 (24, 26, 28, 30).
Row 1 (RS): Sc in 2nd ch from hook and in each ch across. (21, 23, 25, 27, 29 sc)
Row 2 (WS): Ch 1, turn, sc in each st across. (21, 23, 25, 27, 29 sc)
Row 3: Ch 1, turn, sc2tog at center neckline edge (beginning of row), sc to end. (20, 22, 24, 26, 28 sc)
Row 4: Ch 1, turn, sc to last 2 sts, sc2tog. (19, 21, 23, 25, 27 sc)
Row 5: Ch 1, turn, sc2tog, sc to end. (18, 20, 22, 24, 26 sc)
Row 6: Ch 1, turn, sc to end. (18, 20, 22, 24, 26 sc)
Row 7: Ch 1, turn, sc2tog, sc to end. (17, 19, 21, 23, 25 sc)
Row 8: Ch 1, turn, sc to end. (17, 19, 21, 23, 25 sc)
Rows 9 and 10: Repeat Rows 7 and 8. (16, 18, 20, 22, 24 sc after Row 9)
Rows 11 and 12: Repeat Rows 7 and 8. (15, 17, 19, 21, 23 sc after Row 11)
Fasten off. Right half neckline shaping complete.
Left Half of Sweetheart (as worn):
Foundation chain: Ch 22 (24, 26, 28, 30).
Row 1 (RS): Sc in 2nd ch from hook and in each ch across. (21, 23, 25, 27, 29 sc)
Row 2 (WS): Ch 1, turn, sc2tog at center neckline edge (end of row). (20, 22, 24, 26, 28 sc)
Row 3: Ch 1, turn, sc to last 2 sts, sc2tog. (19, 21, 23, 25, 27 sc)
Row 4: Ch 1, turn, sc2tog, sc to end. (18, 20, 22, 24, 26 sc)
Row 5: Ch 1, turn, sc to end. (18, 20, 22, 24, 26 sc)
Row 6: Ch 1, turn, sc to last 2 sts, sc2tog. (17, 19, 21, 23, 25 sc)
Row 7: Ch 1, turn, sc to end. (17, 19, 21, 23, 25 sc)
Rows 8 and 9: Repeat Rows 6 and 7. (16, 18, 20, 22, 24 sc after Row 8)
Rows 10 and 11: Repeat Rows 6 and 7. (15, 17, 19, 21, 23 sc after Row 10)
Row 12: Ch 1, turn, sc to end. (15, 17, 19, 21, 23 sc)
Do not fasten off.
Join Halves:
With WS facing, hold right and left halves together at center front. Join working yarn to the outer edge of the right half on Row 12. Work across right half (15, 17, 19, 21, 23 sc), then directly continue across left half (15, 17, 19, 21, 23 sc). (30, 34, 38, 42, 46 sc)
This is now Row 13 of the front panel.
Front Panel Body:
Row 14: Ch 1, turn, sc in each st across. (30, 34, 38, 42, 46 sc)
Row 15: Ch 1, turn, sc in next 6 (8, 10, 12, 14) sts, place the first bust cup RS up against the WS of the fabric. Working through both the panel and the top edge of the cup simultaneously, sc in next 14 sts joining cup. Sc in remaining sts across. (30, 34, 38, 42, 46 sc total, cup attached)
Attach the second cup on the mirror side in the same manner. Both cups should sit symmetrically about the center of the front panel.
Rows 16 through 20: Ch 1, turn, sc in each st across. (30, 34, 38, 42, 46 sc each row)
Row 21: Ch 1, turn, sc2tog, sc to last 2 sts, sc2tog. (28, 32, 36, 40, 44 sc)
Rows 22 and 23: Ch 1, turn, sc in each st across. (28, 32, 36, 40, 44 sc)
Row 24: Ch 1, turn, sc2tog, sc to last 2 sts, sc2tog. (26, 30, 34, 38, 42 sc)
Rows 25 and 26: Ch 1, turn, sc in each st across. (26, 30, 34, 38, 42 sc)
Row 27: Ch 1, turn, sc2tog, sc to last 2 sts, sc2tog. (24, 28, 32, 36, 40 sc)
Rows 28 through 34: Ch 1, turn, sc in each st across. (24, 28, 32, 36, 40 sc each row)
Fasten off front panel.
Checkpoint: The front panel at the waist edge should measure approximately 17.5 (20.5, 23, 26, 29) inches / 44.5 (52, 58.5, 66, 73.5) cm wide when laid flat.
Section 3: Back Panel
The back panel is worked flat from the top down to the waist in two halves split at the center back for the closure.
Right Back Half:
Foundation chain: Ch 18 (20, 22, 24, 26).
Row 1 (RS): Sc in 2nd ch from hook and in each ch across. (17, 19, 21, 23, 25 sc)
Rows 2 through 6: Ch 1, turn, sc in each st across. (17, 19, 21, 23, 25 sc)
Row 7: Ch 1, turn, sc2tog, sc to end. (16, 18, 20, 22, 24 sc)
Row 8: Ch 1, turn, sc to end. (16, 18, 20, 22, 24 sc)
Row 9: Ch 1, turn, sc2tog, sc to end. (15, 17, 19, 21, 23 sc)
Row 10: Ch 1, turn, sc to end. (15, 17, 19, 21, 23 sc)
Row 11: Ch 1, turn, sc2tog, sc to end. (14, 16, 18, 20, 22 sc)
Rows 12 through 34: Ch 1, turn, sc in each st across. (14, 16, 18, 20, 22 sc each row)
Fasten off.
Left Back Half:
Work as mirror image of right back half, placing decreases at the opposite edge.
Section 4: Spaghetti Straps (Make 2)
Foundation chain: Ch 4.
Row 1: Sc in 2nd ch from hook and in next 2 chs. (3 sc)
Rows 2 through 55 (55, 57, 57, 59): Ch 1, turn, sc in each st across. (3 sc per row)
Strap length equals approximately 8.5 (8.5, 8.75, 8.75, 9) inches / 21.5 (21.5, 22, 22, 23) cm. Adjust length during fitting.
Fasten off with long tail for sewing.
Section 5: Assembling the Bodice
Step 1: Wet block all bodice panels to measurements. Allow to dry completely.
Step 2: With RS together, sew the front panel side edges to the back panel side edges using mattress stitch or whipstitch, matching Row 34 at the waist on all pieces.
Step 3: Pin and sew straps to the back top edge (approximately 2 inches in from the outer edge on each side) and to the front panel at the shoulder position (approximately 2.5 inches in from center front on each side).
Step 4: Try on or place on a dress form and adjust strap positions for symmetry and fit.
Section 6: Skirt
Setup round: With RS facing, beginning at right back opening edge, join MC to the bottom of the assembled bodice waist. Work 1 sc in BLO in each row end around the entire waist circumference.
Total waist stitches: 94 (102, 112, 122, 132) sc
Round 1: Join, sc in each st around. (94, 102, 112, 122, 132 sc)
Rounds 2 through 5: Sc in each st around. (94, 102, 112, 122, 132 sc per round)
Hip Expansion Rounds:
Round 6: Sc in next 46 (50, 55, 60, 65) sts, inc in next st, sc to end, inc in last st. (96, 104, 114, 124, 134 sc)
Round 7: Sc in each st around. (96, 104, 114, 124, 134 sc)
Round 8: (Sc in next 23 (25, 27, 30, 32) sts, inc in next st) 4 times. (100, 108, 118, 128, 138 sc)
Continue following the expansion pattern through Round 46, adding increases as specified to shape the hip curve naturally.
Pattern Notes for Success
The turning chain (ch 1) does NOT count as a stitch throughout this entire pattern. Place a marker at each side seam when working in the round and move markers up every 6 rounds.
Wet block all pieces before seaming. This is absolutely non-negotiable for achieving correct finished measurements on a fitted garment.
The corsage elements are made separately in varying sizes and assembled on a backing with a pin back for optional removal. This means you can wear the dress with or without the floral shoulder piece depending on the occasion.
Tips for the Best Results
Take your time with the bust cup shaping. The short rows create that three-dimensional cup shape that makes this bodice so flattering. If the shaping feels confusing, work through it slowly and trust the process.
When joining the cups to the front panel, pin everything in place first. Try the bodice on a dress form or hold it up to yourself to check placement before committing to those join stitches.
The lace hem border requires careful counting. Mark every pattern repeat with a stitch marker to keep yourself on track.
For the corsage, make extra leaves and flowers. Having options during assembly lets you play with the arrangement until it looks just right.
Thank you so much for choosing this crochet pattern for your next project. I truly hope you love making this dress as much as I loved designing it. The finished piece is absolutely stunning and worth every hour you put into it.
If you make this Emerald Garden Floral Shoulder Dress, I would love to see your finished work! Tag me on Instagram or share in our Facebook group. Seeing your creations is honestly the best part of sharing patterns.
Save this pattern to your Pinterest boards so you can find it when you are ready to start, and please leave a comment below if you make it. I love hearing about your color choices, any modifications you tried, and how the fit worked for you. Happy crocheting!
