
This is THE dress pattern you’ve been waiting for. I’m talking show-stopping, jaw-dropping, "wait, you MADE that?!" kind of gorgeous. The Ivory Pearl Fan Dress combines delicate fan motifs, a flattering wrap bodice, and romantic layered tiers that move beautifully when you walk.
Get the Ad-Free PDF Pattern
You can find the free pattern below, or you can purchase the ad-free printable PDF from my shop.
Get the Printable PDF →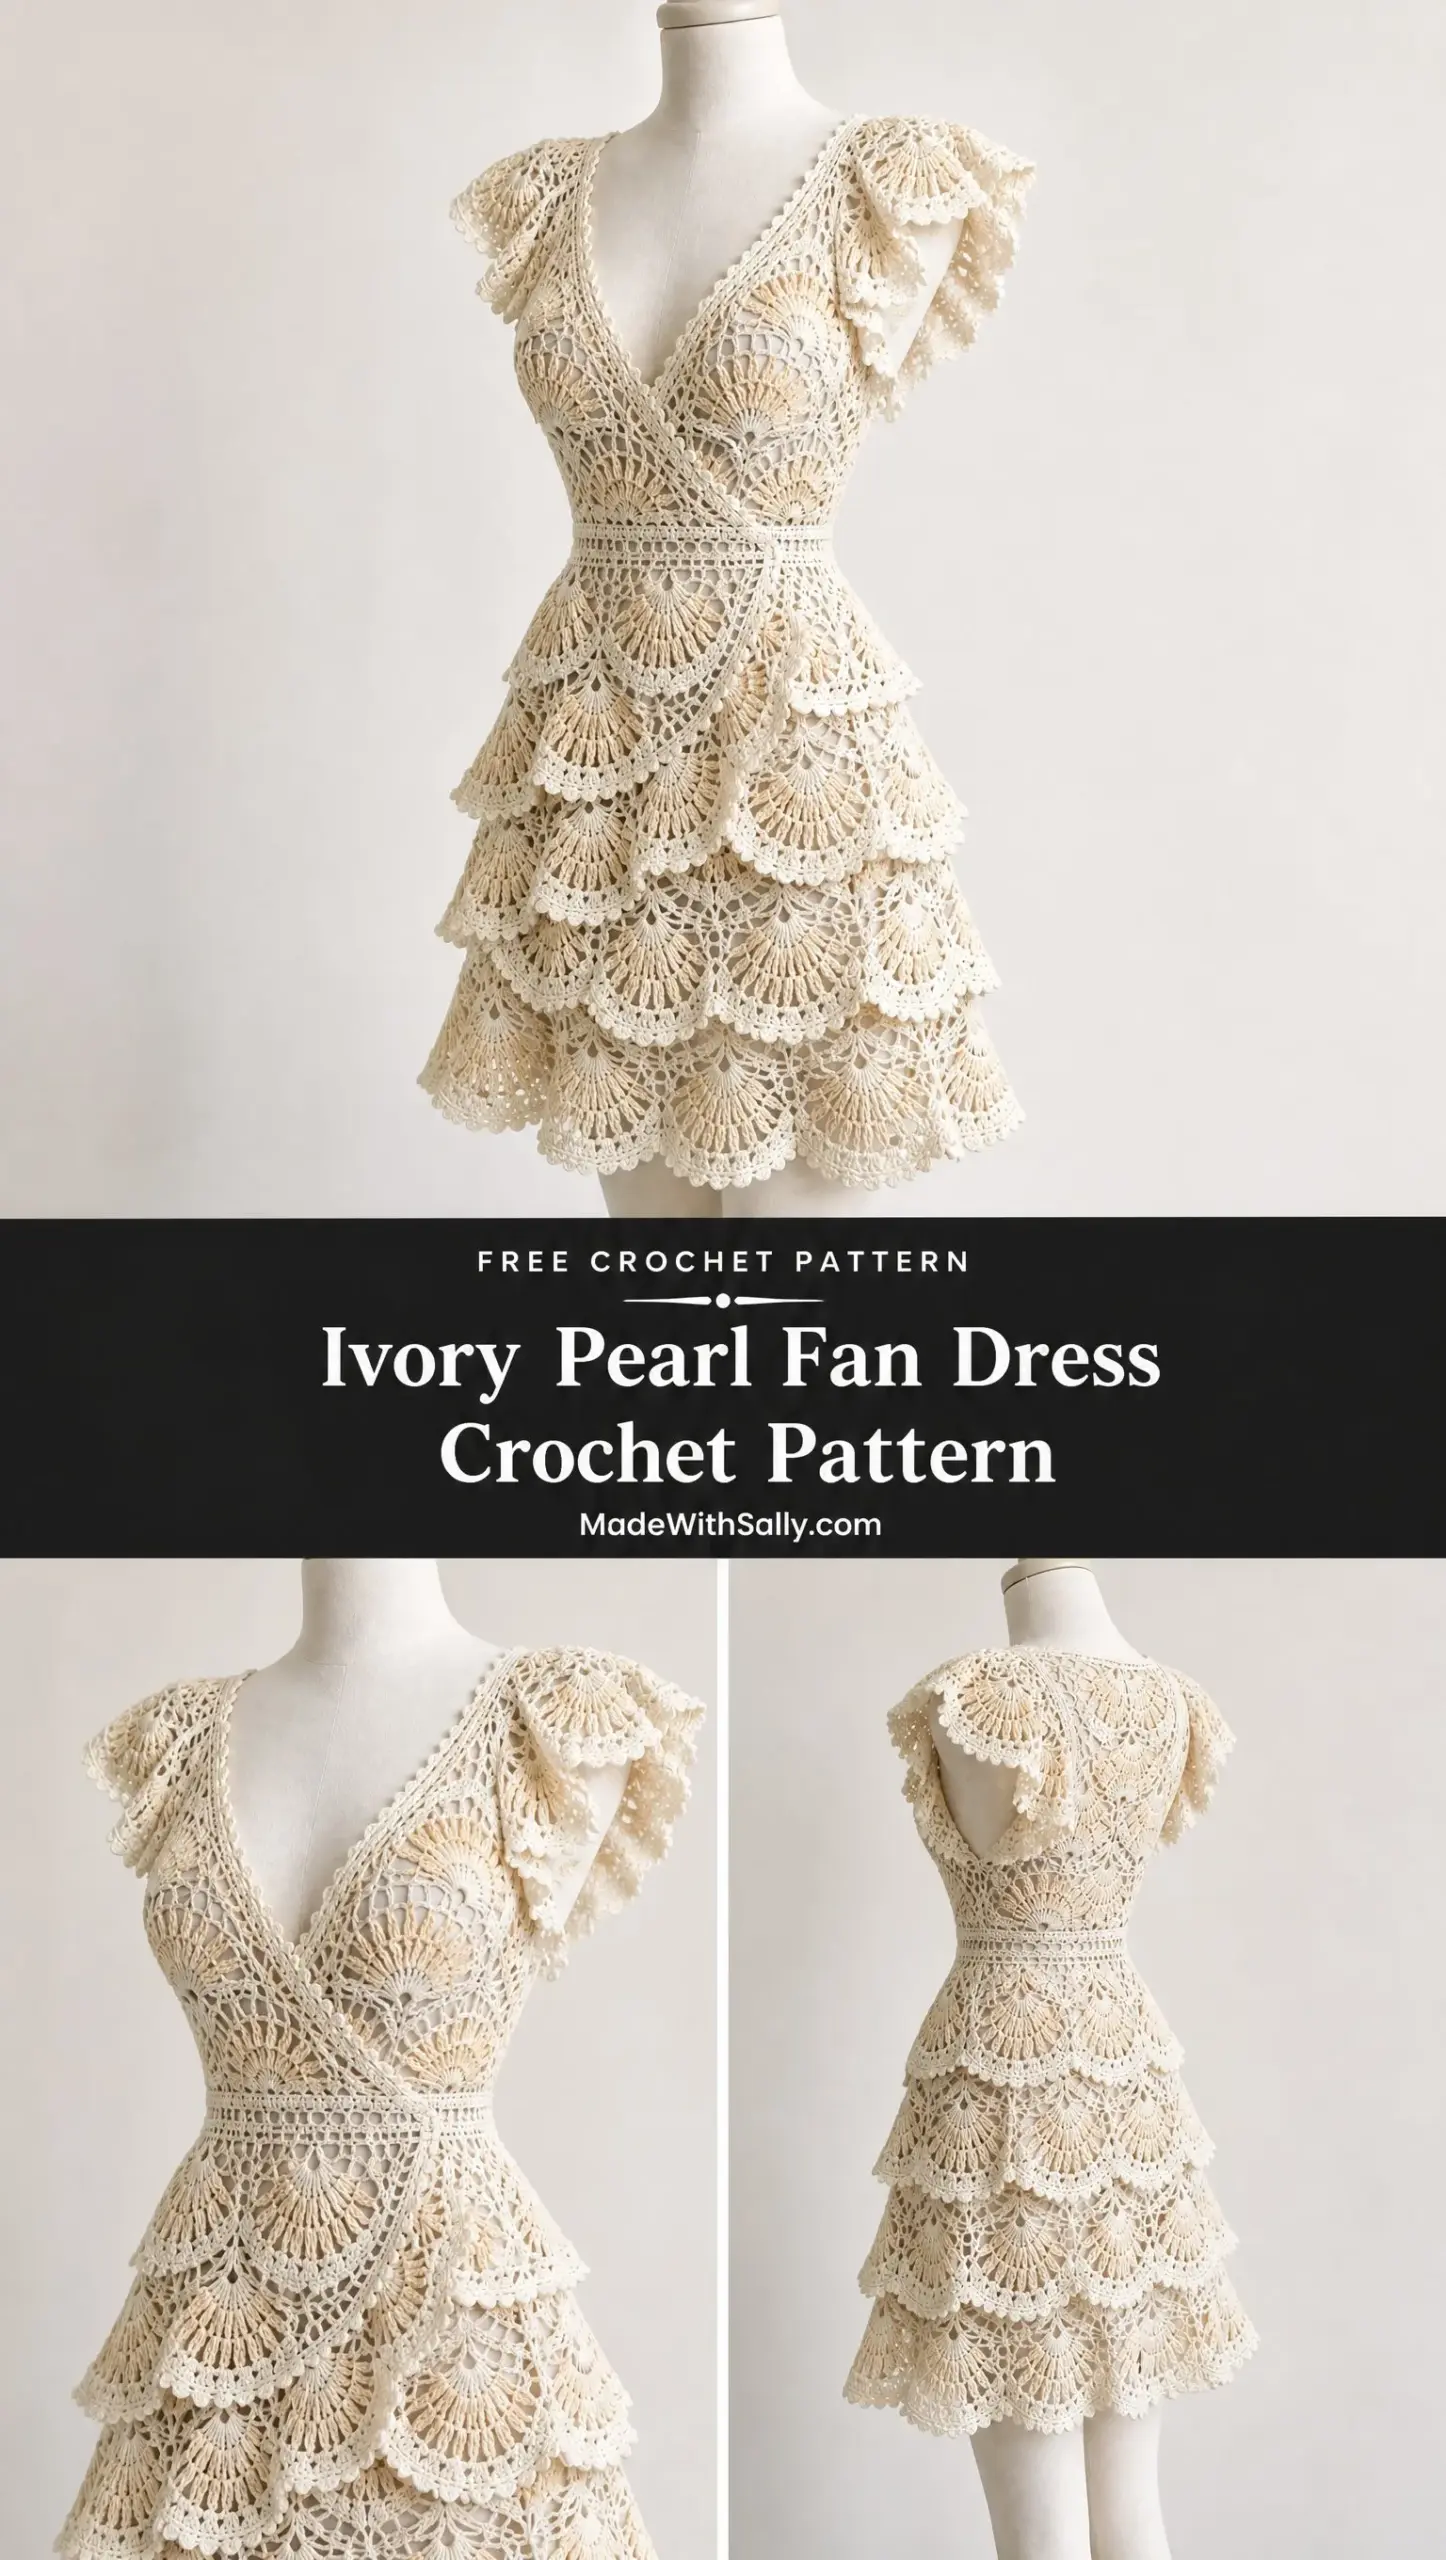
Yes, it’s an advanced intermediate project. Yes, it takes time and attention. But every single stitch is worth it when you slip this dress on and feel like absolute artwork.
If you’ve been searching for a statement crochet garment that looks like it belongs on a runway, this is your pattern. Let’s dive into everything you need to bring this beauty to life.
About This Crochet Dress Pattern
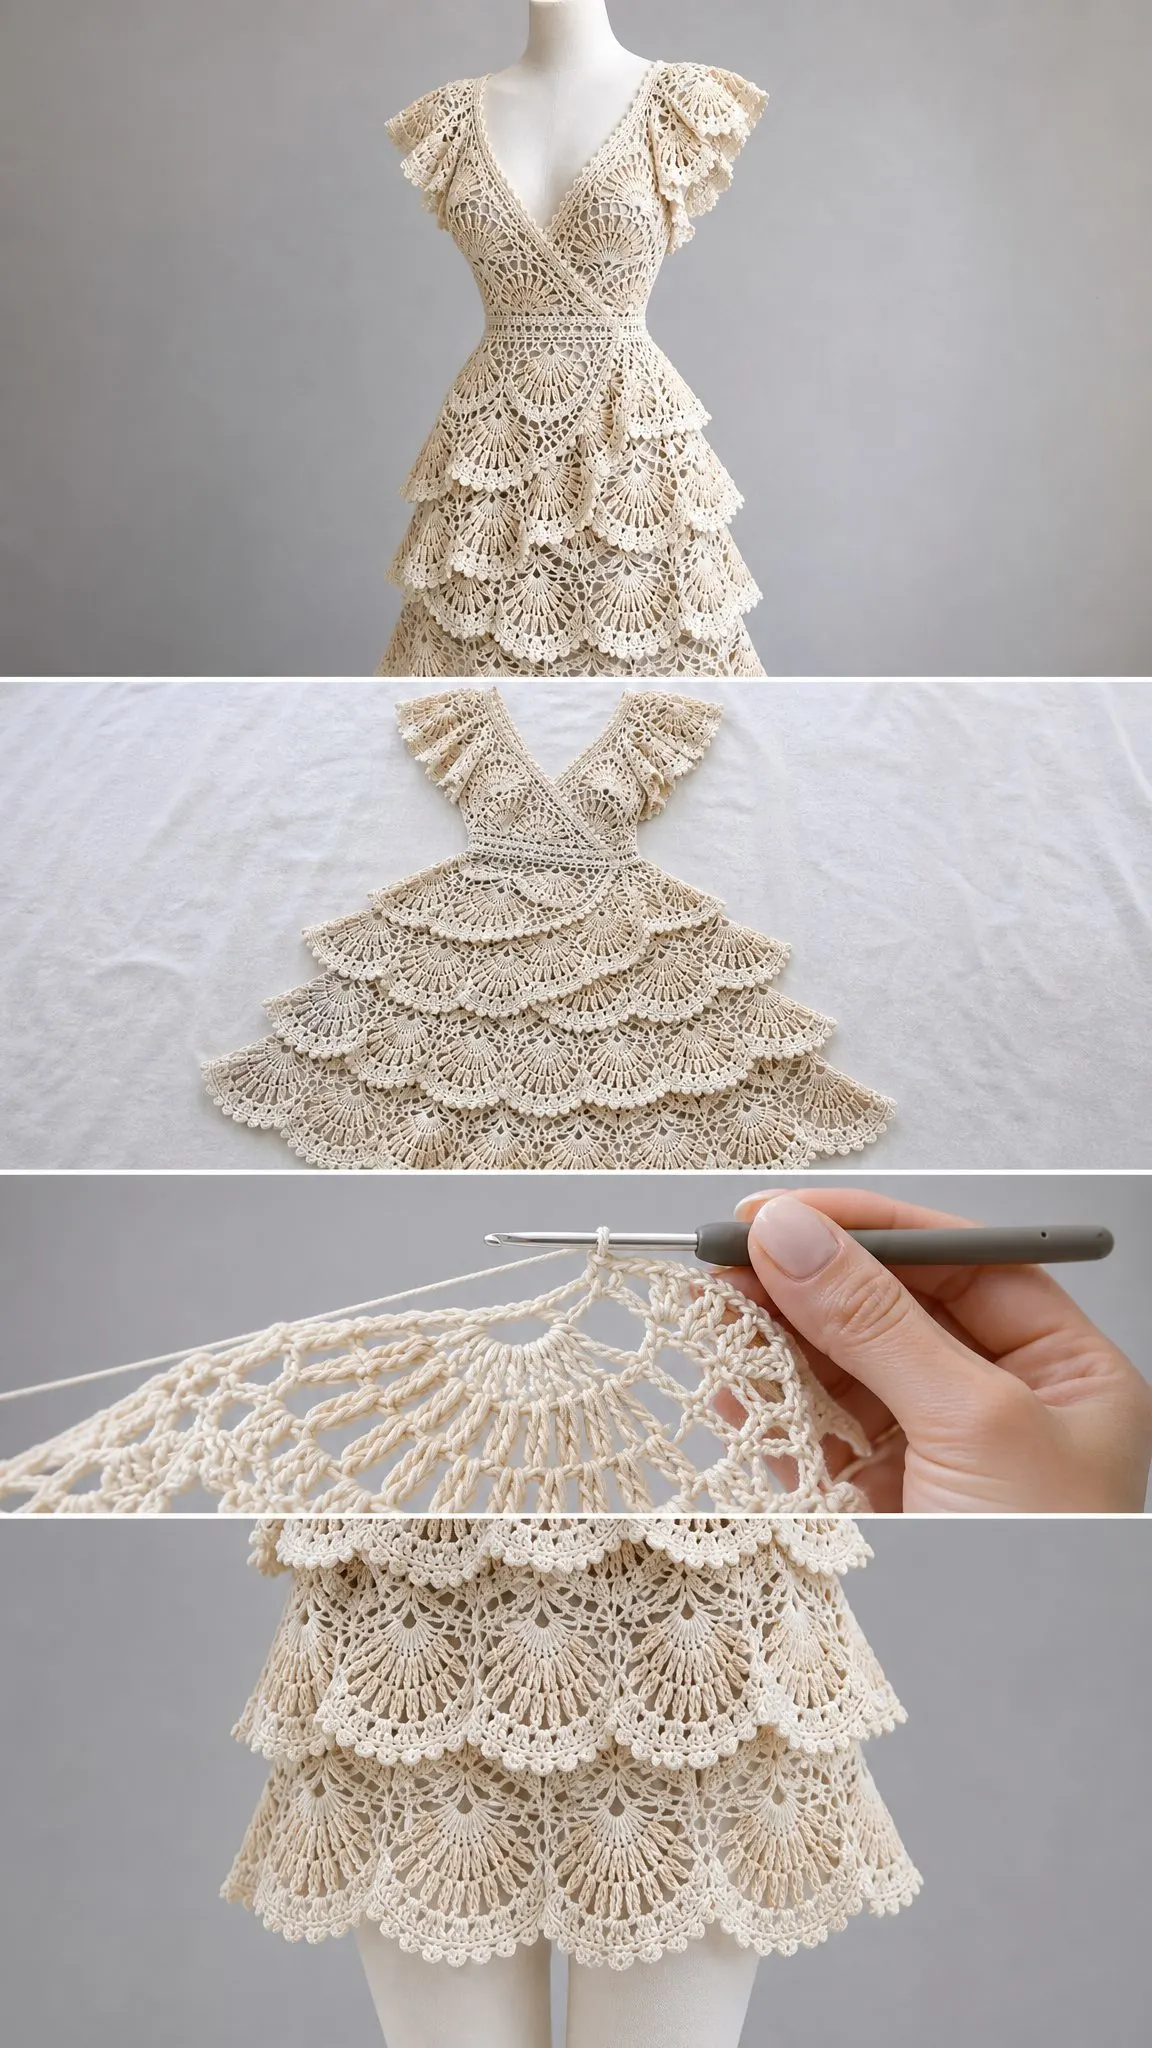
The Ivory Pearl Fan Dress is worked as a fitted openwork wrap bodice joined to a shaped waistband. From there, you’ll add three overlapping fan stitch skirt tiers and a diagonal asymmetrical peplum that gives the dress its distinctive silhouette. Flutter shoulders are built from layered fan panels, creating that romantic, feminine detail you see in the photos.
The "pearl" effect comes entirely from the sheen of mercerized cotton. No beads required. The color effect uses three close neutrals: warm cream at the fan centers, pale champagne through the rays, and cool ivory at the scalloped edges. This subtle tonal variation creates depth and dimension that photographs beautifully.
Skill level: Advanced intermediate. You should be comfortable with garment gauge, shaping in pattern, joining motifs, working into row ends, and adjusting stitch counts to fit. If you’ve made fitted garments before and understand how to read your work, you’re ready for this.
Finished Fit and Sizing
This dress is designed with approximately 2 to 5 cm (0.75 to 2 inches) of negative ease at the bust and a close waist. Choose your size by full bust measurement, then use the fitting checkpoints throughout the pattern to refine the wrap overlap and waist before starting the skirt.
| Size | XS | S | M | L | XL | 2XL |
|---|---|---|---|---|---|---|
| To fit bust (cm) | 76-81 | 84-89 | 91-97 | 99-107 | 109-117 | 119-127 |
| To fit waist (cm) | 61-66 | 69-74 | 76-81 | 84-91 | 94-102 | 104-112 |
| Finished waist (cm) | 62 | 70 | 78 | 86 | 96 | 106 |
| Approx. skirt hem (cm) | 190 | 205 | 220 | 236 | 254 | 272 |
| Back bodice width (cm) | 34 | 37 | 40 | 43 | 47 | 51 |
| Dress length (cm) | 82 | 84 | 86 | 88 | 90 | 92 |
Materials You’ll Need
Yarn:
Hooks:
Notions:
Important: Do not add beads if you want the photographed pearl effect. The mercerized cotton provides all the shimmer you need.
Gauge
After wet blocking: 24 double crochet (dc) = 10 cm / 4 inches and 12 dc rows = 10 cm / 4 inches in plain double crochet.
One 12-stitch fan motif measures about 5 cm (2 inches) wide at its outer edge and 4.5 cm (1.75 inches) tall.
The open mesh is intentionally elastic, so measure your blocked swatch without stretching.
Gauge matters: The waist is the anchor of the dress. If your blocked dc gauge differs from the pattern gauge, calculate your waistband stitches from your actual stitches per cm instead of following the printed counts.
Abbreviations (US Terms)
Special Stitches
Fan Center (Color A): Work 5 dc in the same stitch or chain space. This creates the dense core of each fan motif.
Fan Rays (Color B): Into the same center group, work [dc, ch 1] across selected stitches to spread the fan. On the next row, place 2 dc in each ch-1 space.
Scallop Edge (Color C): Work (sc, ch 3, sl st in first ch, sc) for a tiny rounded picot. Larger scallops are 5 dc in one space with a picot at the center dc.
Open Mesh: Ch 3, skip 2 stitches, sc in next stitch. On following rows, work ch 3, sc in next ch-3 space unless shaping changes the repeat.
Invisible dc decrease: Yarn over, insert hook in next stitch, pull up loop, yarn over and pull through 2 loops. Repeat in next stitch, yarn over and pull through all 3 loops.
Fan Motif Foundation Unit
Use this unit anywhere the instructions call for a "fan block." It is worked bottom-up. Carry unused colors loosely along the wrong side edge only when the distance is short. Otherwise, fasten off.
Row 1 (Color A): Ch 6. In 4th ch from hook, work 5 dc. Turn. (5 dc)
Row 2 (Color B): Ch 3, dc in first dc, ch 1, dc in next dc; repeat from across, ch 1, 2 dc in last dc. Turn. (7 dc, 5 ch-1 spaces)
Row 3 (Color B): Ch 3, dc in first dc, 2 dc in each ch-1 space, dc in each edge dc. Turn. Aim for 14-16 dc. The exact count can be adjusted so the outer curve lies flat.
Row 4 (Color C): Ch 1, sc in first stitch, *ch 3, skip 1 stitch, sc in next stitch; repeat across. Turn.
Row 5 (Color C): Slip stitch to first ch-3 space. In each ch-3 space, work 5 dc, adding a tiny picot [ch 3, sl st in top of center dc] to every second scallop. Fasten off.
Construction principle: The photographed dress uses fan shapes as surface architecture, not isolated granny motifs. In the garment, adjacent fan blocks share mesh spaces and are joined as you go so the fabric stays supple.
Quick Construction Order
Before we dive into the detailed instructions, here’s your roadmap:
1. Swatch and choose size
2. Make waistband
3. Work back bodice
4. Work right underlap front
5. Work left overlapping front
6. Join and stabilize V neckline
7. Add layered flutter shoulders
8. Work skirt foundation
9. Add Tier 1
10. Add Tier 2
11. Add Tier 3
12. Add diagonal peplum sweep
13. Finish seams and snaps
14. Wet block and shape
Section 1: Waistband
Work the waistband first because every other section keys into it. It is firm, 4-5 cm (1.5-2 inches) deep, and slightly smaller than the body measurement.
Foundation chain by size: XS 150, S 168, M 186, L 206, XL 230, 2XL 254. Join without twisting. These counts are based on 2.4 stitches per cm. Recalculate if your gauge differs.
Round 1: Ch 2 (does not count as a stitch), dc in each chain around. Join. Check that the band passes over the hips. If you prefer a side opening, work in rows and later add snaps.
Round 2: Ch 1, sc in each dc around. Join.
Round 3: Ch 2, *dc in next 2 stitches, ch 1, skip 1; repeat around, distributing any remainder symmetrically.
Round 4: Ch 1, sc in every dc and ch-1 space around. Fasten off. Band should measure 4-5 cm deep after blocking.
Fitting checkpoint: Place the band at your natural waist. It should be secure but not compressing. Adjust now. Every bodice and skirt count is easier to alter before attachment.
Section 2: Back Bodice
Mark the center back. Reserve approximately 45% of the waistband stitches for the back panel: 68 (76, 84, 92, 104, 114) stitches. Leave the remaining stitches free for the two overlapping fronts.
Row 1 (RS, Color C): Join yarn at first back marker. Ch 3, dc evenly across reserved back stitches. Turn.
Rows 2-4: Work dc, decreasing 1 stitch at each edge on every other row to shape the waist-to-ribcage transition.
Rows 5-10: Establish alternating open mesh and fan blocks. Work 8-10 stitches in dc at each side edge, then repeat [one fan block over approximately 12 stitches, one 3-ch mesh bridge] across the center. Keep the pattern symmetrical about center back.
Continue until the back bodice measures 18 (19, 20, 21, 22, 23) cm from top of waistband.
Armhole shaping: At the start of the next 2 rows, slip stitch across 4 (4, 5, 5, 6, 6) stitches. Then decrease 1 stitch at each armhole edge on the next 4 (4, 5, 5, 6, 6) rows.
Continue straight in established openwork until armhole depth is 18 (19, 20, 21, 22, 23) cm. Fasten off, leaving the upper edge open. The flutter shoulder layers will bridge the front and back rather than using a conventional shoulder seam.
Section 3: Right Wrap Front
The right front is the underlap. It begins wider at the waist and narrows toward the left shoulder line to form the deep V.
Reserve 58 (64, 70, 78, 86, 94) waistband stitches to the right of the center front point. If needed, borrow 2-6 stitches from the left front to create the wrap overlap.
Row 1 (RS, Color C): Join at right side seam marker and dc across reserved right front stitches toward center front. Turn.
Rows 2-4: Decrease 1 stitch at the side edge on every other row. At the neckline edge, decrease 1 stitch every row by working the final 2 stitches together.
Rows 5 onward: Establish the fan-and-mesh pattern. Keep a solid 5-7 stitch band along the V edge so the neckline does not stretch. Continue neckline decreases every row until the front measures about 10-12 cm wide at shoulder level.
At the armhole edge, match the back shaping: slip stitch the same number of stitches once, then decrease 1 stitch on the same number of rows.
Continue until front armhole depth matches back. End with a 7-10 cm shoulder tab aligned to the outer third of the back upper edge. Fasten off.
Section 4: Left Wrap Front
Work as a mirror image, but make the visible overlap 4-6 cm wider so the neckline crosses securely and the diagonal ruffle has a stable foundation.
Join Color C at center front waistband area and work toward the left side seam over the remaining front stitches.
On each RS row, add one extra increase at the neckline edge on the first 4 rows, then begin the same V-neck decreases used on the right front. This creates the extra overlap width without adding bulk at the side seam.
Work fan-and-mesh pattern, armhole shaping, and shoulder tab to mirror the right front.
Pin both fronts onto the waistband in wearing position. The left front should cross over the right by 6-9 cm at bust level and meet the opposite waistband area without pulling. Adjust by adding or removing one mesh repeat before seaming.
Section 5: Join Bodice and Stabilize Neckline
With the dress on a mannequin or dress form, overlap left front over right. Tack temporarily at the waistband and at the V crossing.
Using Color C and smaller hook, work 1 row of sc from right waist edge up the right V, around back neck, and down left V. Work approximately 3 sc per 2 row ends. Do not over-pack stitches.
Work a second edging row: *sc in next 3 stitches, tiny picot; repeat, omitting picots across the back neck if you want a smoother finish.
At the inside right front underlap, sew a tiny clear snap or attach a 20 cm cotton tie. Add a second concealed snap at the left waist if desired.
Neckline check: The deep V should lie flat while standing and sitting. If it gapes, redo the final sc edging with 5-8% fewer stitches, especially through the diagonal sections.
Section 6: Layered Fan Stitch Flutter Shoulders
Each shoulder has two overlapping fan layers. The lower layer is slightly longer. The upper layer sits 1.5-2 cm higher and is offset so the scallops alternate.
Lower Layer
Join Color A to the outer 70-80% of the front shoulder tab. Work 3-4 fan centers spaced evenly from neckline toward armhole.
Change to Color B and work the ray rows of each fan, joining adjacent fans with ch-3 bridges.
Continue the same strip across the shoulder gap and join to the corresponding back shoulder area. The strip should curve over the shoulder cap, not sit flat like a strap.
Change to Color C and finish the outer edge with scallops and tiny picots. Target finished depth: 7-9 cm.
Upper Layer
Join 1.5-2 cm inside the lower layer attachment line and work 3 smaller fan centers.
Complete rays in Color B and scallops in Color C, stopping at 5-7 cm depth.
Tack the inner edge to the lower layer at 2-3 hidden points so the layers flutter together but remain visibly separate.
Section 7: Skirt Foundation Round
Turn the waistband so you are working into its lower edge. Use Color C. The skirt foundation must flare from the first round so the layered tiers hang softly instead of forming a tube.
Round 1: Work 2 dc in approximately every 3rd waistband stitch, 1 dc in all others. Total increase about 30-33%.
Round 2: Work dc evenly, increasing 10-12% by placing 2 dc in every 9th-10th stitch.
Round 3: Establish [fan block + mesh bridge] repeats around. Make the repeat count divisible by 6 where possible. This makes the peplum placement easier.
Work 1-2 additional rows in pattern until the skirt foundation is 7-8 cm deep.
Section 8: Skirt Tier 1
Tier 1 begins at the skirt foundation and ends around upper thigh. It should overlap Tier 2 by 4-6 cm.
Join Color A into every second fan position around the foundation and work fan centers.
With Color B, build rays for 2 rows. Increase the width of every third fan by adding one extra ch-1 ray space. This creates gradual flare.
With Color C, work one mesh row joining all fans, then one large scallop row. Add a tiny picot to the center of each scallop.
Continue until Tier 1 measures 14 (14, 15, 15, 16, 16) cm from its attachment line. Fasten off.
Section 9: Skirt Tier 2
Tier 2 is attached 8-10 cm below the waist, behind Tier 1. Its top edge must remain hidden.
Fold Tier 1 upward. Join Color C to the back loops or underside of the skirt foundation approximately 8-10 cm below the waist.
Work one setup row of sc, increasing 10-15% evenly.
Work fan centers in Color A, rays in Color B, mesh joins and scalloped edging in Color C exactly as Tier 1, but add one extra ray to every second fan for more fullness.
Continue until Tier 2 extends 5-7 cm below Tier 1. Target depth: 17 (17, 18, 18, 19, 19) cm.
Section 10: Skirt Tier 3
Tier 3 forms the final above-knee hem and carries the widest fans.
Attach 8-10 cm below the Tier 2 attachment line, again behind the layer above.
Increase 12-18% across the setup row. The fabric should flare visibly but still fall under its own weight.
Work fan centers in Color A, then 3 ray rows in Color B. On the final ray row, add an extra dc at both outer edges of each fan.
Change to Color C. Work one mesh row, one 7-dc scallop row, then finish each scallop with [sc in first 3 dc, picot in center dc, sc in last 3 dc].
Continue until finished dress length is 82 (84, 86, 88, 90, 92) cm from shoulder high point, or your preferred above-knee length.
Section 11: Asymmetrical Front Peplum Sweep
The peplum grows from the visible diagonal wrap line and sweeps toward the left hip. It is intentionally asymmetrical and should overlap Tier 1 without fully circling the body.
With RS facing, mark the diagonal from the V crossing to the left front waist, then continue the marked line 6-8 cm down over the upper skirt.
Join Color C at the V crossing and work sc evenly along this diagonal foundation, ending near left hip. Aim for 55-75 sc depending on size and desired sweep.
Row 1 (Color A): Ch 3, work fan centers at 10-12 stitch intervals, placing the densest grouping near the lower half of the diagonal.
Rows 2-3 (Color B): Build rays. Increase at both ends and add one extra ray to each fan toward the hem end so the ruffle widens as it descends.
Row 4 (Color C): Connect fans with open mesh.
Row 5 (Color C): Work scallops and picots. For a dramatic sweep, repeat Rows 2-5 once more only across the lower two-thirds of the ruffle.
Tack the upper 3-5 cm of peplum to the wrap edge. Leave the remainder free so it floats over Tier 1.
Section 12: Side Seams, Underarm, and Final Assembly
Block bodice pieces lightly before permanent seaming. Match side seams and whipstitch through corresponding edge loops using Color C.
At each underarm, join the lowest flutter layer to front and back for 2-3 cm only. Leave the rest free for movement.
If the waistband was worked flat, close the opening with mattress stitch or add 2-3 tiny clear snaps.
Weave every yarn end through at least 4 cm of dense stitches, reverse direction, then trim after blocking. Do not weave only through chain spaces.
Inspect all tier attachment points from the inside. Add discreet reinforcing stitches where several fans meet the waistband or foundation mesh.
Section 13: Blocking and Finishing
Hand wash in cool water with mild soap. Do not wring.
Roll in a towel, then lay flat on blocking mats. Shape the waist to measurement and pin each fan so the rays open evenly.
Pin the V neckline without stretching. Arrange flutter shoulders in two distinct layers.
Shape each skirt tier independently so the scallops remain visible and the overlap is consistent. Pin the peplum sweep last.
Allow to dry completely. Steam only if your yarn label permits. Keep steam above the surface so the cotton does not flatten.
Color Placement Map
| Area | Color A (warm cream) | Color B (champagne) | Color C (cool ivory) |
|---|---|---|---|
| Fan motif | centers / dense core | rays / spreading stitches | mesh joins / scalloped outline |
| Bodice | selected fan centers | inner fan texture | structure, edge bands, neckline |
| Shoulders | fan centers | ray layers | picot scallops |
| Skirt tiers | fan centers | ray fields | mesh + hem scallops |
| Peplum | fan centers | expanding rays | foundation + outer edge |
Made-to-Measure Adjustment Formulas
Waistband stitch count = desired finished waist in cm × your blocked dc stitches per cm. Round to a multiple of 6 for easiest fan placement.
Back waist allocation = about 45% of waistband stitches. Fronts share the remaining 55%, with the visible left front receiving 4-8% more stitches for overlap.
Tier setup increase: Tier 1 about +10-15% over skirt foundation. Tier 2 +10-15%. Tier 3 +12-18%. More increase = stronger ruffle. Less increase = cleaner A-line.
Length adjustment: Add or remove complete ray/mesh rows before the final scallop row. Avoid adding length only by making the final scallops deeper.
Bust adjustment: Add width inside the fan/mesh field, not at the V edge. Keep the neckline edge band firm and unchanged whenever possible.
Fit Troubleshooting
| Issue | Correction |
|---|---|
| V neckline gapes | Rework edging with 5-8% fewer sc. Add a concealed snap at crossing. Avoid extra stitches at diagonal row ends. |
| Waist rides up | Band is too small or bodice too short. Add 1-2 rows above waistband or remake band to body measurement minus only 1-2 cm. |
| Skirt tiers look bulky | Reduce setup increases and use one fewer ray row. Keep tier attachment rows hidden behind the layer above. |
| Fans cup inward | Too few ray increases or hook too small. Add a ch-1 space or extra dc in the outer third of the motif. |
| Fans ripple | Too many stitches in rays or too many scallops. Remove 1-2 ray spaces per fan or use smaller hook for edging. |
| Shoulders droop | Shorten the attachment span and tack upper/lower flutter layers together at hidden points. |
Assembly Checklist
Use this checklist to make sure you haven’t missed any steps:
Final Thoughts
This dress is a labor of love, and I promise you, the finished result is absolutely worth every hour you put into it. The way the fan motifs catch the light, the romantic flutter of those layered shoulders, the way the tiered skirt moves when you walk. It’s wearable art.
Take your time with the fitting checkpoints. Trust the process. And most importantly, enjoy the journey of creating something truly extraordinary with your own two hands.
Thank you so much for choosing this pattern. I genuinely can’t wait to see your finished dresses! If you make one, please share your photos with me on Instagram or in our Facebook group. I love seeing your creations come to life.
If you loved this Ivory Pearl Fan Dress crochet pattern, save it to your Pinterest boards so you can find it when you’re ready to start. And please drop a comment below if you make one. I’d love to hear how it turns out for you!
Want a Quick & Easy Printable Version?
Get a clean, beautifully formatted PDF of this pattern — easy to follow step by step, ready to print or save on any device. No scrolling, no distractions, just the pattern.
Get the Printable PDF →