
This is a fitted cropped top with a heart-shaped cutout at the chest. It uses single crochet throughout. The construction involves working separate pieces and seaming them together.
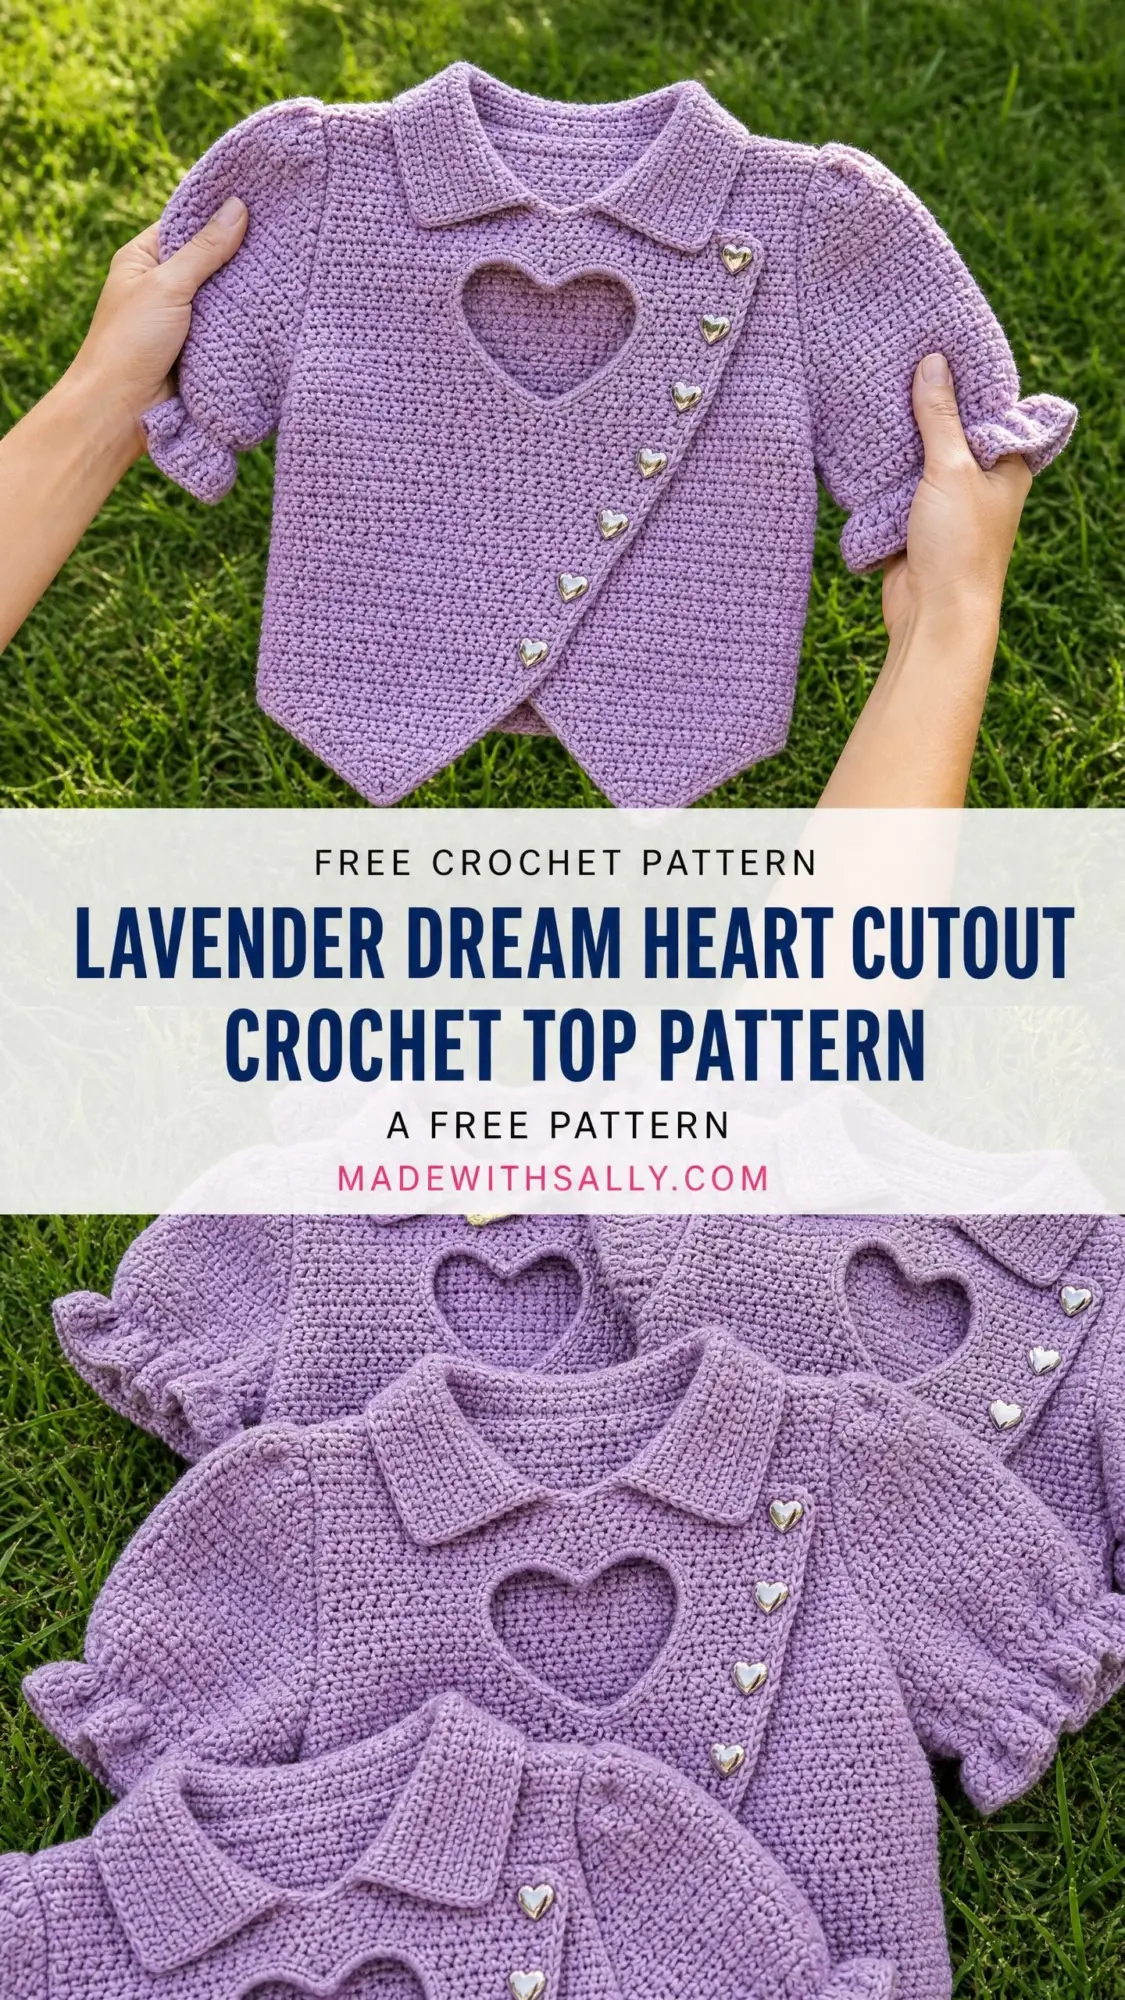
I designed this pattern for crocheters who want a statement garment without complicated stitches. The skill level is advanced beginner to intermediate. If you can work single crochet, increases, and decreases, you can make this top.
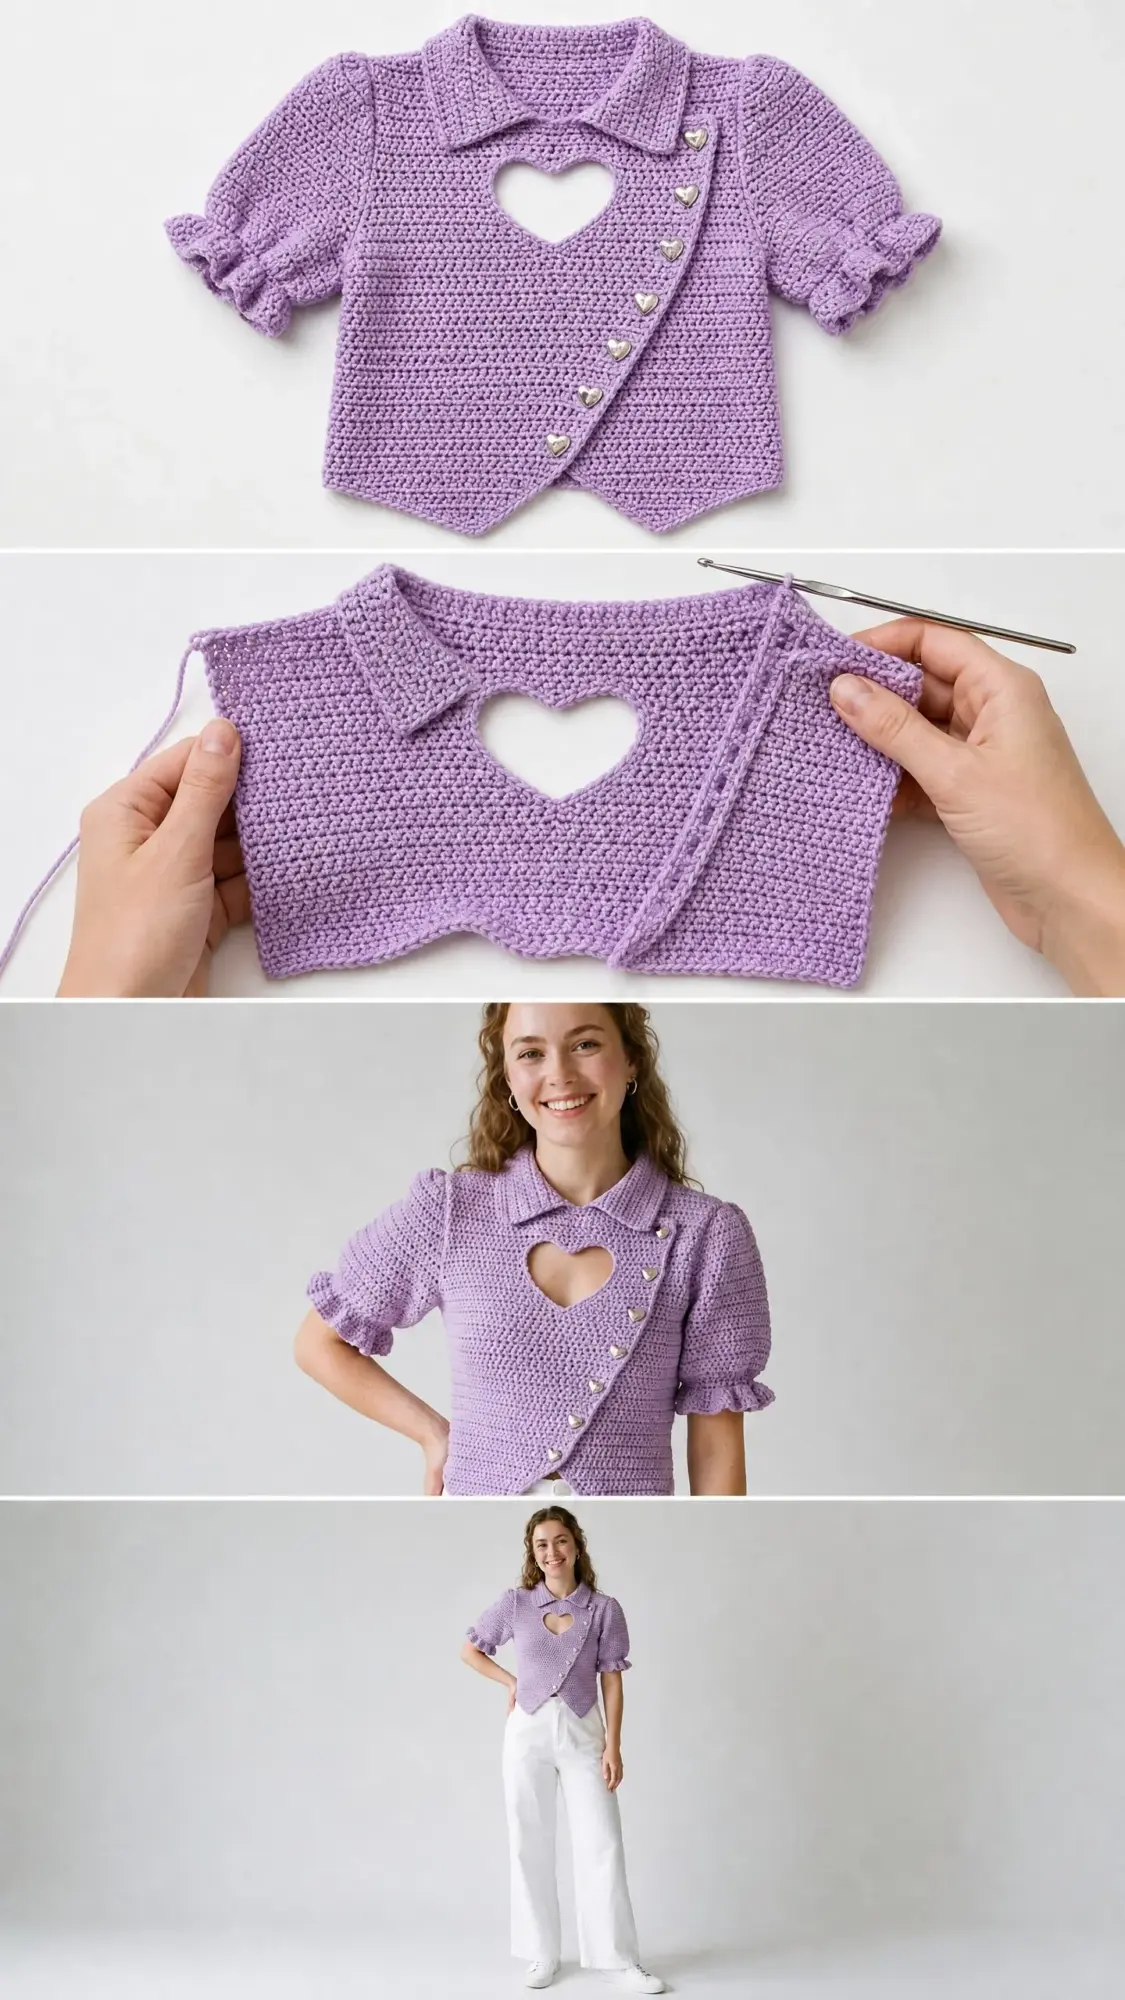
The top features an asymmetric button placket, puff sleeves with ruffle cuffs, a pointed front hem, and a classic flat collar. It looks intricate, but the techniques are straightforward once you break them down piece by piece.
Why This Crochet Top Pattern Works
The dense single crochet fabric creates a structured, opaque body that holds its shape beautifully. Cotton or cotton blend yarn is your best friend here because it prevents the stretching that can happen with pure acrylic. The heart cutout is not as scary as it looks. You simply work two front panels with shaped inner edges. When you place them side by side, the negative space forms the heart.
The asymmetric diagonal button band runs from the right shoulder down to a pointed center front hem. Seven heart-shaped buttons accent this placket. The whole design feels romantic and modern at the same time.
I recommend setting aside 20 to 30 hours for this project. Take your time with the shaping sections and check your gauge carefully.
Materials You Will Need
Yarn: Approximately 900 to 1100 yards of worsted weight yarn (weight category 4). Choose a smooth, lightly twisted yarn with good stitch definition. A cotton-acrylic blend or 100 percent cotton works best for this structured look.
Yarn Suggestions:
Hook: US size G-6 / 4.0 mm crochet hook. Adjust if needed to meet gauge.
Notions:
Finished Measurements
These measurements apply to the completed, blocked, seamed garment in size medium (US 8, EU 38).
Gauge for This Crochet Pattern
20 single crochet stitches = 4 inches / 10 cm
22 rows of single crochet = 4 inches / 10 cm
Please do not skip your gauge swatch. Even one stitch per 4 inches off will change the finished bust measurement by over 2 inches across.
To swatch: Chain 25. Work a single crochet (sc) in the 2nd chain from hook and in each chain across. (24 sc) Turn. Work in single crochet rows until your swatch is at least 5 inches tall. Fasten off. Block your swatch flat and measure.
If your gauge is too loose (fewer stitches per inch), go down one hook size. If your gauge is too tight (more stitches per inch), go up one hook size.
Abbreviations and Stitch Definitions
Special Stitches for This Top
Puff Stitch (puff)
Used decoratively at the cuff ruffle edge.
1. Yarn over, insert hook into stitch.
2. Yarn over and pull up a loop to approximately 1/2 inch height.
3. Repeat steps 1 and 2 two more times in the same stitch. You now have 6 loops on hook.
4. Yarn over and pull through all 6 loops on hook.
5. Chain 1 to close the puff. This counts as one puff stitch unit.
Ruffle Row
Worked across a cuff edge. In each stitch across, work 3 sc. This triples the stitch count and creates a gathered ruffle wave.
Reverse Single Crochet (rev sc)
Also called crab stitch. Used along the button band and hem edges for a neat, corded finish.
1. Do not turn your work. With the RS facing, insert hook from front to back into the stitch to the RIGHT (working backward).
2. Yarn over and pull up a loop.
3. Yarn over and pull through both loops on hook.
4. Repeat, moving right along the edge.
Pattern Notes Before You Begin
1. All pieces are worked flat in rows unless otherwise noted.
2. Each row begins with ch 1, turn. The ch 1 does NOT count as a stitch throughout this pattern.
3. Row 1 after the foundation chain is your right side (RS). Mark this side with a stitch marker.
4. The button band is an asymmetric diagonal strip that runs from the right neckline edge down to the V-point. It is picked up and worked outward from the seamed front.
5. The collar is worked as a separate flat piece and seamed to the neckline after all body pieces are joined.
6. Sleeves are worked flat and seamed into tubes. The sleeve cap is shaped before seaming into the armhole.
7. When working the heart edging, use a smaller hook (US F-5 / 3.75 mm) for tighter, cleaner edges around the cutout. Return to your regular hook for all other sections.
8. Stitch counts in parentheses at the end of each row reflect the total number of working stitches after all increases or decreases are applied.
Step by Step Instructions for the Heart Cutout Top
The Back Panel
The back panel is worked from the bottom hem upward to the shoulder. Finished dimensions: 18 inches / 45.5 cm wide by 15 inches / 38 cm tall.
Foundation Chain: Ch 93.
Row 1 (RS): Sc in 2nd ch from hook and in each ch across. Turn. (92 sc)
Rows 2 through 42: Ch 1, turn. Sc in each st across. Turn. (92 sc)
Checkpoint: After Row 42, the back measures approximately 7.5 inches / 19 cm. This is the base of the armhole.
Back Armhole Shaping
Row 43 (RS): Sl st in first 5 sts. Ch 1, sc in same st as last sl st, sc in each st across to last 5 sts, leave last 5 sts unworked. Turn. (82 sc)
Row 44: Ch 1, turn. Sc2tog, sc in each st across to last 2 sts, sc2tog. Turn. (80 sc)
Row 45: Ch 1, turn. Sc2tog, sc in each st across to last 2 sts, sc2tog. Turn. (78 sc)
Row 46: Ch 1, turn. Sc2tog, sc in each st across to last 2 sts, sc2tog. Turn. (76 sc)
Row 47: Ch 1, turn. Sc2tog, sc in each st across to last 2 sts, sc2tog. Turn. (74 sc)
Rows 48 through 64: Ch 1, turn. Sc in each st across. Turn. (74 sc)
Shoulder and Neck Shaping for Back
Row 65: Ch 1, turn. Sc in first 22 sts. Leave remaining sts unworked. Turn. (22 sc) This is the left shoulder.
Row 66: Ch 1, turn. Sc2tog, sc in each st to end. Turn. (21 sc)
Row 67: Ch 1, turn. Sc in each st across. Fasten off. (21 sc)
Rejoin yarn for the right shoulder. On Row 65, skip 30 center back neck stitches and rejoin yarn to the 53rd stitch from the beginning of Row 64.
Row 65R: Ch 1, sc in next 22 sts. Turn. (22 sc)
Row 66R: Ch 1, turn. Sc in each st across to last 2 sts, sc2tog. Turn. (21 sc)
Row 67R: Ch 1, turn. Sc in each st across. Fasten off. (21 sc)
The 30 center back neck stitches remain open as the back neckline.
Left Front Panel
The left front panel forms the left side of the front, including the left lobe of the heart cutout. Finished dimensions: approximately 9 inches / 23 cm wide by 14 inches / 35.5 cm tall.
Foundation Chain: Ch 47.
Row 1 (RS): Sc in 2nd ch from hook and in each ch across. Turn. (46 sc)
Rows 2 through 42: Ch 1, turn. Sc in each st across. Turn. (46 sc)
Checkpoint: After Row 42, the left front panel measures approximately 7.5 inches / 19 cm tall.
Left Front Armhole Shaping
Row 43 (RS, armhole side is left outer edge): Ch 1, turn. Sc in each st across to last 5 sts, leave last 5 sts unworked. Turn. (41 sc)
Row 44: Ch 1, turn. Sc in each st across to last 2 sts, sc2tog. Turn. (40 sc)
Row 45: Ch 1, turn. Sc in each st across to last 2 sts, sc2tog. Turn. (39 sc)
Row 46: Ch 1, turn. Sc in each st across to last 2 sts, sc2tog. Turn. (38 sc)
Row 47: Ch 1, turn. Sc in each st across to last 2 sts, sc2tog. Turn. (37 sc)
Rows 48 through 52: Ch 1, turn. Sc in each st across. Turn. (37 sc)
Checkpoint: After Row 52, the panel is approximately 9.5 inches / 24 cm tall. Begin heart lobe shaping.
Left Front Heart Lobe Shaping
Row 53: Ch 1, turn. Sc2tog at inner right edge, sc to end. Turn. (36 sc)
Row 54: Ch 1, turn. Sc to last 2 sts, sc2tog. Turn. (35 sc)
Row 55: Ch 1, turn. Sc2tog, sc to end. Turn. (34 sc)
Row 56: Ch 1, turn. Sc to last 2 sts, sc2tog. Turn. (33 sc)
Row 57: Ch 1, turn. Sc2tog, sc to end. Turn. (32 sc)
Row 58: Ch 1, turn. Sc to last 2 sts, sc2tog. Turn. (31 sc)
Row 59: Ch 1, turn. Sc2tog, sc to end. Turn. (30 sc)
Row 60 (bottom of left lobe): Ch 1, turn. Sc in each st across. Turn. (30 sc)
Row 61: Ch 1, turn. 2 sc in first st, sc to end. Turn. (31 sc)
Row 62: Ch 1, turn. Sc to last st, 2 sc in last st. Turn. (32 sc)
Row 63: Ch 1, turn. 2 sc in first st, sc to end. Turn. (33 sc)
Row 64: Ch 1, turn. Sc to last st, 2 sc in last st. Turn. (34 sc)
Row 65: Ch 1, turn. 2 sc in first st, sc to end. Turn. (35 sc)
Row 66: Ch 1, turn. Sc to last st, 2 sc in last st. Turn. (36 sc)
Row 67: Ch 1, turn. 2 sc in first st, sc to end. Turn. (37 sc)
Rows 68 through 69: Ch 1, turn. Sc in each st across. Turn. (37 sc)
Left Front Neckline Shaping
Row 70: Ch 1, turn. Sc2tog at inner right edge, sc to end. Turn. (36 sc)
Row 71: Ch 1, turn. Sc2tog, sc to end. Turn. (35 sc)
Row 72: Ch 1, turn. Sc2tog, sc to end. Turn. (34 sc)
Row 73: Ch 1, turn. Sc2tog, sc to end. Turn. (33 sc)
Row 74: Ch 1, turn. Sc2tog, sc to end. Turn. (32 sc)
Rows 75 through 77: Ch 1, turn. Sc in each st across. Turn. (32 sc)
Row 78 (shoulder only, leaving neckline sts): Ch 1, turn. Sc in first 21 sts only. Leave rem 11 sts. Fasten off. (21 sc)
Right Front Panel
The right front panel is wider because it includes the overlapping button placket and the pointed V-hem at center front. Finished dimensions: approximately 11 inches / 28 cm wide by 16 inches / 40.5 cm tall to the V-tip.
Foundation Chain: Ch 57.
Row 1 (RS): Sc in 2nd ch from hook and in each ch across. Turn. (56 sc)
Rows 2 through 6: Ch 1, turn. Sc in each st across. Turn. (56 sc)
V-Hem Point Shaping for Right Front
Row 7: Ch 1, turn. Sc2tog at left (inner) edge, sc to end. Turn. (55 sc)
Row 8: Ch 1, turn. Sc in each st across. Turn. (55 sc)
Row 9: Ch 1, turn. Sc2tog at left edge, sc to end. Turn. (54 sc)
Row 10: Ch 1, turn. Sc in each st across. Turn. (54 sc)
Row 11: Ch 1, turn. Sc2tog at left edge, sc to end. Turn. (53 sc)
Row 12: Ch 1, turn. Sc in each st across. Turn. (53 sc)
Row 13: Ch 1, turn. Sc2tog at left edge, sc to end. Turn. (52 sc)
Row 14: Ch 1, turn. Sc in each st across. Turn. (52 sc)
Row 15: Ch 1, turn. Sc2tog at left edge, sc to end. Turn. (51 sc)
Row 16: Ch 1, turn. Sc in each st across. Turn. (51 sc)
Rows 17 through 42: Ch 1, turn. Sc in each st across. Turn. (51 sc)
Checkpoint: After Row 42, the right front panel is approximately 7.5 inches / 19 cm tall. The panel is 51 sts wide.
Right Front Armhole Shaping
Row 43 (RS): Ch 1, turn. Sc in first st, sc in each st across to last 5 sts, leave 5 sts unworked. Turn. (46 sc)
Row 44: Ch 1, turn. Sc2tog at armhole (right) edge, sc to end. Turn. (45 sc)
Row 45: Ch 1, turn. Sc to last 2 sts, sc2tog. Turn. (44 sc)
Row 46: Ch 1, turn. Sc2tog, sc to end. Turn. (43 sc)
Row 47: Ch 1, turn. Sc to last 2 sts, sc2tog. Turn. (42 sc)
Rows 48 through 52: Ch 1, turn. Sc in each st across. Turn. (42 sc)
Right Front Heart Lobe Shaping
Row 53: Ch 1, turn. Sc in each st to last 2, sc2tog at inner left edge. Turn. (41 sc)
Row 54: Ch 1, turn. Sc2tog, sc to end. Turn. (40 sc)
Row 55: Ch 1, turn. Sc to last 2 sts, sc2tog. Turn. (39 sc)
Row 56: Ch 1, turn. Sc2tog, sc to end. Turn. (38 sc)
Row 57: Ch 1, turn. Sc to last 2 sts, sc2tog. Turn. (37 sc)
Row 58: Ch 1, turn. Sc2tog, sc to end. Turn. (36 sc)
Row 59: Ch 1, turn. Sc to last 2 sts, sc2tog. Turn. (35 sc)
Row 60 (bottom of right lobe): Ch 1, turn. Sc in each st across. Turn. (35 sc)
Row 61: Ch 1, turn. Sc to last st, 2 sc in last st. Turn. (36 sc)
Row 62: Ch 1, turn. 2 sc in first st, sc to end. Turn. (37 sc)
Row 63: Ch 1, turn. Sc to last st, 2 sc in last st. Turn. (38 sc)
Row 64: Ch 1, turn. 2 sc in first st, sc to end. Turn. (39 sc)
Row 65: Ch 1, turn. Sc to last st, 2 sc in last st. Turn. (40 sc)
Row 66: Ch 1, turn. 2 sc in first st, sc to end. Turn. (41 sc)
Row 67: Ch 1, turn. Sc to last st, 2 sc in last st. Turn. (42 sc)
Rows 68 through 69: Ch 1, turn. Sc in each st across. Turn. (42 sc)
Right Front Neckline Shaping
Row 70: Ch 1, turn. Sc to last 2 sts, sc2tog at inner left edge. Turn. (41 sc)
Row 71: Ch 1, turn. Sc to last 2 sts, sc2tog. Turn. (40 sc)
Row 72: Ch 1, turn. Sc to last 2 sts, sc2tog. Turn. (39 sc)
Row 73: Ch 1, turn. Sc to last 2 sts, sc2tog. Turn. (38 sc)
Row 74: Ch 1, turn. Sc to last 2 sts, sc2tog. Turn. (37 sc)
Rows 75 through 77: Ch 1, turn. Sc in each st across. Turn. (37 sc)
Row 78 (shoulder only): Ch 1, turn. Leave first 16 sts unworked (these become the neckline-side placket overlap). Rejoin at st 17, sc in that st and in each remaining st across to armhole edge. Turn. (21 sc)
Row 79: Ch 1, turn. Sc in each st across. Fasten off. (21 sc)
Assembly and Finishing Tips
Block all pieces before seaming. Lay them flat on your blocking mat, pin to the finished dimensions, and allow to dry completely. This step makes a huge difference in how professional your finished top looks.
Seam the shoulder seams first using a mattress stitch or whip stitch. Then seam the side seams, leaving the armhole openings. Work the heart edging around the cutout using your smaller hook for a clean finish.
Attach the sleeves after seaming them into tubes and shaping the sleeve caps. The ruffle cuffs are added last.
For the button band, pick up stitches along the diagonal front edge and work outward. Space your 7 heart-shaped buttons evenly along the placket. Use a sharp sewing needle and matching thread to attach them securely.
Size Customization Tips
This pattern is written for size medium. To adjust:
For smaller sizes, reduce the foundation chain count by 4 to 8 stitches and work fewer rows before starting armhole shaping.
For larger sizes, add 4 to 8 stitches to the foundation chain and work additional rows before armhole shaping.
Always maintain your gauge and adjust proportionally across all pieces. The heart cutout shaping ratios remain the same.
You Did It
Thank you so much for choosing this pattern. I hope you love making this top as much as I loved designing it. The heart cutout is such a sweet detail, and those puff sleeve ruffles add the perfect finishing touch.
If you make this Lavender Dream Heart Cutout Crochet Top, I would absolutely love to see it. Tag me on Instagram or share in our Facebook group. Seeing your creations is the best part of sharing patterns.
Save this crochet pattern to your Pinterest boards so you can find it when you are ready to start. And please drop a comment below if you make one. I read every single comment and love hearing how your projects turn out.
