
I know what you’re thinking. A fitted maxi dress made entirely from granny squares? That sounds impossible. Or at least like something only advanced crocheters with decades of experience could pull off.
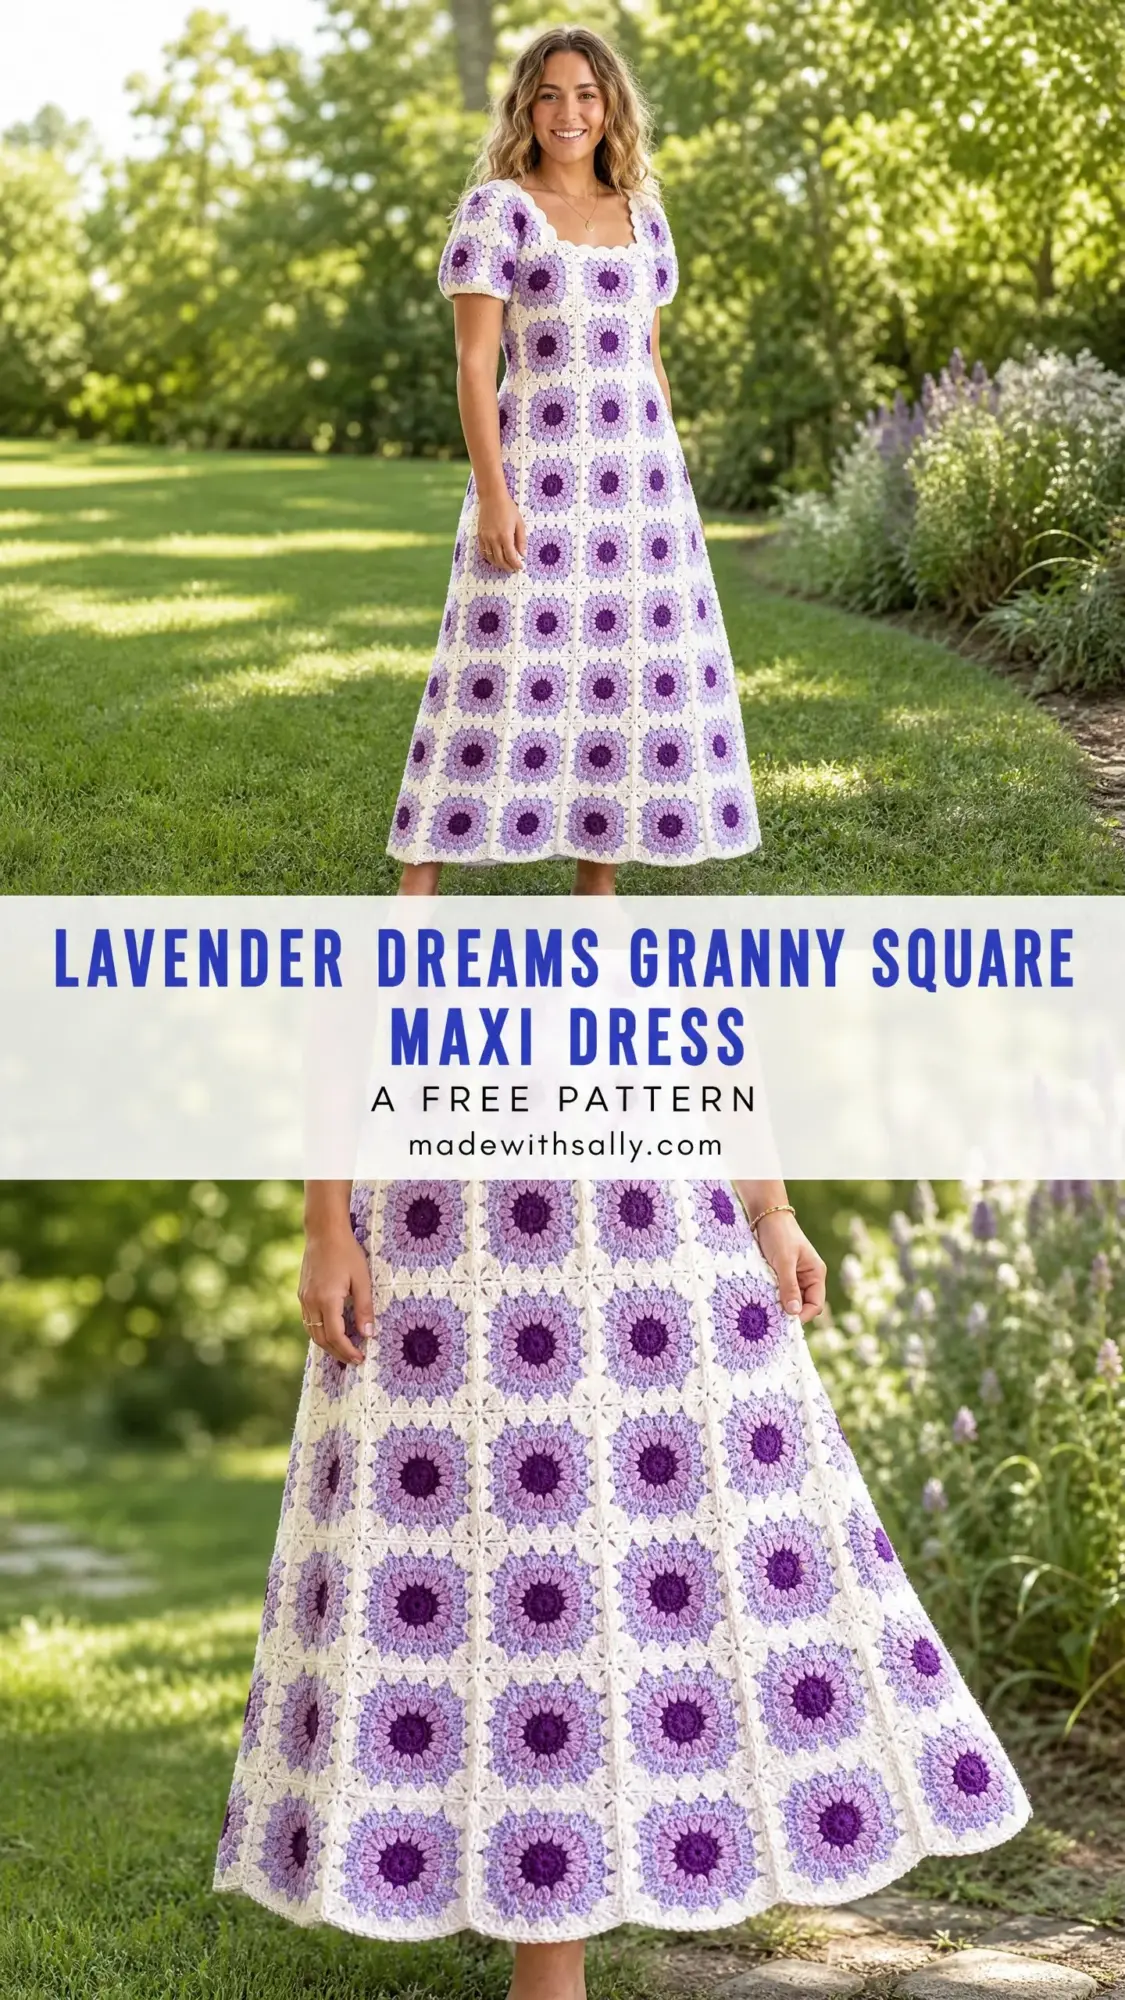
Here’s the truth. If you can crochet a basic granny square, you already have the main skill you need. This entire dress is built from individual 3-inch squares that you join together like puzzle pieces. No complicated shaping within the squares themselves. No decreases that make your head spin. The silhouette comes from how you arrange the squares, not from tricky stitch manipulation.
Whether you’re an intermediate crocheter ready to tackle your first garment or an advanced maker looking for a stunning statement piece, this Lavender Dreams Granny Square Maxi Dress crochet pattern breaks everything down into manageable steps. Let’s walk through it together.
About This Crochet Pattern
This maxi dress features a sunflower-style circular motif set within a traditional granny square frame. The color palette uses deep violet, soft lavender, blush pink, and cream to create those gorgeous concentric rings you see in each square. The construction is modular, meaning you make all your squares first, then join them into panels for the bodice and skirt.
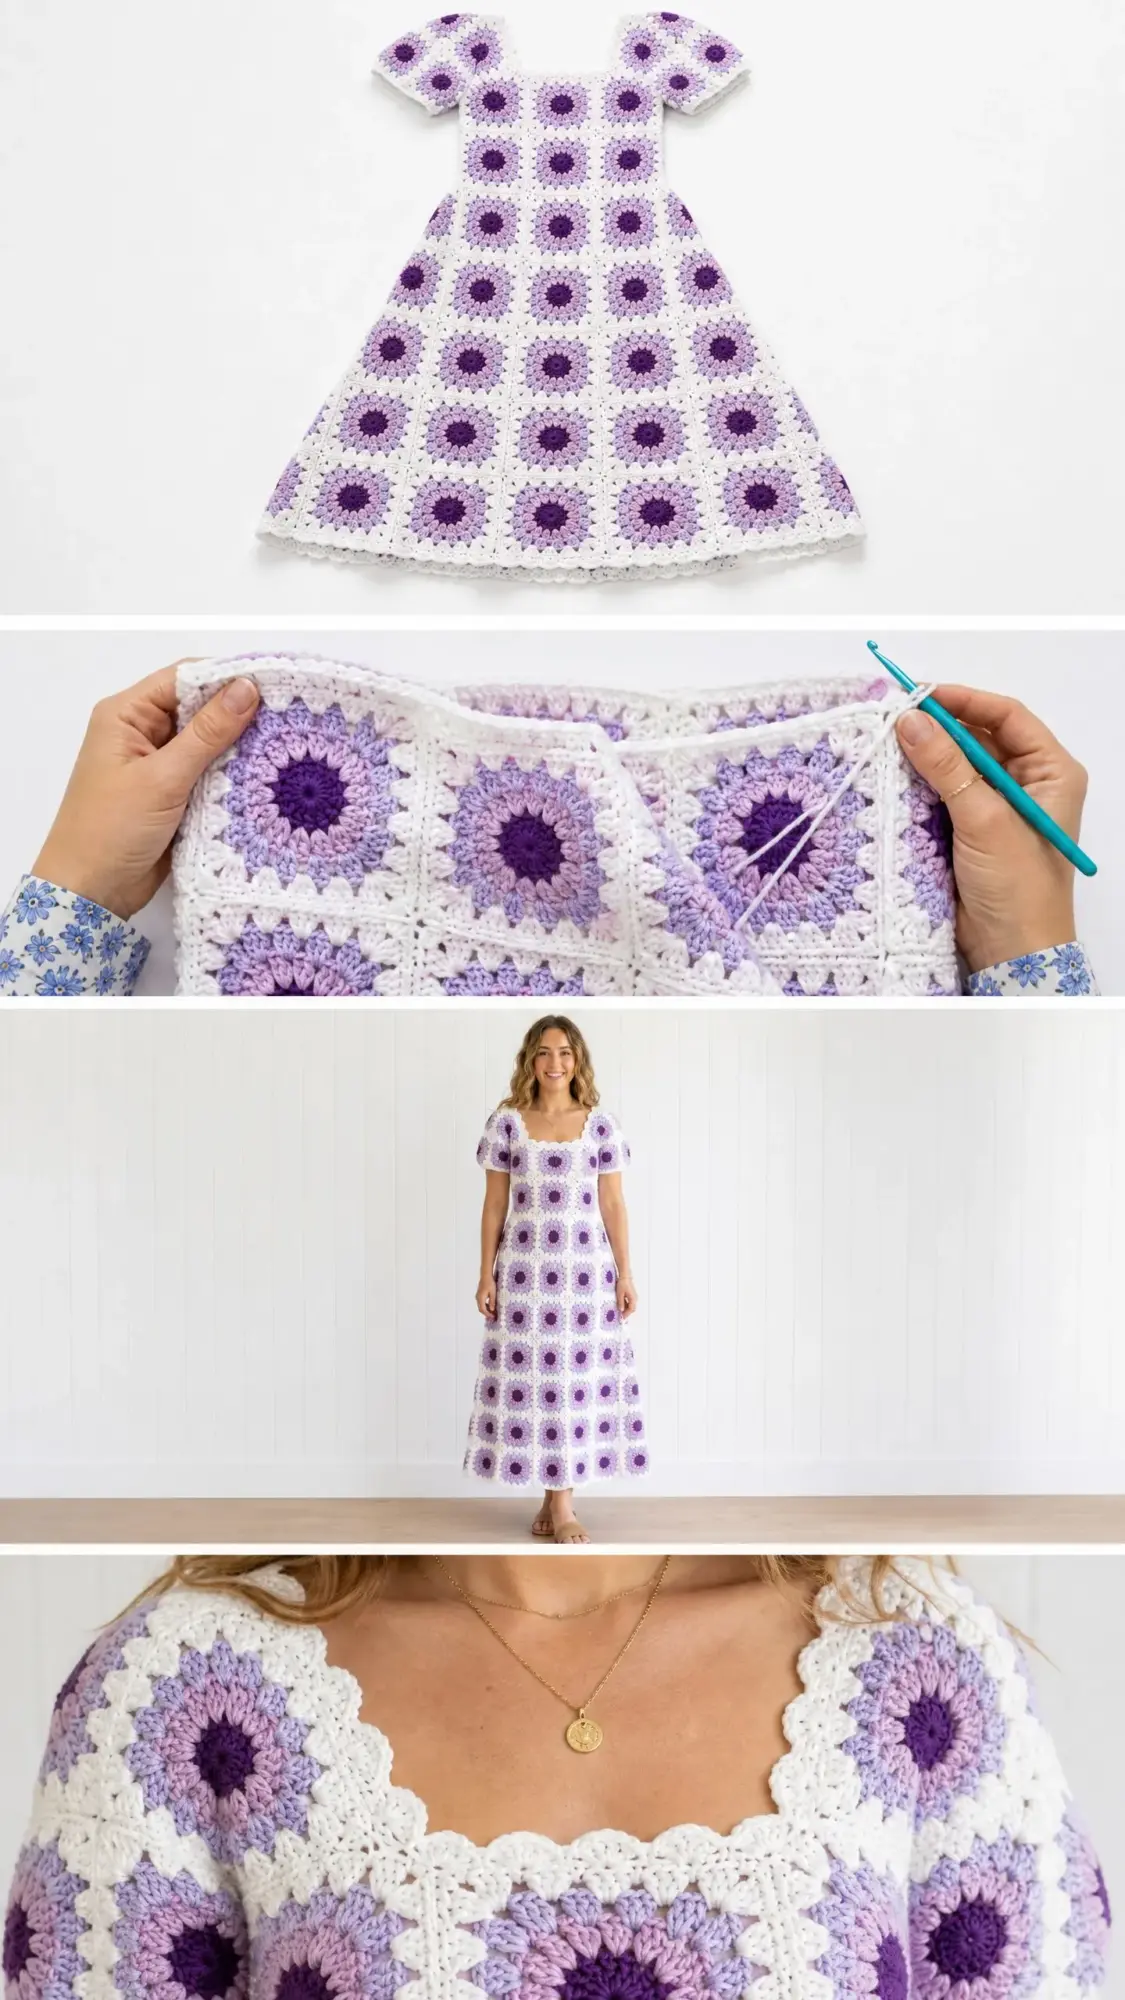
The dress includes a fitted bodice with charming puff sleeves, a naturally flared A-line skirt, and delicate scalloped edging at the neckline and hem. The flare happens automatically because you simply add more squares per row as the skirt descends. Clever, right?
Skill Level: Intermediate to Advanced
Time Estimate: Approximately 120 to 180 hours depending on your speed. Each granny square takes roughly 20 to 30 minutes. With approximately 256 squares needed for a size medium, budget your time accordingly. Joining and finishing add 10 to 15 additional hours.
Finished Measurements
This pattern is written for size Small/Medium (US 4/6). Here are the finished measurements:
I’ll cover size customization later in the pattern. The beauty of granny square construction is that every adjustment is simple math.
Materials Needed
Yarn: Fingering weight / sock weight yarn (CYCA 1), approximately 1800 yards / 1646 m total
Break down by color:
Hook: US E-4 / 3.5 mm crochet hook (or size needed to achieve gauge)
Notions:
Yarn Suggestions
Option 1: Cascade Yarns Cascade 220 Fingering. 100% Peruvian Highland Wool. 273 yards / 250 m per 50 g skein. Excellent stitch definition for showing off the circular motif detail. Blocks beautifully and holds its shape.
Option 2: Paintbox Yarns Simply DK used at a tighter gauge on a smaller hook to achieve fingering-weight fabric density. 100% Premium Acrylic. 137 yards / 125 m per 50 g skein. Machine washable, more affordable, widely available. Use US D-3 / 3.25 mm hook to compensate.
Option 3: Malabrigo Sock. 100% Superwash Merino Wool. 440 yards / 402 m per 100 g skein. Luxuriously soft against the skin, with a slight halo that adds dimension to the floral motif. More expensive but fewer ends to weave.
Substitution Note: Choose a yarn with good stitch definition so the circular sunflower motif reads clearly. Avoid yarns with heavy twist or boucle texture. If substituting, always make a gauge swatch of at least four complete granny squares joined together before committing to the full project.
Gauge
Each completed granny square (after blocking) measures 3 inches x 3 inches / 7.6 cm x 7.6 cm.
To confirm gauge: make four squares, join them in a 2×2 block, block flat, and measure the joined block. It should measure 6 inches x 6 inches / 15.2 cm x 15.2 cm. Adjust hook size as needed. Gauge is critical for garment fit, so please don’t skip this step.
Abbreviations (US Terms)
Let me define every abbreviation you’ll encounter:
Special Stitch: Scallop Edging
This decorative edging is used at the neckline and hem.
Join Color D in any st. Ch 1. Sc in next st, sk 1 st, 5 dc in next st (this creates a shell), sk 1 st. Rep from to across or around. Join or fasten off as needed. Adjust skip counts as needed to keep scallops lying flat.
The Sunflower Granny Square Step by Step
This is the heart of your entire dress. Each square is worked in rounds from the center outward. The sunflower effect comes from treble crochet clusters in the center rounds with contrasting petal colors around them.
Round 1 (Center, Color A):
Make a magic ring (adjustable ring). Ch 3 (counts as first dc). Work 11 dc into the ring. Join with sl st to top of beginning ch-3. Pull ring closed. (12 dc)
Round 2 (Petal Setup, Color A):
Ch 1. Working in FLO only, (sc in next st, ch 3) 12 times. Join with sl st to first sc. (12 sc, 12 ch-3 loops)
Do not fasten off. The ch-3 loops form the inner petal bases.
Round 3 (Petals, Color C):
Join Color C with sl st to any ch-3 loop from Round 2. Ch 1. Working into each ch-3 loop: (sc, hdc, 3 dc, hdc, sc) in each loop around. Join with sl st to first sc. (12 petals, each containing sc, hdc, 3 dc, hdc, sc = 7 sts per petal, 84 sts total)
Fasten off Color C.
Round 4 (Behind Petals, Color B):
Working behind the petals of Round 3, join Color B with sl st to any skipped BLO sc from Round 2 (the loops not used in Round 2). Ch 3. (Counts as dc.) Work 1 dc in same st. Work 2 dc in each remaining BLO sc from Round 2 around. Join with sl st to top of beginning ch-3. (24 dc)
Round 5 (Outer Petal Ring, Color B):
Ch 1. Working in FLO: (sc in next st, ch 4) 24 times. Join with sl st to first sc. (24 sc, 24 ch-4 loops)
Do not fasten off.
Round 6 (Outer Petals, Color C):
Join Color C with sl st to any ch-4 loop. (sc, hdc, 3 dc, hdc, sc) in each ch-4 loop around. Join with sl st to first sc. (24 petals)
Fasten off Color C.
Round 7 (Circular Frame, Color B):
Join Color B with sl st in any BLO sc from Round 5. Ch 1. Sc in same st. Sc in each remaining BLO sc from Round 5 around. (24 sc)
Join with sl st to first sc.
Round 8 (Square Frame Begin, Color D):
Join Color D in any sc. Ch 3 (counts as dc). Work 5 dc in same st (corner cluster).
For 24 sc in Round 7: divide by 4 = 6 sts per side. Work corners at sts 1, 7, 13, 19.
Detailed instructions: Join Color D in st 1. Ch 3 (counts as dc). 5 dc in same st. Ch 2 (corner). Sk 1, dc in next, ch 1, sk 1, dc in next, ch 1, sk 1, dc in next, ch 1, 6 dc in next st, ch 2. Rep 3 times. Work last side to match. Join with sl st to top of beginning ch-3.
You should have 4 corner ch-2 spaces and 3 ch-1 spaces per side. (56 dc + 4 ch-2 corner sps + 12 ch-1 sps)
Round 9 (Square Frame Finish, Color D):
Sl st to corner ch-2 sp. Ch 3 (counts as dc). (2 dc, ch 2, 3 dc) in same corner sp. Ch 1, (3 dc in next ch-1 sp, ch 1) 3 times. (3 dc, ch 2, 3 dc) in corner ch-2 sp. Rep from to around. Join with sl st to top of beginning ch-3.
You now have: 4 corner ch-2 sps, 4 groups of 3 ch-1 sps (with 3-dc clusters), and 4 corner clusters. This is the classic granny square final round.
Fasten off Color D. Weave in all ends. Block square to exactly 3 inches x 3 inches / 7.6 cm x 7.6 cm.
How Many Squares to Make
For size Small/Medium as written, make the following:
Total: 246 squares plus a buffer of 10 extra squares for error and tension variation = 256 squares recommended.
Color Configuration
The squares alternate between two configurations for visual depth:
Configuration 1: Center A (Deep Violet), Petals C (Blush Pink), Frame B (Soft Lavender), Outer Frame D (Cream)
Configuration 2: Center B (Soft Lavender), Petals C (Blush Pink), Frame A (Deep Violet), Outer Frame D (Cream)
Alternate configurations in a checkerboard arrangement across the dress. The finished dress shows a varied distribution that reads as beautifully textured.
Bodice Construction
CHECKPOINT: Before beginning the bodice, confirm you have 72 blocked squares (36 for front, 36 for back), each measuring exactly 3 x 3 inches / 7.6 x 7.6 cm.
The bodice is a rectangular panel 6 squares wide and 6 squares tall for both front and back.
When both panels are seamed at the sides, the total bodice circumference = 36 inches / 91.4 cm, which accommodates a 34 to 36-inch bust with slight ease.
Joining the Bodice Front Panel
Lay out 36 squares in a 6-wide by 6-tall grid on your blocking mat. Arrange colors in alternating configuration checkerboard. The top row will become the neckline edge.
To flat join: Hold two squares with wrong sides together. Insert hook through the ch-2 corner sp of both squares simultaneously. Join Color D with sl st. Ch 1. Working through both thicknesses, sc evenly along the shared edge, placing 1 sc in each ch-sp and dc st, and sc3tog at each corner junction. Continue until all squares in the row are joined horizontally. Then join rows to each other vertically in the same manner.
Joining sequence: Join squares into 6 horizontal strips of 6 squares each. Then join the 6 strips together vertically. This creates the front bodice panel.
Repeat for the back bodice panel.
CHECKPOINT: After completing both bodice panels, each should measure 18 inches wide x 18 inches tall / 45.7 x 45.7 cm.
Armhole Shaping and Side Seams
The armhole is created by leaving the top corner squares of each panel un-joined at the sides when seaming.
Leave the top 2 squares (squares in column 1 and column 6 of row 1) open at their outer vertical edges. When you seam the front and back panels together at the sides, seam only rows 2 through 6 on each side (leaving rows 1 corner squares open for the armhole).
Side Seam: Hold bodice front and bodice back with wrong sides together. Using Color D and flat join sc method, seam the left side: sc through corresponding edges of rows 2, 3, 4, 5, and 6 of front and back left edges. Repeat for right side. Leave rows 1 corner squares (left and right) open as armhole openings.
Each armhole opening = approximately 12 inches / 30.5 cm perimeter.
Neckline Shaping
The neckline is a wide, shallow square neckline. On the bodice front only, the top row of 6 squares forms a straight horizontal line.
After joining all bodice panels and side seams, join Color D at the top left corner of the bodice front. Work sc across the top edge of all 6 front squares: approximately 18 sc across. (18 sc)
Next row (neckline shaping): Sc in first 4 sts, hdc in next 2, sl st in next 6 center sts (this creates the dip), hdc in next 2, sc in last 4. Turn.
Next row: Sc across all sts, working sc in each sc, sc in each hdc, sc in each sl st. (18 sc)
Now work scallop edging across the neckline: Join Color D. Ch 1. Sc in first st, sk 1, 5 dc in next st, sk 1. Rep across, adjusting as needed to end neatly. Work scallop edging also around the top back neckline edge (worked straight across without dip). Join ends of neckline edging at shoulders with sl st.
Sleeve Construction
Make 2 sleeves. Each sleeve is 4 squares: 2 squares wide by 2 squares tall, joined into a tube.
Join 4 squares in a 2×2 block. Then seam the left and right vertical edges together to form a loop.
Setting in the Sleeve
Pin the sleeve tube into the armhole opening with right sides facing out, aligning seam edges. Using Color D, sc through both thicknesses around the entire armhole perimeter to attach sleeve to bodice. (Approximately 40 to 44 sc around the armhole.)
Sleeve Cap Puff
Before attaching the sleeve to the bodice, work one round of sc around the top open edge of the sleeve tube, decreasing 4 sts evenly by working sc2tog at 4 evenly spaced points. (Starting sts: approximately 40, after decreasing: 36 sc.) This gathers the fabric slightly and creates that beautiful puffed cap look.
Sleeve Hem Edging
At the lower open edge of the sleeve, work one round of scallop edging in Color D. Sc in next st, sk 1, 5 dc in next st, sk 1. Rep around. Join with sl st. Fasten off.
Skirt Construction for Your Crochet Dress
The skirt uses 11 rows of squares, growing progressively wider from top to bottom to create the A-line silhouette. The waist edge of the skirt attaches to the bottom of the bodice.
Skirt Layout Per Panel (Front and Back Each):
Total per panel: 83 squares
Measurements:
Assembling the Skirt
Join squares into horizontal strips. For rows that are wider than the row above, distribute extra squares evenly at the sides.
Preferred method for width increases between rows: When joining a wider row to a narrower row above, work the extra square’s top edge to the side selvedge of the row above by sc-joining through both the top edge of the new square and the side edge sts of the adjacent square above. This creates a smooth stepped seam at the sides of the skirt.
Work all 11 rows of the skirt front panel. Repeat for skirt back panel.
Attaching Skirt to Bodice
Hold skirt front Row 1 top edge against bodice front bottom edge, wrong sides together. Using Color D, sc through corresponding edges all the way across. This joins the skirt front to the bodice front.
Repeat to join skirt back to bodice back bottom edge.
Now seam the skirt side seams: with wrong sides together, sc-join the left side edges of skirt front Row 1 through Row 11 to skirt back Row 1 through Row 11. Repeat for the right side.
Hem Edging
Join Color D at any point along the hem edge (the bottom edge of Row 11 of both front and back skirt panels combined).
Round 1: Ch 1. Sc evenly around the entire hem circumference, working 1 sc in each dc, 1 sc in each ch-sp, and sc3tog at inside corners. Join with sl st to first sc.
Round 2 (Scallop Edging): Ch 1. Sc in next st, sk 1, 5 dc in next st, sk 1. Rep from to around the entire hem. Join with sl st to first sc. Fasten off.
Back Closure (Optional but Recommended)
If adding a zipper: Before seaming the back right side seam from the bodice top to a point 7 inches / 18 cm below the neckline, leave this seam open. Hand-stitch an invisible zipper into this opening.
If no zipper: Simply seam the back fully. The natural stretch of the crochet fabric provides enough ease to pull the dress on over the hips.
Size Customization Tips
The entire dress is modular. Fit is controlled entirely by how many squares wide and tall each section is. Each square = 3 inches / 7.6 cm after blocking.
To size up: Add one square per side to the bodice width (add 2 total per row, front and back). Every 2 squares added to bodice width = 6 inches / 15.2 cm added to bust circumference.
To lengthen the bodice: Add rows of squares. Each additional row = 3 inches / 7.6 cm of bodice length.
To lengthen the skirt: Add rows of squares to the skirt section.
To widen the flare more dramatically: Increase skirt width by 2 squares per panel per flare row rather than 1.
Size Guide Using Squares (Bodice Width x Bodice Height, Per Panel):
Adjust skirt width proportionally, starting the skirt 2 squares narrower than your hip measurement in squares and stepping up gradually.
Important Pattern Notes
1. The dress is constructed from individually blocked granny squares joined using a flat join. The flat join creates a visible seam line that reads as part of the grid design.
2. The A-line flare in the skirt is achieved structurally. No shaping rows are worked within individual squares. All shaping comes from the arrangement and count of squares per section.
3. All squares must be blocked before joining. Do not skip blocking.
4. A lining is recommended for modesty since crochet fabric is open.
5. The neckline scallop uses Color D and is worked after the bodice is assembled.
Final Thoughts
Thank you so much for choosing this Lavender Dreams Granny Square Maxi Dress crochet pattern for your next project. I know it’s a commitment of time and yarn, but the result is genuinely breathtaking. Take it one square at a time, and before you know it, you’ll have a pile of beautiful sunflower motifs ready to become something extraordinary.
I would absolutely love to see your finished dress. Tag me on Instagram or share your progress photos in my Facebook group. Seeing your creations is honestly the best part of designing patterns.
If this pattern caught your eye, go ahead and save it to your Pinterest boards so you can find it when you’re ready to start. And if you make this dress, please drop a comment below. I read every single one and would love to hear how it turned out for you.
