
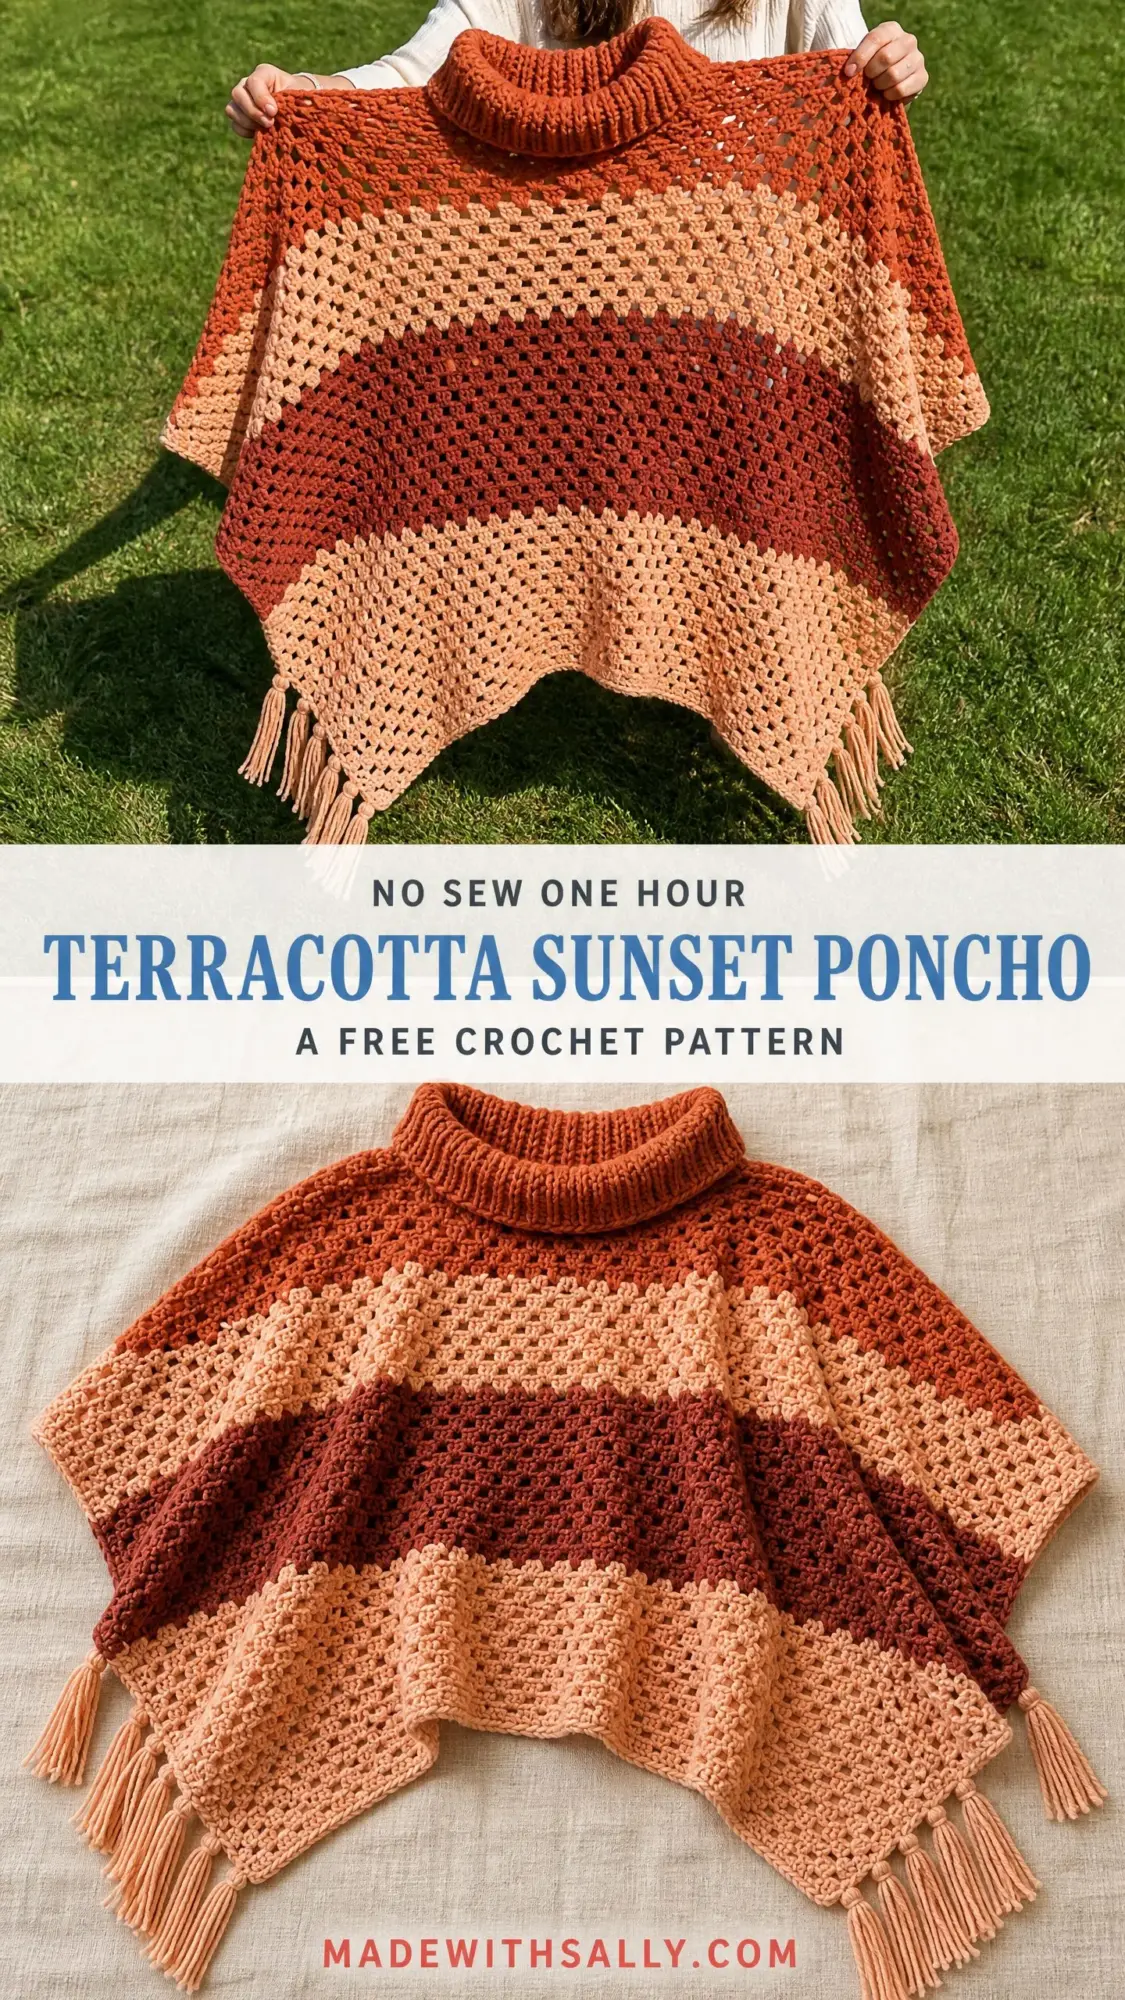
This is a cozy oversized poncho worked in warm autumnal stripes. Two identical rectangular panels get seamed at the shoulders, and a tall ribbed cowl collar finishes the neckline. The body uses a simple granny mesh stitch that creates beautiful drape and works up faster than you might expect.
If you know how to double crochet and chain, you can absolutely make this poncho. The open mesh pattern is repetitive and rhythmic once you get going. The construction is straightforward, and I will walk you through every step including the seaming and collar pickup.
The finished piece has that effortlessly bohemian look with flowing pointed hems and soft fringe along the bottom edge. It is the kind of project that looks impressive but does not require advanced skills. Just patience, good music, and maybe a cup of tea.
Why You Will Love This Crochet Poncho Pattern
The Terracotta Sunset Poncho hits that sweet spot between cozy blanket and wearable garment. The granny mesh stitch creates an airy fabric that is surprisingly warm without feeling heavy. The four color palette of rust orange, peach blush, deep terracotta, and light cream creates a gradient effect that reminds me of desert sunsets.
This is a one size fits most pattern, which makes it perfect for gifting. The generous dimensions mean it drapes beautifully on different body types. And because it is worked in two flat rectangular panels with no shaping, you can easily adjust the width or length if needed.
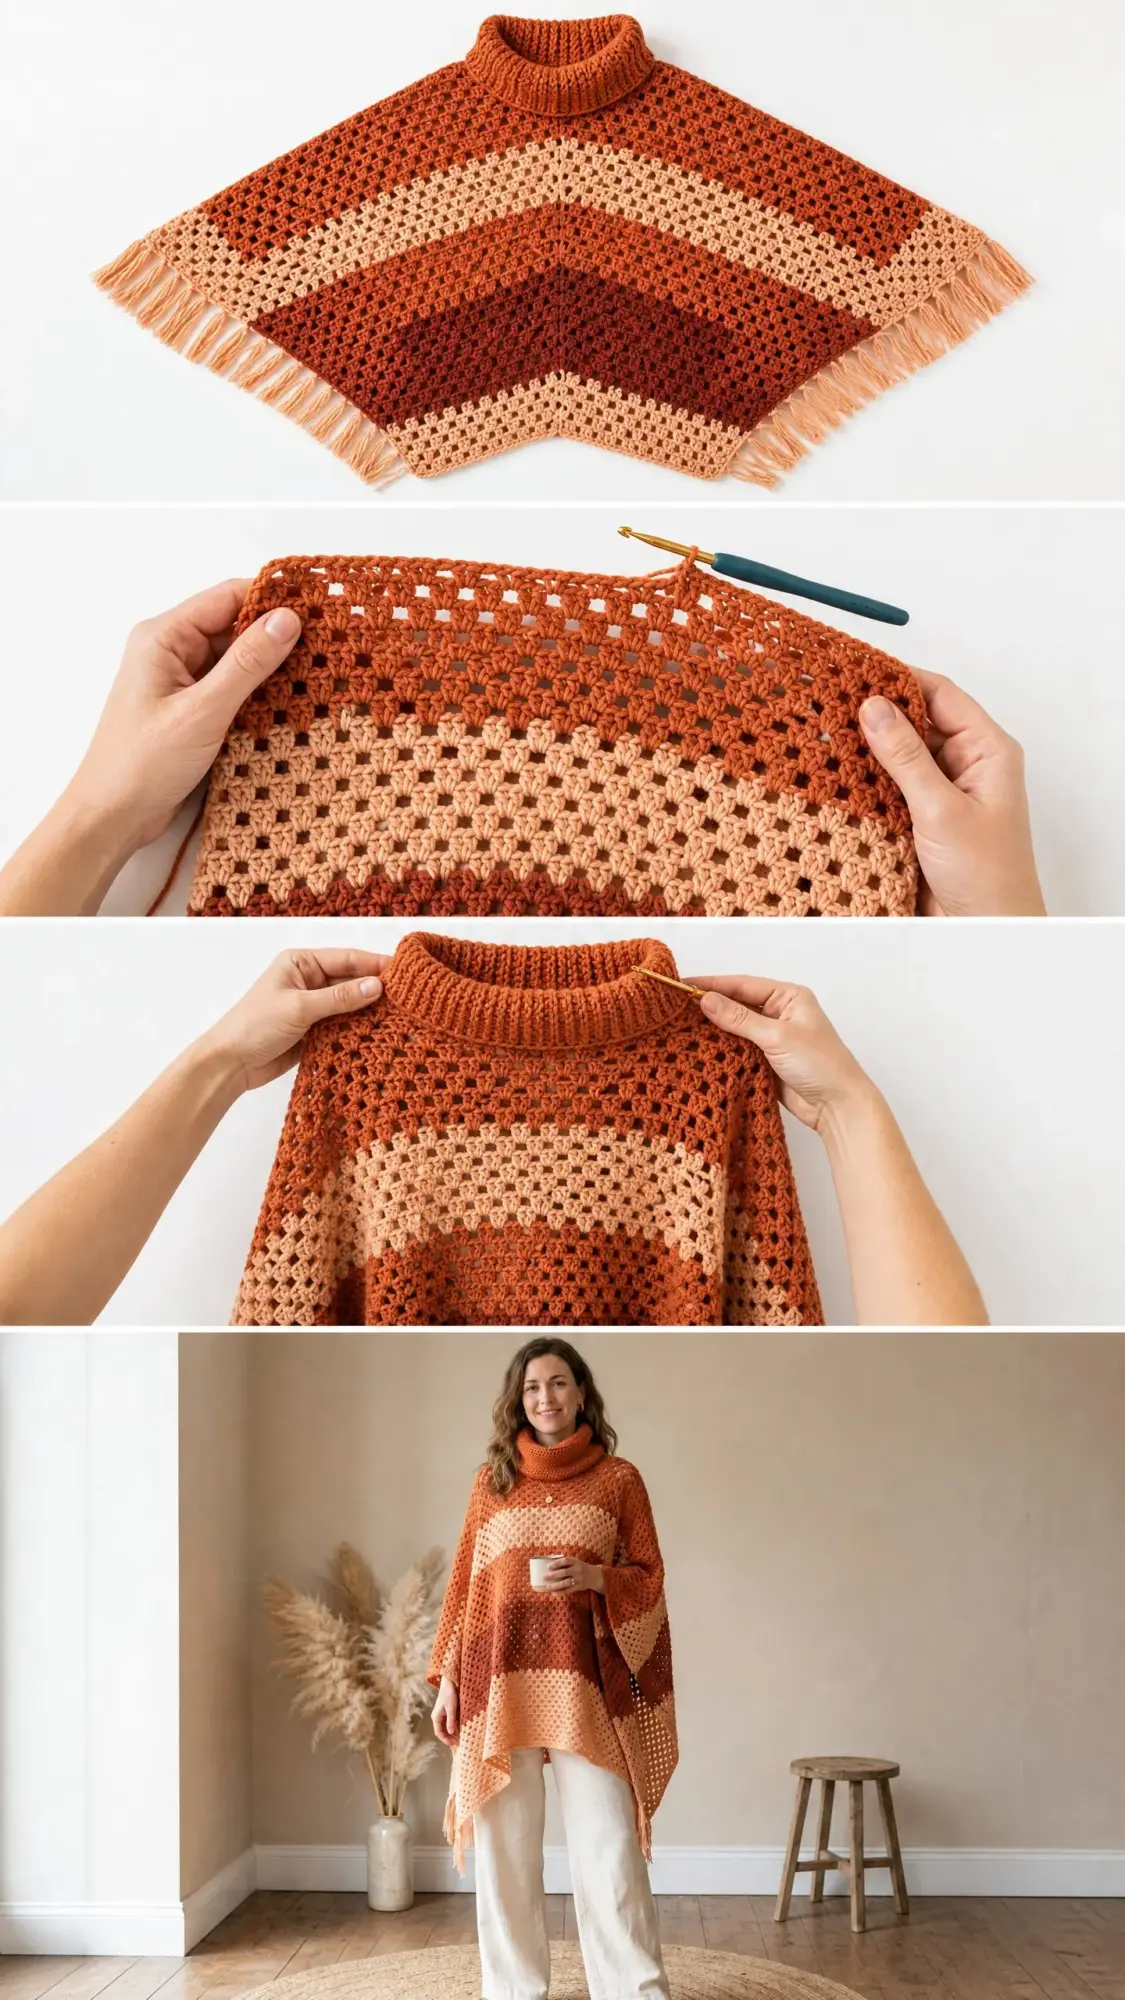
The cowl collar adds a luxurious touch and is worked directly into the neckline after seaming. Working in the back loop only creates that lovely ribbed texture you see in the photos.
Skill Level
This pattern is rated intermediate. The stitch pattern itself is simple and highly repetitive. What bumps it up from beginner level is the construction: you will be working two panels, seaming them with precision, picking up stitches for the collar, and managing four color changes throughout.
If you are comfortable with double crochet (dc), basic seaming, and working in rounds, you will complete this project with confidence. If you have never picked up stitches around a neckline before, do not worry. I will explain exactly how to do it.
Time Estimate
Plan for approximately 18 to 24 hours of working time depending on your speed. Each panel takes roughly 7 to 10 hours. The seaming, collar, and finishing add another 2 to 3 hours.
This is a great Netflix project. The repetitive mesh stitch becomes almost meditative once you establish your rhythm.
Finished Measurements
One size fits most adults.
| Measurement | Size |
|---|---|
| Total poncho width (cuff to cuff when laid flat) | 52 inches / 132 cm |
| Total poncho length (front center neck to lowest point) | 28 inches / 71 cm |
| Each panel dimensions | 26 inches wide by 26 inches long / 66 cm by 66 cm |
| Collar height | 6 inches / 15 cm |
| Collar circumference | approximately 24 inches / 61 cm |
Materials Needed
Yarn
You will need worsted weight yarn (weight category 4) in four colors. The total yardage is approximately 1,600 yards / 1,463 meters across all colors.
| Color | Name | Yardage |
|---|---|---|
| Color A | Rust Orange | 500 yards / 457 meters |
| Color B | Peach Blush | 450 yards / 411 meters |
| Color C | Deep Terracotta / Brown | 350 yards / 320 meters |
| Color D | Light Peach / Cream | 300 yards / 274 meters |
Yarn Suggestions:
Option 1: Lion Brand Pound of Love (100% acrylic, worsted weight, 1,020 yards per 16 oz skein). This gives excellent drape for a poncho and is machine washable. Purchase one skein each in Terracotta, Peach, Chestnut, and Champagne.
Option 2: Paintbox Yarns Simply DK used doubled throughout (100% acrylic, DK weight). Using two strands held together achieves a worsted weight equivalent with exceptional stitch definition for the open mesh pattern.
Option 3: Cascade 220 Superwash (100% superwash wool, worsted weight, 220 yards per 100g skein). This provides warmth and beautiful stitch clarity. Purchase approximately 3 skeins in the rust colorway, 2 to 3 skeins in peach, 2 skeins in deep brown, and 2 skeins in cream.
Substitution note: Any smooth worsted weight yarn that achieves the stated gauge will work. Avoid hairy or bouclé yarns as they will obscure the open mesh texture.
Hook
US size K-10.5 / 6.5 mm crochet hook
Notions
Gauge
In Granny Mesh Stitch pattern:
2 granny mesh repeats (each repeat = 3 dc + ch 2 space) = 3 inches / 7.6 cm
6 rows of granny mesh = 4 inches / 10 cm
Gauge swatch: Chain 28. Work 12 rows of Granny Mesh Stitch (instructions below). Block lightly. Your swatch should measure approximately 12 inches wide by 8 inches tall / 30.5 cm by 20 cm.
Gauge is critical for achieving the correct finished dimensions. Adjust hook size as needed. If your swatch is too big, go down a hook size. If it is too small, go up a hook size.
Abbreviations (US Terms)
Before we start, here are all the abbreviations used in this pattern with plain English explanations:
Special Stitches
Granny Mesh Stitch (worked flat in rows)
This stitch creates an open grid of double crochets separated by chain-2 spaces. It mimics the grid of a granny square laid flat. The pattern repeat is a multiple of 5 stitches plus 4.
Row 1 (RS): Ch 3 (counts as first dc), 2 dc in 4th ch from hook (first cluster made), sk next 2 ch, ch 2, sk next 2 ch, (3 dc in next ch, ch 2, sk 2 ch) across to last ch, 3 dc in last ch. Turn.
Row 2 (WS): Ch 3 (counts as first dc), 2 dc in first ch-2 sp, (ch 2, 3 dc in next ch-2 sp) across, ending with ch 2, 3 dc in top of t-ch sp. Turn.
Row 3 and all subsequent rows: Same as Row 2. The pattern is entirely repetitive after Row 2 is established.
To change color: When beginning a new stripe, join the new color with a sl st to the top of the turning chain before making the ch-3 at the start of the new row. Cut old color leaving a 6-inch tail and weave in later.
Cowl Ribbing Stitch (worked in rounds)
This creates a dense, stretchy, ribbed texture for the cowl collar.
Round 1: Join yarn with sl st. Ch 1, sc in each st around. Sl st to first sc to join. Do not turn.
Round 2: Ch 1, sc in back loop only (BLO) in each st around. Sl st to first sc to join. Do not turn.
Repeat Round 2 for all subsequent cowl rounds. Working in BLO every round creates the ribbed appearance.
Pattern Notes
1. The poncho is made of two identical rectangular panels, referred to as Panel 1 and Panel 2. Both panels are worked identically.
2. Each panel is worked flat from the bottom point upward to the top edge. The full width is established at the start and no shaping increases or decreases are worked in the body.
3. Stripes are worked in horizontal bands across both panels. The stripe sequence is the same on both panels.
4. The collar is worked in rounds directly into the neckline opening after both panels are seamed.
5. Fringe is cut and attached after all other finishing is complete.
6. The ch-3 at the beginning of each row counts as a double crochet throughout the body panels.
Stripe Sequence
This sequence is the same for both panels. Work from first row to last:
| Rows | Color |
|---|---|
| Rows 1 to 4 | Color A (Rust Orange) |
| Rows 5 to 8 | Color B (Peach Blush) |
| Rows 9 to 12 | Color C (Deep Terracotta) |
| Rows 13 to 16 | Color B (Peach Blush) |
| Rows 17 to 20 | Color A (Rust Orange) |
| Rows 21 to 24 | Color D (Light Peach / Cream) |
| Rows 25 to 28 | Color C (Deep Terracotta) |
| Rows 29 to 32 | Color B (Peach Blush) |
| Rows 33 to 36 | Color A (Rust Orange) |
| Rows 37 to 39 | Color D (Light Peach / Cream) |
Total rows per panel: 39
Terracotta Sunset Poncho Pattern Instructions
Panel 1 (make one)
Foundation Chain: With Color A and a size K-10.5 / 6.5 mm hook, ch 144.
Row 1 (RS): Ch 3 counts as first dc. Work 2 dc in the 4th ch from hook (first cluster complete). (Sk 2 ch, ch 2, sk 2 ch, 3 dc in next ch) 27 times. Sk 2 ch, ch 2, 3 dc in last ch. Turn.
Stitch count: 29 clusters of 3 dc + 27 ch-2 spaces = 87 dc + 27 ch-2 spaces across.
Row 2 (WS): Ch 3 (counts as first dc), 2 dc in first ch-2 sp. (Ch 2, 3 dc in next ch-2 sp) 27 times. Ch 2, 3 dc in top of t-ch. Turn.
Stitch count: 29 clusters, 28 ch-2 spaces.
Row 3: Same as Row 2. Turn.
Stitch count: 29 clusters, 28 ch-2 spaces.
Row 4: Same as Row 2. Turn.
Stitch count: 29 clusters, 28 ch-2 spaces.
Color change note: At the end of Row 4, do not cut Color A. Drop Color A to the wrong side and pick up Color B by pulling the loop of Color B through the final loop of the last sl st join. You can carry Color A loosely up the side edge for reuse later, or cut and rejoin.
Row 5 (Color B): Ch 3, 2 dc in first ch-2 sp. (Ch 2, 3 dc in next ch-2 sp) 27 times. Ch 2, 3 dc in top of t-ch. Turn.
Stitch count: 29 clusters, 28 ch-2 spaces.
Rows 6 through 8: Same as Row 5. Turn after each row.
Stitch count: 29 clusters, 28 ch-2 spaces.
Rows 9 through 12 (Color C): Ch 3, 2 dc in first ch-2 sp. (Ch 2, 3 dc in next ch-2 sp) 27 times. Ch 2, 3 dc in top of t-ch. Turn.
Stitch count: 29 clusters, 28 ch-2 spaces.
CHECKPOINT: After Row 12, your panel should measure approximately 26 inches / 66 cm wide and 8 inches / 20 cm tall from the foundation chain.
Rows 13 through 16 (Color B): Ch 3, 2 dc in first ch-2 sp. (Ch 2, 3 dc in next ch-2 sp) 27 times. Ch 2, 3 dc in top of t-ch. Turn.
Stitch count: 29 clusters, 28 ch-2 spaces.
Rows 17 through 20 (Color A): Ch 3, 2 dc in first ch-2 sp. (Ch 2, 3 dc in next ch-2 sp) 27 times. Ch 2, 3 dc in top of t-ch. Turn.
Stitch count: 29 clusters, 28 ch-2 spaces.
CHECKPOINT: After Row 20, your panel should measure approximately 26 inches / 66 cm wide and approximately 13.5 inches / 34 cm tall. You are just past the midpoint of the panel.
Rows 21 through 24 (Color D): Ch 3, 2 dc in first ch-2 sp. (Ch 2, 3 dc in next ch-2 sp) 27 times. Ch 2, 3 dc in top of t-ch. Turn.
Stitch count: 29 clusters, 28 ch-2 spaces.
Rows 25 through 28 (Color C): Ch 3, 2 dc in first ch-2 sp. (Ch 2, 3 dc in next ch-2 sp) 27 times. Ch 2, 3 dc in top of t-ch. Turn.
Stitch count: 29 clusters, 28 ch-2 spaces.
Rows 29 through 32 (Color B): Ch 3, 2 dc in first ch-2 sp. (Ch 2, 3 dc in next ch-2 sp) 27 times. Ch 2, 3 dc in top of t-ch. Turn.
Stitch count: 29 clusters, 28 ch-2 spaces.
CHECKPOINT: After Row 32, your panel should measure approximately 26 inches / 66 cm wide and approximately 21.5 inches / 54.5 cm tall. You are in the final quarter of the panel.
Rows 33 through 36 (Color A): Ch 3, 2 dc in first ch-2 sp. (Ch 2, 3 dc in next ch-2 sp) 27 times. Ch 2, 3 dc in top of t-ch. Turn.
Stitch count: 29 clusters, 28 ch-2 spaces.
Rows 37 through 39 (Color D): Ch 3, 2 dc in first ch-2 sp. (Ch 2, 3 dc in next ch-2 sp) 27 times. Ch 2, 3 dc in top of t-ch. Turn after Rows 37 and 38. Do not turn after Row 39. Fasten off and weave in end.
Stitch count: 29 clusters, 28 ch-2 spaces.
CHECKPOINT: Panel 1 is complete. It should measure 26 inches / 66 cm wide and 26 inches / 66 cm tall. Block gently before seaming.
Panel 2 (make one)
Work Panel 2 identically to Panel 1 following all rows and the same stripe sequence. Both panels are the same. They become the front and back of the poncho when seamed.
Seaming the Panels
Lay both panels flat with right sides facing up, one panel above the other, both oriented the same direction (foundation chain at the bottom of each).
Shoulder Seam Placement
The poncho is formed by placing one panel as the front and one as the back, then seaming them together along portions of the top edge (Row 39) to create shoulder seams. You will leave the center open for the neck hole and the sides open for arm openings.
1. From the left edge of the top row, measure in 8 inches / 20 cm and place a stitch marker. This marks the end of the left shoulder seam.
2. From the right edge of the top row, measure in 8 inches / 20 cm and place a stitch marker. This marks the start of the right shoulder seam.
3. The center section between the two markers (10 inches / 25.5 cm) is left open as the neck hole.
Join Panel 1 (front) and Panel 2 (back) with right sides together. Using Color A and a yarn needle or sl st seam with crochet hook, seam the left shoulder: work through the corresponding stitches of both panels from the left edge to the first stitch marker. Fasten off.
Rejoin Color A at the right stitch marker and seam from there to the right edge of the panels. Fasten off.
Rotate the now-joined piece 90 degrees. The side edges of the two panels now form the left and right sides of the poncho. These sides are left entirely open as the arm openings and do not require seaming.
CHECKPOINT: After seaming, slip the poncho over your head. The neckline should measure approximately 10 inches / 25.5 cm across (the open center portion). The poncho should fall over both shoulders with the side panels draping freely over the arms.
Cowl Collar
The collar is worked in rounds directly into the neck opening. Work with right side of the poncho facing you (the outside of the garment facing out).
Setup: Using Color A, join yarn with a sl st to the right shoulder seam.
Place stitch markers at 4 even points around the neckline: at both shoulder seams and at the center front and center back of the opening. There should be approximately 24 inches / 61 cm of circumference to work into.
Pick up stitches: Working around the neck opening and picking up evenly, work 1 sc into each stitch and 2 sc into each row-end along the neckline edge. Aim for a total of 80 sc evenly distributed around the opening. Adjust by adding or removing 1 sc in non-critical sections to reach exactly 80 sc. Sl st to first sc to join round.
Round 1: 80 sc.
Round 2: Ch 1, sc in BLO in each sc around. Sl st to first sc to join. Do not turn.
Round 2: 80 sc.
Rounds 3 through 18: Repeat Round 2.
Each round: 80 sc.
Note: 18 rounds of BLO single crochet at the stated gauge will produce a collar of approximately 6 inches / 15 cm in height. The collar is designed to be worn folded over once as a cowl. If you prefer a shorter cowl, work only 9 rounds for a folded cowl height of 3 inches / 7.5 cm.
Fasten off. Weave in all ends.
CHECKPOINT: The collar should measure approximately 12 inches / 30.5 cm tall before folding and fold neatly over itself to create a 6-inch / 15 cm tall cowl neck.
Fringe
Cut fringe from Color B and Color D, mixing them for a tonal effect, or use a single color. Each fringe strand is cut to 14 inches / 35.5 cm before folding. This produces a 6-inch / 15 cm finished fringe after attachment and knotting.
Cut approximately 160 strands total, each 14 inches / 35.5 cm long. Work with 4 strands held together per fringe unit.
To attach fringe: Fold 4 strands in half. Insert hook from back to front through a chain-sp at the lower edge. Pull the folded loop of the strands through the sp. Pass the cut ends through the folded loop and pull tight to secure. Knot each fringe unit snugly against the hem.
Space fringe units approximately every third cluster opening along the hem of both panels, placing one fringe unit in each ch-sp selected. This yields approximately 18 to 20 fringe units per panel edge.
Trim all fringe to an even length after attachment. A finished fringe length of 5 to 6 inches / 12.5 to 15 cm is recommended.
Size Customization Tips
To make the poncho wider: Add additional repeat units of 5 chains to your foundation chain. Adding 10 chains (2 more repeat units) adds approximately 3 inches / 7.5 cm to each panel width. Adjust yarn quantities accordingly.
To make the poncho longer: Work additional rows in any stripe color, maintaining the stripe sequence rhythm or extending the final stripe. Each additional row adds approximately 0.67 inches / 1.7 cm to the panel height.
To widen the neckline: After seaming, simply leave a larger center section unseamed. Moving each shoulder seam in by 2 more inches on each side will add 4 inches to the neck opening width.
For a child size (approximately age 8 to 12): Use a ch-94 foundation chain (18 repeat units), work 26 rows per panel, and reduce fringe to 10-inch / 25.5 cm cut strands. Use DK weight yarn with a G-6 / 4 mm hook and re-gauge accordingly.
Finishing and Blocking
Weave in all yarn ends on the wrong side of the garment using a yarn needle. Work each tail in at least two directions for security.
For acrylic yarn: Use the wet blocking method. Submerge the finished poncho in cool water for 15 minutes. Gently squeeze out excess water without wringing. Roll in a clean towel to absorb further moisture. Lay flat on a blocking mat and pin to the schematic measurements. Allow to dry completely.
For wool yarn: Follow the same wet blocking process but use a gentle wool wash solution. Do not agitate or the yarn may felt.
After blocking, the open mesh pattern will relax and open up beautifully, giving the poncho an elegant, drapey hand.
Care Instructions
For acrylic yarn: Machine wash cold on a gentle cycle. Lay flat to dry. Do not place in a high-heat dryer as this may cause the acrylic to lose its softness and shape. Do not iron directly.
For wool yarn: Hand wash in cool water with wool-safe detergent. Do not wring or twist. Lay flat to dry away from direct sunlight or heat.
Store the poncho folded flat rather than hung to prevent the open mesh from stretching out of shape over time.
Final Thoughts on This Crochet Poncho Pattern
The Terracotta Sunset Poncho is the kind of project that feels luxurious to wear and satisfying to make. The repetitive granny mesh stitch gives you that meditative crochet experience while the color changes keep things interesting. And when you slip it on for the first time, you will understand exactly why ponchos have made such a comeback.
I hope you enjoy making this as much as I enjoyed designing it. The warm autumn tones work beautifully for fall and winter, but you could easily adapt the palette to soft blues and grays for a coastal vibe or jewel tones for something more dramatic.
Thank you so much for choosing this pattern. If you make one, I would absolutely love to see it. Tag me on Instagram or share your finished poncho in my Facebook group.
If you loved this pattern, save it to your Pinterest boards so you can find it when you are ready to cast on. And please leave a comment below to let me know if you have any questions or just to say hello. I read every single one.
