
Last summer, I found myself standing in front of my closet, completely uninspired. Everything felt heavy, dark, or just wrong for the season. I wanted something that felt like sunshine, something that would make me smile every time I put it on. That’s when I started sketching this dress.
Get the Ad-Free PDF Pattern
You can find the free pattern below, or you can purchase the ad-free printable PDF from my shop.
Get the Printable PDF →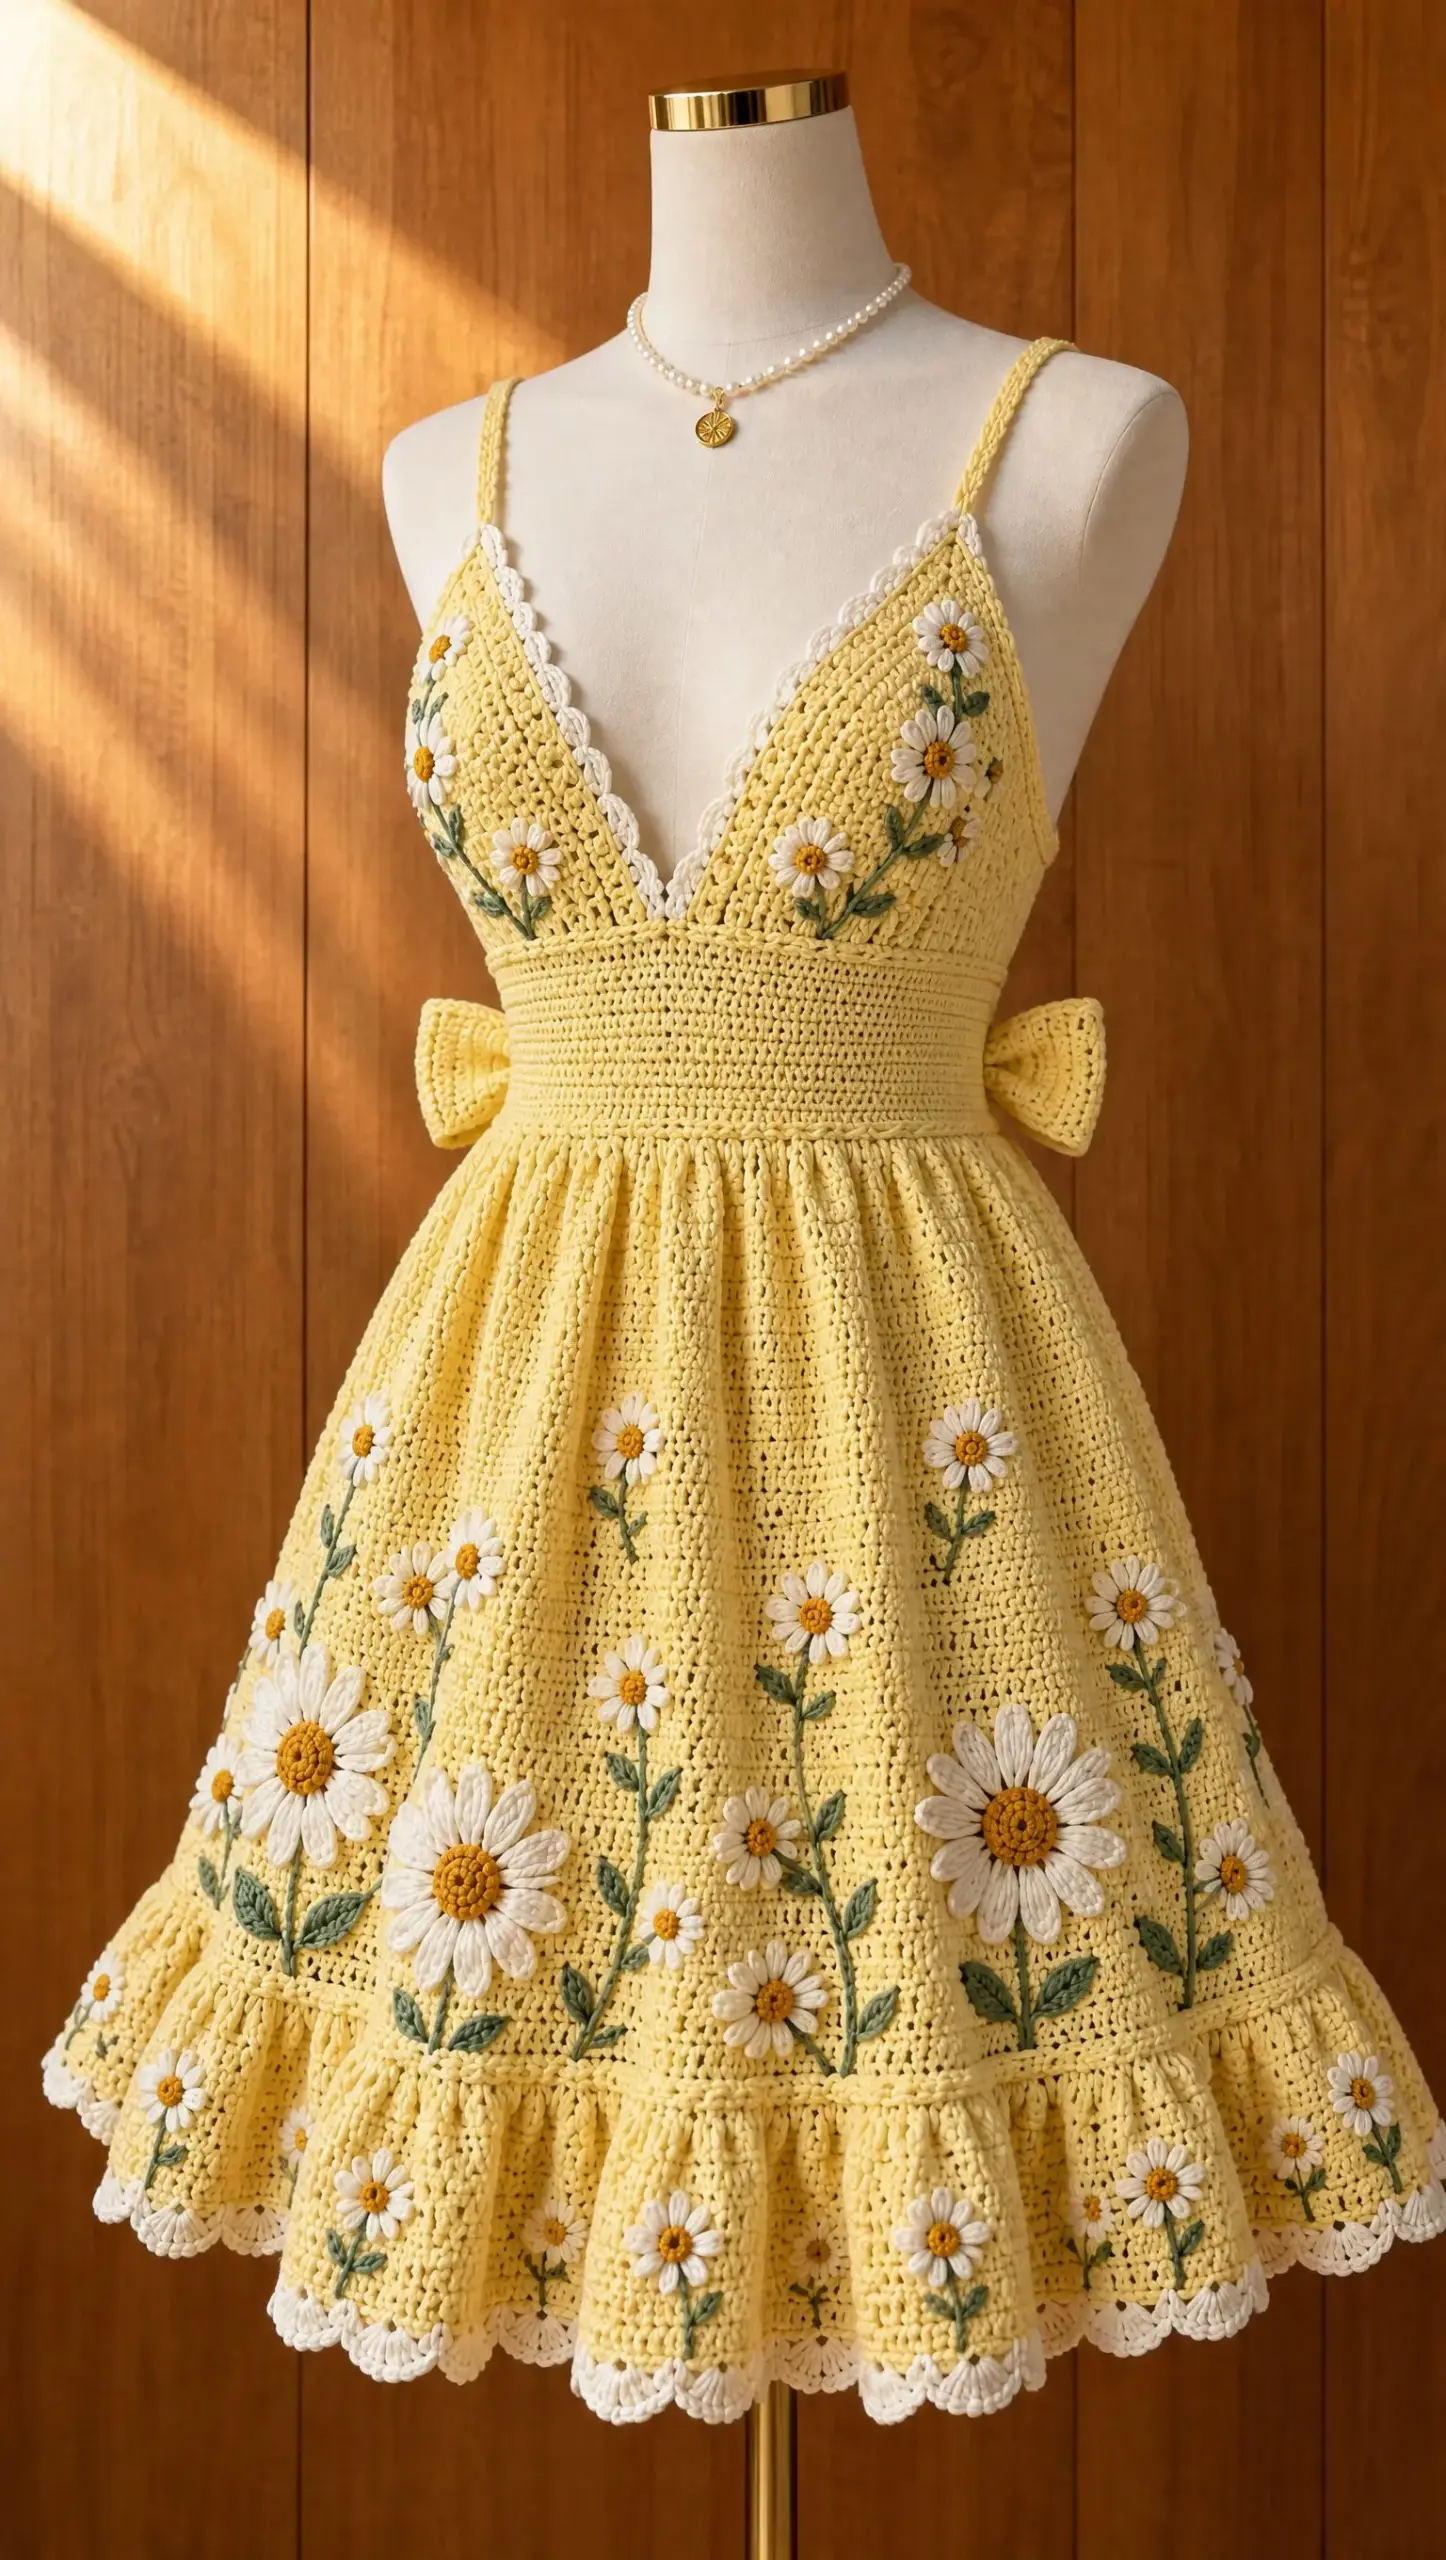
I’d been hoarding these gorgeous lemon yellow cotton skeins for months, waiting for the right project. You know how that goes. The daisies came to me while I was sitting in my garden, watching the wildflowers sway. I thought, what if I could wear that feeling? What if I could carry a little meadow with me wherever I went?
This Lemon Daisy Ruffle Dress is the result of that daydream, and honestly, it might be my favorite thing I’ve ever made. It’s cheerful, feminine, flattering, and surprisingly practical to construct once you understand the modular approach.
About This Pattern
This crochet sundress features sculpted triangle cups, a fitted waistband, a gathered A-line skirt, and a broad ruffled hem. The daisy appliques and embroidered stems add that whimsical garden-party charm that makes this piece truly special.
Skill Level: Intermediate
Construction Method: Modular cups plus fitted waistband plus gathered A-line skirt plus applied floral embellishment
The beauty of this pattern is that it’s completely made-to-measure. You’re not locked into standard sizing. Instead, you’ll take your own body measurements and use simple formulas to customize every piece. This means the dress will actually fit you perfectly, which is honestly the dream when it comes to crocheted garments.
Materials You’ll Need
Gathering your supplies before you start makes the whole process smoother. Here’s everything you’ll need:
Yarn:
Tools:
Optional: 6 to 10 mm soft waistband elastic if you want extra waist stability
Yarn Estimates by Body Size
| Size | Bust | Waist | Lemon Yarn | Ivory + Accents |
|---|---|---|---|---|
| XS | 76-81 cm | 61-66 cm | 350-400 g | 55-70 g |
| S | 81-86 cm | 66-71 cm | 400-450 g | 60-75 g |
| M | 86-96 cm | 71-81 cm | 450-500 g | 65-80 g |
| L | 96-106 cm | 81-91 cm | 500-575 g | 70-90 g |
| XL | 106-116 cm | 91-101 cm | 575-650 g | 75-95 g |
| 2XL | 116-127 cm | 101-112 cm | 650-725 g | 80-105 g |
| 3XL | 127-137 cm | 112-122 cm | 725-825 g | 85-115 g |
Quick tip: If you want a longer skirt, fuller ruffle, or dense floral coverage, add 15 to 25 percent more lemon yarn and one extra ball of ivory.
Gauge Information
Getting your gauge right matters most at the waistband. This is where fit really counts.
Main fabric: 24 single crochet (sc) x 26 rows = 10 cm / 4 inches after wet blocking
Ruffle fabric: 22 half double crochet (hdc) x 18 rows = 10 cm / 4 inches. Gauge is less critical here since the ruffle is meant to flow freely.
Make a 15 cm square swatch in single crochet (sc). A single crochet is the most basic crochet stitch where you insert your hook, yarn over, pull through, yarn over again, and pull through both loops. Wash and dry your swatch the same way you plan to care for the finished dress. Adjust your hook size until your blocked gauge is close to 2.4 stitches per centimeter.
Abbreviations and Stitch Guide
Let me walk you through all the stitches and terms you’ll encounter:
Special Stitch Patterns
Ivory Shell Edging: Slip stitch in next stitch, skip 1 stitch, 5 double crochet in next stitch, skip 1 stitch. Repeat this sequence. At corners or strap points, omit a skipped stitch as needed so the edging lies flat.
Small Ivory Scallop: Slip stitch in next stitch, 4 half double crochet in next stitch, slip stitch in next stitch. Repeat around the lower edge.
Taking Your Measurements
Before you begin crocheting, you’ll need these measurements:
| Code | Measurement | How to Measure |
|---|---|---|
| B | Full bust | Around fullest part, tape level and comfortable |
| UB | Underbust | Directly below bust |
| W | Natural waist | Where waistband will sit |
| CB | Cup base | From center front under bust to cup side edge |
| CD | Cup depth | From underbust line over fullest point to desired cup peak |
| SL | Strap length | Cup peak over shoulder to back waist/top edge attachment |
| SK | Skirt length | Waistband lower edge to desired finished hem |
Fit Formulas
These simple calculations will help you customize your dress:
Always try on or pin-fit the cups and waistband before starting the skirt. Trust me on this one.
Sculpted Triangle Cups (Make 2)
The cups are built from the lower center upward in dense single crochet. Their shape is controlled by working increases along a center spine, then tapering the top. This construction makes them easy to customize for both width and depth.
Step 1 – Foundation: With lemon yarn, chain enough stitches to equal CB at your blocked gauge. For example, for a 17 cm cup base at 2.4 stitches per centimeter, chain 42. Add 1 turning chain.
Step 2 – Lower Shaping: Row 1 (WS): Single crochet in 2nd chain from hook and across. Mark the center stitch (or center gap if stitch count is even). Turn.
Step 3 – Build the Cup Wedge: Row 2 (RS): Chain 1, single crochet to marked center, work 3 single crochet in the center stitch, re-mark the middle of those 3 single crochet, single crochet to end. Turn.
Repeat this center increase row on every RS row. On WS rows, single crochet evenly without increases.
Step 4 – Reach Cup Depth: Continue until the measured distance from the lower edge to the cup peak is approximately CD minus 2 cm. Hold the piece over your body or a well-fitting bra cup. The side edges should meet the desired underarm and center-front points without strain.
Step 5 – Form the Pointed Peak: For the final 2 cm, stop increasing. On every row, sc2tog at the beginning and end until 5 to 7 stitches remain at the top. Fasten off, leaving a sewing tail.
Step 6 – Shape the Lower Edge: If the base has curved during shaping, work 1 row of single crochet evenly across the base, using occasional sc2tog so the base lies straight. Do not make it shorter than CB.
Step 7 – Second Cup: Make the second cup to match the first exactly. Count rows rather than relying only on measurement.
Adjustment tip: Need more projection without a wider base? Add extra plain WS/RS rows after the cup has reached full base width, then taper the top. Need more side coverage? Add 1 to 2 single crochet at both outer ends for several rows before tapering.
Join the Cups and Edge the Neckline
Step 1 – Center-Front Join: Place cups right side up with inner lower corners touching. Pin the inner edges together for 2 to 4 cm, depending on desired V depth. Using lemon yarn and a tapestry needle, mattress stitch the pinned section. Reinforce the bottom of the V with 2 to 3 hidden passes.
Step 2 – Lower Cup Stabilization: With lemon, join at one outer lower cup corner. Single crochet evenly across the entire lower edge of Cup 1, across the center join, and across Cup 2. Turn and work 1 more single crochet row. This creates a firm line for attaching the waistband.
Step 3 – Ivory Neckline Edging: With RS facing, join ivory at one outer top edge. Work the shell repeat up Cup 1, around its peak, down the V edge, up Cup 2 and down to the opposite outer edge. Keep shells shallow around the V so the edge does not flare.
Slim Shoulder Straps (Make 2)
Step 1 – Strap Foundation: With lemon, chain to the measured SL plus 5 cm for fitting adjustment.
Step 2 – Dense Strap: Row 1: Single crochet in 2nd chain from hook and across. Row 2: Chain 1, single crochet BLO across. Fasten off. The finished strap should be about 8 to 10 mm wide.
Step 3 – Attach Front: Sew one strap to each cup peak across at least 1.5 cm of fabric. Use several small passes through dense stitches rather than one large stitch.
Step 4 – Leave Back Temporary: Do not permanently attach the back ends until the waistband is finished and the dress can be tried on.
Wide Fitted Waistband
The waistband is worked as one dense horizontal rectangle, approximately 9 to 11 cm deep. It should sit snugly at the natural waist and support the weight of the skirt.
Step 1 – Calculate Starting Stitches: Target circumference = W minus 2 to 4 cm. Multiply target centimeters by your single crochet stitches-per-centimeter. Round to an even number. For example, 72 cm target times 2.4 equals about 173 stitches. Use 174 stitches.
Step 2 – Foundation Row: With lemon, chain calculated stitch count plus 1. Single crochet in 2nd chain from hook and across. Turn.
Step 3 – Build Depth: Work even rows of single crochet until band measures 9 to 11 cm deep. For a firmer lower edge, work the last 2 rows in BLO.
Step 4 – Create Back Seam: Wrap waistband around body. It should close snugly without distorting stitches. Mattress stitch the short ends at center back. If you want a removable elastic stabilizer, leave a 2 cm opening inside the seam until final fitting.
Step 5 – Attach Bodice: Center the joined cups on the front half of the waistband. Pin the lower cup edge to the top edge of waistband. Sew securely with lemon using a whip stitch from the WS, easing gently but without gathers.
Step 6 – Attach Strap Backs: Try on the bodice. Cross straps very slightly toward center back if desired. Pin each strap to the waistband top edge 8 to 13 cm from center back. Check symmetry, then sew securely and trim excess strap.
Optional hidden elastic: For heavy skirts or very smooth cotton, thread soft elastic through the inside of the waistband at the natural waist line. Join elastic without stretching the crochet smaller than the intended fit.
Gathered A-Line Skirt
Step 1 – Skirt Starting Count: Calculate 1.45 times waistband stitch count for the pictured fullness. If waistband has 174 stitches, target about 252 skirt stitches. The exact count is not critical, but it should be divisible by 6 for easy shaping.
Step 2 – Attach Yarn: With RS facing and lemon, join yarn at center back along waistband lower edge. Chain 1.
Step 3 – Gathering Round: Work single crochet around, distributing increases evenly until target skirt count is reached. For example, alternate 1 single crochet in next stitch and 2 single crochet in next stitch, adjusting the final few repeats so increases are evenly spread. Join with slip stitch.
Step 4 – Set the Skirt Fabric: Rounds 2 through 6: Chain 1, single crochet evenly around, join. This creates a neat upper-skirt yoke below the gathers.
Step 5 – Change to Half Double Crochet: Next round: Chain 2, half double crochet in each stitch around, join. Continue in half double crochet for the rest of the main skirt for softer drape.
Step 6 – A-Line Increases: Every 5th round, add 6 increases evenly around. Place markers at six equally spaced points and work 2 half double crochet in the marked stitch. On all other rounds, half double crochet evenly.
Step 7 – Work to Ruffle Line: Continue until main skirt measures SK minus 12 to 15 cm from lower waistband edge, or until it reaches the desired point for the ruffle seam. End with a complete round and do not fasten off.
Length check: Cotton can lengthen after wet blocking. Before beginning the ruffle, steam or lightly wet-block the hanging skirt, let it dry, then recheck length.
Broad Hem Ruffle
Step 1 – Ruffle Increase: Next round: Chain 2. Work 2 half double crochet in next stitch, 1 half double crochet in next stitch around. Join. This increases the circumference by about 50 percent and creates the broad single ruffle.
Step 2 – Ruffle Body: Work half double crochet evenly for 10 to 13 cm, or until the total skirt length is about 1.5 to 2 cm shorter than your target finished length.
Step 3 – Ivory Transition: Change to ivory. Work 1 round single crochet evenly around.
Step 4 – Ivory Scallops: Work the small ivory scallop repeat around the entire hem. Adjust the final repeat by skipping one fewer stitch if necessary. Fasten off and weave in securely.
Back Waist Bow
Step 1 – Bow Center: With lemon, chain 11. Single crochet in 2nd chain from hook and across (10 sc). Work 24 to 30 rows or until strip is about 10 to 12 cm long. Fasten off.
Step 2 – Bow Loops (Make 2): Chain enough for a strip about 14 to 17 cm long. Single crochet across, turn, then work 5 to 7 more single crochet rows. Fasten off. Fold each strip into a loop with ends overlapping by 1.5 cm. Stitch overlap securely.
Step 3 – Shape the Bow: Place the two loops side by side with overlaps meeting in the middle. Pinch each loop at center. Wrap the bow-center strip firmly around both loops 2 to 3 times and stitch the strip ends together on the back.
Step 4 – Attach: Center bow at back waist seam. Stitch through the bow center only, leaving loops dimensional. Add one hidden tack at the outer underside of each loop if you want them to stay perfectly symmetrical.
Daisy Appliques
Small Daisy (About 3 cm)
1. With ochre, make a magic ring. Work 8 single crochet into ring. Join. Tighten ring.
2. Change to ivory. Chain 4, 2 double crochet in same stitch, chain 4, slip stitch in same stitch. Repeat in each of 8 center stitches to make 8 petals.
3. Fasten off, leaving an ivory tail for sewing.
Medium Daisy (About 5 cm)
1. With ochre, magic ring, 10 single crochet in ring. Join.
2. Round 2: 2 single crochet in each stitch around (20 sc). Join. This forms a raised center.
3. Change to ivory. Chain 5, double crochet, treble crochet, double crochet into next stitch, chain 5, slip stitch in following stitch. Repeat around for 10 petals, using two center stitches per petal.
4. Fasten off with a long sewing tail.
Large Daisy (About 7 to 8 cm)
1. With ochre, magic ring, 10 single crochet. Join. Round 2: 2 single crochet in each stitch (20). Round 3: BLO single crochet evenly around to cup the center slightly.
2. Change to ivory. For each petal: chain 8, work back along chain with slip stitch, single crochet, half double crochet, 3 double crochet, half double crochet. Slip stitch into next center stitch. Repeat 12 times evenly around the center.
3. For fuller petals, work a second narrow petal layer between the first layer petals using chain 6 and the same tapered return sequence.
4. Fasten off and block petals flat with the center slightly raised.
Suggested flower count: For a balanced adult dress, make 8 to 12 small daisies, 6 to 9 medium daisies, and 3 to 5 large daisies. Use fewer flowers for a cleaner look or more for a meadow effect.
Floral Placement and Sage Embroidery
Step 1 – Block Before Placement: Wet-block the finished dress to final dimensions before attaching flowers. Allow it to dry completely.
Step 2 – Plan the Composition: Lay dress flat. Place the largest daisies low on the skirt, mainly above the ruffle seam. Place medium daisies through the center and lower skirt. Position small daisies higher toward the cups and upper skirt. Keep some open lemon space between clusters.
Step 3 – Pin Every Flower: Pin all appliques before sewing any of them. Hang the dress briefly to check that the layout looks balanced when gravity opens the skirt.
Step 4 – Sew Daisies: Using matching ivory, stitch each center firmly and add 2 to 4 hidden tacks around the underside of larger petals. Keep petal tips free for dimension.
Step 5 – Embroider Stems: Thread sage yarn or floss. Using backstitch or split stitch, embroider slim stems from selected flowers downward 4 to 12 cm. Avoid pulling the crochet fabric tight.
Step 6 – Add Leaves: Work lazy-daisy stitches or small fishbone leaves in pairs along some stems. Keep leaves narrow and irregular so the decoration looks botanical rather than geometric.
Step 7 – Cup Decoration: Use only small and medium daisies on cups. Stitch them lightly so they do not stiffen the cup fabric. Keep the center V and shell edging visually clear.
Final Assembly and Finishing
1. Check all seams from the wrong side. Reinforce cup-to-waistband joins and both strap attachments if any stitch appears stressed.
2. Weave in all remaining ends through dense stitches, reverse direction once, and trim.
3. Steam-block scallops and daisy petals lightly, or wet-block the entire dress. Do not press the raised ochre centers flat.
4. Hang the dress for several hours. Recheck hem level. Cotton may relax. If one area drops, re-wet that section and reshape.
5. Try on and confirm strap length. Shorten at back attachment if needed, then restitch securely.
6. If waistband rolls, add the optional hidden elastic or one additional BLO single crochet round around its lower edge.
7. Hand wash in cool water with mild detergent. Support the wet garment fully. Never lift it by the straps. Dry flat and reshape flowers while damp.
Troubleshooting Common Issues
| Problem | Solution |
|---|---|
| Cups gape at neckline | Remove 1 to 2 final taper rows or tighten shell edging slightly with a smaller hook |
| Cups feel shallow | Add plain rows at full cup width before tapering peak |
| Waistband stretches | Use smaller hook for waistband, work tighter sc, or add hidden elastic |
| Skirt too bulky at waist | Reduce starting fullness multiplier to 1.30 to 1.35 and distribute fewer increases |
| Ruffle too wavy | Use a smaller increase ratio: repeat 2 hdc, hdc in next 2 sts instead of every other stitch |
| Ruffle not full enough | Increase by about 60 percent instead of 50 percent, then work the body evenly |
| Hem scallops flare | Use fewer scallops or a 0.25 mm smaller hook for ivory edging |
| Flowers curl | Wet-block individually before sewing. Pin each petal to shape until fully dry |
| Dress grows after wear | Cotton is heavy. Shorten before final ruffle if needed and stabilize waistband and straps |
The Finished Look
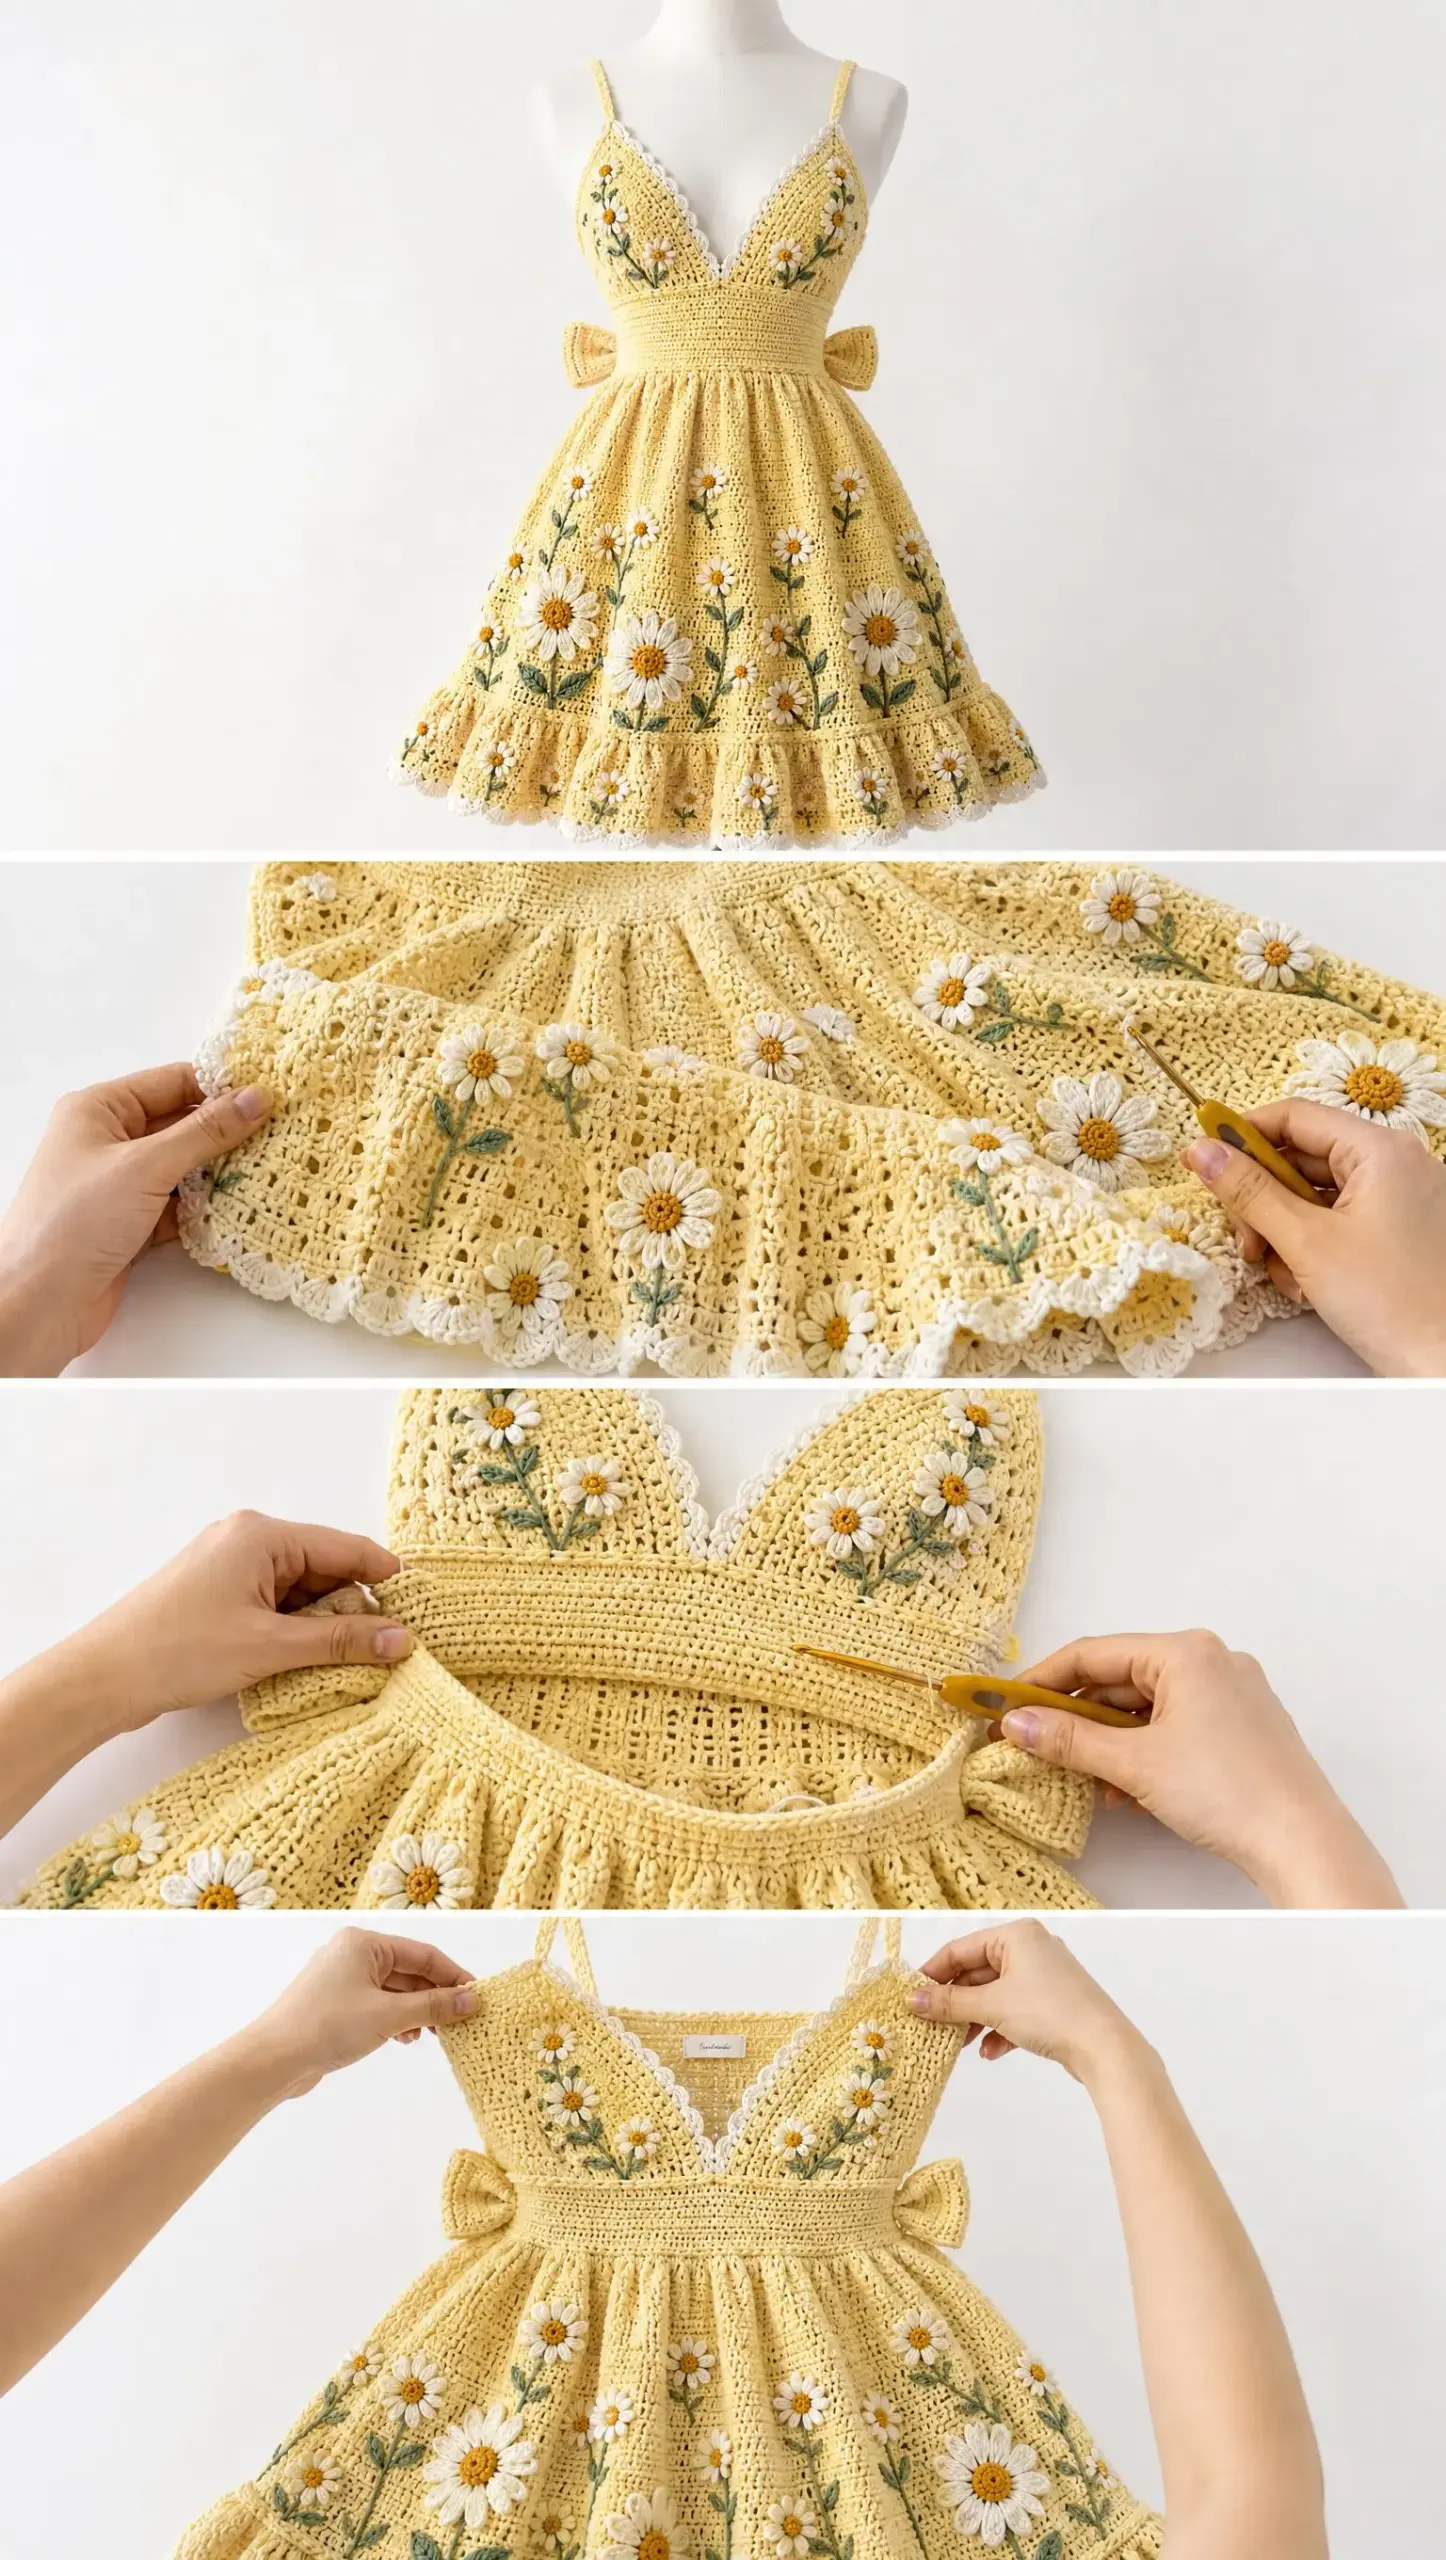
Your completed Lemon Daisy Ruffle Dress should have a dense, supportive lemon bodice with a crisp smooth waistband. The softly gathered A-line skirt flows into one broad ruffled tier. Bright ivory daisies with raised ochre centers scattered across the fabric catch the light beautifully. Fine sage stems wind between them, and ivory shell and scallop details frame everything. The dimensional lemon bow at the center back waist adds that perfect finishing touch.
This dress is the kind of project that takes time and care, but the result is something truly special. Every time you wear it, you’ll feel that sunshine-and-wildflowers energy we talked about at the beginning.
I really hope you love making this Lemon Daisy Ruffle Dress as much as I loved designing it. If this pattern is calling to you, go ahead and save it to your Pinterest boards so you can find it when you’re ready to start. And please, if you make one, drop a comment below or tag me on social media. I would absolutely love to see your version blooming!
Want a Quick & Easy Printable Version?
Get a clean, beautifully formatted PDF of this pattern — easy to follow step by step, ready to print or save on any device. No scrolling, no distractions, just the pattern.
Get the Printable PDF →