
This is hands down one of the most STUNNING bridal accessories I have ever seen come off a crochet hook. We are talking pineapple lace, dimensional flower petals, pearl bead drops, and a silhouette that drapes like absolute perfection across the shoulders. If you have been waiting for that special occasion project to really show off your skills, this is it.
Get the Ad-Free PDF Pattern
You can find the free pattern below, or you can purchase the ad-free printable PDF from my shop.
Get the Printable PDF →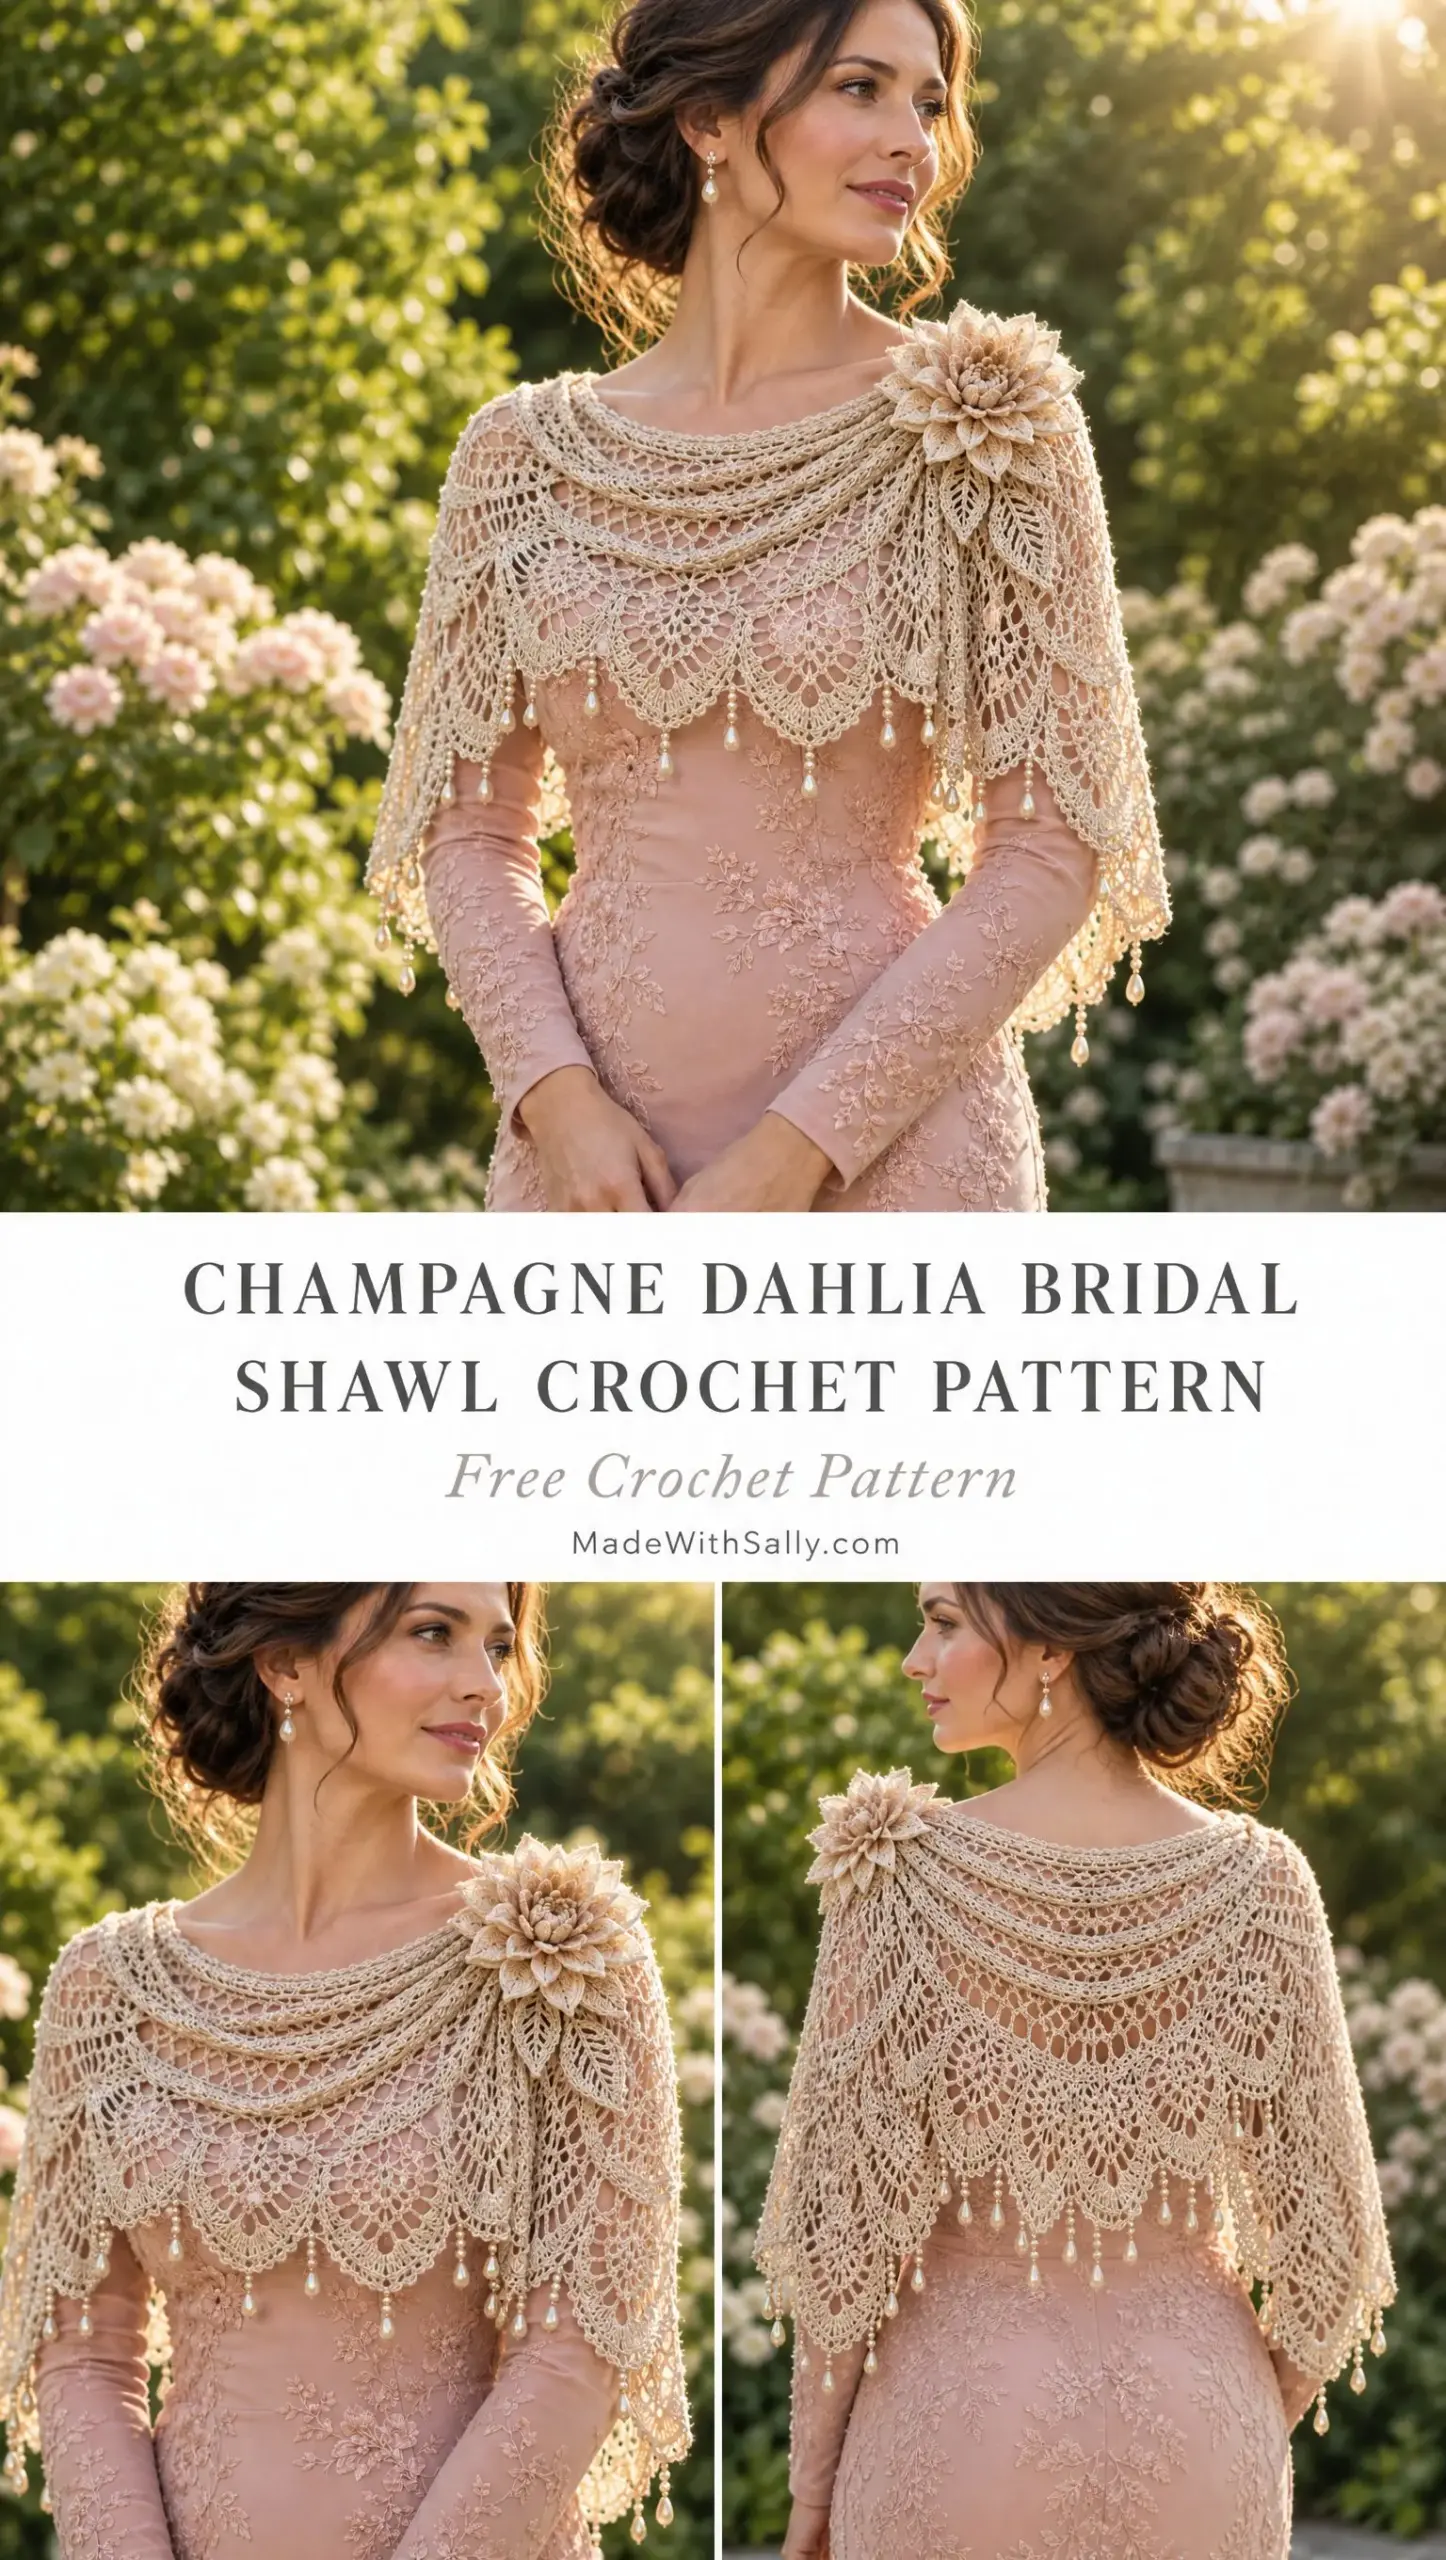
The Champagne Dahlia Bridal Shawl looks impossibly intricate, but here is the thing. It breaks down into manageable sections that build on each other logically. You will work the body from the neckline down, add some gorgeous short rows for shaping, finish with a corded scallop edge, then create the dahlia and leaves separately before stitching everything together.
Whether you are making this for your own wedding, gifting it to a bride-to-be, or creating a show-stopping piece for a formal event, this pattern delivers serious wow factor. Let me walk you through everything you need to know to bring this beauty to life.
About This Elegant Bridal Capelet
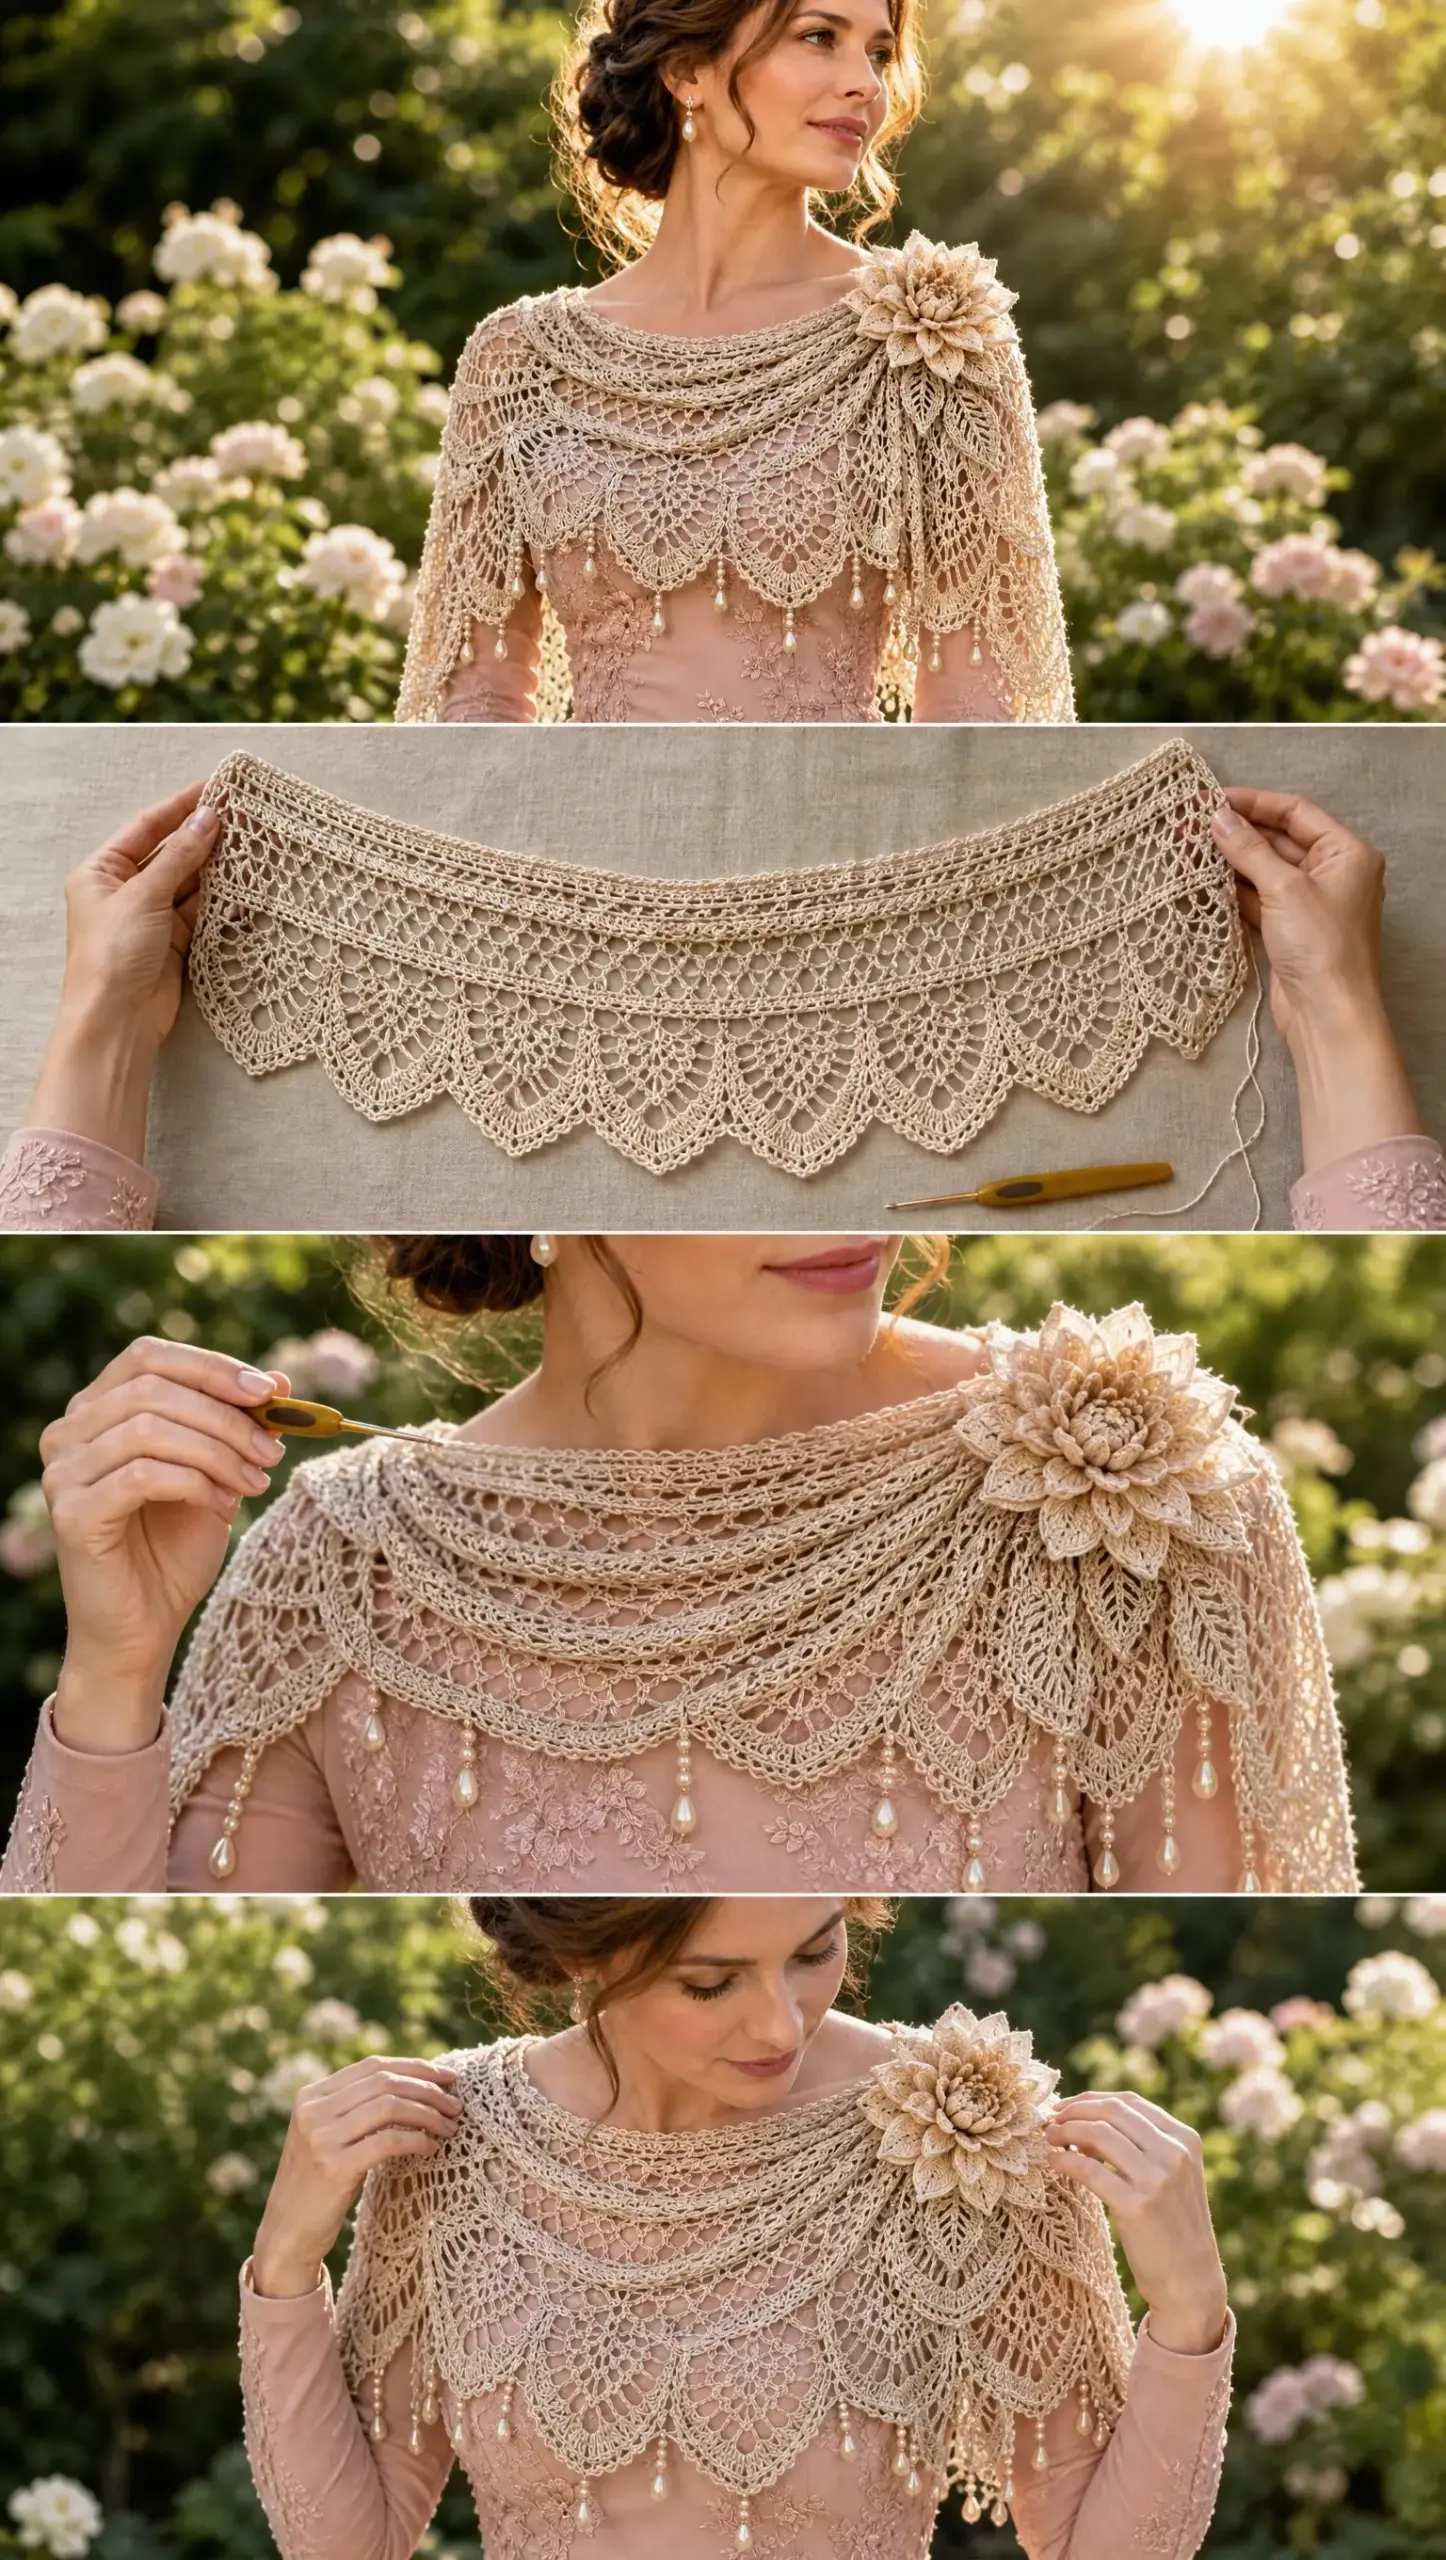
The Champagne Dahlia Bridal Shawl is a lightweight, shoulder-hugging capelet that sits beautifully just below the base of the neck. It is worked from the top down in expanding lace rows, which means you start at the neckline and work your way outward. The body alternates airy chain meshes with large pineapple fans, creating that classic lace look that never goes out of style.
What makes this piece truly special are the finishing details. A corded scallop edging gives the lower edge a lovely rounded ridge texture. Short bead drops with teardrop pearls add movement and sparkle. And the oversized dimensional dahlia with two pineapple-lace leaves transforms this from a beautiful shawl into a genuine work of art.
The construction is top-down and worked flat in rows, so the front edges remain open. This creates that gorgeous draped effect you see in the photos, where the fabric gathers naturally at the shoulders.
Skill Level
This pattern is rated intermediate to advanced. You should be comfortable with lace repeats, increases, picots, post-style corded edges, and hand sewing motifs. If you have worked pineapple lace before, you will feel right at home. If pineapple stitch is new to you, I recommend practicing on a smaller project first to get familiar with the rhythm of the decreasing chain loops.
Finished Measurements
Here are the dimensions you can expect after blocking:
Finished span: Approximately 50 to 54 inches (127 to 137 cm) from cuff edge to cuff edge
Center back depth: 17 to 19 inches (43 to 48 cm)
Side depth: 13 to 15 inches (33 to 38 cm)
Center-front points: Naturally shorter than the sides
Dahlia diameter: Approximately 5.5 to 6.5 inches (14 to 16.5 cm)
The measurements are given as ranges because lace yarns and blocking behavior vary widely. Use the schematic and fit checks throughout the pattern as your guide.
Materials You Will Need
Gather these supplies before you begin:
Yarn:
Hooks:
Beads:
Notions:
Gauge
One blocked 12-stitch pineapple repeat across Body Rows 9 through 16 equals approximately 3.1 to 3.4 inches (8 to 8.5 cm) wide. Eight rows of lace equals approximately 3.0 to 3.25 inches (7.5 to 8.25 cm) deep.
Gauge is less important than drape for this project, but neckline circumference and shoulder span definitely matter. Make a 24 to 30 stitch lace swatch using your chosen yarn and block it exactly as you plan to block the finished shawl before starting.
Abbreviations and Stitch Definitions
Here are all the abbreviations used in this pattern with their meanings:
ch = chain, the foundation stitch created by yarning over and pulling through the loop on your hook
sl st = slip stitch, insert hook, yarn over, pull through both loops at once
sc = single crochet, insert hook, yarn over, pull up a loop, yarn over, pull through both loops
hdc = half double crochet, yarn over, insert hook, yarn over, pull up a loop, yarn over, pull through all three loops
dc = double crochet, yarn over, insert hook, yarn over, pull up a loop, (yarn over, pull through two loops) twice
tr = treble crochet, yarn over twice, insert hook, yarn over, pull up a loop, (yarn over, pull through two loops) three times
dtr = double treble crochet, yarn over three times, insert hook, yarn over, pull up a loop, (yarn over, pull through two loops) four times
sp = space
sk = skip
st(s) = stitch(es)
rep = repeat
RS / WS = right side / wrong side
picot = ch 3, sl st in first ch
V-st = (dc, ch 2, dc) in same sp
Special Stitches
These techniques appear throughout the pattern:
Corded scallop: Work 5 dc in designated space, remove hook from loop, insert hook front-to-back through top of first dc, catch dropped loop and pull through. Ch 1 tightly. This gathers the shell into a rounded corded ridge. Think of it like a popcorn stitch but worked in a shell formation.
Pineapple decrease: At the top of a pineapple, replace two adjacent ch-5 loops with one ch-3 loop, then on the next row work sc in that ch-3 loop. This pulls the pineapple to a point and is what creates that classic tapered pineapple shape.
Folded petal: A long petal worked around a chain foundation, then folded lengthwise and lightly tacked at its base so the petal stands three-dimensionally. This technique gives the dahlia its realistic depth.
Before You Begin
Take these preparatory steps to ensure success:
Choose a starting chain that comfortably encircles the neckline from one front edge, around the back neck, to the opposite front edge without constriction. The base instructions use 168 foundation chains plus 6 turning chains, giving you 14 lace repeats that fit many adult shoulder widths after expansion.
For a smaller capelet: Begin with 144 + 6 chains
For a larger capelet: Begin with 192 + 6 chains
Adjust only in multiples of 12. The pattern uses a 12-stitch lace repeat, so one added repeat increases the finished shoulder span by roughly 3 to 3.5 inches (7.5 to 9 cm) after blocking.
Here is a helpful tip: count repeats, not individual stitches, whenever possible. Place a removable marker after each 12-stitch repeat on the setup row to keep track.
Shawl Body Pattern Instructions
Neckline Foundation
The written rows below use 168 foundation chains + 6 turning chains = 14 pineapple repeat sections. If you changed size, simply work the repeat between asterisks more or fewer times.
Foundation: Ch 174 loosely. Dc in 7th ch from hook, ch 2, sk 2 ch, dc in next ch across. You should have 56 dc posts including the first turning-chain post. Turn.
Row 1 (WS): Ch 4 (counts as tr), tr in same st, ch 3, sc in next ch-2 sp, ch 3, (tr, ch 2, tr) in next dc; rep across, ending with 2 tr in last st. Turn.
Row 2: Ch 3, dc in next tr, ch 3, sc in next ch-3 sp, ch 5, sc in next ch-3 sp, ch 3, V-st in next ch-2 sp; rep across. End with dc in each of last 2 sts. Turn.
Row 3: Ch 3, dc in next dc, ch 2, sc in next ch-3 sp, ch 3, 7 dc in next ch-5 sp, ch 3, sc in next ch-3 sp, ch 2, V-st in next V-st ch-2 sp; rep across. End dc in last 2 sts. Turn.
Row 4: Ch 3, dc in next dc, ch 3, sc in next ch-3 sp, (dc in next dc, ch 1) 6 times, dc in 7th dc, ch 3, sc in next ch-3 sp, ch 3, V-st in next V-st; rep across. Turn.
Row 5: Ch 3, dc in next dc, ch 4, sc in first ch-1 sp over pineapple, (ch 3, sc in next ch-1 sp) 5 times, ch 4, V-st in next V-st; rep across. Turn.
Row 6: Ch 3, dc in next dc, ch 5, sc in next ch-3 sp, (ch 3, sc in next ch-3 sp) 3 times, ch 5, V-st in next V-st; rep across. Turn.
Row 7: Ch 3, dc in next dc, ch 5, sc in next ch-3 sp, ch 3, sc in next ch-3 sp, ch 5, V-st in next V-st; rep across. Turn.
Row 8: Ch 3, dc in next dc, ch 5, sc in center ch-3 sp, ch 5, V-st in next V-st; rep across. Turn. The first pineapple tier is complete.
Expansion Band
This section opens up each original pineapple section into two descending lace lanes. This controlled expansion gives the capelet its sweeping curved outline without creating a gathered ruffle at the neck.
Row 9: Ch 3, dc in next dc, ch 3, 5 dc in next ch-5 sp, ch 3, V-st in next V-st, ch 3, 5 dc in next ch-5 sp, ch 3; rep across, keeping edge dc groups. Turn.
Row 10: Ch 3, dc in next dc, ch 3, (dc in next dc, ch 1) 4 times, dc in 5th dc, ch 3, (dc, ch 2, dc, ch 2, dc) in next V-st ch-2 sp, ch 3, (dc in next dc, ch 1) 4 times, dc in 5th dc, ch 3; rep across. Turn.
Row 11: Ch 3, dc in next dc, ch 4, sc in each of the 4 ch-1 sps with ch 3 between them, ch 4, V-st in each of the two ch-2 sps in center cluster, ch 4, sc in each of next 4 ch-1 sps with ch 3 between, ch 4; rep across. Turn.
Row 12: Ch 3, dc in next dc, ch 5, sc in next ch-3 sp, ch 3, sc in next ch-3 sp, ch 5, V-st in next V-st, ch 2, V-st in next V-st, ch 5, sc in next ch-3 sp, ch 3, sc in next ch-3 sp, ch 5; rep across. Turn.
Large Pineapple-Lace Fan Tier
Work the following 8-row repeat across every V-st pair created in the Expansion Band. The two outer edges are kept slightly shallower so the center-front corners finish shorter than the side and back sections.
Row 13: Ch 3, dc in next dc, ch 3, sc in next ch-5 sp, ch 3, 9 dc in first V-st ch-2 sp, ch 3, sc in ch-2 bridge between V-sts, ch 3, 9 dc in second V-st ch-2 sp, ch 3, sc in next ch-5 sp, ch 3; rep across. Turn.
Row 14: Ch 3, dc in next dc, ch 3, (dc in next dc, ch 1) 8 times, dc in 9th dc, ch 3, sc in center bridge sc, ch 3, (dc in next dc, ch 1) 8 times, dc in 9th dc, ch 3; rep across. Turn.
Row 15: Ch 3, dc in next dc, ch 4, sc in first ch-1 sp, (ch 3, sc in next ch-1 sp) 7 times, ch 4, sc in center ch-3 sp, ch 4, sc in first ch-1 sp of second fan, (ch 3, sc in next ch-1 sp) 7 times, ch 4; rep across. Turn.
Row 16: Ch 3, dc in next dc, ch 5, sc in next ch-3 sp, (ch 3, sc in next ch-3 sp) 5 times, ch 5, sc in center ch-4 sp, ch 5, sc in next ch-3 sp, (ch 3, sc in next ch-3 sp) 5 times, ch 5; rep across. Turn.
Row 17: Ch 3, dc in next dc, ch 5, sc in next ch-3 sp, (ch 3, sc in next ch-3 sp) 3 times, ch 5, sc in center ch-5 sp, ch 5, sc in next ch-3 sp, (ch 3, sc in next ch-3 sp) 3 times, ch 5; rep across. Turn.
Row 18: Ch 3, dc in next dc, ch 5, sc in next ch-3 sp, ch 3, sc in next ch-3 sp, ch 5, sc in center ch-5 sp, ch 5, sc in next ch-3 sp, ch 3, sc in next ch-3 sp, ch 5; rep across. Turn.
Row 19: Ch 3, dc in next dc, ch 6, sc in center ch-3 sp of first pineapple, ch 6, sc in center ch-5 sp, ch 6, sc in center ch-3 sp of second pineapple, ch 6; rep across. Turn.
Row 20: Ch 3, dc in next dc, ch 5, sc in first ch-6 sp, ch 4, sc in next ch-6 sp, ch 4, sc in next ch-6 sp, ch 5; rep across. Turn.
Lengthening the Sides and Back
To create elbow-length sides while keeping the center-front shorter, use short rows before the final edging. Divide the capelet into 5 zones by repeat count:
1. Attach yarn at the beginning of the Left Side zone. Work Rows 17-20 pattern logic across Left Side + Back + Right Side only. Turn.
2. Work back across Right Side + Back + Left Side. Turn.
3. Repeat these two short rows once more if more elbow coverage is desired. Fasten off.
4. Reattach at the beginning of Back zone and work 2 additional short rows across Back only. Fasten off.
5. Lightly steam or wet-block at this stage. The sides should now fall lower than the two front corners.
Fit check: Drape the unedged shawl over a dress form or over your shoulders. The top edge should lie smoothly, the side points should reach near the elbows, and the two front ends should sit 2 to 4 inches (5 to 10 cm) higher than the side points. Add or remove one short-row pair before edging if needed.
Corded Scalloped Lower Edge
Edging Row 1 (RS): Join yarn at right front corner. Work sc evenly along the entire lower edge, placing 3 sc in each major point and approximately 2 sc per row-end along short-row transitions. Keep the edge flat, not gathered. Turn.
Edging Row 2: Ch 1, sc in first sc, ch 3, sk 2 sc, sc in next sc across. Adjust at the last repeat so both corners match. Turn.
Edging Row 3: Ch 1, sc in first sp, corded scallop in next ch-3 sp, ch 1, sc in next ch-3 sp across. If necessary, use a plain 5-dc shell at one transition space so spacing remains even. Do not force the edge. Fasten off.
Front/Neck finishing: Join at one lower front corner. Work 1 row sc evenly up the front edge, around the neckline and down the opposite front edge. Work a second row of reverse sc (also called crab stitch) or closely spaced sl st for a neat corded edge. Fasten off and weave in ends.
Oversized Ivory-and-Champagne Dahlia
The flower is built on a firm crocheted disk so it can be sewn securely to the shawl without flattening the petals. Finished diameter is approximately 5.5 to 6.5 inches (14 to 16.5 cm).
Flower Base Disk
Rnd 1: With champagne, make a magic ring. Ch 2, 12 hdc in ring; join with sl st. (12 sts)
Rnd 2: Ch 2, 2 hdc in each st around; join. (24 sts)
Rnd 3: Ch 2, hdc in next st, 2 hdc in next st around; join. (36 sts)
Rnd 4: Ch 2, hdc in next 2 sts, 2 hdc in next st around; join. (48 sts) Fasten off.
Outer Folded Petals (make 16)
With ivory or pale champagne and 1.75 to 2.0 mm hook: Ch 18. Beginning in 2nd ch from hook work sl st, sc, hdc, dc in next 5 ch, tr in next 5 ch, dc in next 3 ch, hdc, sc. Working along opposite side of foundation chain: sc, hdc, dc in next 3 ch, tr in next 5 ch, dc in next 5 ch, hdc, sc, sl st at tip. Fasten off leaving a 6 inch (15 cm) tail. Fold the petal lengthwise with RS outward and take 2 to 3 tiny stitches through the lower 0.5 inch (1.25 cm) to form a pointed cupped petal.
Middle Folded Petals (make 12)
Ch 14. Beginning in 2nd ch from hook: sl st, sc, hdc, dc in next 4 ch, tr in next 4 ch, dc in next 2 ch, hdc. Work back along opposite side with mirror sequence. Fasten off. Fold and tack at base as for outer petals.
Inner Pointed Petals (make 10)
Ch 10. Beginning in 2nd ch from hook: sl st, sc, hdc, dc in next 3 ch, tr in next 2 ch, dc. Mirror along opposite side. Fold and tack. For the tightest center petals, wrap the lower third around the hook shaft before securing the base.
Dahlia Assembly
1. Place the 48-stitch base disk RS up. Mark 16 equally spaced points around the outer round.
2. Sew one outer petal at each mark, angling petals slightly outward. Stitch only through the petal base so the upper half remains free.
3. Add the 12 middle petals in a second ring, offset between outer petals and raised at a steeper angle.
4. Add the 10 inner petals in a third ring, alternating champagne and ivory if desired. Crowd them slightly for a full dahlia center.
5. For the center, make a small spiral: ch 22, work 2 sc in each chain, coil tightly and stitch into the center opening.
6. Steam only from the back if needed. Do not press the petals.
Slim Pineapple-Lace Leaves (make 2)
Make one 5.5 inch (14 cm) leaf and one 4.5 inch (11.5 cm) leaf. Work both in champagne.
Row 1: Ch 24 (long leaf) or ch 20 (short leaf). Dc in 6th ch from hook, ch 2, sk 2, dc in next ch to last 2-3 chains. Turn.
Row 2: Ch 4, tr in same st, ch 3, sc in next ch-2 sp, ch 3, V-st in next dc to tip. In tip st work (tr, ch 3, tr, ch 3, tr). Rotate to work down opposite side of foundation chain, mirroring the pattern. Turn at stem end.
Row 3: Work ch-5 loops into each V-st ch-2 sp. At the tip, work 7 dc into center ch-3 sp to begin a miniature pineapple. Mirror down second side.
Rows 4-7: Shape the tip pineapple exactly as Body Rows 4-8: separate dc with ch 1, then reduce chain loops from 5 to 3 to 1 until the pineapple closes to a point. Keep side edges in ch-3 or ch-4 mesh.
Stem: At base, ch 12, sl st back along chain and into leaf base. Fasten off. Block the leaf gently, keeping it narrow and slightly curved.
Beaded Scallop Drops
Add beads only after the shawl has been fully wet-blocked and dried. This prevents thread tension from distorting the lace.
| Drop Type | Sequence | Placement |
|---|---|---|
| Short | 3 seed beads + 1 teardrop pearl | Every other scallop near front and back center |
| Medium | 5 seed beads + 1 teardrop pearl | At side sections and prominent large scallop points |
| Accent | 7 seed beads + 1 teardrop pearl | Optional at the two lowest side points only |
1. Cut a 12 to 14 inch (30 to 35 cm) length of strong matching sewing thread. Knot securely around the base of a corded scallop, leaving a short tail to weave back later.
2. Thread the seed beads followed by one teardrop pearl. Pass the needle back upward through all seed beads, skipping the pearl, to create a neat pendant drop.
3. Take two tiny stitches through the same scallop base, then weave the thread through 1 to 2 adjacent crochet posts before trimming.
4. Keep all drops short enough that they move freely but do not tangle with neighboring drops. Space them evenly rather than beading every scallop.
Attaching the Leaves and Dahlia
1. Put on the shawl or place it on a dress form. Arrange the top draped bands so they gather naturally at the wearer’s left shoulder (right side when viewed from the front).
2. Pin the longer lace leaf so it points diagonally downward toward the upper arm; place the shorter leaf slightly toward the front neckline. Sew each leaf at the base and in 2 to 3 discreet points along the center spine.
3. Center the dahlia over the leaf bases. The flower should overlap the gathered shawl bands but should not compress them flat.
4. Using doubled matching thread, stitch the flower base disk to the shawl at 8 to 10 points around the disk perimeter. Catch sturdy dc posts rather than delicate chain loops.
5. Add 3 to 4 anchoring stitches through the inner disk only. Do not sew through upper petal layers.
6. Optional: Sew a small snap or hook-and-eye beneath the flower to help the top edge remain in place during wear.
Blocking and Finishing
Proper blocking transforms this project from nice to absolutely stunning. Here is how to do it right:
1. Weave all yarn ends through at least 1 inch (2.5 cm) of solid stitch paths, reversing direction once. Do not weave through open chain spaces.
2. Soak the shawl in cool water for 10 to 15 minutes with a small amount of gentle wool/cotton wash if appropriate for the fiber. Press out water in a towel; do not wring.
3. Pin the neckline into a shallow curve. Pin the side sections lower than the front corners, matching the schematic. Open every pineapple fan and scallop evenly.
4. Dry completely. Remove pins, then attach leaves, flower and bead drops if not already attached.
5. For storage, lay the dahlia face-up and loosely support the petals with acid-free tissue. Avoid crushing the flower under other garments.
Sizing and Customization Options
| Adjustment | How to Modify |
|---|---|
| Wider shoulders / fuller cape | Add 12 foundation chains per extra repeat. Each added repeat adds about 3 to 3.5 inches (7.5 to 9 cm) after blocking. |
| Narrower shoulders | Remove 12 foundation chains per repeat. Keep at least 10 body repeats so the back remains full enough. |
| More arm coverage | Add one more pair of short rows over Left Side + Back + Right Side before the edging. |
| Shorter bridal capelet | Skip the second pair of side short rows and the extra back rows. |
| Less dramatic flower | Use 12 outer, 10 middle and 8 inner petals. |
| No beads | Omit bead drops and work a picot after every second corded scallop instead. |
| More sparkle | Use a fine metallic carry thread for Edging Row 3 and for the flower’s inner petal ring only. |
Final Checklist Before Wearing
Run through these points to make sure your shawl is finished perfectly:
Care Instructions
Hand wash cool, support the lace fully when wet, and re-block the scallops after washing. For metallic or beaded yarns, follow the yarn manufacturer’s care instructions. Store flat rather than hanging for long periods to preserve the shape.
You Did It!
Creating this Champagne Dahlia Bridal Shawl is a true labor of love, and the results are absolutely breathtaking. Every bride, mother of the bride, or formal event attendee who wears this piece will feel like the most elegant person in the room. The combination of classic pineapple lace, the dimensional dahlia, and those delicate pearl drops creates something truly heirloom-worthy.
Thank you so much for choosing this pattern for your special project. I would absolutely love to see your finished shawl! Tag me on Instagram or share your photos in our Facebook group so I can celebrate your beautiful work with you.
If this pattern has captured your heart, go ahead and save it to your Pinterest boards so you can find it easily when you are ready to start. And please drop a comment below if you make this beauty. I love hearing about your color choices, any modifications you tried, and who the lucky recipient will be. Happy crocheting!
Want a Quick & Easy Printable Version?
Get a clean, beautifully formatted PDF of this pattern — easy to follow step by step, ready to print or save on any device. No scrolling, no distractions, just the pattern.
Get the Printable PDF →