I designed this blanket for my nephew’s nautical nursery, and honestly, it might be my proudest creation yet. I wanted something that felt classic and coastal without being kitschy. The combination of cable texture, appliqué anchors, compass roses, and that sweet little lighthouse just works perfectly together. Every time I look at it draped over a bed or tucked into a crib, I get so excited about how it turned out!
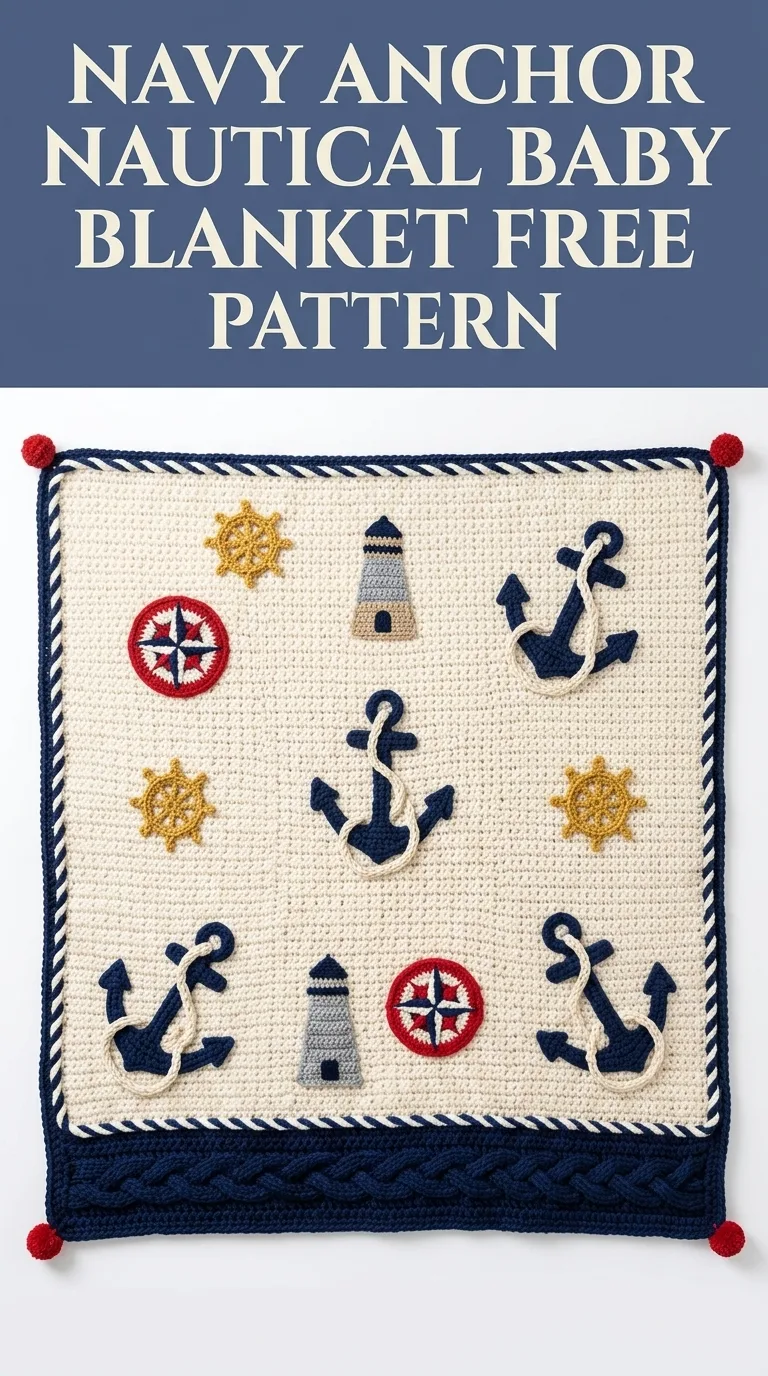
This Navy Anchor Nautical Baby Blanket crochet pattern combines a simple single crochet base with stunning crocheted appliqués and a gorgeous cable border. It looks incredibly impressive, but I promise it breaks down into very manageable pieces. You will work the main blanket body first, create each nautical motif separately, then attach everything and finish with that beautiful twisted rope border.
Why You Will Love This Nautical Baby Blanket Pattern
This crochet pattern gives you so much visual impact for your effort. The cream background makes every colorful element pop. Navy blue anchors, red and navy compass roses, a golden ship’s wheel, and a striped lighthouse all come together in perfect harmony.
Perfect for gifts. Baby showers, first birthdays, or just because. Parents decorating a coastal or nautical nursery will absolutely treasure this handmade blanket.
Skill building without overwhelm. You will practice single crochet, cables, color changes, and appliqué attachment. Each technique appears in small, doable sections.
Customizable layout. The appliqué placement is flexible. You can arrange the motifs however you like based on your personal preference.
Skill Level
Intermediate. You should be comfortable with basic crochet stitches and willing to try cables and appliqué work. If you have never done cables before, do not worry. I walk you through every cross and post stitch.
Finished Dimensions
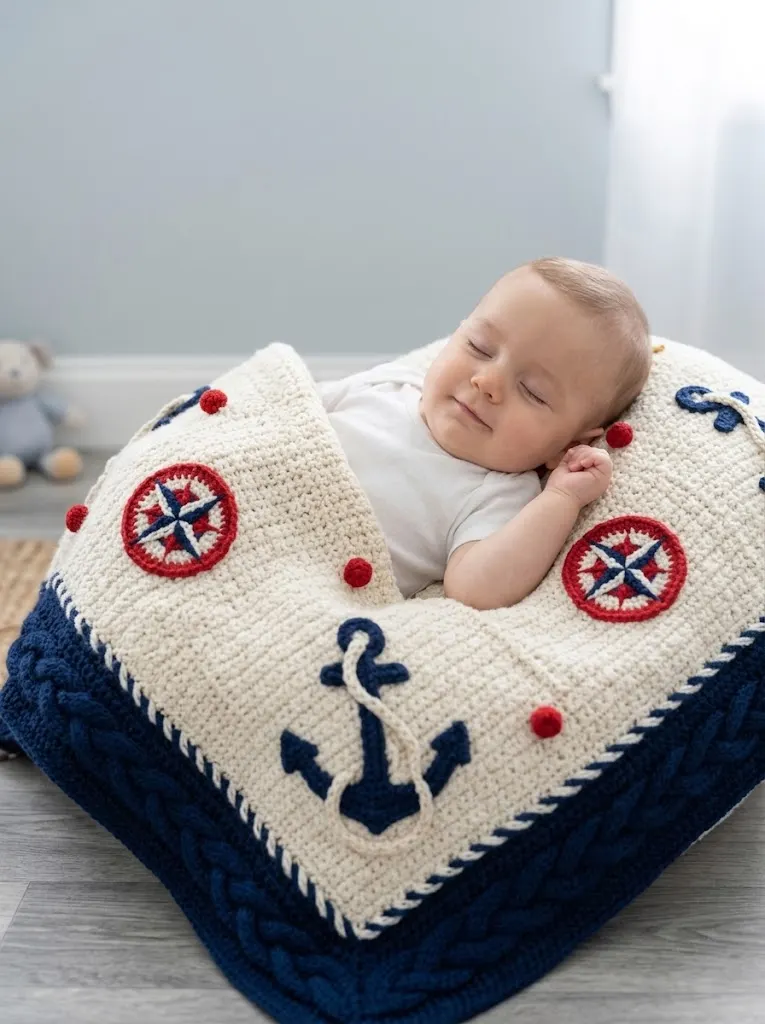
Approximately 36 inches wide by 42 inches long including the border. This is a generous baby blanket size that works beautifully for tummy time, stroller walks, and eventually as a toddler throw.
Materials Needed

Yarn
You will need worsted weight yarn (weight 4) in the following colors:
I recommend a soft acrylic blend that is machine washable. Baby blankets need to survive many trips through the laundry.
Hook
Notions
Gauge
14 single crochet stitches and 16 rows = 4 inches in single crochet with 5.0 mm hook.
Always check your gauge. If your blanket measures smaller, go up a hook size. If larger, go down.
Abbreviations and Stitch Definitions
Let me define every stitch before we begin. Understanding these will make the pattern much easier to follow.
Ch = Chain. Yarn over, pull through the loop on your hook. This creates the foundation for your work.
Sc = Single crochet. Insert hook into stitch, yarn over and pull up a loop (2 loops on hook), yarn over and pull through both loops.
Dc = Double crochet. Yarn over, insert hook into stitch, yarn over and pull up a loop (3 loops on hook), yarn over and pull through 2 loops, yarn over and pull through remaining 2 loops.
Hdc = Half double crochet. Yarn over, insert hook into stitch, yarn over and pull up a loop (3 loops on hook), yarn over and pull through all 3 loops at once.
Sl st = Slip stitch. Insert hook into stitch, yarn over, pull through both the stitch and the loop on your hook in one motion. Used for joining and moving across stitches invisibly.
FPdc = Front post double crochet. Yarn over, insert hook from front to back to front around the post of the stitch below, complete as a regular double crochet. This creates raised texture.
BPdc = Back post double crochet. Yarn over, insert hook from back to front to back around the post of the stitch below, complete as a regular double crochet.
Skip = Pass over the indicated number of stitches without working into them.
Inc = Increase. Work 2 stitches into the same stitch.
Dec = Decrease. Work 2 stitches together as one.
Magic ring = An adjustable starting loop that pulls closed completely. Wrap yarn around fingers, insert hook, pull up a loop, chain to secure, then work stitches over the ring. Pull the tail to close the center hole.
Main Blanket Body Instructions
The blanket body uses simple single crochet in cream. This creates a clean canvas for your nautical appliqués.
Foundation
With cream yarn and 5.0 mm hook, ch 127.
Row 1
Sc in 2nd ch from hook and in each ch across. (126 sc)
Row 2
Ch 1, turn. Sc in each st across. (126 sc)
Rows 3 through 140
Repeat Row 2.
Your blanket body should measure approximately 36 inches wide and 35 inches tall at this point. Fasten off and weave in ends.
Tip: Place a stitch marker at the beginning of each row to track your progress. Move it up as you go.
Anchor Appliqué (Make 5)
These adorable anchors are the star of the show. You will make five total in navy blue.
Anchor Shank (Center Post)
With navy yarn, ch 21.
Row 1: Sc in 2nd ch from hook and in each ch across. (20 sc)
Rows 2 through 4: Ch 1, turn. Sc in each st across. (20 sc)
Fasten off, leaving a long tail for sewing.
Anchor Stock (Horizontal Bar at Top)
With navy yarn, ch 16.
Row 1: Sc in 2nd ch from hook and in each ch across. (15 sc)
Rows 2 through 3: Ch 1, turn. Sc in each st across. (15 sc)
Fasten off.
Anchor Ring (Top Loop)
With navy yarn, ch 8. Sl st to first ch to form a ring.
Round 1: Ch 1, work 16 sc around the ring. Sl st to first sc to join. (16 sc)
Fasten off.
Anchor Flukes (Bottom Arms)
Make 2 per anchor.
With navy yarn, ch 2.
Row 1: 3 sc in 2nd ch from hook. (3 sc)
Row 2: Ch 1, turn. 2 sc in first st, sc in next st, 2 sc in last st. (5 sc)
Row 3: Ch 1, turn. 2 sc in first st, sc in each st to last st, 2 sc in last st. (7 sc)
Rows 4 through 6: Repeat Row 3. (13 sc after Row 6)
Fasten off.
Assembly
Sew the stock horizontally across the top of the shank, about 2 rows down from the top edge. Attach the ring centered above the stock. Sew the flukes at angles to the bottom of the shank, pointing outward like a traditional anchor shape.
Compass Rose Appliqué (Make 3)
These red and navy compass roses add such a classic nautical touch.
Outer Circle (Red)
With red yarn, make a magic ring.
Round 1: Ch 1, 8 sc into the ring. Pull tight to close. Sl st to first sc. (8 sc)
Round 2: Ch 1, 2 sc in each st around. Sl st to join. (16 sc)
Round 3: Ch 1, *sc in next st, 2 sc in next st* repeat around. Sl st to join. (24 sc)
Round 4: Ch 1, *sc in next 2 sts, 2 sc in next st* repeat around. Sl st to join. (32 sc)
Round 5: Ch 1, *sc in next 3 sts, 2 sc in next st* repeat around. Sl st to join. (40 sc)
Fasten off.
Inner Star Points (Navy)
With navy yarn, make a magic ring.
Round 1: Ch 1, 8 sc into ring. Sl st to join. (8 sc)
Round 2: *Ch 5, sl st in 2nd ch from hook, sc in next ch, hdc in next ch, dc in next ch, skip next st on circle, sl st in next st* repeat 4 times to create 4 points. (4 points)
Fasten off and center on the red circle. Sew in place.
Lighthouse Appliqué (Make 1)
This sweet lighthouse uses multiple colors for the striped effect.
Lighthouse Tower
With white yarn, ch 9.
Row 1: Sc in 2nd ch from hook and across. (8 sc)
Rows 2 through 3: Ch 1, turn. Sc across. Change to red at end of Row 3.
Rows 4 through 5: With red, ch 1, turn. Sc across. Change to white at end of Row 5.
Rows 6 through 7: With white, sc across. Change to red.
Rows 8 through 9: With red, sc across. Change to gray.
Rows 10 through 12: With gray, sc across.
Fasten off.
Lighthouse Top (Light Housing)
With golden yellow, ch 6.
Row 1: Sc in 2nd ch from hook and across. (5 sc)
Rows 2 through 4: Ch 1, turn. Sc across.
Fasten off and attach to the top of the tower.
Lighthouse Base
With gray yarn, ch 12.
Row 1: Sc in 2nd ch from hook and across. (11 sc)
Rows 2 through 3: Ch 1, turn. Sc across.
Fasten off and attach below the tower.
Ship’s Wheel Appliqué (Make 2)
With golden yellow yarn, make a magic ring.
Round 1: Ch 1, 8 sc into ring. Sl st to join. (8 sc)
Round 2: Ch 1, 2 sc in each st. Sl st to join. (16 sc)
Spokes: *Ch 6, sl st in 2nd ch from hook and in each ch back to the wheel, sl st in next 2 sts on wheel* repeat 8 times.
Fasten off.
Cable Border
This border features a gorgeous braided cable pattern in navy that frames the entire blanket beautifully.
Bottom Cable Panel
With navy yarn, ch 127.
Row 1: Dc in 4th ch from hook and in each ch across. (125 dc)
Row 2: Ch 2, turn. *FPdc around next 2 sts, BPdc around next 2 sts* repeat across, ending with dc in last st.
Row 3: Ch 2, turn. Work the cable cross: skip 2 sts, FPdc around next 2 sts, then go back and FPdc around the 2 skipped sts (crossing in front). Continue pattern across.
Rows 4 through 12: Continue alternating ribbing and cable cross rows.
Fasten off. Sew to the bottom edge of the blanket body.
Rope Edge Border
With navy and cream yarn held together (or using a twisted cord technique), work a slip stitch border around the entire blanket perimeter. This creates that beautiful twisted rope effect visible in the finished blanket.
Join yarn at any corner. Sl st in each st around all four sides, working 3 sl st in each corner to turn smoothly. Sl st to join and fasten off.
Red Bobble Accents (Make 6)
These small red dots add playful pops of color.
With red yarn, make a magic ring.
Round 1: Ch 1, 6 sc into ring. Sl st to join.
Round 2: 2 sc in each st. Sl st to join. (12 sc)
Fasten off, leaving a tail. Stuff lightly with yarn scraps if desired, then sew closed and attach to blanket.
Final Assembly
Lay your blanket flat on a clean surface. Arrange all appliqués in a balanced layout. I placed anchors in each corner and one in the center. Compass roses fill the spaces between. The lighthouse sits prominently in the lower center. Ship’s wheels and red bobbles fill remaining gaps.
Pin everything in place before sewing. Use a tapestry needle and matching yarn colors to whipstitch each piece securely. Weave in all remaining ends on the back.
Care Instructions
Machine wash cold on a gentle cycle. Tumble dry low or lay flat to dry. The appliqués are sewn on securely, but avoid high heat to maintain the blanket’s shape and softness.
Final Thoughts on This Nautical Baby Blanket Crochet Pattern
This Navy Anchor Nautical Baby Blanket crochet pattern truly combines everything I love about handmade gifts. It is visually stunning, meaningful, and made with love in every stitch. Whether you are creating it for your own little one or gifting it to expecting parents, this blanket will become a treasured keepsake.
I hope this step by step crochet tutorial gave you everything you need to create your own coastal masterpiece. Take your time with each appliqué, enjoy the meditative rhythm of the single crochet body, and have fun arranging your nautical scene.
Thank you so much for choosing this pattern. It means the world to me when crafters trust my designs for their special projects. If you make this blanket, I would absolutely love to see it! Tag me on Instagram or share a photo on Facebook. Seeing your finished projects is the best part of my day.
If you loved this pattern, go ahead and save it to your Pinterest boards so you can find it whenever you are ready to start. And please drop a comment below if you make one. I read every single message and love hearing how your projects turn out!
