
I don’t know about you, but I have a serious weakness for cardigans that feel like a wearable hug. You know the ones. Cozy enough for cool mornings, stylish enough for running errands, and roomy enough that you actually want to put them on.

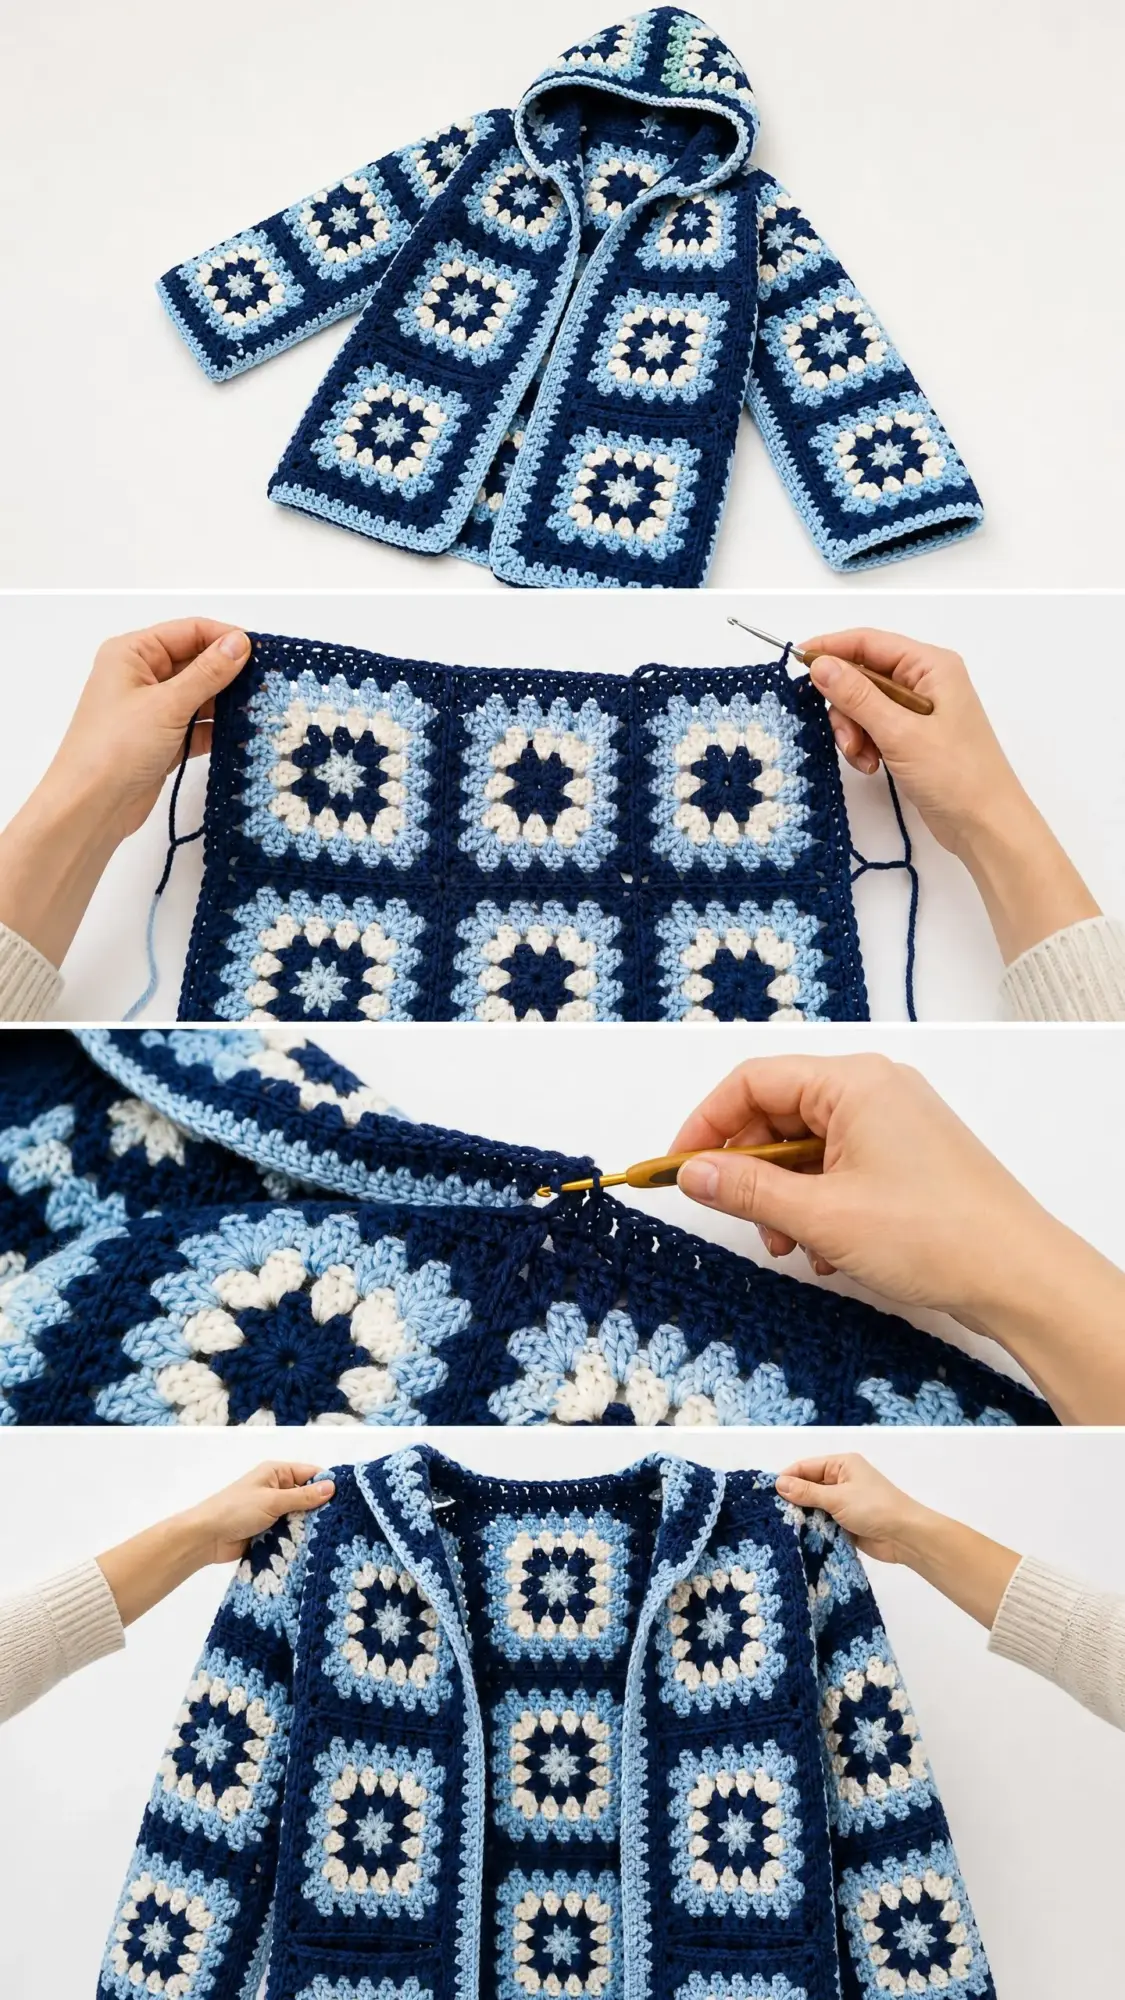
This hooded granny square cardigan checks every single box. The classic granny square construction means you already know the stitches. The join-as-you-go method keeps seaming to a minimum. And that hood? It transforms a simple cardigan into something you will reach for constantly.
The navy, medium blue, and cream colorway gives it a coastal vibe that works year-round. Whether you are curled up with coffee or strolling through a farmers market, this hoodie has you covered. Literally.
About This Crochet Pattern
This relaxed-fit, hip-length hooded cardigan is constructed entirely from classic granny squares. The body, sleeves, and hood are all assembled from the same square motif in a coordinating colorway. The cardigan opens at the front with no closure, features front patch pockets integrated into the lower body, and is finished with a clean single crochet border running up the front edges and around the hood opening.
The construction method is modular. You crochet individual squares to gauge, join them flat using a slip stitch or flat join, and then seam the resulting panels together. The hood is built from a rectangle of squares attached at the neckline. If you have ever made a granny square blanket, you already understand the basic concept.
Skill Level: Intermediate
You need to be comfortable crocheting granny squares to a consistent gauge, working the join-as-you-go technique, seaming crochet fabric, and picking up stitches for a border. No special shaping stitches are required. Accuracy in motif gauge and assembly is essential to achieving the correct finished dimensions.
Time Estimate: 40 to 60 hours for an average intermediate crocheter, not including blocking time.
Finished Measurements
Each granny square measures 4 inches / 10 cm x 4 inches / 10 cm after blocking.
The pattern below is written for Size Medium. Size adjustments appear in parentheses in the order S, M, L, XL where values differ.
Materials Needed
Yarn
You will need worsted weight yarn (CYCA #4) in three colors:
Yarn Suggestions
Option 1: Lion Brand Wool-Ease (80% acrylic, 20% wool), worsted weight, 197 yd / 180 m per 3 oz / 85 g skein. Excellent stitch definition for granny squares and machine washable.
Option 2: Paintbox Yarns Simply DK used doubled throughout. This creates a soft, drapey hand similar to the garment pictured and is fully machine washable.
Option 3: Cascade 220 Superwash (100% superwash wool), worsted weight, 220 yd / 200 m per 3.5 oz / 100 g skein. Superior stitch definition, slight halo, and wonderful drape. Hand wash cool.
Substitution note: Any smooth worsted weight yarn that achieves gauge will work. Avoid highly textured or thick-and-thin yarns as they will obscure the granny square pattern. Natural fiber blends with some elasticity are recommended for garment shaping.
Hook
US size J-10 / 6.0 mm crochet hook
Notions
Gauge
One granny square blocked = 4 in / 10 cm x 4 in / 10 cm
Gauge is critical. Too large a square and the garment will be too big. Too small and it will be too small. Measure your blocked square before proceeding.
Gauge swatch instructions: Make one granny square following the Full Granny Square instructions below. Block it by soaking in cool water, pressing out excess moisture, and pinning flat. Measure after drying. Adjust hook size as needed.
Abbreviations (US Terms)
Before we dive in, here are all the abbreviations you will encounter:
Special Stitches and Techniques
Granny Cluster
In this pattern, a cluster within a granny square means 3 double crochet stitches worked into the same chain space, one after another. Each double crochet is worked to completion before the next: yarn over, insert hook, yarn over, pull up loop, yarn over, pull through 2 loops, yarn over, pull through 2 loops = 1 dc. Repeat for a total of 3 dc in the same space. This is the standard granny cluster.
Join As You Go (JAYG) Flat Join Method
When the new square reaches a joining side on its final round, instead of chaining the corner ch-2 or working a ch-1 between clusters independently, you connect to the adjacent finished square.
At each join point: work to where the chain would go, drop working yarn to front, insert hook into corresponding ch-sp or space of finished square from RS to WS, pick up working yarn, pull through that space and through the loop on your hook (slip stitch join), then continue the round.
This creates a flat, nearly invisible seam visible only as a line of slip stitches on the wrong side.
Single Crochet Border
Worked in the round around the front opening and hood. Insert hook into edge stitch or space, yarn over, pull up loop, yarn over, pull through both loops. Work 1 sc into each dc and 1 sc into each ch-1 sp along straight edges. Work 2 sc into each ch-2 corner sp.
Pattern Notes Before You Begin
1. All squares use the same basic motif with a consistent color sequence: Rnd 1 in Color A, Rnd 2 in Color B, Rnd 3 in Color C, Rnd 4 in Color A. This produces the navy center star, medium blue middle ring, cream ring, and navy outer border.
2. The garment body is constructed in panels: Left Front, Right Front, Back, and two Sleeves. Each panel is a grid of squares joined as you go during the final round of each new square.
3. Chain 3 at the beginning of each granny square round counts as the first dc throughout.
4. When joining yarn in a new color, join with a sl st into the designated corner ch-2 sp of the previous round unless otherwise noted.
5. Fasten off after each round unless instructed to continue.
6. Weave in all ends before assembly. Blocking individual squares before assembly is strongly recommended.
Square Counts by Size
How to Crochet the Full Granny Square
Make the required number of squares for your size.
Foundation Ring
Using Color A, ch 4, join with sl st to first ch to form ring.
Round 1 (Color A)
Ch 3 (counts as first dc), 2 dc into ring (first cluster complete), ch 2, (3 dc into ring, ch 2) 3 times, join with sl st to top of beg ch-3. Fasten off Color A.
You should have 4 clusters of 3 dc and 4 ch-2 corner spaces (12 dc + 4 ch-2 sps).
Round 2 (Color B)
Join Color B with sl st into any ch-2 corner sp.
Ch 3 (counts as first dc), 2 dc into same corner sp, ch 2, 3 dc into same corner sp (first corner complete), ch 1, (3 dc into next corner sp, ch 2, 3 dc into same corner sp, ch 1) 3 times, join with sl st to top of beg ch-3. Fasten off Color B.
You should have 8 clusters of 3 dc, 4 ch-2 corner sps, 4 ch-1 sps between corners (24 dc + 4 ch-2 corner sps + 4 ch-1 side sps).
Round 3 (Color C)
Join Color C with sl st into any ch-2 corner sp.
Ch 3, 2 dc into same corner sp, ch 2, 3 dc into same corner sp, ch 1, 3 dc into next ch-1 side sp, ch 1, (3 dc into next corner sp, ch 2, 3 dc into same corner sp, ch 1, 3 dc into next ch-1 side sp, ch 1) 3 times, join with sl st to top of beg ch-3. Fasten off Color C.
You should have 12 clusters of 3 dc, 4 ch-2 corner sps, 8 ch-1 sps (36 dc + 4 ch-2 sps + 8 ch-1 sps).
Round 4 (Color A)
Join Color A with sl st into any ch-2 corner sp.
Ch 3, 2 dc into same corner sp, ch 2, 3 dc into same corner sp, (ch 1, 3 dc into next ch-1 sp) twice, ch 1, (3 dc into next corner sp, ch 2, 3 dc into same corner sp, (ch 1, 3 dc into next ch-1 sp) twice, ch 1) 3 times, join with sl st to top of beg ch-3. Fasten off Color A.
You should have 16 clusters of 3 dc, 4 ch-2 corner sps, 12 ch-1 sps (48 dc + 4 ch-2 corner sps + 12 ch-1 side sps).
Assembly Layout for the Granny Square Cardigan
All panels are described as a grid: columns (width) x rows (height). Squares are joined one at a time, left to right, bottom to top within each panel.
Panel Dimensions for Size Medium
Joining Method for Panel Assembly
When two squares share one edge within a panel, on the final Round 4 of the new square, replace each ch-1 between clusters and each ch-2 at corners with a sl st join into the corresponding space of the adjacent square.
When a square shares two edges (it touches both the square to its left and the square below it), join both edges using JAYG during Round 4.
Back Panel Instructions
Row 1 of squares (bottom edge):
Square B1: Make one standalone Full Granny Square with no joining. This is the bottom-left square of the back.
Squares B2 through B5: For each subsequent square in Row 1, make through Rnd 3, then work Rnd 4 JAYG joining the left edge to the right edge of the previous square. Fasten off.
Rows 2 through 7:
For the first square of each row (leftmost): Work through Rnd 3, then Rnd 4 JAYG joining the bottom edge only to the top edge of the square directly below.
For middle and last squares: Work through Rnd 3, then Rnd 4 JAYG joining bottom edge to square below AND left edge to square to the left simultaneously. At the bottom-left corner ch-2 sp of the new square, this corner is shared with three other squares. Work sl st into the junction point to secure all four corners together.
Front Panel Instructions
Right Front Panel: Work exactly as back panel but 3 squares wide. The right edge of this panel will be the front opening edge (no joining). The left edge will be joined to the right edge of the back at the shoulder.
Left Front Panel: Mirror of right front. The left edge is the front opening edge. The right edge joins to the left edge of the back at the shoulder.
Sleeve Panel Instructions
Work as for back panel but 5 squares wide x 6 squares tall.
Hood Panel Instructions
Work as for back panel but 4 squares wide x 3 squares tall.
Garment Construction
Before seaming, all panels should be completed and blocked. Double check panel dimensions.
Shoulder Seams
Lay the back panel RS up, flat. Place the right front panel RS down on top of the back panel, aligning the right edges of both at the top right. The right front panel covers the right 2 squares of the back top edge. Seam these 2 squares (8 in) together using a flat sl st seam through both layers with Color A.
Repeat on the left side with the left front panel.
After shoulder seaming, the remaining center 1 square of the back (4 in) is unjoined. This is part of the back neckline opening.
Side Seams
With body front and back assembled at shoulders and laid flat RS together, seam the side edges from the bottom upward, leaving the top 8 in / 20 cm open on each side for the armhole opening (2 squares).
Sleeve Attachment
Fold the sleeve panel in half lengthwise (RS together). Center the sleeve top edge over the armhole opening. Seam the top edge of the sleeve to the armhole edge using a flat sl st seam.
After attaching the sleeve top, seam the sleeve side edges together from cuff upward, closing the sleeve tube.
Hood Construction and Attachment
Fold the hood panel in half widthwise (RS together). Seam along the top 12-in edge using a flat sl st seam. Turn RS out.
Attach the open bottom edge of the hood to the neckline. The hood is slightly wider than the neckline, which produces natural hood fullness. Ease the hood bottom edge to the neckline by distributing the extra fullness evenly. Pin and seam using a flat sl st seam with Color A.
Pocket Attachment
Position each pocket square on the lower front body of the corresponding front panel. Center the pocket horizontally, positioned at approximately the second row from the bottom. Whipstitch the bottom and two side edges of each pocket square to the front panel, leaving the top edge open.
Border
With Color A, work a single crochet border around the entire front opening and hood. Start at the bottom right front corner, work up the right front edge, around the hood opening, and down the left front edge. Work 1 sc into each dc and 1 sc into each ch-1 sp along straight edges. Work 2 sc into each ch-2 corner sp.
Tips for Success with This Crochet Tutorial
Block every square before assembly. I know it feels tedious, but consistent 4-inch squares make assembly so much easier. Your seams will line up beautifully.
Use stitch markers generously. Mark the corners of squares you are joining. Mark where panels will meet. Future you will be grateful.
Take your time with the JAYG joins. The first few feel awkward. By square ten, you will be in a rhythm. By square fifty, you will wonder why you ever seamed squares the old way.
Check your work as you go. Lay out your panels periodically to make sure everything is lining up. It is much easier to fix a mistake on square number twelve than square number fifty.
Do not skip the gauge swatch. This is a garment. Fit matters. Five minutes making a gauge swatch saves hours of frustration.
I really hope you love making this cozy granny square hoodie as much as I loved designing it. If you found this pattern helpful, save it to your Pinterest boards so you can find it easily when you are ready to cast on. And if you make one, please drop a comment below or tag me in your photos. I absolutely love seeing your finished projects!
