
I don’t know about you, but I have a serious weakness for handmade baby clothes. The tiny stitches, the sweet details, the fact that someone actually took the time to create something so small and perfect. It gets me every single time.

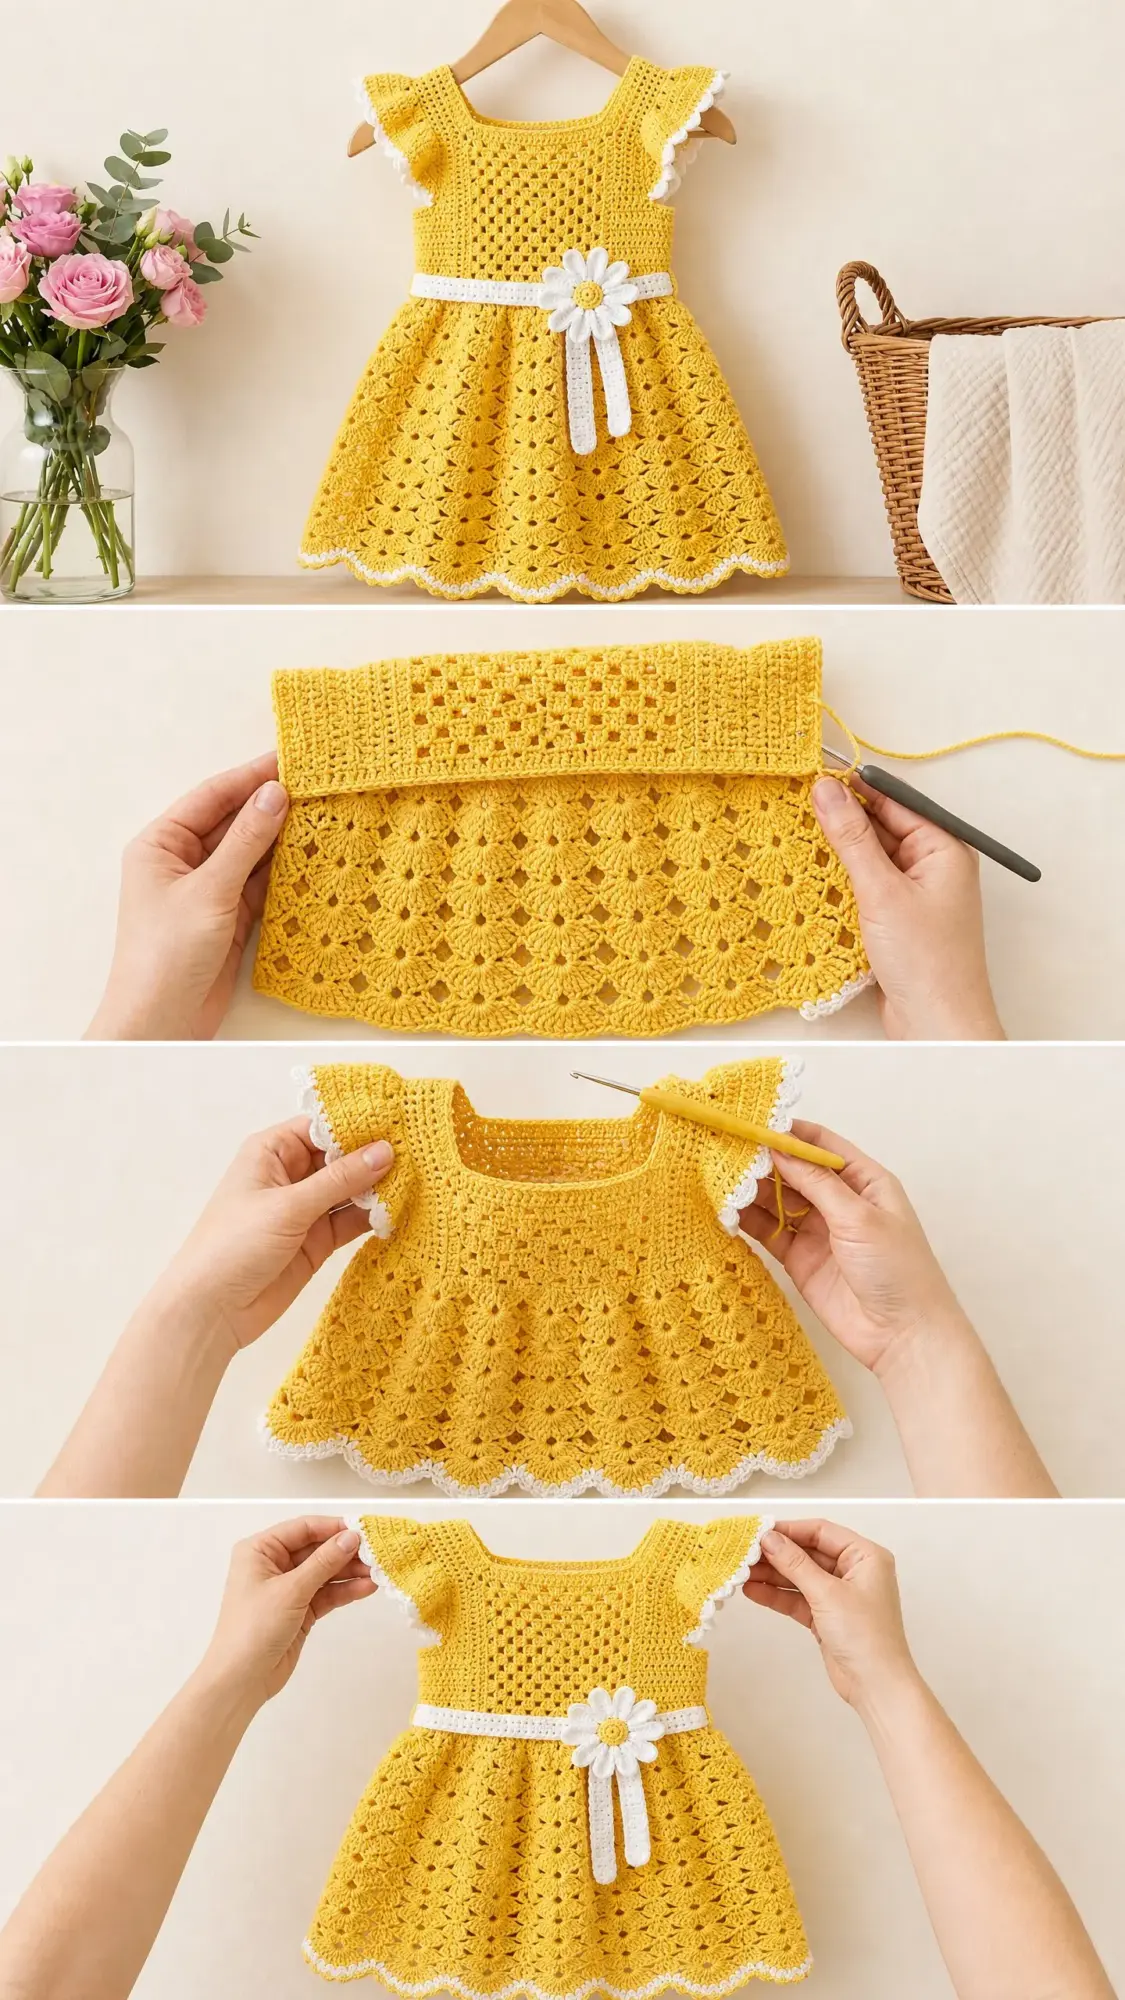
This sunny yellow daisy dress has been living in my head rent-free ever since I first sketched it out. The combination of that cheerful golden yellow with crisp white accents just screams spring and summer. And that little crocheted daisy at the waist? Pure sweetness.
If you’ve been looking for a baby dress crochet pattern that looks impressive but won’t make you pull your hair out, this is the one. The construction is straightforward, the stitches are basic, and the result is absolutely adorable. Let me walk you through everything you need to know.
About This Baby Dress Crochet Pattern
This dress features a bodice worked flat with a beautiful granny square style mesh panel on the front. The skirt flows down from the waist in an open shell fan stitch that creates a natural A-line shape. Flutter sleeves add the sweetest detail at the shoulders, and a scalloped white border finishes the hem beautifully.
The whole thing comes together with a removable white belt and a handmade daisy flower. It’s the kind of dress that makes people ask "did you really make that?"
Skill Level: Advanced Beginner to Intermediate
Finished Sizes:
Time to Complete: Approximately 10 to 14 hours at a moderate pace
All stitch counts are written for Size 6-12 months. Larger size adjustments appear in parentheses in the format (6-12 mo / 12-18 mo / 18-24 mo).
Materials You’ll Need
Yarn:
Recommended Yarns:
Choose a smooth yarn with good stitch definition. Avoid fuzzy or textured yarns so the shell fan pattern shows up clearly.
Hook: US size G-6 / 4.00 mm
Notions:
Gauge
This is critical for a well-fitting garment. Please take time to swatch before diving in.
Make a swatch of at least 5 inches square in both single crochet and the shell fan stitch. Adjust your hook size up or down as needed.
Abbreviations and Stitch Definitions
Let me break down every stitch you’ll encounter. If you’re newer to crochet, read through this section carefully before starting.
Brackets [ ] mean work the instructions inside the stated number of times.
Parentheses ( ) indicate stitch counts at the end of a row or size variations.
Special Stitches Explained
Shell Fan Stitch
This creates the gorgeous open fan pattern throughout the skirt. It’s worked over a multiple of 11 stitches plus 2.
1. Skip 2 stitches
2. Work 5 dc into the next stitch (this forms one shell)
3. Skip 2 stitches
4. Sc into the next stitch
5. Chain 3
6. Sc into the same stitch (this creates the fan join point)
7. Skip 2 stitches
8. Work 5 dc into the next stitch
9. Skip 2 stitches
10. Sc into the next stitch
Continue repeating. On following rounds, the 5-dc shell goes into the center dc of the previous shell, and the sc goes into the ch-3 space of the previous row.
Granny Mesh Block
This creates the open textured panel on the bodice front.
1. Ch 3 (counts as first dc), turn
2. Skip 2 stitches, work 3 dc into the next stitch
3. Ch 2, skip 2 stitches, work 3 dc into the next stitch
4. Repeat across to last 3 stitches, ch 2, skip 2, dc in last stitch
Picot Stitch
Used in the edgings for that delicate finishing touch.
1. Sc into next stitch
2. Ch 3
3. Sl st into the first chain of the ch-3 just made
This creates a small decorative knot on the edge.
Scallop Border
1. Sl st into first stitch
2. Skip 1 stitch, work 5 dc into the next stitch
3. Skip 1 stitch, sl st into the next stitch
4. Repeat around
Daisy Flower
Center Ring: Magic ring, ch 1, work 6 sc into ring, join with sl st. (6 sc)
Petal Round: [Ch 5, sl st into next sc] 6 times, join. (6 petals)
Fasten off, leaving a long tail for attaching.
Pattern Notes Before You Begin
Read these through before starting. They’ll save you confusion later.
1. The bodice is worked flat in two panels (front and back), then joined at the shoulders with slip stitches.
2. The skirt is worked in the round from the waist edge downward.
3. Flutter sleeves are added after the bodice is joined by working shell edging into the armhole openings.
4. The white waistband is worked separately.
5. A turning chain of 3 counts as the first dc throughout.
6. A turning chain of 1 counts as the first sc throughout.
7. There’s no zipper or button closure on the body. The neckline and armholes are generous enough for easy dressing.
8. The right side (RS) should show the granny mesh texture facing outward.
9. When changing colors, complete the last yarn over of the final stitch with the new color before pulling through.
Step by Step Instructions
Front Bodice Panel
Foundation: With MC, ch 32 (35 / 38).
Row 1 (RS): Sc in 2nd ch from hook and in each ch across, turn. (31 / 34 / 37 sc)
Row 2 (WS): Ch 1, sc in each st across, turn. (31 / 34 / 37 sc)
Row 3 (RS): Ch 3 (counts as dc), sk next 2 sts, 3 dc in next st, [ch 2, sk 2, 3 dc in next st] 8 (9 / 10) times, ch 2, sk 2, dc in last st, turn. (31 / 34 / 37 sts including turning ch, forming 9 / 10 / 11 mesh blocks)
Row 4 (WS): Ch 3, [3 dc in ch-2 sp, ch 2] 9 (10 / 11) times, dc in top of turning ch, turn. (31 / 34 / 37 sts)
Row 5 (RS): Repeat Row 4. (31 / 34 / 37 sts)
Row 6 (WS): Repeat Row 4. (31 / 34 / 37 sts)
Row 7 (RS): Repeat Row 4. (31 / 34 / 37 sts)
Row 8 (WS): Repeat Row 4. (31 / 34 / 37 sts)
Row 9 (RS): Ch 1, sc in each st and 2 sc in each ch-2 sp across, turn. (31 / 34 / 37 sc)
This row closes the mesh and creates a solid base for armhole shaping. Count carefully here.
Armhole Shaping (Front)
Row 10 (WS): Sl st across first 4 sts (these become the armhole), ch 1, sc in same st as last sl st, sc across to last 4 sts, leave last 4 sts unworked, turn. (23 / 26 / 29 sc)
Row 11 (RS): Ch 1, sc2tog, sc to last 2 sts, sc2tog, turn. (21 / 24 / 27 sc)
Row 12 (WS): Ch 1, sc2tog, sc to last 2 sts, sc2tog, turn. (19 / 22 / 25 sc)
Row 13 (RS): Ch 1, sc across, turn. (19 / 22 / 25 sc)
Neckline Shaping (Front)
Row 14 (WS): Ch 1, sc in first 6 (7 / 8) sts, turn. Work on this shoulder only. (6 / 7 / 8 sc)
Row 15 (RS): Ch 1, sc across, turn. (6 / 7 / 8 sc)
Row 16 (WS): Ch 1, sc across. Fasten off. (6 / 7 / 8 sc)
Leave the center 7 (8 / 9) sts unworked for the neckline.
Rejoin MC to remaining 6 (7 / 8) sts for second shoulder.
Row 14b (WS): Ch 1, sc across, turn. (6 / 7 / 8 sc)
Row 15b (RS): Ch 1, sc across, turn. (6 / 7 / 8 sc)
Row 16b (WS): Ch 1, sc across. Fasten off. (6 / 7 / 8 sc)
Checkpoint: Each shoulder strap should measure approximately 1.5 in / 4 cm wide. The total front panel should measure approximately 6 in / 15 cm tall.
Back Bodice Panel
Work exactly as for Front Bodice Panel through Row 9. (31 / 34 / 37 sc)
Armhole Shaping (Back): Repeat Rows 10 through 13 exactly as for Front. (19 / 22 / 25 sc after Row 13)
Back Neckline Shaping
Row 14 (WS): Ch 1, sc in first 6 (7 / 8) sts, turn. (6 / 7 / 8 sc)
Row 15 (RS): Ch 1, sc across, turn. (6 / 7 / 8 sc)
Row 16 (WS): Ch 1, sc across. Do not fasten off. (6 / 7 / 8 sc)
Row 14b (WS): Rejoin MC, ch 1, sc across 6 (7 / 8) sts, turn. (6 / 7 / 8 sc)
Row 15b (RS): Ch 1, sc across, turn. (6 / 7 / 8 sc)
Row 16b (WS): Ch 1, sc across. Fasten off. (6 / 7 / 8 sc)
Joining Shoulders
Hold front and back bodice panels with wrong sides together (RS facing outward on both sides). Align the shoulder strap edges.
With MC, sl st through both layers across the 6 (7 / 8) shoulder stitches on each side to join. Fasten off and weave in ends. Repeat for second shoulder.
Neckline Edging
With RS facing, join CC at back right shoulder seam.
Round 1: Ch 1, work sc evenly around the entire neckline opening: approximately 8 (9 / 10) sc across back, 2 sc at corner, 8 (9 / 10) sc down front neckline slope, 7 (8 / 9) sc across front neckline base, 8 (9 / 10) sc up other front slope, 2 sc at corner, 8 (9 / 10) sc across back, join with sl st to first sc. (approximately 43 / 48 / 53 sc total)
Round 2 (Picot Edging): Ch 1, [sc in next st, ch 3, sl st into first ch of ch-3 just made] around, join with sl st. Fasten off CC.
Flutter Sleeve Edging
With RS facing, join CC at underarm corner of one armhole opening.
Round 1: Ch 1, sc evenly around armhole opening, join with sl st.
Adjusted counts for even shell distribution:
Round 2 (Shell Flutter): Ch 1, [sl st in next st, sk 1, 5 dc in next st, sk 1] around, join with sl st.
Fasten off CC. Repeat for second armhole.
Skirt
Setup Round: With RS facing, join MC at side seam at the bottom edge of the bodice (Row 1 of the front panel, which is the waistline). Work sc evenly across the entire bottom edge of the joined bodice.
Work across front bottom edge: 31 (34 / 37) sc.
Work across back bottom edge: 31 (34 / 37) sc.
Join with sl st to first sc. (62 / 68 / 74 sc total)
Increase Round 1: Ch 1, increase to reach 88 sc total (this is the working stitch count for the shell fan skirt, which requires a multiple of 11).
88 divided by 11 = 8 shell fan repeats.
Skirt Rounds
Round 1 (establish shell fan pattern): Ch 3 (counts as dc), dc in same st, sk 2, sc in next st, ch 3, sc in same st, sk 2, [5 dc in next st, sk 2, sc in next st, ch 3, sc in same st, sk 2] 7 times, 3 dc in same st as beg ch-3, join with sl st to top of beg ch-3. (8 shells / 8 ch-3 fan joins)
Note: The round begins in the center of the first shell. Chain 3 and work 2 dc to start, then at the end work the remaining 3 dc into the same starting stitch. This keeps the join invisible.
Round 2: Sl st to center dc of first 5-dc shell (the 3rd dc of that shell), ch 1, sc in same st, ch 3, sc in same st (forms fan join over shell), sk 2, 5 dc in ch-3 sp of previous round, sk 2, [sc in center dc of next shell, ch 3, sc in same st, sk 2, 5 dc in ch-3 sp, sk 2] 7 times, join with sl st to first sc. (8 shells / 8 fan joins)
Rounds 3 through 8: Repeat Round 2.
Rounds 9 through 14: Continue repeating Round 2. (8 shells per round)
Rounds 15 through 16: Repeat Round 2.
Total Rounds by Size:
Checkpoint: Before the hem border, the skirt should measure approximately 5 in / 12.5 cm for size 6-12 mo, 5.5 in / 14 cm for size 12-18 mo, and 6 in / 15 cm for size 18-24 mo.
Hem Border
Hem Round 1 (MC): Working into the last shell fan round, ch 1, sc in every dc and into every ch-3 sp around. Work 1 sc into each of the 5 dc in each shell, and 3 sc into each ch-3 fan sp. Add 1 sc between each shell unit. Adjust to 72 sc (divisible by 4 for the scallop). Join with sl st. (72 sc)
Hem Round 2 (CC Scallop): Join CC, ch 1. [Sl st in next st, sk 1 st, 5 dc in next st, sk 1 st] 18 times, join with sl st to first sl st. Fasten off CC. (18 scallops)
Hem Round 3 (CC Picot accent): Rejoin CC at top of any 5-dc shell of Hem Round 2, [sc in center dc of shell, ch 3, sl st into first ch of ch-3 just made, sc in each of next 2 dc of shell, sl st into sl st between shells] around. Repeat around. Fasten off CC.
Waistband Belt
Foundation: With CC, ch 71 (76 / 81).
Row 1: Sc in 2nd ch from hook and in each ch across, turn. (70 / 75 / 80 sc)
Row 2: Ch 1, sc in each st across, turn. (70 / 75 / 80 sc)
Row 3: Ch 1, [sc in next st, ch 3, sl st into first ch of ch-3] across (picot row).
Fasten off, leaving a 12 in / 30 cm tail for sewing.
Work 1 row of sc along the bottom edge of the foundation chain to finish both long edges cleanly.
Daisy Flower
Work the Daisy Flower as described in Special Stitches above. Make 1 daisy in CC.
For a fuller daisy: After working the basic 6-petal version, join CC again at the base and work a second layer of petals: [ch 7, sl st into next sc of center ring] 6 times. This creates longer back petals for dimension.
Sew the daisy onto the center of the belt using the long tail and a tapestry needle. Secure firmly.
Attaching the Belt
Position the belt at the natural waist (the join point between bodice and skirt). You can sew the belt to the dress at the side seams only, leaving front and back free. Or create small loops to make it removable.
Finishing Your Baby Dress
Weave in all ends using a tapestry needle, working ends into the backs of stitches for at least 1 in in two directions to prevent unraveling.
Wet Blocking: Hand wash in cool water with gentle soap. Press out excess water without wringing. Lay flat and shape the skirt so the shell fans open fully and the scalloped hem lies flat. Allow to dry completely.
Light Steam Option: For acrylic yarn, hold a steam iron 1 to 2 inches above the fabric (do not press directly). This relaxes the stitches and helps the scalloped hem lie flat.
Care Instructions
Machine wash cold on gentle cycle if using machine-washable acrylic. Lay flat to dry. Do not tumble dry. Iron on low heat with a pressing cloth if needed.
Size Customization Tips
To go smaller (3-6 months): Reduce foundation chain by 3 stitches. Use 7 shell fan repeats in the skirt (77 sc). Reduce skirt length by 2 rounds.
To go larger (2T-3T): Add 3 to 6 stitches to the bodice foundation chain. Increase skirt to 9 or 10 shell fan repeats (99 or 110 sc). Add 4 to 6 additional skirt rounds. Extend the belt by 10 to 15 chains.
To adjust length only: Add or remove complete shell fan rounds. Each 2 rounds adds approximately 1.25 in in length.
To adjust width only: Change the shell fan repeat count in 1-repeat increments. Each additional repeat adds approximately 3 in to the circumference.
Final Thoughts on This Crochet Tutorial
This baby dress crochet pattern is one of those projects that looks far more complicated than it actually is. The shell fan stitch does all the heavy lifting to create that beautiful texture, and once you get the rhythm down, the skirt practically works itself up.
I love how the white accents pop against the sunny yellow. And that little daisy? It’s the perfect finishing touch that makes this dress feel extra special. This would make an incredible baby shower gift or a sweet outfit for photos.
Thank you so much for choosing this pattern. I truly hope you enjoy making it as much as I enjoyed designing it. If you’d like to share your finished dress, I would absolutely love to see it! Tag me on Instagram or pop a photo into our Facebook group.
Go ahead and save this pattern to your Pinterest boards so you can find it easily when you’re ready to start. And if you make one, please drop a comment below. I love hearing how your projects turn out and seeing the color combinations you choose!
