
Looking for the perfect warm-weather project that doubles as a stunning handmade gift? This fitted halter dress keeps you cool while making a serious style statement. The bodice uses single crochet (sc) for structure, the midriff features open diamond mesh for breathability, and the skirt flows into gorgeous swirl lace panels that flare beautifully with every step.
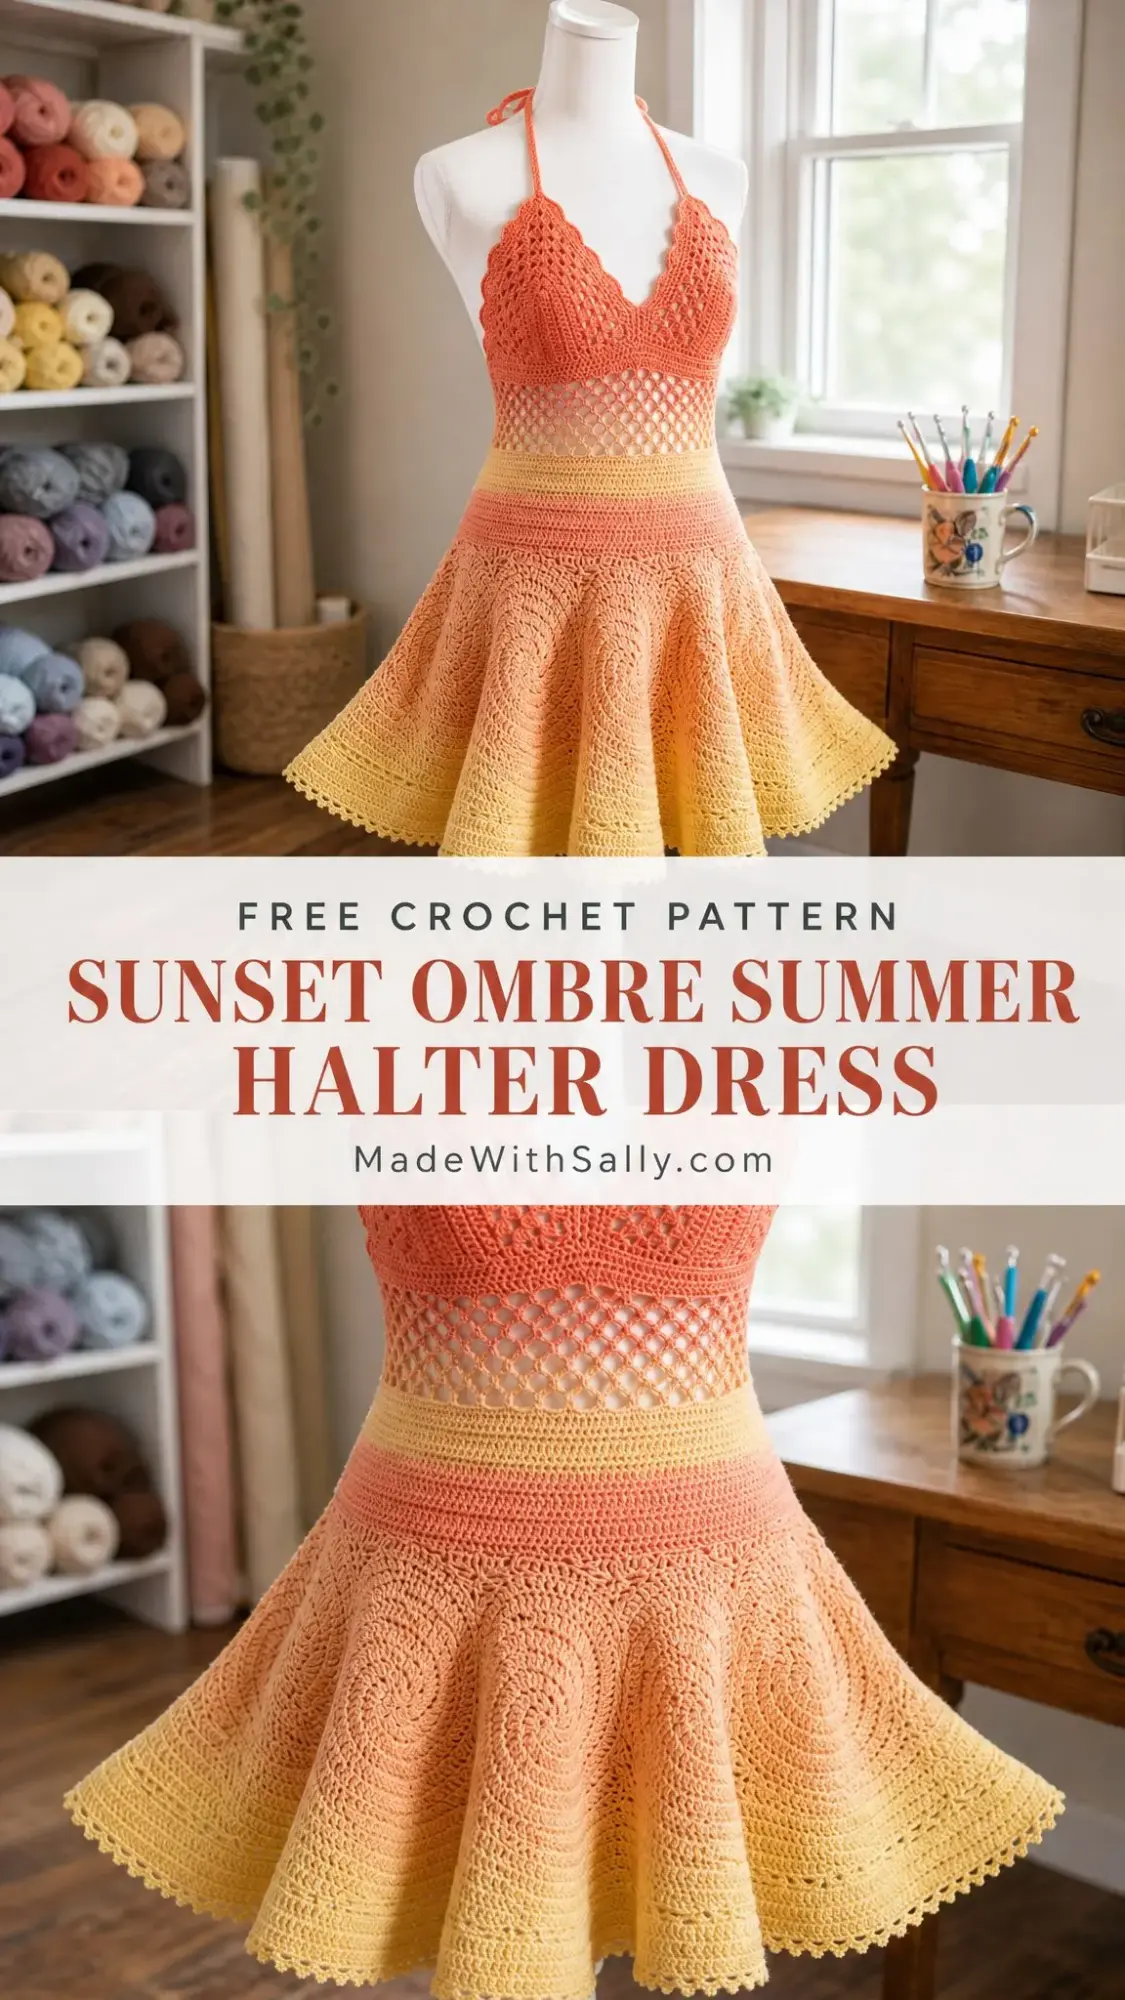
This pattern works best for advanced intermediate crocheters who have tackled at least one fitted top and one lace project. The construction moves from top down, starting with two separate cup pieces that join at the center front. From there, you’ll pick up stitches for the mesh midriff, build a shaped waistband, then dive into the stunning lace skirt.
Fair warning: this is a 40 to 55 hour project. But every single hour shows in the finished garment. The gradient color shift from coral-orange through peachy tones to golden yellow creates that sunset effect that makes this dress absolutely unforgettable. Whether you’re making it for yourself or someone special, this is the kind of piece people remember.
Why This Halter Dress Pattern Works
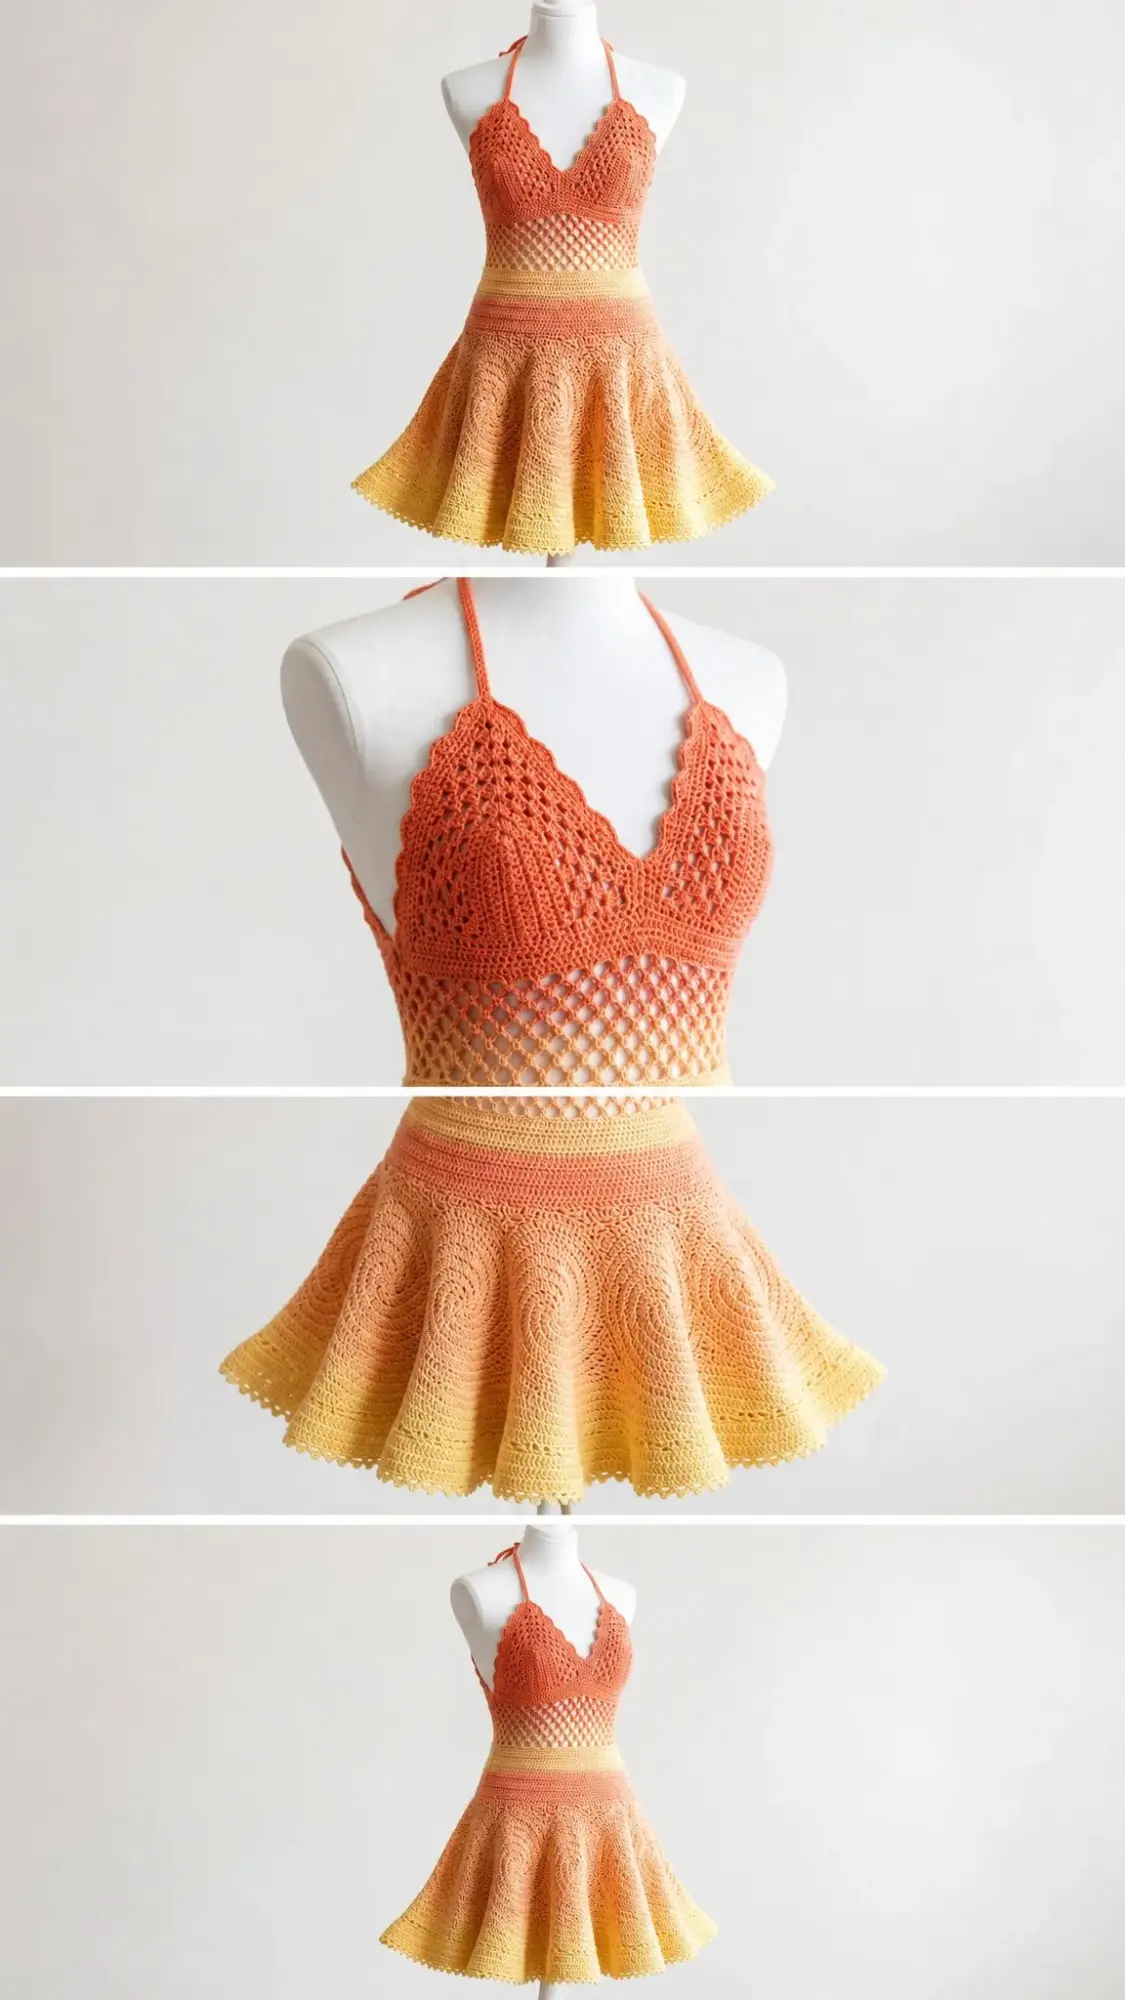
The construction method here is clever. Instead of trying to work a fitted bodice in the round and wrestling with shaping, you build two triangular cups flat. This gives you complete control over fit. The cups join at the center front V-neck, and halter ties secure everything at the nape of your neck.
The open back keeps things breezy for summer. The diamond mesh panel at the midriff adds visual interest while creating airflow exactly where you want it. And that swirl lace skirt? It’s worked in 24 repeats that naturally increase as you go, giving you that gorgeous flared silhouette without complicated math.
Materials You’ll Need
Yarn:
Yarn Weight: DK weight (CYCA #3) or light worsted. A smooth, mercerized cotton or cotton-blend gives the best stitch definition for lace work. This is strongly recommended over acrylic for a garment like this.
Hooks:
Notions:
Yarn Suggestions
Lion Brand 24/7 Cotton works beautifully here. It’s 100% mercerized cotton, DK weight, with 186 yards per 100g skein. Grab 2 skeins each of Tangerine and Peach, plus 2 skeins of Buttercup.
WeCrochet Dishie is another solid choice. Use the E-4 hook throughout for a slightly denser fabric. Try Serrano for Color A, Peach for Color B, and Canary for Color C.
Paintbox Yarns Cotton DK offers an affordable option with an excellent color range. Choose Tomato Red, Melon Sorbet, and Banana Cream.
Gauge (Please Don’t Skip This)
Bodice and mesh panel (E-4 / 3.5 mm hook):
Lace skirt panel (F-5 / 3.75 mm hook):
I know gauge swatches feel tedious. But for a fitted garment like this, even half a stitch difference per inch changes your bust measurement by 1 to 2 inches across the full circumference. Work a 6-inch square in single crochet and adjust your hook until you match.
Finished Measurements (Size Small)
Abbreviations and Stitch Definitions
Before we dive in, let’s cover the stitches you’ll use. I’ll define each one so you can reference back as needed.
Special Stitches
Picot: Chain 3, slip stitch into the first chain of the chain-3 just made. This creates a small decorative knot used at the hem edging.
Shell Stitch: Work 5 dc all into the same stitch or space. Used in bodice cup shaping and scalloped edges.
V-Stitch (V-st): (Dc, ch 2, dc) all into the same stitch or space. Used in the mesh midriff panel.
3-dc Cluster (cl): Yarn over, insert hook into indicated stitch, yo and pull up a loop, yo and draw through 2 loops (2 loops on hook). Repeat this 2 more times into the same stitch (4 loops on hook). Yo and draw through all 4 loops. Cluster complete.
Scallop Edging: Sl st into first st, skip 2 sts, work 5 dc into next st (shell made), skip 2 sts, sl st into next st. Repeat across. Each scallop uses 6 stitches.
Pattern Instructions
Section 1: Left Cup
Using Color A and E-4 / 3.5 mm hook, work flat in rows. The cup builds as a wedge, starting narrow at top and widening toward the bottom. Right side (RS) faces you on odd-numbered rows.
Foundation: Ch 4. Sl st to form a small ring (or work into a magic circle).
Row 1 (RS): Ch 1, work 3 sc into the ring. Turn. (3 sc)
Row 2 (WS): Ch 1, 2 sc in first st, sc in next st, 2 sc in last st. Turn. (5 sc)
Row 3 (RS): Ch 1, 2 sc in first st, sc in each st to last st, 2 sc in last st. Turn. (7 sc)
Row 4 (WS): Ch 1, 2 sc in first st, sc in each st to last st, 2 sc in last st. Turn. (9 sc)
Row 5 (RS): Ch 1, 2 sc in first st, sc in each st to last st, 2 sc in last st. Turn. (11 sc)
Row 6 (WS): Ch 1, 2 sc in first st, sc in each st to last st, 2 sc in last st. Turn. (13 sc)
Row 7 (RS): Ch 1, 2 sc in first st, sc in each st to last st, 2 sc in last st. Turn. (15 sc)
Row 8 (WS): Ch 1, 2 sc in first st, sc in each st to last st, 2 sc in last st. Turn. (17 sc)
Row 9 (RS): Ch 1, 2 sc in first st, sc in each st to last st, 2 sc in last st. Turn. (19 sc)
Row 10 (WS): Ch 1, 2 sc in first st, sc in each st to last st, 2 sc in last st. Turn. (21 sc)
Row 11 (RS): Ch 1, 2 sc in first st, sc in each st to last st, 2 sc in last st. Turn. (23 sc)
Row 12 (WS): Ch 1, 2 sc in first st, sc in each st to last st, 2 sc in last st. Turn. (25 sc)
Row 13 (RS): Ch 1, 2 sc in first st, sc in each st to last st, 2 sc in last st. Turn. (27 sc)
Row 14 (WS): Ch 1, sc in each st across. Turn. (27 sc)
Row 15 (RS): Ch 1, sc in each st across. Turn. (27 sc)
Row 16 (WS): Ch 1, sc in each st across. Turn. (27 sc)
Row 17 (RS): Ch 1, sc in each st across. Turn. (27 sc)
Row 18 (WS): Ch 1, sc in each st across. Turn. (27 sc)
Do not fasten off. Place a stitch marker in the last loop and set aside.
Section 1B: Right Cup
Repeat Rows 1 through 18 exactly as written for the Left Cup. Do not fasten off. Place a stitch marker in the last loop.
Checkpoint: Each cup should measure approximately 5 inches wide at the base and 6 inches tall. The shape will be a slightly elongated triangle with straight side edges.
Section 2: Joining the Cups
Hold both cups with RS facing. Left cup on left, right cup on right. You’ll join them at the top center point (the narrow ring end) with a single crochet join, creating the center-front V.
Step 1: With RS of left cup facing and working yarn still attached at the bottom edge, ch 1. Work 1 sc evenly across the bottom edge of the left cup (27 sc), then work 1 sc into the top-center joining point, then work 27 sc evenly across the bottom edge of the right cup. (55 sc total across joined base edge)
You now have a continuous bottom edge of 55 sts with the V formed at center top.
Section 3: Midriff Mesh Panel
Join Color B at the right side edge of the bodice bottom. You’ll work the mesh in rows with a turning chain.
Color Transition Note: Alternate 2 rows Color A, 2 rows Color B throughout the mesh panel for a gradient effect, ending with Color B.
Mesh Row 1 (RS): Attach yarn with sl st at right edge of the 55-st bodice base. Ch 4 (counts as dc + ch 1). Skip next st, (dc in next st, ch 1, skip next st) across to last st, dc in last st. Turn. (28 dc, 27 ch-1 sps)
Mesh Row 2 (WS): Ch 5 (counts as dc + ch 2). Skip first ch-1 sp, (dc in next dc, ch 2, skip ch-1 sp) across, dc in 3rd ch of t-ch. Turn. (29 dc, 28 ch-2 sps)
Mesh Row 3 (RS): Ch 4 (counts as dc + ch 1). (Dc in next dc, ch 1) across, dc in 3rd ch of t-ch. Turn. (29 dc, 28 ch-1 sps)
Mesh Row 4 (WS): Repeat Mesh Row 2. (29 dc, 28 ch-2 sps)
Mesh Row 5 (RS): Repeat Mesh Row 3. (29 dc, 28 ch-1 sps)
Mesh Row 6 (WS): Repeat Mesh Row 2. (29 dc, 28 ch-2 sps)
Mesh Row 7 (RS): Ch 1, sc in each dc and each ch-sp across, sc in 3rd ch of t-ch. Turn. (57 sc)
Section 4: Waistband
The waistband creates a defined waist between mesh and skirt. Work as a flat panel across the front 57 sts.
Waistband Row 1 (RS): Ch 1, BLO sc in each st across. Turn. (57 sc)
Waistband Row 2 (WS): Ch 1, BLO sc in each st across. Turn. (57 sc)
Waistband Row 3 (RS): Ch 1, BLO sc in each st across. Turn. (57 sc)
Waistband Row 4 (WS): Ch 1, BLO sc in each st across. Turn. (57 sc)
Waistband Row 5 (RS): Ch 1, sc in first st, (sc2tog, sc in next 18 sts) twice, sc2tog, sc in rem sts to end. Turn. (54 sc)
Checkpoint: The piece should measure approximately 8 inches from top of bodice cup to bottom of waistband. Waistband edge measures approximately 12 inches wide (front panel only).
Section 5: Skirt
Establish full waist circumference: At the end of Waistband Row 5, chain 36 additional stitches to bridge the open back. Slip stitch to the first stitch of Waistband Row 5 to join into a round. (54 front sts + 36 back chain = 90 sts)
Skirt Setup Round: Ch 1, sc in each of the 54 front sts, sc in each of the 36 back ch sts. Sl st to first sc to join. Pm. (90 sc)
Skirt Increase Round 1: Ch 1, (sc in next 4 sts, 2 sc in next st) 18 times. Sl st to join. (108 sc)
Skirt Increase Round 2: Ch 1, (sc in next 5 sts, 2 sc in next st) 18 times. Sl st to join. (126 sc)
Skirt Increase Round 3: Ch 1, (sc in next 6 sts, 2 sc in next st) 18 times. Sl st to join. (144 sc)
Skirt Lace Section
The lace is built on 144 stitches divided into 24 repeats. Begin transitioning to Color C now.
Lace Round 1: Ch 3 (counts as first dc). Dc in next st, (ch 2, skip 2 sts, dc in next 4 sts) 23 times, ch 2, skip 2 sts, dc in next 2 sts. Sl st to top of t-ch to join. (96 dc, 24 ch-2 sps)
Lace Round 2: Ch 1. (Sc in each of next 4 dc, 2 sc in ch-2 sp) 24 times. Sl st to join. (144 sc)
Lace Round 3: Ch 4 (counts as dc + ch 1). (Skip 1 st, dc in next st, ch 1) 71 times, skip last st. Sl st to 3rd ch of t-ch. (72 dc, 72 ch-1 sps)
Lace Round 4: Ch 1. (Sc in dc, sc in ch-1 sp) around. Sl st to join. (144 sc)
Lace Round 5: Ch 3. (Dc in next 4 sts, 2 dc in next st, ch 2, skip 3 sts) 24 times. Sl st to join. (144 dc, 24 ch-2 sps)
Lace Round 6: Ch 1. (Sc in each of 6 dc, 2 sc in ch-2 sp) 24 times. Sl st to join. (192 sc)
Lace Round 7: Ch 3 (counts as dc). (Ch 2, skip 2 sts, dc in next 6 sts) 24 times, ch 2, skip 2 sts, sl st to t-ch. (144 dc, 24 ch-2 sps)
Lace Round 8: Ch 1. (2 sc in ch-2 sp, sc in next 6 dc) 24 times. Sl st to join. (192 sc)
Lace Round 9: Ch 3. (Dc in next 5 sts, 2 dc in next st, ch 3, skip 2 sts) 24 times. Sl st to join. (168 dc, 24 ch-3 sps)
Lace Round 10: Ch 1. (Sc in each of 6 dc, 3 sc in ch-3 sp) 24 times. Sl st to join. (216 sc)
Lace Round 11: Ch 4 (counts as dc + ch 1). (Skip 1 st, dc in next st, ch 1) 107 times, skip 1. Sl st to 3rd ch of t-ch. (108 dc, 108 ch-1 sps)
Lace Round 12: Ch 1. (Sc in dc, sc in ch-sp) around. Sl st to join. (216 sc)
Lace Round 13: Ch 3 (counts as dc). (2 dc in next st, dc in next 6 sts, ch 3, skip 2 sts) 24 times. Sl st to join. (192 dc, 24 ch-3 sps)
Lace Round 14: Ch 1. (Sc in each of 8 dc, 3 sc in ch-3 sp) 24 times. Sl st to join. (264 sc)
Lace Round 15: Ch 3. (Dc in next 4 sts, ch 2, skip 2, dc in next 5 sts) 24 times. Sl st to join. (216 dc, 24 ch-2 sps)
Lace Round 16: Ch 1. (Sc in 9 dc, 2 sc in ch-2 sp) 24 times. Sl st to join. (264 sc)
Lace Round 17: Ch 3 (counts as dc). (Work cl over next 3 sts, dc in next 4 sts, work cl over next 3 sts, dc in next 2 sts, ch 2, skip 2 sts) 24 times. Sl st to join. (192 sts, 24 ch-2 sps)
Lace Round 18: Ch 1. (Sc in cl, sc in 4 dc, sc in cl, sc in 2 dc, 2 sc in ch-2 sp) 24 times. Sl st to join. (240 sc)
Lace Round 19: Ch 3. (Dc in next 7 sts, 2 dc in next st, ch 3, skip 2 sts) 24 times. Sl st to join. (216 dc, 24 ch-3 sps)
Lace Round 20: Ch 1. (Sc in 9 dc, 3 sc in ch-3 sp) 24 times. Sl st to join. (288 sc)
Lace Round 21: Ch 4 (counts as dc + ch 1). (Skip 1 st, dc in next st, ch 1) 143 times, skip 1. Sl st to 3rd ch of t-ch. (144 dc, 144 ch-1 sps)
Lace Round 22: Ch 1. (Sc in dc, sc in ch-sp) around. Sl st to join. (288 sc)
Checkpoint: The skirt should measure approximately 10 inches from the waistband. Hem circumference should be approximately 64 inches. Color should now be fully Color C (golden yellow).
Section 6: Hem Edging
Hem Round 1: Ch 1. Sc in first st, (ch 3, skip 2 sts, sc in next st) around, ending with ch 3, skip 2 sts. Sl st to first sc. (96 ch-3 sps, 96 sc)
Hem Round 2: Sl st into first ch-3 sp. Ch 1. (Sc in ch-3 sp, ch 3, sc in same ch-3 sp, ch 3) around. Sl st to first sc. (96 double-sc groups)
Hem Round 3 (picot finish): Sl st into first ch-3 sp. (Sc in ch-sp, work picot, sc in same ch-sp, sl st to next ch-sp) around. Sl st to first sc. Fasten off. Weave in end.
Section 7: Scallop Edge on Bodice Cups
Return to each cup. With RS facing and Color A, work the scalloped top edge along the diagonal side edges of each cup.
Attach Color A at the bottom corner. Work 1 sc evenly into each row-end along the edge toward the top ring (approximately 18 sc). Then work the scallop edging: sl st in first st, skip 2 sts, work 5 dc in next st (shell), skip 2 sts, sl st in next st. Repeat across.
Finishing
Halter Ties: Attach Color A at the top outer corner of each cup. Chain 120 (or desired length to tie at nape of neck). Sl st back down the chain. Fasten off and weave in ends.
Back Waist Ties: Attach Color B at each side edge of the waistband. Chain 60. Sl st back down the chain. These ties secure the open back at the waist.
Blocking: Wet block the finished dress on blocking mats. Pin the skirt to open up the lace motifs and define the swirl pattern. Allow to dry completely before wearing.
Weave in all ends carefully, especially at color change points.
Tips for Success
This dress has negative ease at the bust, meaning it’s designed to fit snugly for support. If you’re between sizes, go with the larger measurements and check your gauge carefully.
The color transitions work best when you plan ahead. Lay out your yarn cakes or skeins and mark where each color change happens. If using gradient yarn, make sure you have enough yardage in each color zone.
Take your time with the lace rounds. They’re repetitive once you get the rhythm, and counting after each round will save you from ripping back later.
You Did It!
This Sunset Ombre Summer Halter Dress is a showstopper. The gradient colors, the fitted bodice, the flowing lace skirt. Every element works together to create something truly special.
Thank you so much for choosing this pattern for your next project. I genuinely hope you love making it as much as I loved designing it. If you complete your dress, I would absolutely love to see it! Tag me on Instagram or share a photo in my Facebook group. Seeing your finished projects is the best part of this whole thing.
If you loved this crochet tutorial for the Sunset Ombre Summer Halter Dress, go ahead and save it to your Pinterest boards so you can find it when you’re ready to start. And please drop a comment below if you make one. I read every single comment and love hearing how your projects turn out!
