
A fitted crochet dress with a sweetheart neckline? That sounds intimidating, right? I hear you. When most crocheters see a garment like this, they assume it requires years of experience and some kind of secret knowledge. But here is the truth: if you can work half double crochet in the round and follow a basic granny square pattern, you already have the skills you need.
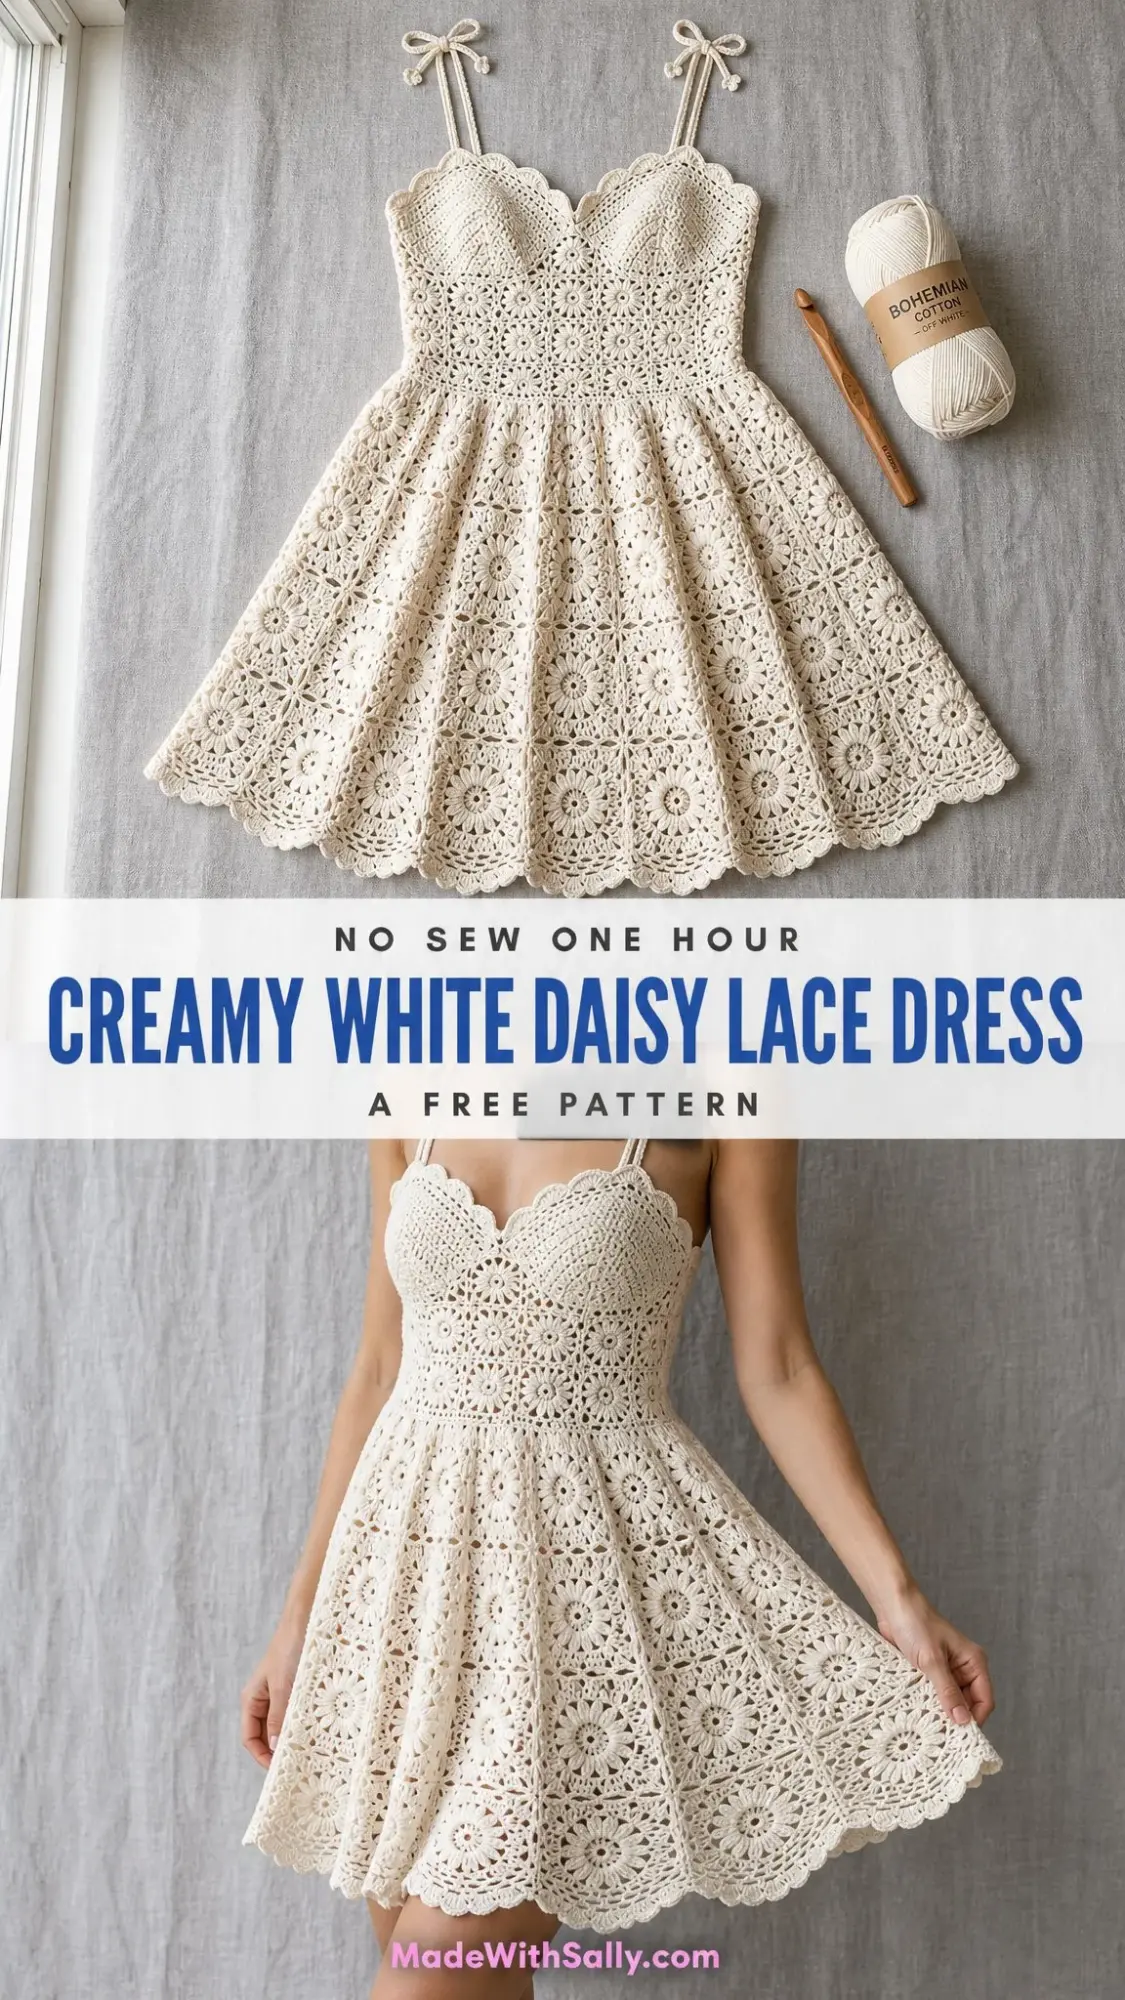
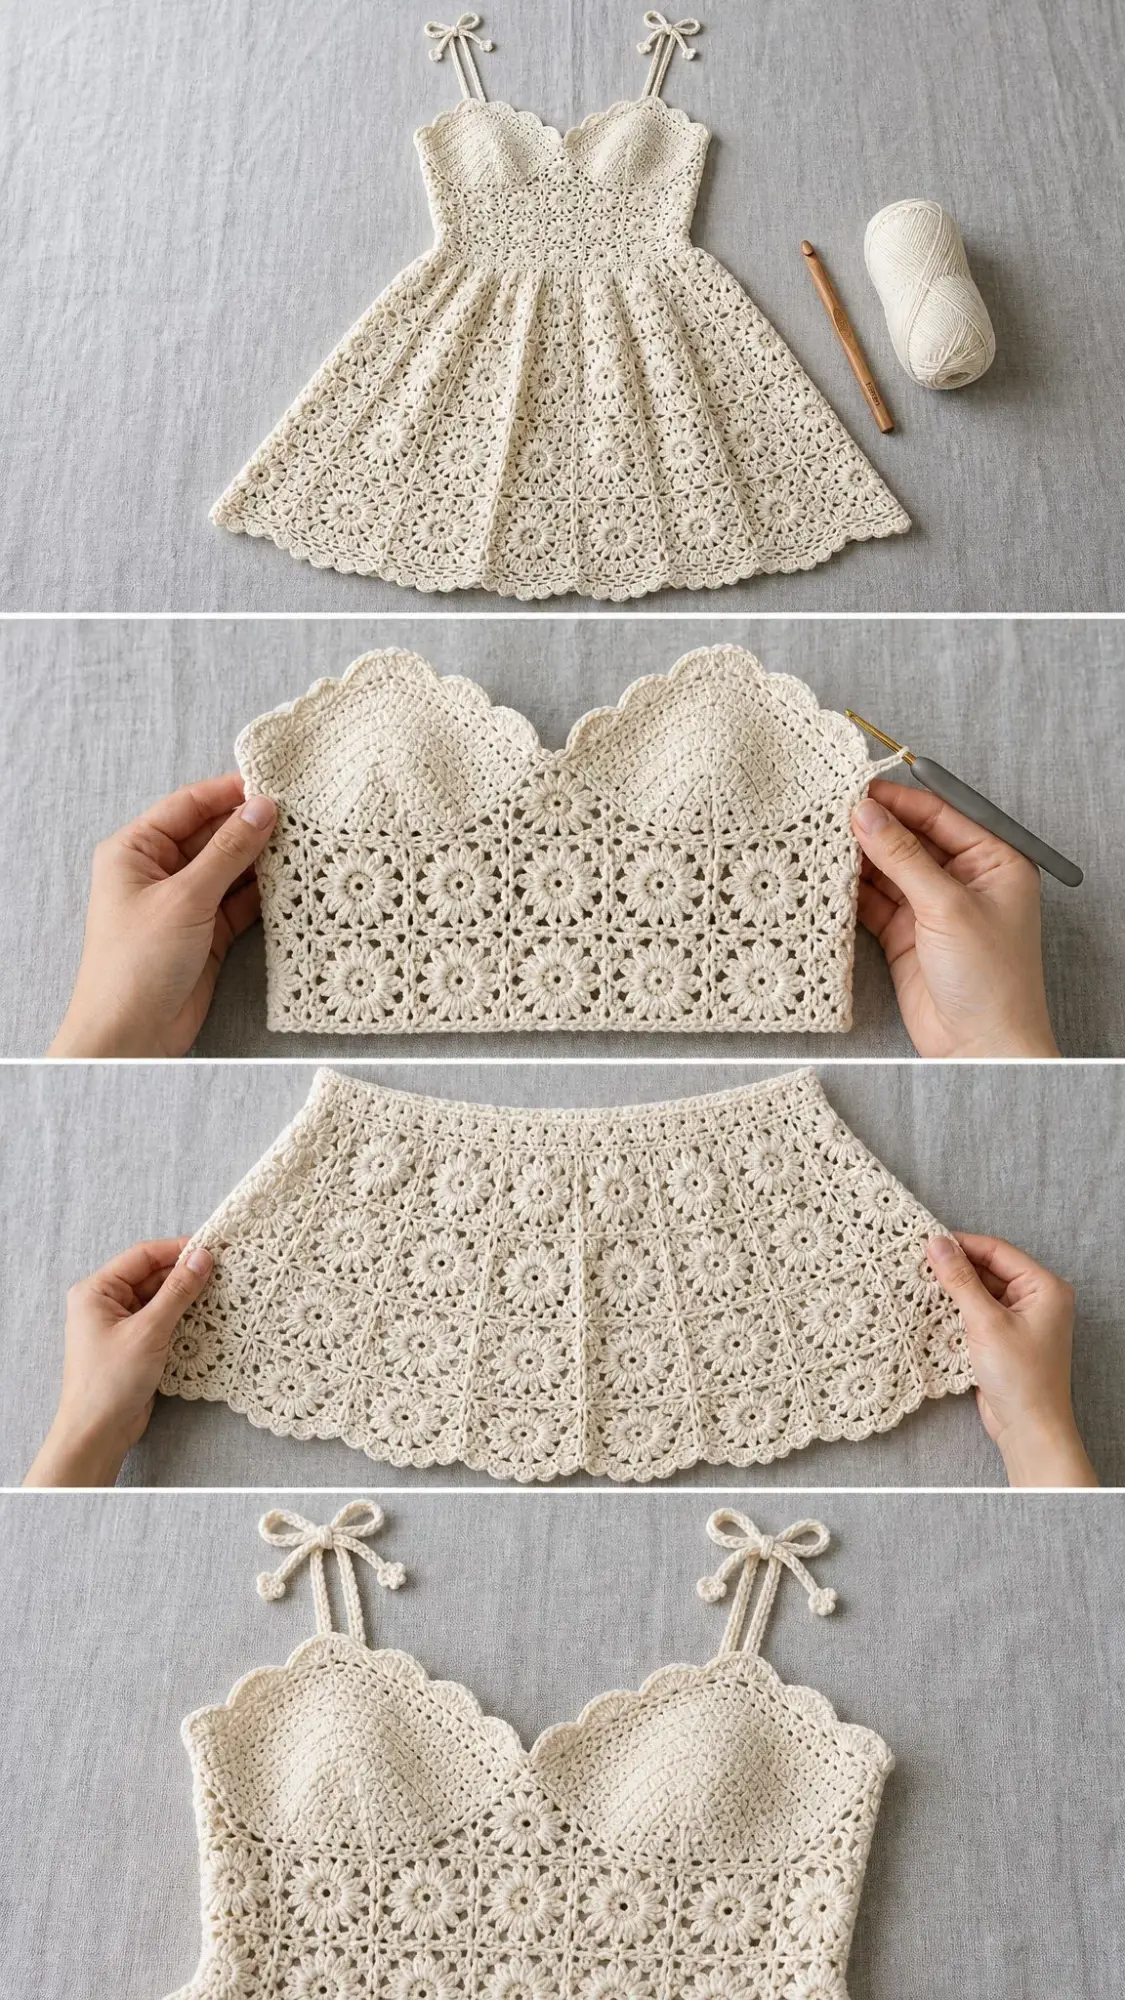
This dress breaks down into two simple sections. The bodice is just half double crochet worked in rounds with some straightforward increases and decreases. The skirt is made entirely from joined square motifs, the same technique you would use for a blanket. The sweetheart neckline looks fancy, but it is really just dividing your work and decreasing on one edge. Nothing magical. Just one stitch at a time.
Whether you are an ambitious beginner ready to tackle your first garment or an intermediate crocheter looking for a stunning summer project, this pattern walks you through every single stitch. I have included checkpoints throughout so you can verify your measurements before moving forward. No guessing. No hoping for the best. Just clear instructions that get you to a beautiful finished dress.
Pattern Overview
This creamy white sundress features a fitted bodice with a romantic sweetheart neckline, delicate scallop edging, and a flowy A-line skirt made from daisy granny square motifs. The adjustable spaghetti straps tie into sweet little bows at the shoulders. The entire dress is worked in a single off-white or cream color, giving it a vintage, bohemian feel that works for summer weddings, garden parties, or beachy vacations.
The bodice is constructed bottom-up in joined rounds, shaped with decreases at the waist and increases at the bust. The skirt is built from 30 individual daisy squares joined together using the join-as-you-go method, then attached to the bodice at the waist.
Skill Level: Advanced Beginner to Intermediate
Time Estimate: Approximately 40 to 60 hours total
Finished Measurements
This pattern is written for size Small (US 4-6). Size customization notes are included at the end.
Materials Needed
Yarn: Approximately 1,400 to 1,600 yards / 1,280 to 1,460 meters of DK weight (light 3) 100% cotton yarn in off-white or cream.
Recommended Yarn Options:
1. WeCrochet Comfy Cotton Blend in Bare or Almond (218 yd per 100g skein). You will need approximately 7 skeins. This is my top recommendation for excellent stitch definition.
2. Paintbox Yarns Simply DK Cotton in Champagne White or Vanilla Cream (273 yd per 100g skein). Budget-friendly with beautiful even plying. You will need approximately 6 skeins.
3. Drops Safran in Off-White, color 17 (175 yd per 50g skein). A firmer hand that gives motifs excellent structure. You will need approximately 9 skeins.
Substitution Note: Choose a smooth, tightly plied cotton yarn with minimal halo. Fuzzy or textured yarn will hide the pretty daisy details.
Hooks:
Additional Tools:
Gauge
Bodice gauge (Size E-4 hook, hdc in rounds): 20 stitches x 16 rounds = 4 inches x 4 inches
Motif gauge (Size F-5 hook, after blocking): 1 completed daisy square = 4 inches x 4 inches
Gauge is critical for a fitted garment. Please do not skip swatching. Even half a stitch difference per inch will change your bust measurement by more than 1 inch.
Abbreviations
Before we begin, let me define every abbreviation you will encounter:
Special Stitches and Techniques
Daisy Stitch Square Motif
This motif creates the daisy-covered skirt. It starts with a center ring and builds outward over 5 rounds.
Foundation Ring: Using F-5 hook, ch 5, sl st to first ch to form a ring. (Or use a magic ring if you prefer.)
Motif Round 1 (Daisy Center):
Ch 3 (counts as dc), work 11 dc into ring, sl st to top of beg ch-3 to join. (12 dc)
Motif Round 2 (Petal Ring):
Ch 1, sc in same st, (ch 3, sk 1 st, sc in next st) 5 times, ch 3, sl st to first sc to join. (6 ch-3 sps)
Motif Round 3 (Petal Fill):
Sl st into first ch-3 sp, ch 3 (counts as dc), work 4 dc in same ch-3 sp, (5 dc in next ch-3 sp) 5 times, sl st to top of beg ch-3 to join. (30 dc arranged in 6 petals of 5 dc each)
Motif Round 4 (Square Frame):
Sl st to top of 3rd dc of first petal group (center dc of petal), ch 4 (counts as dc plus ch 1), dc in same st, ch 2, dc in center dc of next petal, ch 2, (dc, ch 2, dc, ch 2, dc) in center dc of next petal (corner made), ch 2, dc in center dc of next petal, ch 2, (dc, ch 2, dc, ch 2, dc) in center dc of next petal (corner made), ch 2, dc in center dc of next petal, ch 2, (dc, ch 2, dc) in same st as beg (completing first corner), ch 2, sl st to 3rd ch of beg ch-4 to join.
Your motif now has 4 corners, each with (dc, ch 2, dc, ch 2, dc), and 2 dc edge stitches between corners with ch-2 sps.
Motif Round 5 (Fill and Square Out):
Sl st into first ch-2 sp (corner sp), ch 3 (counts as dc), (2 dc, ch 2, 3 dc) in same corner sp (corner cluster), (3 dc in next ch-2 sp) twice, (3 dc, ch 2, 3 dc) in corner ch-2 sp, rep from beg for all 4 corners, sl st to top of beg ch-3 to join.
Each side now has 9 dc (3 groups of 3), with ch-2 corner sps. Total: 36 dc plus 4 corner ch-2 sps.
Fasten off, leaving a 10-inch tail for joining if not using join-as-you-go.
Join-As-You-Go Method
When making your second and subsequent motifs, work Round 5 normally on the first three sides. On the fourth side (the joining side), replace each ch-2 corner sp with: ch 1, sl st to corresponding corner sp of adjacent motif, ch 1. Replace each ch between dc groups on the joining edge with sl st to corresponding ch sp on adjacent motif. This creates a flat, seamless join without extra seaming later.
Scallop Border Stitch
Work along any finished edge: sc in first st, (sk 2 sts, 5 dc in next st, sk 2 sts, sc in next st) across, adjusting as needed at corners to keep scallops even.
Strap Cord
Using E-4 hook, ch 65 (or to desired length). Row 1: sl st in 2nd ch from hook and in each ch across. (64 sl st) Fasten off. The cord has a neat, rounded rope appearance perfect for tying into a bow.
Pattern Instructions
Skirt Motif Panel
Work 30 daisy square motifs total, arranged in a 6 x 5 grid (6 columns wide, 5 rows tall). Each motif measures 4 inches square after blocking, so your panel will be 24 inches wide x 20 inches tall before seaming.
Join motifs using the join-as-you-go method as each one is completed.
To form the skirt tube, fold the grid so the two 5-motif-tall short edges meet. Seam together using sl st through both layers on the WS with matching yarn. This back seam should be nearly invisible from the RS.
Your skirt tube now measures approximately 48 inches in circumference and 20 inches in height.
Skirt Top Edge Gathering Round:
Using E-4 hook with RS facing, work along the top edge of the skirt tube: sc2tog across entire top edge, evenly distributing 135 sc total around the entire top circumference, sl st to first sc to join. (135 sc)
This gathering round compresses the skirt top to match the bodice waist measurement of 27 inches.
Checkpoint: Your top edge should now measure approximately 27 inches in circumference.
Skirt Hem Border
With RS facing and F-5 hook, join yarn at any point on the bottom edge of skirt tube.
Border Round 1: Ch 1, sc evenly around entire lower edge, working 1 sc per dc along motif lower edges and 2 sc per corner sp, total 216 sc, sl st to join. (216 sc)
Border Round 2 (Scallop): (Sk 2 sc, 5 dc in next sc, sk 2 sc, sc in next sc) 36 times around, sl st to first dc to join. (36 scallops)
Fasten off and weave in ends.
Bodice
The bodice is worked in joined rounds from the lower bust edge upward.
Foundation:
Using E-4 hook, ch 171, sl st to first ch to form a ring, being careful not to twist.
Foundation Round: Ch 1, hdc in each ch around, sl st to first hdc to join. (170 hdc)
Rounds 1 to 4 (Lower Bust, Even):
Ch 1, hdc in each st around, sl st to first hdc to join. (170 hdc each round)
Setting Up Markers:
Place markers at 4 positions for shaping:
Rounds 5 to 9 (Waist Shaping, Decrease Section):
Round 5: Ch 1, hdc to 2 sts before Marker A, hdc2tog, sm, hdc2tog, hdc to 2 sts before Marker C, hdc2tog, sm, hdc2tog, hdc to end, sl st to join. (166 hdc)
Round 6: Rep Round 5 pattern. (162 hdc)
Round 7: Rep Round 5 pattern. (158 hdc)
Round 8: Rep Round 5 pattern. (154 hdc)
Round 9: Rep Round 5 pattern. (150 hdc)
Rounds 10 to 11 (Waist, Even):
Ch 1, hdc in each st around, sl st to join. (150 hdc each round)
Rounds 12 to 14 (Continue Waist Shaping):
Round 12: Rep decrease pattern. (146 hdc)
Round 13: Rep decrease pattern. (142 hdc)
Round 14: Rep decrease pattern. (138 hdc)
Round 15 (Final Waist):
Ch 1, hdc in each st around, sl st to join. (138 hdc)
Checkpoint: Your bodice should measure approximately 4 inches tall. The circumference should be approximately 27 to 28 inches. Pin and measure before continuing.
Repositioning Markers for Increase Rounds:
Remove old markers. Place new markers at sts 1, 35, 70, and 104.
Rounds 16 to 19 (Underbust to Bust Expansion):
Round 16: Ch 1, hdc to Marker 1, 2 hdc in marked st, sm, hdc to Marker 2, 2 hdc in marked st, sm, hdc to Marker 3, 2 hdc in marked st, sm, hdc to Marker 4, 2 hdc in marked st, sm, hdc to end, sl st to join. (142 hdc)
Round 17: Rep Round 16 pattern. (146 hdc)
Round 18: Rep Round 16 pattern. (150 hdc)
Round 19: Rep Round 16 pattern. (154 hdc)
Rounds 20 to 22 (Upper Bust, Even):
Ch 1, hdc in each st around, sl st to join. (154 hdc each round)
Checkpoint: Your bodice should measure approximately 7 inches tall. Circumference is approximately 30.8 inches.
Rounds 23 to 26 (Full Bust Expansion):
Round 23: Rep increase pattern. (158 hdc)
Round 24: Rep increase pattern. (162 hdc)
Round 25: Rep increase pattern. (166 hdc)
Round 26: Rep increase pattern. (170 hdc)
Rounds 27 to 28 (Top Bust, Even):
Ch 1, hdc in each st around, sl st to join. (170 hdc each round)
Sweetheart Neckline Shaping
Divide for front and back panels:
Back Bodice Top (Rows 29 to 34):
Attach yarn at st 86.
Row 29 (WS): Ch 1, hdc in each of 85 sts across back, turn. (85 hdc)
Rows 30 to 34: Ch 1, hdc in each st across, turn. (85 hdc each row)
Back Top Border: Ch 1, (sk 2, 5 dc in next st, sk 2, sc in next st) 14 times, sk 1, sl st to last st. Fasten off. (14 scallops)
Right Front Cup (Rows 29 to 34):
Attach yarn at st 1 of front panel.
Row 29: Ch 1, hdc in each of first 42 sts, hdc2tog, turn. (42 hdc)
Row 30: Ch 2 (does not count as st), hdc2tog, hdc to end, turn. (41 hdc)
Row 31: Ch 1, hdc to last 2 sts, hdc2tog, turn. (40 hdc)
Row 32: Ch 2, hdc2tog, hdc to end, turn. (39 hdc)
Row 33: Ch 1, hdc to last 2 sts, hdc2tog, turn. (38 hdc)
Row 34: Ch 2, hdc2tog, hdc to end. (37 hdc) Do not turn.
Work scallop border across top edge. Rotate work, sc evenly down inner V edge (approximately 6 sc). Fasten off.
Left Front Cup (Rows 29 to 34):
Attach yarn at st 44 of front panel.
Row 29: Ch 1, hdc2tog, hdc in each rem st to end of front panel, turn. (41 hdc)
Row 30: Ch 1, hdc to last 2 sts, hdc2tog, turn. (40 hdc)
Row 31: Ch 2, hdc2tog, hdc to end, turn. (39 hdc)
Row 32: Ch 1, hdc to last 2 sts, hdc2tog, turn. (38 hdc)
Row 33: Ch 2, hdc2tog, hdc to end, turn. (37 hdc)
Row 34: Ch 1, hdc to last 2 sts, hdc2tog. (36 hdc)
Work scallop border across top edge. Sc evenly down inner V edge. Fasten off.
Sweetheart Border (Connecting Scallop):
With E-4 hook and RS facing, attach yarn at top right corner of right front cup. Work scallop border across entire top front edge, traveling across top of right cup, down into sweetheart V dip (sc closely around the curve, approximately 8 to 10 sc), back up the left V edge, across top of left cup, sl st to close. Aim for 12 to 14 scallops across cups plus smooth curve at center V.
Fasten off. Weave in ends.
Checkpoint: Your completed bodice should measure approximately 10 inches tall. Bust circumference at the widest point should be 34 inches. Waist should be 27 to 28 inches.
Joining Bodice to Skirt
Hold bodice and skirt both RS out. Match the gathering round at the top of the skirt to the foundation round of the bodice.
With E-4 hook, work 1 round of sl st through both layers all the way around. (135 sl st)
Work 1 round of sc over the seam on the RS to reinforce: Ch 1, sc in each sl st around, sl st to join. (135 sc)
This creates a subtle ridge at the waist that reinforces the seam and defines the waistline.
Straps (Make 2)
Using E-4 hook, ch 65.
Row 1: Sl st in 2nd ch from hook and in each ch across. (64 sl st)
Fasten off, leaving a 12-inch tail for attaching.
Tie one end of each strap into a small bow. Attach the non-bow end to the back bodice top edge, positioned approximately 2 inches from each side. Attach the bow end to the front bodice at the outer top corners of each bust cup. Adjust strap length by retying the bow.
Finishing and Blocking
Weave in all remaining ends securely on the WS.
Blocking is essential for this dress. The motifs will not lay flat or join neatly without it.
Fill a basin with cool water. Submerge the dress fully and gently press water through. Do not wring or agitate. Lift carefully, supporting the full weight, and press gently in a towel to remove excess water.
Lay flat on a blocking mat. Pin the skirt motifs to their full 4 x 4 inch measurements, pulling corners square and opening the daisy centers. Pin the bodice to correct measurements (waist 27 inches, bust 34 inches). Pin scallop borders so each scallop fans evenly. Allow to dry completely, usually 24 to 48 hours.
Size Customization Tips
For the bodice: Add or remove stitches in multiples of 4 from the foundation chain. Each additional 5 stitches adds approximately 1 inch of circumference.
For the skirt: Adjust the number of motifs per row. For size Medium, use 7 motifs per row (28 inches total width, 56 inches circumference) and increase the gathering round to 150 sts to match a 30-inch waist.
For strap length: Each 5 additional chains adds approximately 1 inch.
For skirt length: Add or remove rows of motifs. Each row adds 4 inches.
Care Instructions
Machine wash on gentle cycle with cold water, inside out, in a mesh laundry bag. Always lay flat to dry. Do not tumble dry. Do not iron directly. If pressing is needed, use a pressing cloth and cool iron with steam. Store flat or rolled to prevent the skirt weight from stretching the bodice.
Final Thoughts on This Crochet Dress Pattern
This creamy white daisy lace crochet dress is absolutely a labor of love, but the result is something truly special. The combination of the fitted bodice, romantic sweetheart neckline, and that gorgeous daisy motif skirt creates a piece you will reach for again and again. Take your time with the checkpoints, trust your gauge swatch, and remember that every beautiful handmade garment is built one stitch at a time.
Thank you so much for choosing this pattern for your next crochet project. I genuinely cannot wait to see your finished dresses. If you make one, please tag me on Instagram or share a photo in my Facebook group. Nothing makes my day quite like seeing your gorgeous creations come to life.
If you loved this pattern, go ahead and save it to your Pinterest boards so you can find it easily when you are ready to start. And please drop a comment below if you have any questions or just want to share your progress. I love hearing from you, and your comments help other crocheters find patterns they will love too. Happy crocheting!
