
I call this one my "Winter Poinsettia" pattern, and it started as a quick sketch in my notebook three Christmases ago. My grandmother used to crochet these intricate holiday doilies that everyone fought over at estate sales. I wanted to capture that heirloom quality while adding my own twist with the dimensional flowers and gold accents.
Get the Ad-Free PDF Pattern
You can find the free pattern below, or you can purchase the ad-free printable PDF from my shop.
Get the Printable PDF →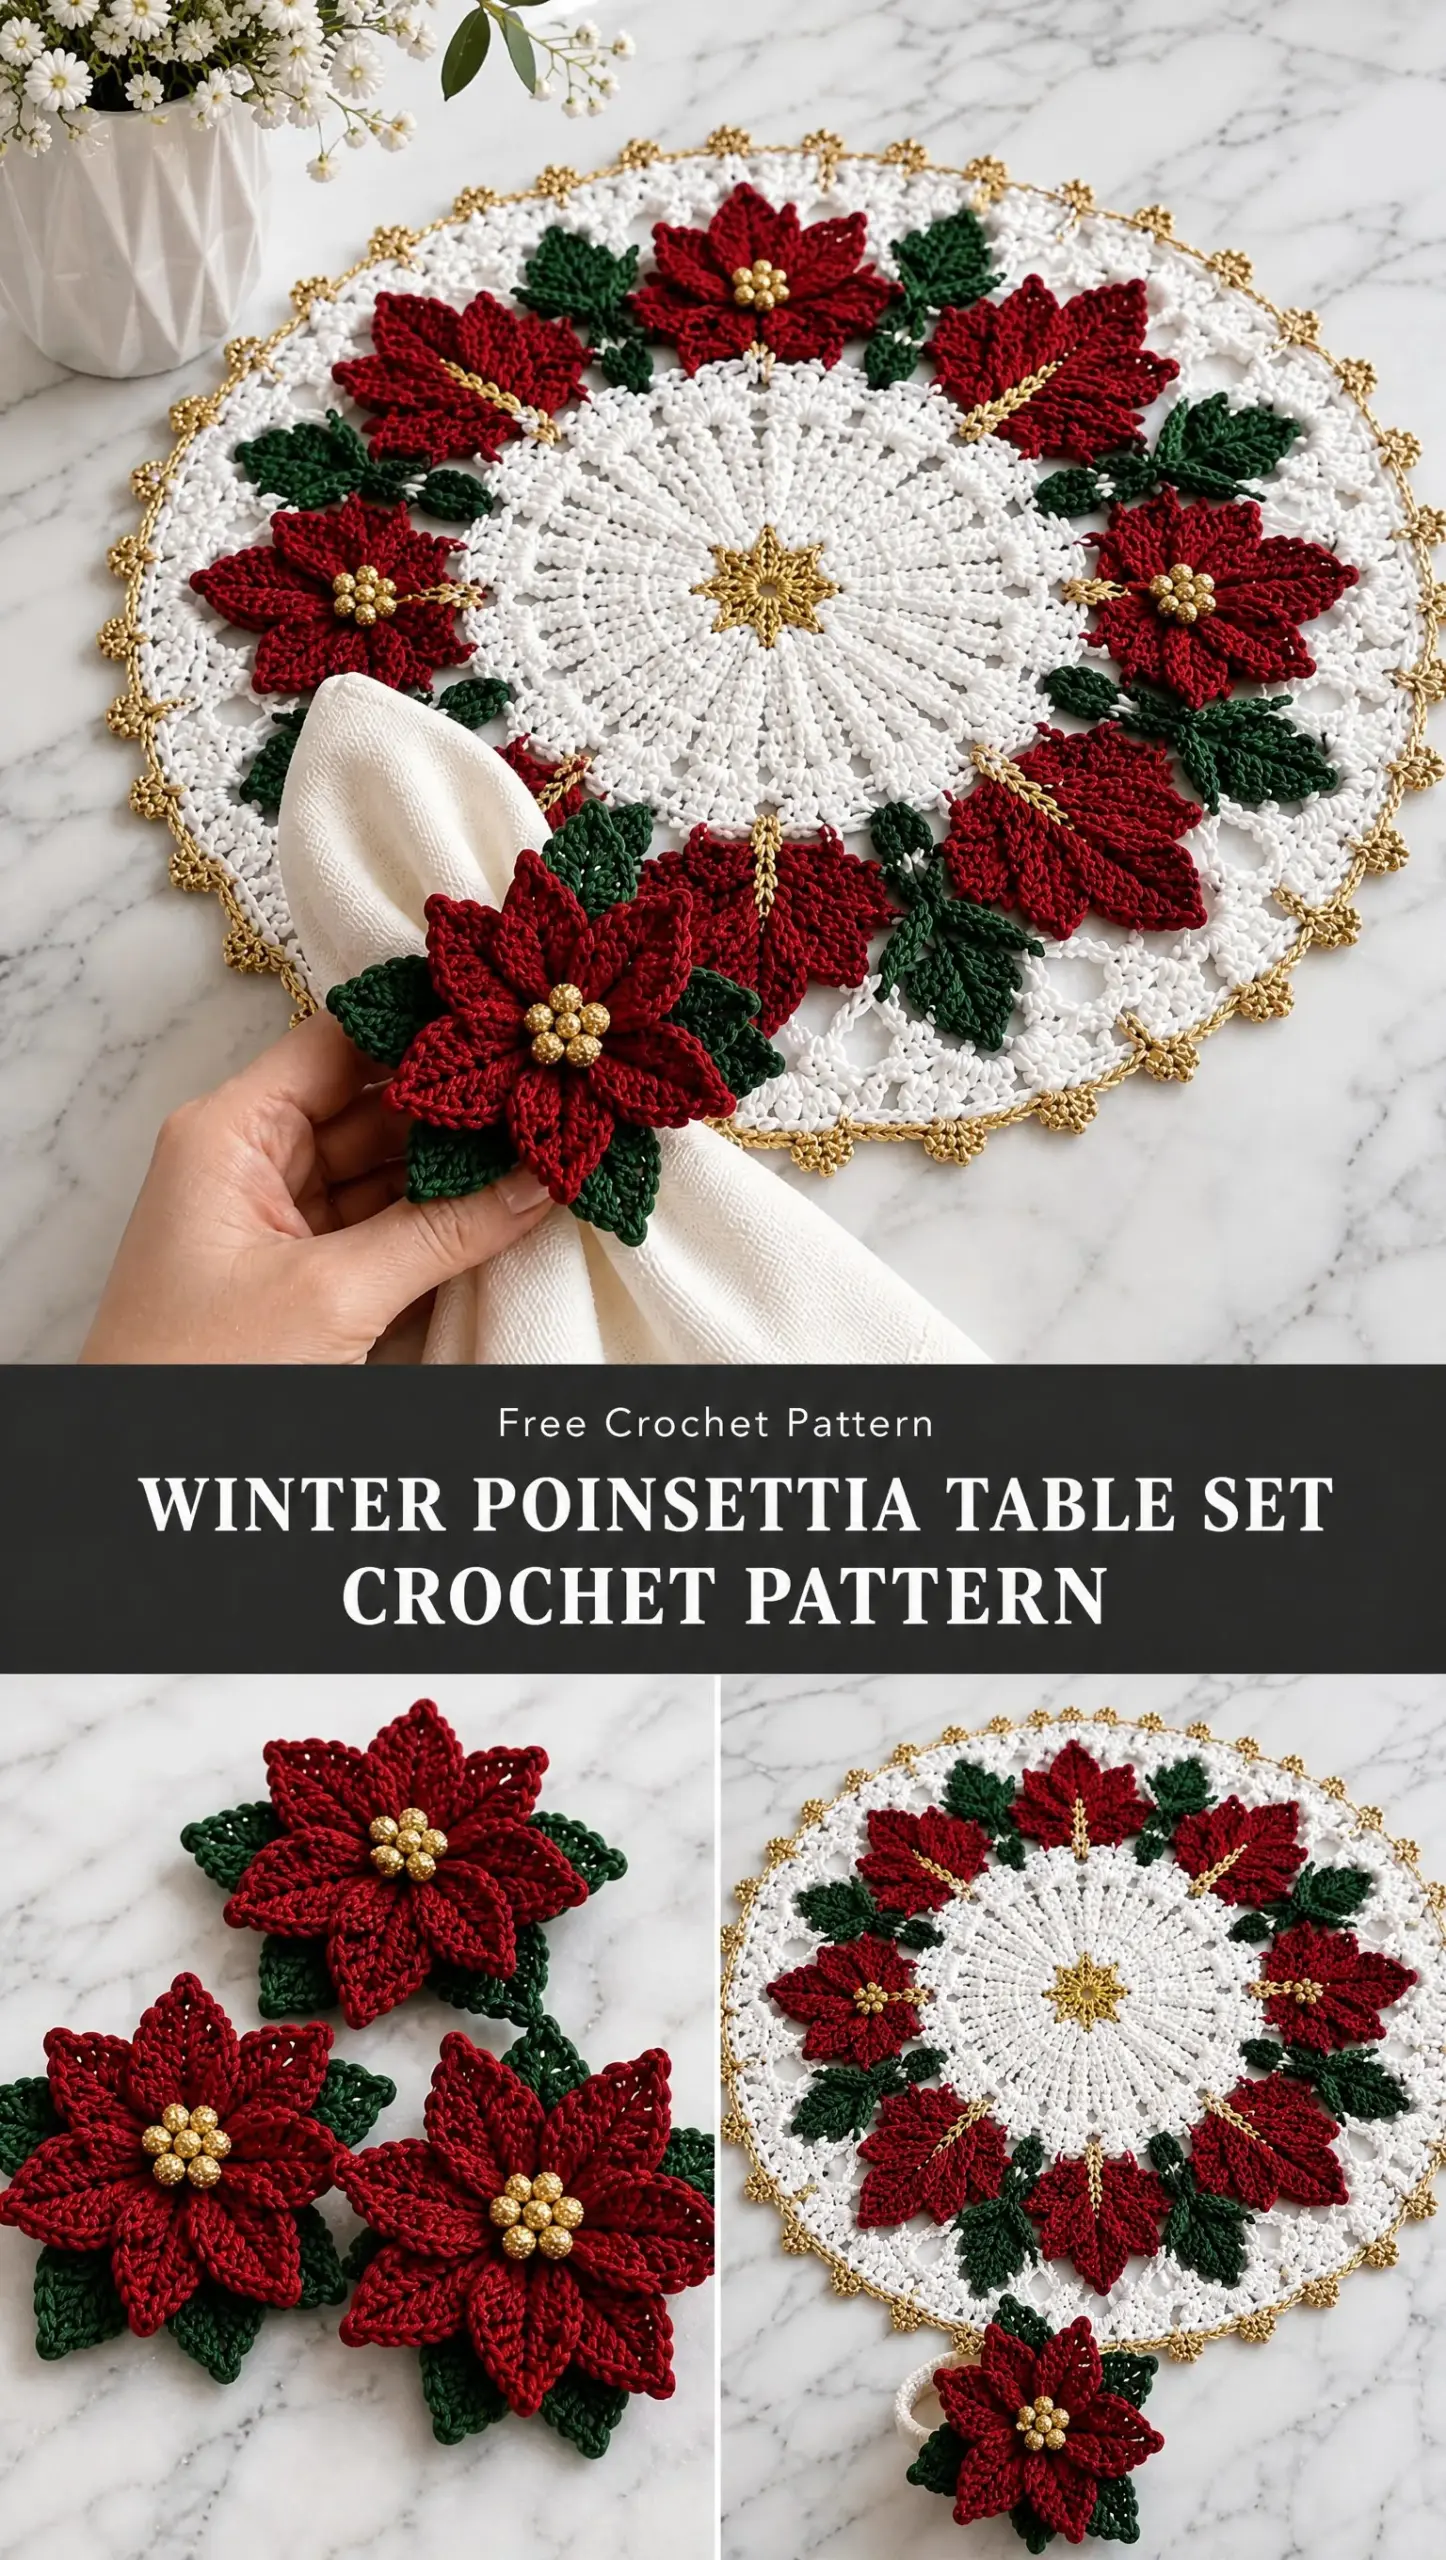
This table set includes a stunning circular placemat, poinsettia napkin rings, and loose decorative flowers for scattering across your holiday table. The combination of snow white lace, cranberry red poinsettias, forest green leaves, and delicate gold details creates something truly special.
After testing and refining the pattern multiple times, I am genuinely thrilled with how it turned out. The two-tier poinsettia construction gives each flower incredible dimension, and that gold picot edge catches the candlelight beautifully during dinner parties.
Pattern Overview and Skill Level
This Winter Poinsettia Table Set crochet pattern is rated intermediate. You should feel comfortable working in the round, making magic rings, and sewing appliqués before starting. The individual techniques are not difficult, but the project requires patience and attention to detail during assembly.
The finished placemat measures approximately 15 to 16 inches (38 to 41 cm) in diameter. Each poinsettia flower spans about 4.25 inches (11 cm) across. The napkin ring band has a diameter of roughly 1.5 inches (4 cm) and stretches to accommodate a gathered cloth napkin.
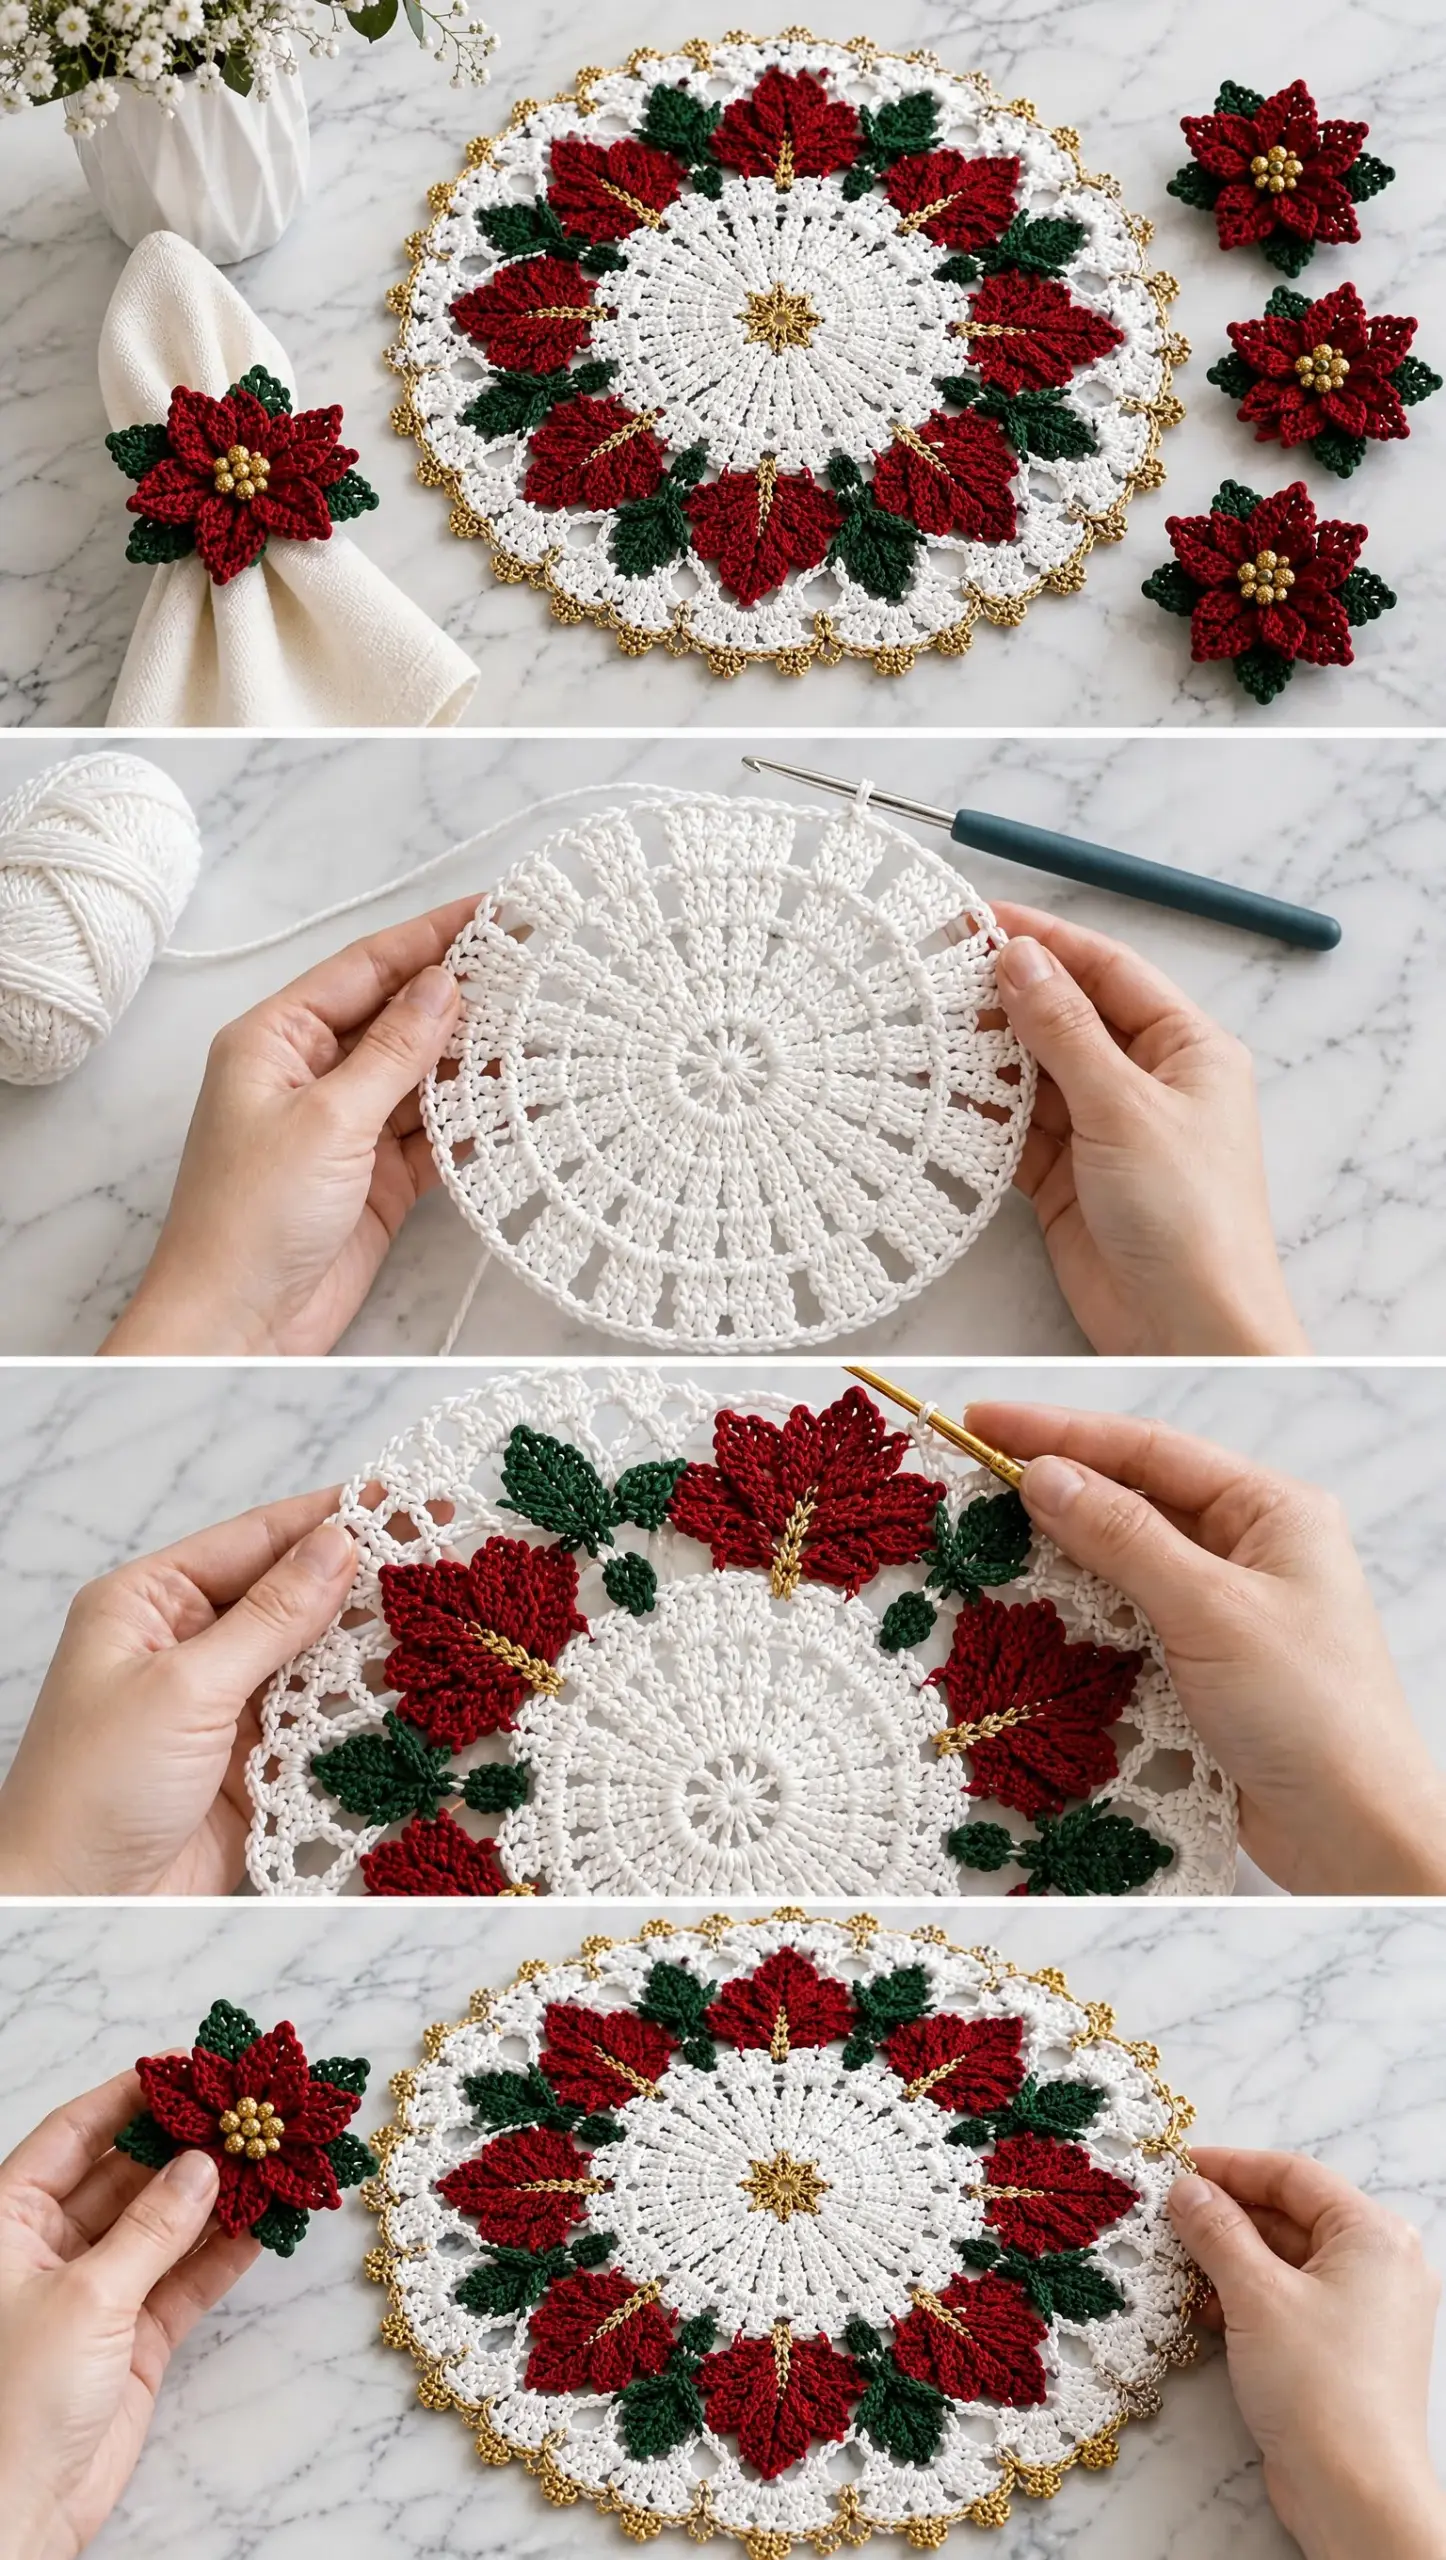
Construction works like this: you crochet a white radial center, add an open arch border, apply gold picot edging, then sew on separately made poinsettia and leaf motifs. Everything comes together through careful assembly rather than complex stitchwork.
Materials You Will Need
Yarn: Fine cotton yarn in sport weight or #2 weight works best. You can also use a firm fingering cotton held single. You need four colors:
These yardage estimates cover one placemat, one napkin ring, and three loose decorative flowers. Multiply accordingly if making a full table set.
Hooks: Use a 2.5 mm hook for the cotton yarn. For metallic thread, you may need a smaller 1.75 to 2.0 mm hook. Keep the metallic usage light so your fabric stays flexible and drapes nicely.
Notions: Tapestry needle, small sharp embroidery needle for metallic thread, locking stitch markers, scissors, and rustproof pins. You will also need a blocking board or thick towel. Fabric stiffener is optional and should only be used on loose flowers, never on the placemat itself.
Gauge Information
Gauge matters less than achieving a flat fabric. After completing Round 8 of the white center, your disc should measure about 6.25 to 6.75 inches (16 to 17 cm). If your work cups upward like a bowl, loosen your tension or increase your hook size. If it ripples and waves, tighten your tension or go down a hook size.
Abbreviations and Special Stitches
Before diving into the pattern, let me define all the abbreviations you will encounter:
Special Stitches You Will Use
Pointed shell: Work (2 dc, 2 tr, ch 3, sl st in first ch, 2 tr, 2 dc) all in the same stitch or space. This creates a decorative pointed motif.
3-dc cluster (dc3tog): Yarn over, insert hook, pull up loop, yarn over and pull through 2 loops. Repeat in next 2 stitches. Then yarn over and pull through all 4 loops on hook.
Gold bobble: Work 5 incomplete double crochets in the same stitch, yarn over and pull through all loops, chain 1 to close. This creates the golden center bumps on each poinsettia.
Leaf: Chain 8. Beginning in 2nd chain from hook, work sc, hdc, dc, 2 tr, dc, hdc. Work 3 sc in the last chain. Rotate and work hdc, dc, 2 tr, dc, hdc, sc along the opposite side. Slip stitch to first sc. Optionally, add a surface slip stitch up the center in gold or green for a vein detail.
Part 1: Circular Poinsettia Placemat
Section A: White Radial Center
Join each round with a slip stitch to the first dc unless stated otherwise. The chain 2 at the start of a round does not count as a stitch.
Round 1 (White): Make a magic ring. Ch 2, work 12 dc in ring. Join. (12 stitches)
Round 2 (White): Ch 2, 2 dc in each st around. Join. (24 stitches)
Round 3 (White): Ch 2, dc in next st, 2 dc in next st; rep from around. Join. (36 stitches)
Round 4 (White): Ch 2, *dc in next 2 sts, 2 dc in next st; rep around. Join. (48 stitches)
Round 5 (White): Ch 2, *dc in next 3 sts, 2 dc in next st; rep around. Join. (60 stitches)
Round 6 (White): Ch 2, *dc in next 4 sts, 2 dc in next st; rep around. Join. (72 stitches)
Round 7 (White): Ch 2, *dc in next 5 sts, 2 dc in next st; rep around. Join. (84 stitches)
Round 8 (White): Ch 2, *dc in next 6 sts, 2 dc in next st; rep around. Join. (96 stitches)
Round 9 (White): Ch 2, *dc in next 7 sts, 2 dc in next st; rep around. Join. (108 stitches)
Round 10 (White): Ch 2, *dc in next 8 sts, 2 dc in next st; rep around. Join. (120 stitches)
Section B: Open Arch Border
Round 11 (White): Ch 1, sc in same st, *ch 5, sk 4 sts, sc in next st; rep around. End with ch 2, dc in first sc to position hook at top of final arch. (24 arches)
Round 12 (White): Ch 1, sc in same arch, *ch 6, sc in next ch-5 sp; rep around. End with ch 3, dc in first sc. (24 arches)
Round 13 (White): In each ch-6 sp work (sc, ch 3, 3 dc, ch 3, sc). Join with sl st to first sc.
Round 14 (White): Sl st to center dc of first 3-dc group. *Ch 7, sc in center dc of next 3-dc group; rep around. Join. (24 arches)
Round 15 (White): In each ch-7 sp work (sc, ch 3, 5 dc, ch 3, sc). Join.
Round 16 (White): Sl st to center dc of first 5-dc group. *Ch 8, sc in center dc of next group; rep around. Join. (24 arches)
Round 17 (White): In each ch-8 sp work (sc, ch 3, 7 dc, ch 3, sc). Join.
Round 18 (White): Sl st to center dc of first 7-dc group. *Ch 9, sc in center dc of next group; rep around. Join. (24 arches)
Round 19 (White): In each ch-9 sp work (sc, ch 3, 9 dc, ch 3, sc). Join and fasten off.
Section C: Gold Picot Edge
Join gold thread at the first outer shell. Working loosely so the edge does not contract, *sl st in the next 2 dc, picot, sl st in the next 2 dc; repeat across each shell. Work 1 to 2 loose sl sts across the small chain gaps between shells. Fasten off and weave in carefully.
Section D: Small Gold Center Star
1. With gold thread, make a magic ring. Ch 1 and work 12 sc into the ring. Join.
2. For each of 6 points: ch 5, sl st in 2nd ch from hook, sc in next ch, hdc in next ch, dc in next ch; sk 1 base sc, sl st in next base sc. Repeat from 5 more times.
3. Fasten off leaving a sewing tail. Center the star over the placemat magic ring and tack every point invisibly to the white fabric.
Part 2: Poinsettia and Leaf Motifs
Section A: Small Placemat Poinsettia (Make 8)
Each finished flower measures approximately 3.25 to 3.5 inches (8 to 9 cm). Work in cranberry red. The petals are made into chain loops so they stand in two offset tiers.
Step 1 (Foundation): Magic ring, ch 1, work 12 sc in ring. Join. Do not tighten the center excessively.
Step 2 (Back-loop setup): *Ch 5, sl st in BLO of next 2 sc; repeat 6 times to make 6 long petal loops. Join.
Step 3 (Outer petals): Into each ch-5 loop work (sc, hdc, 2 dc, 2 tr, ch 2, sl st in 2nd ch from hook, 2 tr, 2 dc, hdc, sc). Six pointed petals made. Fasten off.
Step 4 (Inner-tier setup): Join red in any unused front loop of the foundation ring. *Ch 4, sl st in front loop 2 stitches ahead; repeat 6 times, spacing evenly.
Step 5 (Inner petals): Into each ch-4 loop work (sc, hdc, dc, 2 tr, ch 2, sl st in 2nd ch from hook, 2 tr, dc, hdc, sc). Fasten off.
Step 6: Shape petals with fingers so the inner tier sits between the points of the outer tier.
Section B: Gold Flower Center
1. With gold thread, join in the center ring from the front.
2. Work 6 small gold bobbles evenly around the center. Keep them compact and close together.
3. Fasten off on the back and secure metallic ends with several passes under cotton stitches.
Section C: Leaves (Make 24 for Placemat)
Make 3 leaves per flower using the Leaf special stitch described earlier. For a slightly larger leaf, begin with ch 10 and work sc, hdc, dc, tr, 2 tr, tr, dc, hdc, then 3 sc in the end chain and mirror down the opposite side. Leave a 7 inch (18 cm) sewing tail.
Section D: Assemble the Eight Placemat Clusters
1. Lay the placemat flat with the RS facing up. Mark 8 positions evenly around the transition between the dense white center and the open border, approximately every 45 degrees.
2. At each marker, arrange one red poinsettia so its center sits about 4.5 to 5 inches (11.5 to 12.5 cm) from the placemat center.
3. Slip three green leaves under the flower at roughly 10 o’clock, 2 o’clock, and 6 o’clock. Angle leaves outward so the points are visible between petals.
4. Sew leaves first using green tails, catching only the top loops of the white base so stitches do not show underneath excessively.
5. Sew each poinsettia at its center and at the base of each outer petal. Leave the pointed ends free for dimension.
6. Rotate the placemat after every cluster and confirm the spacing remains symmetrical before securing the next flower.
Optional Gold Accent Stems: For restrained gold lines, thread 18 to 24 inches (45 to 60 cm) of gold through a sharp needle. Make 3 to 5 short couching stitches from the center of selected poinsettias toward the petal tip, or surface-slip-stitch a narrow line. Do this on only 3 or 4 flowers, not every flower, to keep the metallic detail elegant.
Part 3: Poinsettia Napkin Ring
Section A: Crochet Band
1. With cranberry red and 2.5 mm hook, ch 9.
2. Row 1: Sc in 2nd ch from hook and in each ch across. Turn. (8 sc)
3. Rows 2 through 26: Ch 1, sc BLO in each st across. Turn. The ribbed strip should measure about 4.5 to 5 inches (11.5 to 12.5 cm) long unstretched.
4. Bring short ends together without twisting. Sl st through both layers to join, or whipstitch neatly. Fasten off.
5. For a larger napkin bundle, add rows until the band fits comfortably around the gathered napkin with slight stretch.
Section B: Large Two-Tier Poinsettia
This finished flower measures approximately 4 to 4.5 inches (10 to 11.5 cm). It uses the same construction as the placemat motif, just enlarged for a fuller centerpiece.
1. Foundation: With red, magic ring. Ch 1, 12 sc in ring. Join.
2. Outer loops: *Ch 7, sl st in BLO of next 2 sc; repeat 6 times.
3. Outer petals: In each ch-7 loop work (sc, hdc, 2 dc, 3 tr, ch 2, sl st in 2nd ch from hook, 3 tr, 2 dc, hdc, sc).
4. Inner loops: Join red in any unused front loop. *Ch 5, sl st in front loop 2 stitches ahead; repeat 6 times.
5. Inner petals: In each ch-5 loop work (sc, hdc, 2 dc, 2 tr, ch 2, sl st in 2nd ch from hook, 2 tr, 2 dc, hdc, sc). Fasten off.
6. Make 3 large green leaves using the ch-10 leaf variation. Arrange them under the flower in a fan.
7. Add 6 to 8 compact gold bobbles to the flower center.
Section C: Attach Flower to Band
1. Flatten the band seam and place it at the back so it will be hidden by the flower.
2. Tack the three leaves to the band first, sewing through several rib rows for strength.
3. Center the poinsettia over the seam. Sew firmly through the foundation ring and the bases of all six outer petals.
4. Do not sew the petal tips to the band. The free tips create the dimensional, camera-facing bloom seen in the reference.
5. Weave in all ends. Insert an ivory cloth napkin and rotate the ring so the flower faces forward.
Section D: Three Loose Decorative Flowers
Make 3 copies of the Large Two-Tier Poinsettia, each with 3 leaves and gold bobble centers. For table scatter, stitch the leaves securely to the back and lightly steam-block from a distance. For reusable ornaments, add a small felt circle or crocheted white backing to conceal ends.
Part 4: Finishing, Blocking, and Troubleshooting
Blocking the Placemat
1. Weave in all cotton ends before wet blocking. Metallic ends should be secured by stitching them under several cotton stitches rather than relying on knots.
2. Soak the placemat in cool to lukewarm water for 10 to 15 minutes with a drop of mild soap. Do not scrub metallic thread.
3. Press out water in a towel. Do not wring.
4. Pin the placemat face up into a true circle, measuring the diameter in at least four directions. Open every white arch and point each outer shell evenly.
5. Arrange poinsettia petals and leaves so they remain dimensional but balanced. Allow to dry completely before removing pins.
Troubleshooting Common Problems
If the center cups upward: Your tension is too tight or your hook is too small. Move up 0.25 to 0.5 mm or add 1 evenly spaced increase every 12 stitches on the next solid round.
If the center ruffles: You have too many increases or your tension is too loose. Move down 0.25 mm or omit 4 to 6 increases on the next solid round.
If outer arches pull inward: Your chains are too short. Add 1 chain to each arch on the round where pulling begins.
If the outer edge waves: Your chains are too long or shells are too full. Remove 1 chain per arch or reduce the shell by 2 dc.
If flowers flop: Your cotton is too soft. Use a smaller hook for motifs. Lightly steam or wet block petals. Avoid heavy stiffener on the napkin ring.
Care Instructions
Hand wash in cool water or machine wash inside a mesh bag on a delicate cycle if your metallic thread label permits. Reshape and dry flat. Do not tumble dry metallic thread unless the manufacturer specifically allows it. Store flat with tissue between pieces if the gold thread is prone to snagging.
Making a Full Table Set
| Set Size | Placemats | Napkin Rings | Loose Flowers |
|---|---|---|---|
| 2 place settings | 2 | 2 | 3 to 5 |
| 4 place settings | 4 | 4 | 5 to 7 |
| 6 place settings | 6 | 6 | 7 to 9 |
Pattern Checklist
Before considering your project complete, verify the following:
Final Thoughts on This Winter Poinsettia Crochet Pattern
Creating this Winter Poinsettia Table Set takes time and patience, but the result is something your family will treasure for years. The combination of traditional doily techniques with dimensional floral motifs gives you an heirloom-quality piece without requiring advanced skills. Just take it one section at a time.
I love seeing this pattern worked up in traditional Christmas colors, but it would look equally stunning in white and silver for a winter wonderland theme, or burgundy and gold for a more formal look. The construction stays the same, so feel free to customize your color palette.
Thank you so much for choosing this pattern for your holiday table. I hope every stitch brings you joy and that your finished set becomes part of your family’s traditions. Happy crocheting, and may your holiday table be bright, handmade, and beautifully detailed.
If you found this Winter Poinsettia Table Set crochet pattern helpful, I would love it if you saved it to your Pinterest boards so you can find it when you are ready to start. And please drop a comment below if you make one. Seeing your finished projects absolutely makes my day!
Want a Quick & Easy Printable Version?
Get a clean, beautifully formatted PDF of this pattern — easy to follow step by step, ready to print or save on any device. No scrolling, no distractions, just the pattern.
Get the Printable PDF →