
I named this one after my grandmother’s rose garden. She had these dusty pink climbing roses that bloomed every June, and the color combination in this pattern takes me right back to those summer afternoons. I actually sketched the first version of this dress in an old spiral notebook almost five years ago, but it sat untouched until my best friend announced her pregnancy last spring.
That news sent me digging through boxes of pattern notes and half-finished ideas. When I found those faded sketches, I knew the timing was finally right. I spent three weeks perfecting the shell stitch drape, adjusting the yoke shaping, and adding those sweet little accessories that make a handmade gift feel truly special.
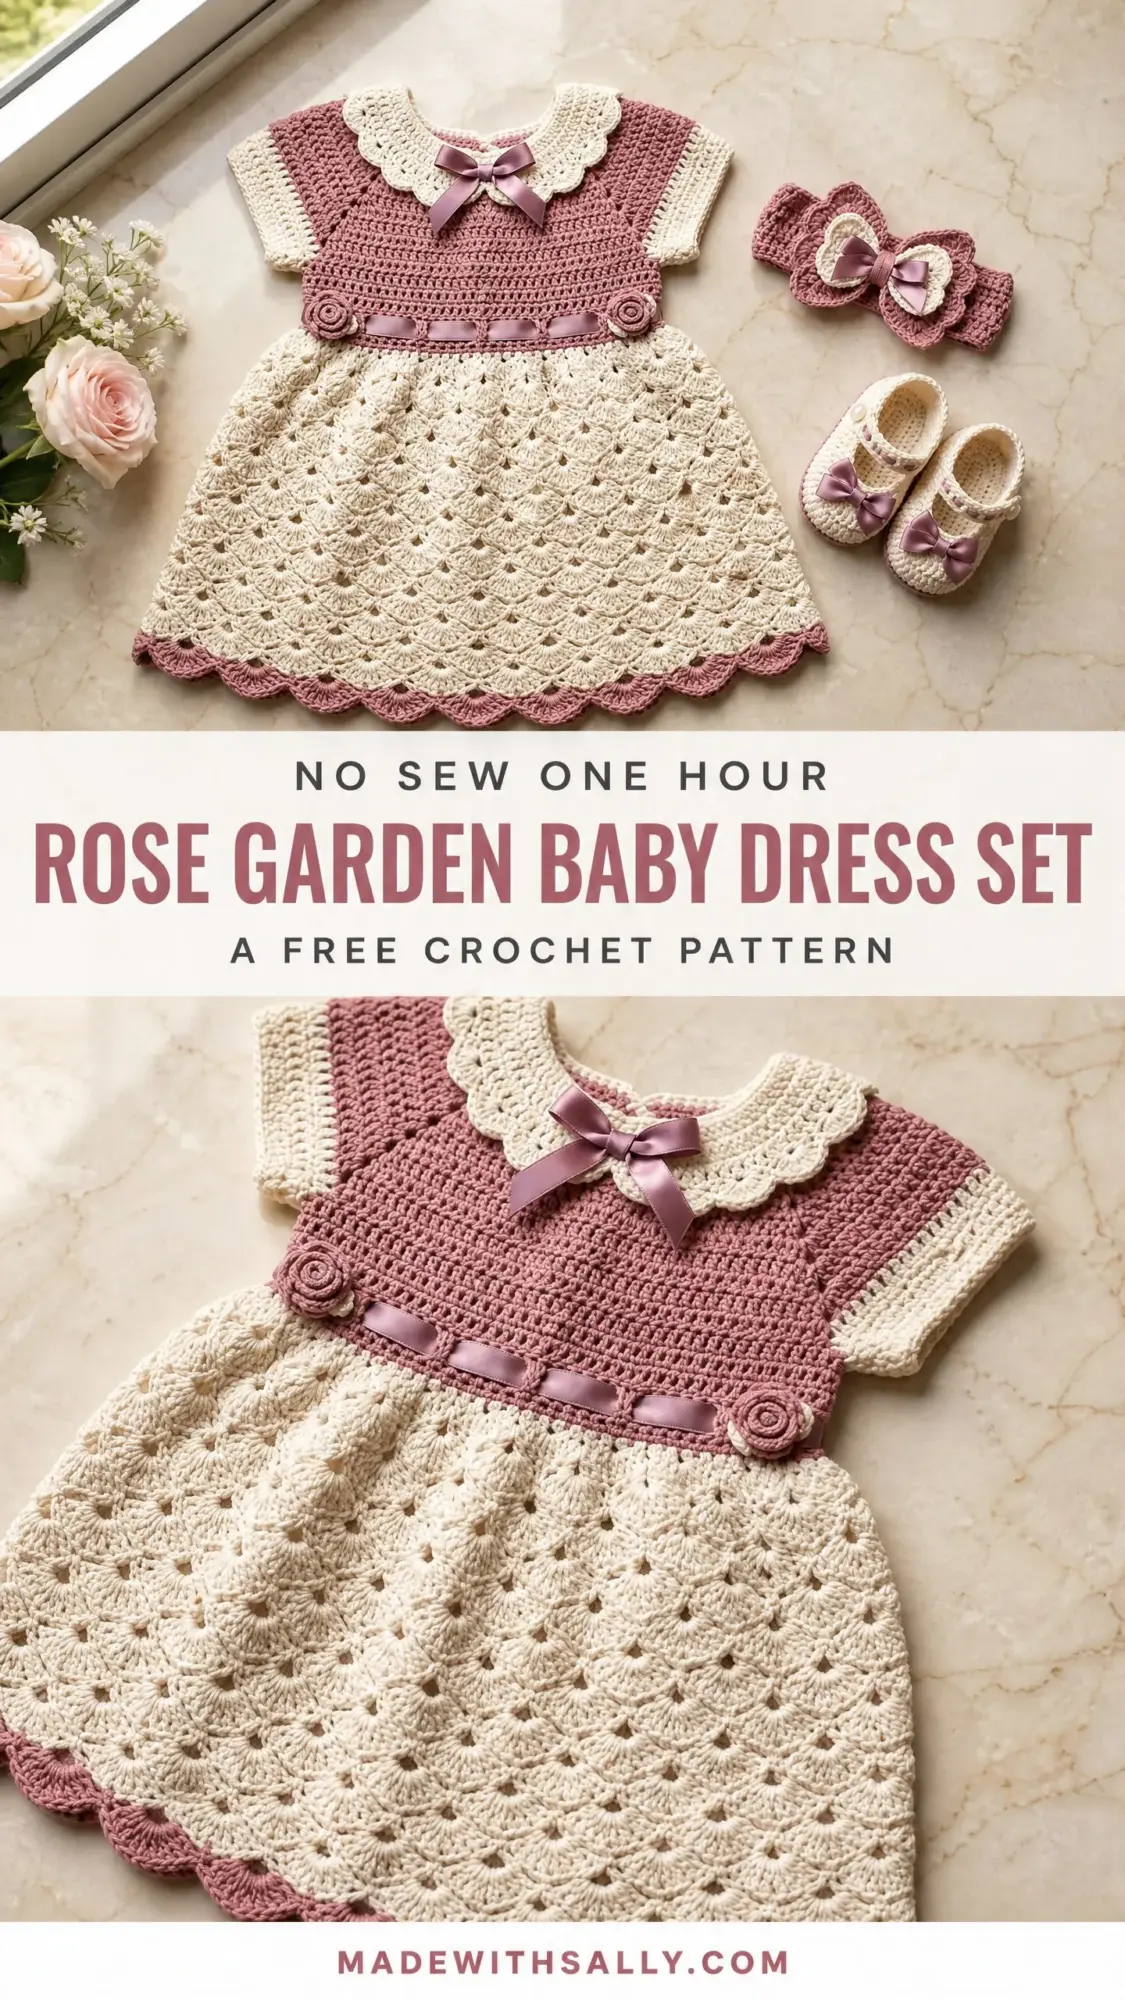
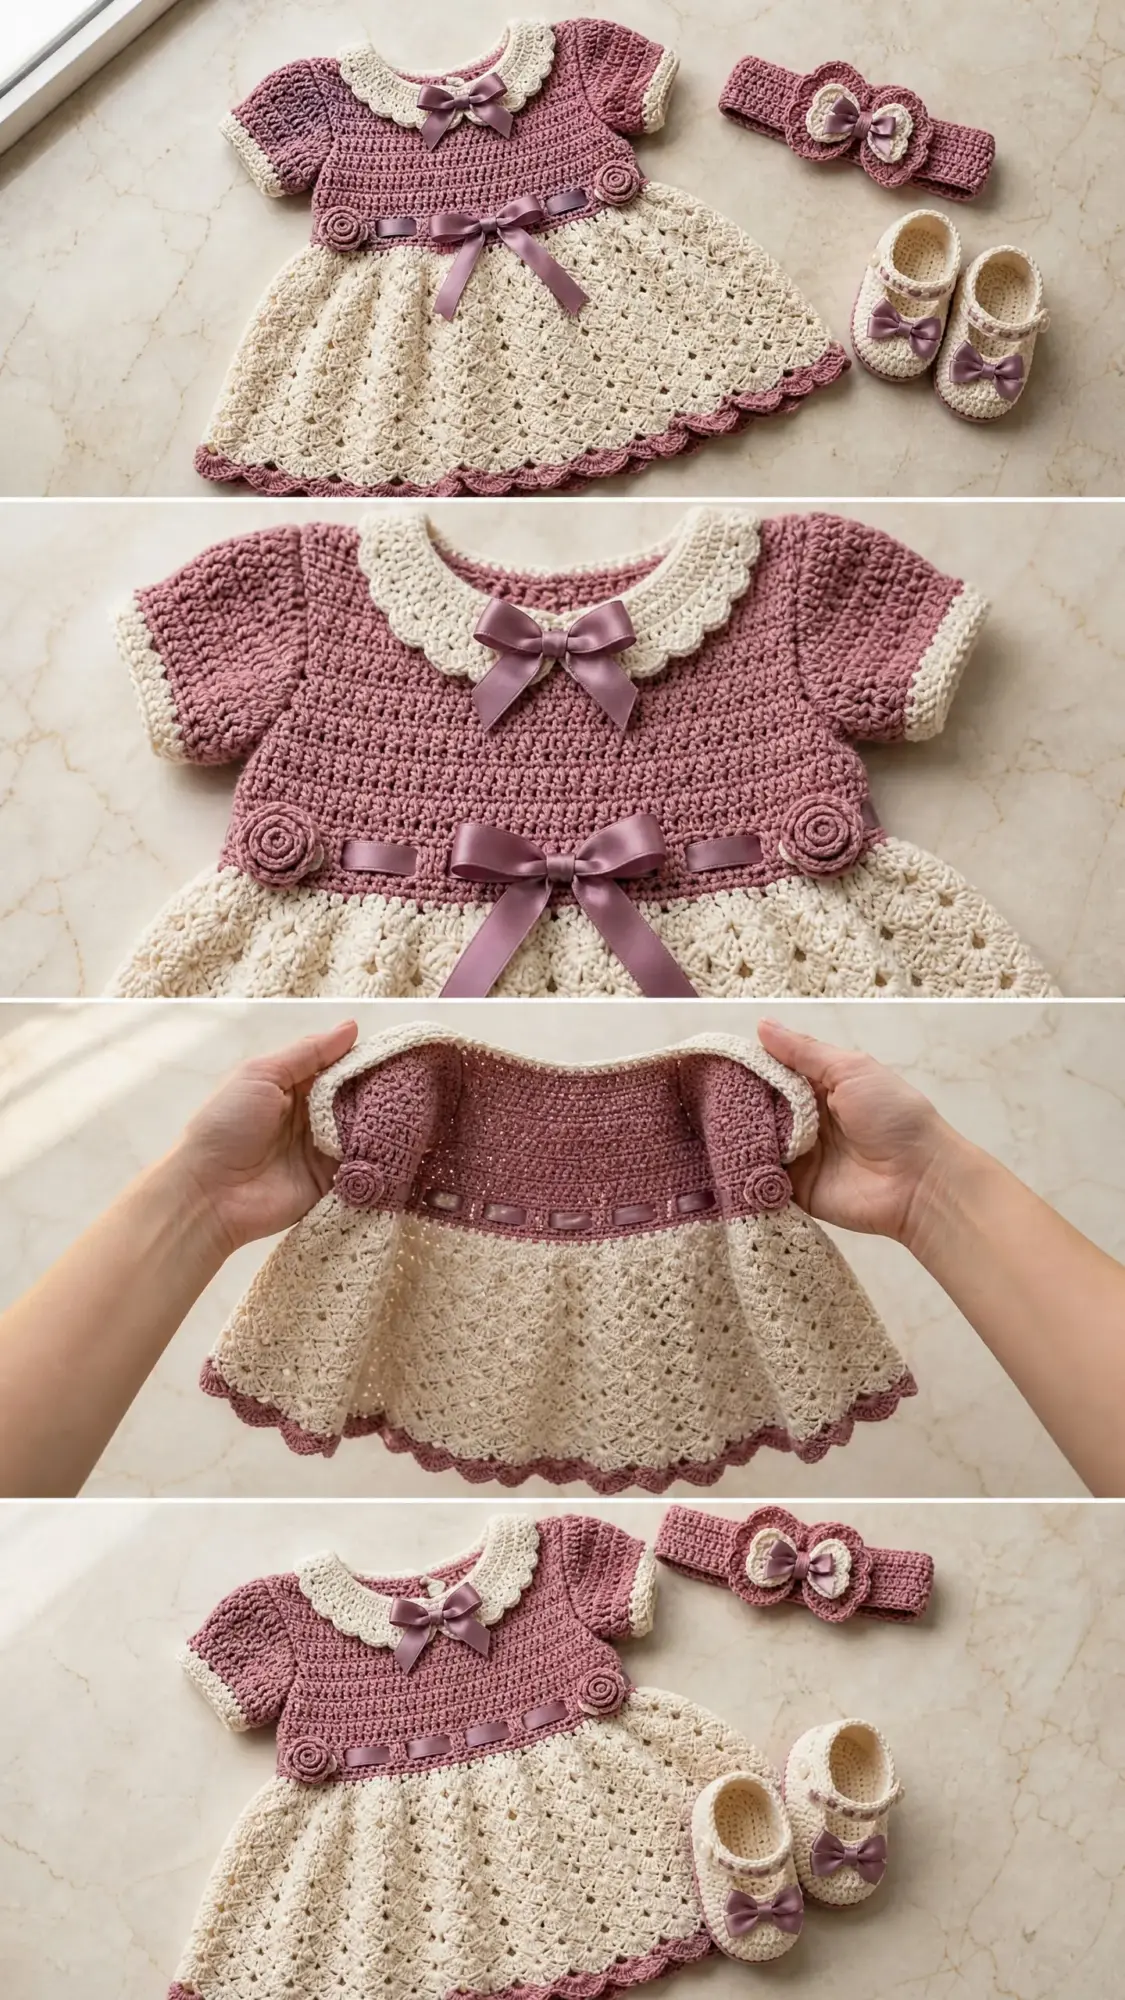
The result is this complete baby set: a dress with a fitted yoke, dreamy shell stitch skirt, Peter Pan collar, matching headband, and Mary Jane booties. It looks intricate, but I promise the construction is more straightforward than it appears. If you can work basic stitches and follow a pattern carefully, you can absolutely make this.
About This Crochet Pattern
This heirloom quality baby dress set works up in a two color palette. The pattern calls for a dusty rose shade and a warm cream or ecru. You will create three coordinating pieces that make an unforgettable baby shower gift or newborn photo prop.
The dress features a fitted yoke worked in the round from the top down. It has short set in sleeves, a scalloped Peter Pan collar, and a gorgeous shell stitch skirt. A satin ribbon threads through an eyelet row at the waist for that classic vintage touch. The back closes with four small buttons worked into button loops.
The headband showcases a crocheted flower motif with a ribbon center. The booties are sweet Mary Jane style with ribbon bows and button straps. Everything coordinates beautifully.
This pattern is rated intermediate level. You should be comfortable working in the round, reading stitch counts through color changes, constructing a top down yoke with raglan style increases, and working shell stitches with consistent tension. If you have only made scarves and dishcloths so far, I recommend completing at least two smaller garment projects first.
Finished Measurements
The dress fits approximately 3 to 6 months.
Dress measurements:
Headband circumference: approximately 14 to 16 inches or 35.5 to 40.5 cm (stretches to fit)
Bootie foot length: approximately 3.5 inches or 9 cm (fits 0 to 6 months)
Time Estimate
Plan for the following time investment:
This is a wonderful project to work on over several evenings. I like to break it into sections and celebrate each finished piece.
Materials Needed
Yarn:
Hook: US Size E-4 (3.5 mm) crochet hook
Notions:
Satin ribbon (3/8 inch or 1 cm wide, dusty rose or mauve):
Optional: Small amount of fiberfill or scrap yarn for stuffing crocheted roses, rust proof straight pins and blocking board
Yarn Suggestions
Suggestion 1: Paintbox Yarns Simply DK in Dusty Rose (Color A) and Vanilla Cream (Color B). This yarn has excellent stitch definition, a smooth finish that showcases the shell pattern beautifully, and is machine washable.
Suggestion 2: Lion Brand Pound of Love in Pink Lemonade (Color A) and Fisherman (Color B). An affordable, machine washable acrylic that is baby safe, very soft, and comes in large skeins ideal for gift sets.
Suggestion 3: Paintbox Yarns Cotton DK in Dusty Rose and Champagne White. A 100 percent cotton option that is breathable for warmer climates. Note that cotton has less stretch than acrylic, so gauge swatching is especially important.
Substitution tip: Any smooth DK weight yarn that achieves gauge may be substituted. Avoid highly textured, fuzzy, or bouclé yarns as they will obscure the shell stitch pattern.
Gauge
18 stitches and 20 rows = 4 inches or 10 cm in single crochet worked in rows with US Size E-4 (3.5 mm) hook.
Shell pattern gauge: One complete 5 double crochet shell and its connecting single crochet = approximately 1.5 inches or 3.8 cm wide. Eight rows of shell pattern = approximately 4 inches or 10 cm tall.
Important: Gauge is mandatory for this garment. A difference of even half a stitch per inch will significantly alter the chest circumference and length. Work a 5 inch or 12.5 cm swatch in single crochet, wash and block it as you intend to treat the finished garment, and measure again before starting. Adjust hook size as needed.
Abbreviations and Stitch Definitions
Special Stitches for This Pattern
Shell Stitch (sh)
Work 5 double crochet stitches all into the same stitch or space. This creates a fan shaped shell. The shell is the signature stitch of the skirt and gives it that beautiful drape.
Scallop Edging
Skip 2 stitches, work 5 double crochet into next stitch, skip 2 stitches, slip stitch into next stitch. Repeat across.
Picot
Chain 3, slip stitch into the first chain made. This creates a tiny decorative bump.
Bobble (3-dc bobble)
Yarn over, insert hook into stitch, yarn over and pull up a loop, yarn over and pull through 2 loops (2 loops remain on hook). Repeat 2 more times into the same stitch (4 loops on hook). Yarn over and pull through all 4 loops on hook.
Crocheted Rose
With Color A, chain 30. Row 1 (RS): Work 2 double crochet into the 4th chain from hook, then work 2 double crochet into every chain across. Fasten off leaving a 12 inch tail. Roll the strip tightly from one end to form a rose shape, and use the tail to sew the base together. Two or three stitches through the base securely hold the shape.
Button Loop
Chain 4, skip 2 stitches, slip stitch into next stitch. When working past this loop on subsequent rounds, work 4 single crochet into the chain 4 space.
Eyelet Row
Chain 2, skip 1 stitch, double crochet into next stitch. Repeat across. The chain 2 spaces form the eyelets through which ribbon is threaded.
Pattern Notes Before You Begin
1. The dress is worked in the round from the top down. The yoke is worked in Color A in single crochet with raglan style increases. After the yoke, the body transitions to Color B for the shell stitch skirt. Color A returns for the waistband eyelet row and hem edging.
2. The back of the yoke is worked flat (back and forth in rows) for the button band section, then joined to work the skirt in the round.
3. Turning chains: For single crochet, chain 1 at beginning (does not count as a stitch). For double crochet, chain 3 at beginning (counts as first double crochet). For half double crochet, chain 2 (does not count as a stitch unless specified).
4. The collar is worked separately and sewn to the neckline after the yoke is complete.
5. When changing colors, complete the final yarn over of the last stitch in the current color with the new color.
6. All rounds are joined with a slip stitch to the first stitch unless otherwise stated.
7. Place a stitch marker at the beginning of each round and move it up as you work.
8. Stitch counts in parentheses at the end of each row or round reflect the total number of working stitches.
Dress Instructions
Part 1: Yoke
The yoke is worked flat in rows initially (for the back opening), then joined to work in the round. Use Color A throughout the yoke.
Foundation Chain: With Color A and E-4 hook, chain 53.
Row 1 (RS): Starting in the 2nd chain from hook, work 1 sc in each chain across. (52 sc)
Place markers after Row 1 to divide the neckline into sections: 7 sts left back, 1 marker st, 10 sts left sleeve, 1 marker st, 15 sts front, 1 marker st, 10 sts right sleeve, 1 marker st, 7 sts right back = 52 sts. Place a stitch marker in the single stitch at each raglan point (4 raglan markers total, in sts 8, 19, 35, and 46 counted from the left).
Row 2 (WS): Ch 1, turn. Sc in each st across, working 3 sc into each of the 4 marked raglan stitches. (60 sc)
Move raglan markers to the center stitch of each 3 sc group.
Row 3 (RS): Ch 1, turn. Sc in each st to 1 st before first marked st, 3 sc in marked st, sc in each st to 1 st before second marked st, 3 sc in marked st, sc in each st to 1 st before third marked st, 3 sc in marked st, sc in each st to 1 st before fourth marked st, 3 sc in marked st, sc in each st to end. (68 sc)
Row 4 (WS): Repeat Row 3. (76 sc)
Row 5 (RS): Repeat Row 3. (84 sc)
Row 6 (WS): Repeat Row 3. (92 sc)
Row 7 (RS): Repeat Row 3. (100 sc)
Row 8 (WS): Repeat Row 3. (108 sc)
Row 9 (RS): Repeat Row 3. (116 sc)
Row 10 (WS): Repeat Row 3. (124 sc)
Checkpoint: After Row 10, the yoke should measure approximately 2 inches or 5 cm from the top neckline edge, and the piece should be 124 stitches wide.
Dividing Row (RS, Row 11): Ch 1, turn. Sc across the first 22 sts (left back), chain 4 (underarm bridge), skip the next 25 sts (left sleeve), sc across the next 37 sts (front), chain 4 (underarm bridge), skip the next 25 sts (right sleeve), sc across the last 22 sts (right back). (81 sc plus 2 chain 4 bridges = 89 working positions)
Part 2: Button Bands and Joining
Right Back Button Band:
With RS facing, join Color A to the bottom right corner of the back opening. Ch 1, work 22 sc evenly up the right back edge. (22 sc)
Row 2: Ch 1, turn. Sc in each st across. (22 sc)
Fasten off.
Left Back Button Band with Button Loops:
With RS facing, join Color A to the top left corner of the back opening. Ch 1, work 22 sc evenly down the left back edge. (22 sc)
Row 2: Ch 1, turn. Sc in first 2 sts, (ch 4, sk 2 sts, sc in next 4 sts) 3 times, ch 4, sk 2 sts, sc in last 2 sts. (4 button loops made)
Row 3: Ch 1, turn. Sc in each st and 4 sc in each ch 4 sp across. (22 sc)
Fasten off.
Sew buttons to right back band opposite button loops.
Joining for Body in the Round:
With RS facing, join Color A at left back corner at the bottom of the button band.
Round 1 (joining round): Ch 1. Sc across the 22 right back sts, work 4 sc across the right underarm bridge chain, sc across 37 front sts, work 4 sc across the left underarm bridge chain, sc across 22 left back sts (overlapping button bands). Join with sl st to first sc. (89 sc)
Part 3: Waistband Transition and Eyelet Row
Continue with Color A.
Round 2: Ch 1. Sc in each st around. Join. (89 sc)
Round 3: Ch 1. Sc in each st around. Join. (89 sc)
Round 4 (increase round): Ch 1. Sc in first 88 sts, 2 sc in last st. Join. (90 sc)
Round 5 (eyelet): Ch 1. Sc in each st around. Join. (90 sc)
Round 6 (eyelet): Ch 3 (counts as dc). (Ch 1, sk 1 st, dc in next st) 44 times, ch 1, sk 1 st, join with sl st to top of ch 3. (45 dc + 45 ch 1 sps = 90 positions)
Round 7 (restore count): Ch 1. (Sc in dc, sc in ch 1 sp) around. Join. (90 sc)
Checkpoint: After Round 7, the dress from neckline to bottom of waistband should measure approximately 4 to 4.5 inches or 10 to 11.5 cm.
Part 4: Shell Stitch Skirt
Change to Color B at the end of Round 7.
Round 8 (set up for shells): With Color B, ch 1. Sc in first st, (sk 2 sts, 5 dc in next st, sk 2 sts, sc in next st) 14 times, sk 2 sts, 5 dc in next st, sk 2 sts, join with sl st to first sc. (15 shells, 15 sc = 90 working sts)
Round 9: Ch 1. Sc in same st as join. (5 dc in next sc, sc in center dc of next shell) 14 times, 5 dc in last sc, join with sl st to first sc. (15 shells, 15 sc = 90 sts)
Rounds 10 through 12: Repeat Round 9 three times. (15 shells, 15 sc per round = 90 sts per round)
Round 13 (expand to 7 dc shells): Ch 1. Sc in sc below. (7 dc in sc between shells, sc in center dc of shell) 14 times. 7 dc in last sc between shells. Join. (15 shells of 7 dc + 15 sc = 120 sts)
Rounds 14 through 20: Ch 1. Sc in sc below. (7 dc in sc between shells, sc in center dc of shell) 14 times. 7 dc in last sc between shells. Join. (120 sts per round)
Note: The center dc of a 7 dc shell is the 4th dc.
Round 21 (expand to 9 dc shells): Ch 1. Sc in sc below. (9 dc in sc between shells, sc in center dc of shell) 14 times. 9 dc in last sc between shells. Join. (15 shells of 9 dc + 15 sc = 150 sts)
Round 22: Ch 1. Sc in sc below. (9 dc in sc between shells, sc in center dc of shell) 14 times. 9 dc in last sc between shells. Join. (150 sts)
Checkpoint: After Round 22, the skirt section should measure approximately 7 inches or 17.75 cm from the base of the eyelet waistband. Total dress length from neckline should be approximately 11 inches or 28 cm.
Part 5: Scalloped Hem Edging
Change to Color A at end of Round 22.
Round 23 (Color A, scallop hem): Do not turn. Sl st in first sc, sl st in each of next 2 dc, (5 dc in next dc, sl st in each of next 4 dc, sl st in next sc, sl st in each of next 4 dc) 14 times, 5 dc in next dc, sl st in each of next 2 dc, sl st in last sc. Join. (15 fans of 5 dc worked)
Fasten off Color A. Weave in end.
Part 6: Sleeves
The sleeves are worked in the round picking up the skipped sleeve stitches from the Dividing Row plus the underarm bridge.
With RS facing, join Color A at the center of the underarm bridge chain.
Rnd 1: Ch 1. Work 4 sc across the chain 4 underarm bridge, then sc in each of the 25 skipped sleeve stitches. Join with sl st. (29 sc)
Rnds 2 through 4: Ch 1. Sc in each st around. Join. (29 sc)
Rnd 5 (decrease round): Ch 1. (Sc2tog, sc in next 3 sts) 5 times, sc2tog, sc in last 2 sts. Join. (23 sc)
Rnd 6 (sleeve edging, scallop): Sl st in first 2 sts. (5 dc in next st, sl st in next 3 sts) 5 times, 5 dc in next st, sl st in last 2 sts. Join and fasten off.
Repeat for second sleeve.
Finishing the Dress
Peter Pan Collar
The collar is worked separately in Color B and sewn to the neckline.
With Color B, chain 45.
Row 1 (RS): Sc in 2nd ch from hook and in each ch across. (44 sc)
Row 2: Ch 1, turn. 2 sc in first st, sc across to last st, 2 sc in last st. (46 sc)
Row 3: Repeat Row 2. (48 sc)
Row 4: Repeat Row 2. (50 sc)
Row 5 (scallop edge): Ch 1, turn. Sl st in first st, (sk 2 sts, 5 dc in next st, sk 2 sts, sl st in next st) across. Fasten off.
Pin collar to neckline with RS facing out, centering it at the front. The collar edges should meet at the back opening. Sew in place using whip stitch.
Crocheted Rose Accent
Make 2 roses using the Crocheted Rose instructions in the Special Stitches section. Sew one rose to each side of the front waistband, positioning them at the points where the ribbon will tie.
Ribbon Details
Thread the 24 inch ribbon through the eyelet round at the waist. Center the ribbon at the front and tie in a bow. Tack the bow in place with a few small stitches if desired.
Tie the 12 inch ribbon into a bow and sew to the center front of the collar, just below the neckline.
Headband Instructions
With Color A, chain 70 (or until chain measures approximately 14 inches).
Row 1: Sc in 2nd ch from hook and in each ch across. (69 sc)
Rows 2 and 3: Ch 1, turn. Sc in each st across. (69 sc)
Fasten off, leaving a long tail. Sew short ends together to form a loop.
Headband Flower
With Color B, chain 25.
Row 1: Work 3 dc in 4th ch from hook, 3 dc in each ch across. Fasten off leaving a 10 inch tail.
Roll the strip to form a flower shape and secure with the tail. Tie the 8 inch ribbon into a small bow. Sew the bow to the center of the flower, then sew the completed flower to the headband.
Booties Instructions
Make 2. The booties are worked from the toe up.
Toe:
With Color B, ch 7.
Rnd 1: Sc in 2nd ch from hook, sc in next 4 ch, 3 sc in last ch. Working along opposite side of foundation chain, sc in next 4 ch, 2 sc in last ch. Join. (14 sc)
Rnd 2: Ch 1. 2 sc in first st, sc in next 4 sts, 2 sc in each of next 3 sts, sc in next 4 sts, 2 sc in each of last 2 sts. Join. (20 sc)
Rnd 3: Ch 1. Sc in each st around. Join. (20 sc)
Rnds 4 and 5: Repeat Rnd 3. (20 sc)
Rnd 6 (heel shaping): Ch 1. Sc in first 6 sts, (sc2tog) 4 times, sc in last 6 sts. Join. (16 sc)
Rnd 7: Ch 1. Sc in each st around. Join. (16 sc)
Rnds 8 and 9: Repeat Rnd 7. (16 sc)
Rnd 10 (ankle cuff, Color A): Change to Color A. Ch 1. Sc in each st around. Join. (16 sc)
Rnd 11: Ch 1. Sc in each st around. Join. (16 sc)
Fasten off.
Bootie Strap
With Color A, join yarn at the inside ankle. Ch 12. Sl st in same st to form strap loop. Work 12 sc along the chain. Fasten off. Sew button to outside of bootie opposite the strap.
Tie 5 inch ribbon into a bow and sew to the top of each bootie.
Care Instructions
Hand wash in cool water with mild detergent, or machine wash on delicate cycle in a mesh laundry bag. Lay flat to dry. Steam block gently if needed to restore shape. Store flat or loosely rolled to prevent creasing.
Wrapping Up This Baby Dress Crochet Pattern
Making this Rose Garden Baby Dress Set is truly a labor of love. The combination of the structured yoke, flowing shell stitch skirt, and coordinating accessories creates a gift that any new parent will treasure. Take your time with the yoke increases and trust the stitch counts. The shell pattern becomes almost meditative once you get into the rhythm.
I hope you enjoy making this crochet pattern as much as I enjoyed designing it. There is something deeply satisfying about creating handmade heirloom pieces for the little ones in our lives.
If this pattern caught your eye, go ahead and save it to your Pinterest boards so you can find it when you are ready to start. And please leave a comment below if you make this set. I would absolutely love to see your finished pieces and hear which color combinations you chose!
