
I don’t know about you, but I have a soft spot for home decor that actually does something. Pretty is nice, but pretty and functional? That’s the sweet spot.
Get the Ad-Free PDF Pattern
You can find the free pattern below, or you can purchase the ad-free printable PDF from my shop.
Get the Printable PDF →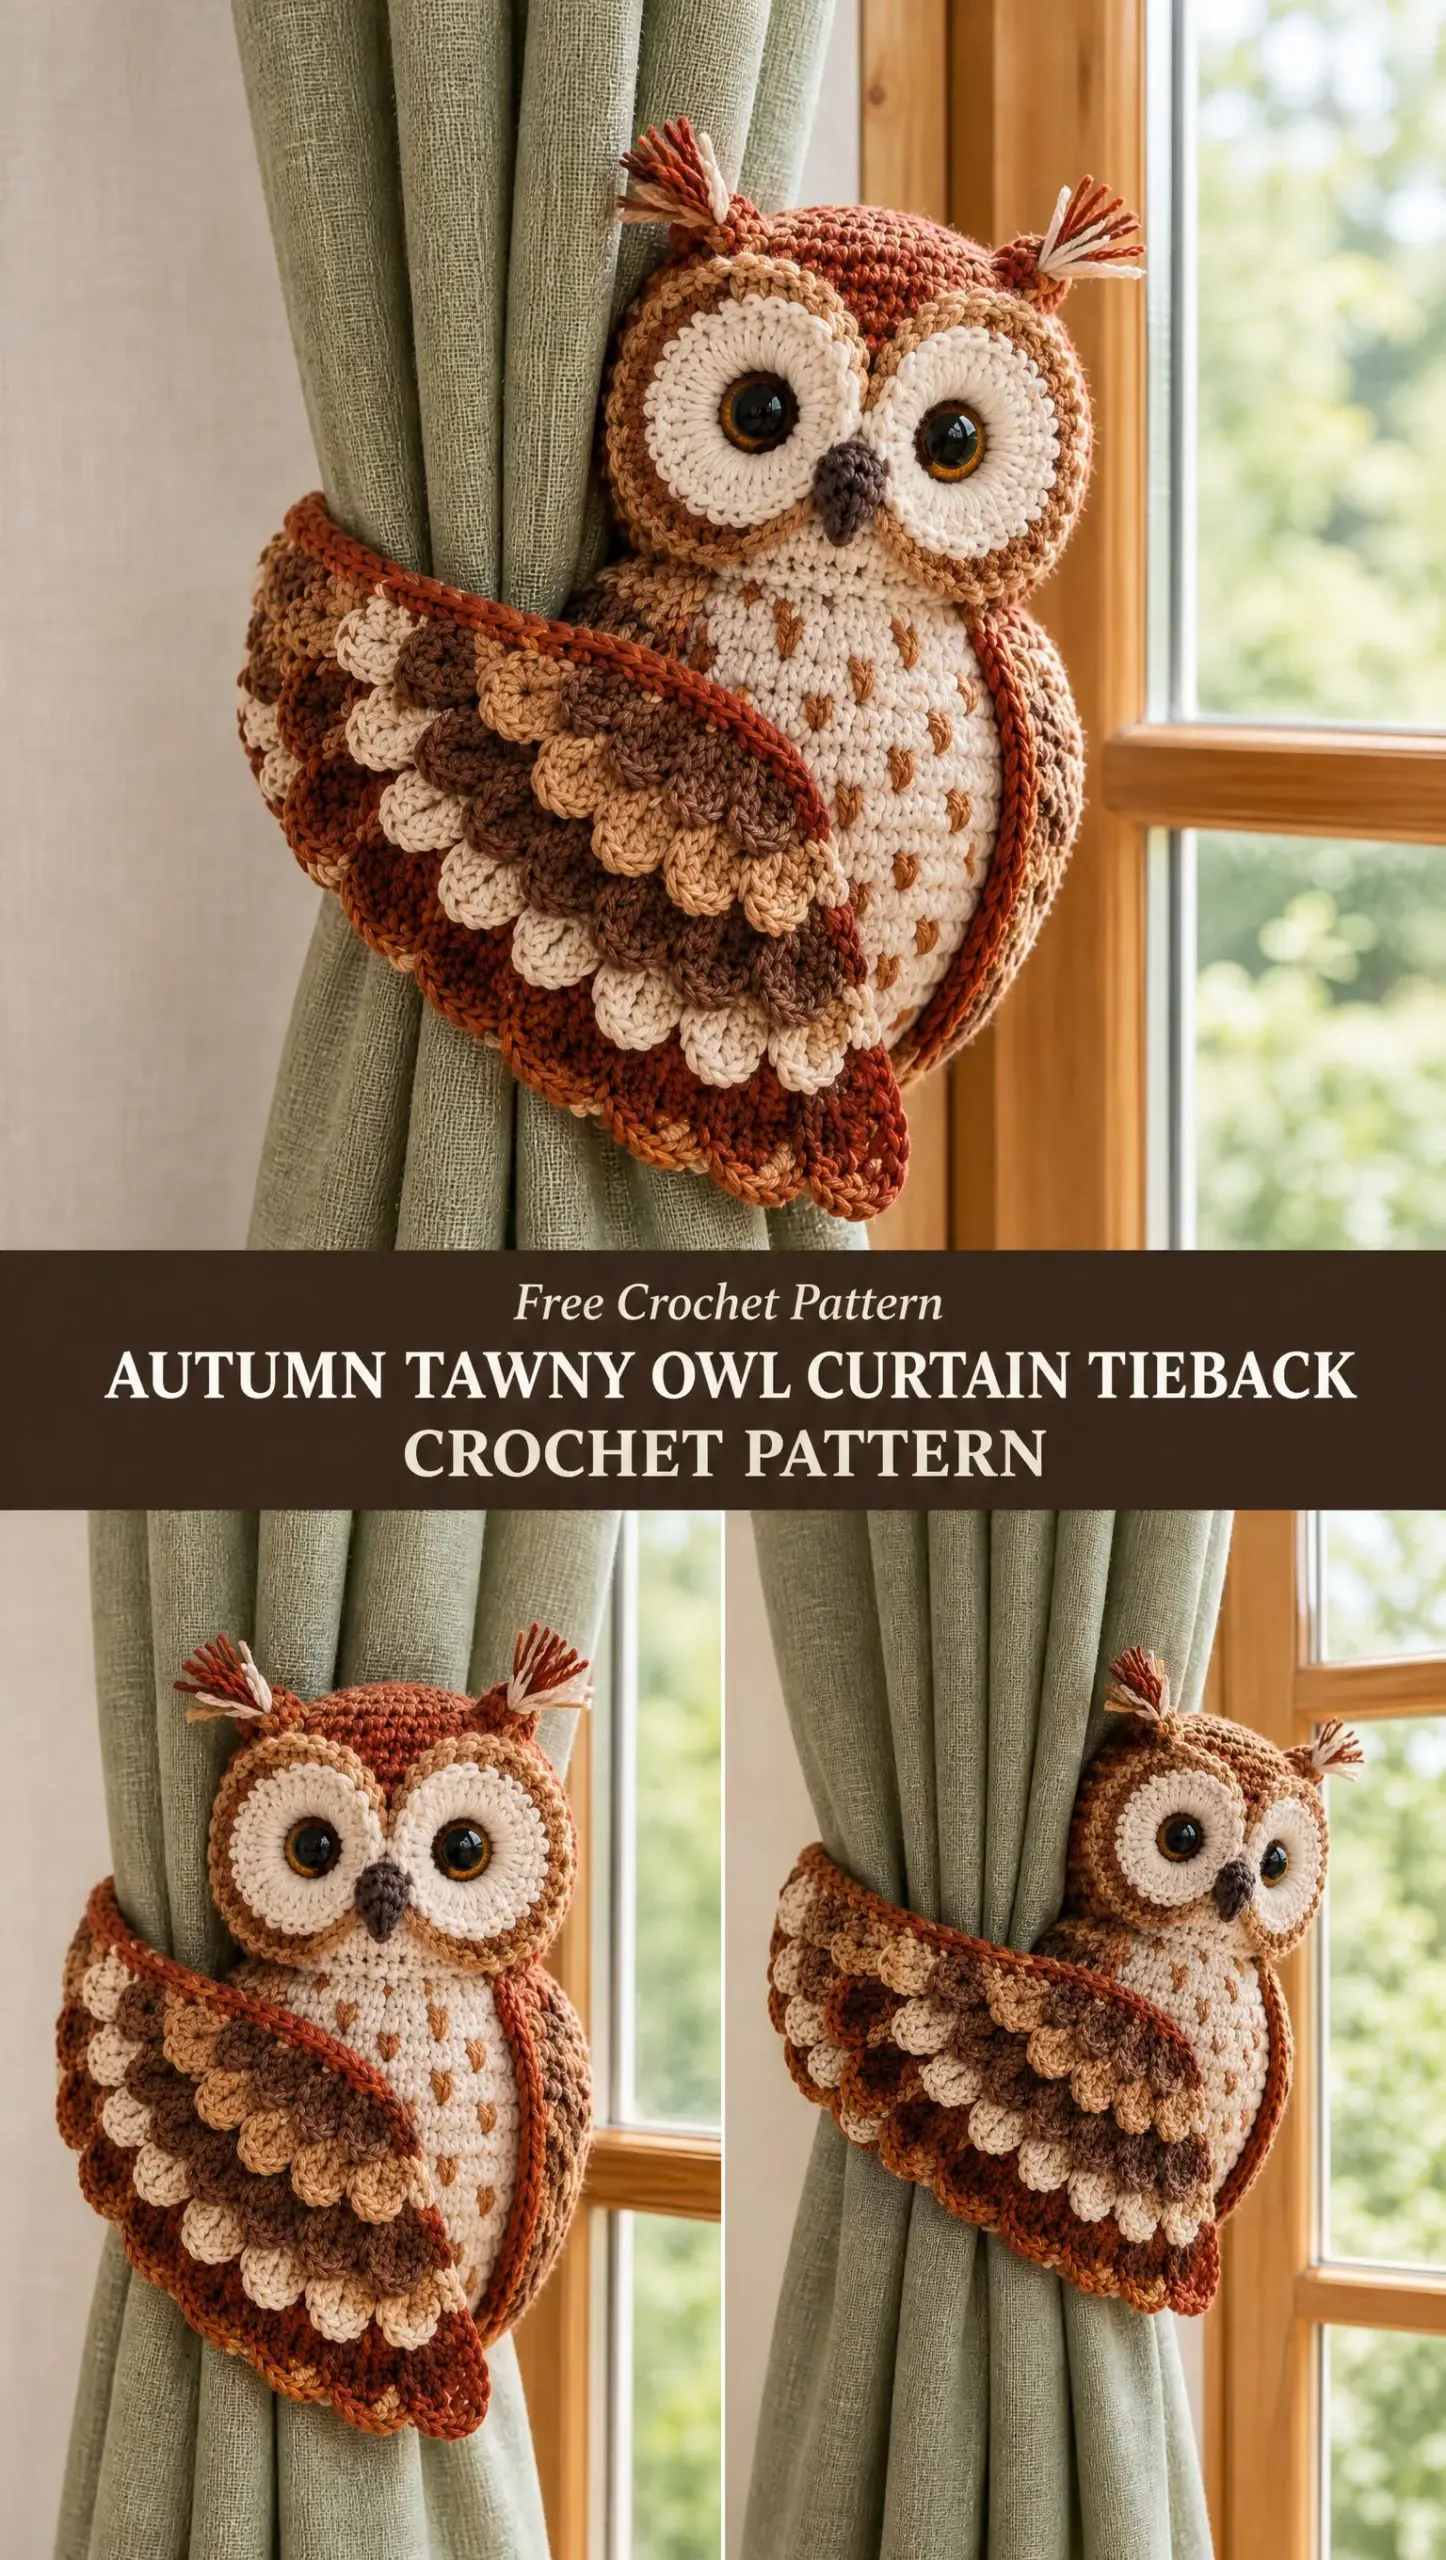
This tawny owl curtain tieback hits both marks perfectly. You get a charming handmade owl with textured feather wings, raised cream eye circles, and sweet little ear tufts. And it holds your curtains back while looking absolutely adorable doing it.
The warm autumn color palette makes this piece feel cozy without being overwhelming. Burnt orange, caramel, cream, and espresso brown all work together to create something that looks like it belongs in a woodland cottage. Let me walk you through exactly how to make one for your own home.
About This Owl Curtain Tieback Pattern
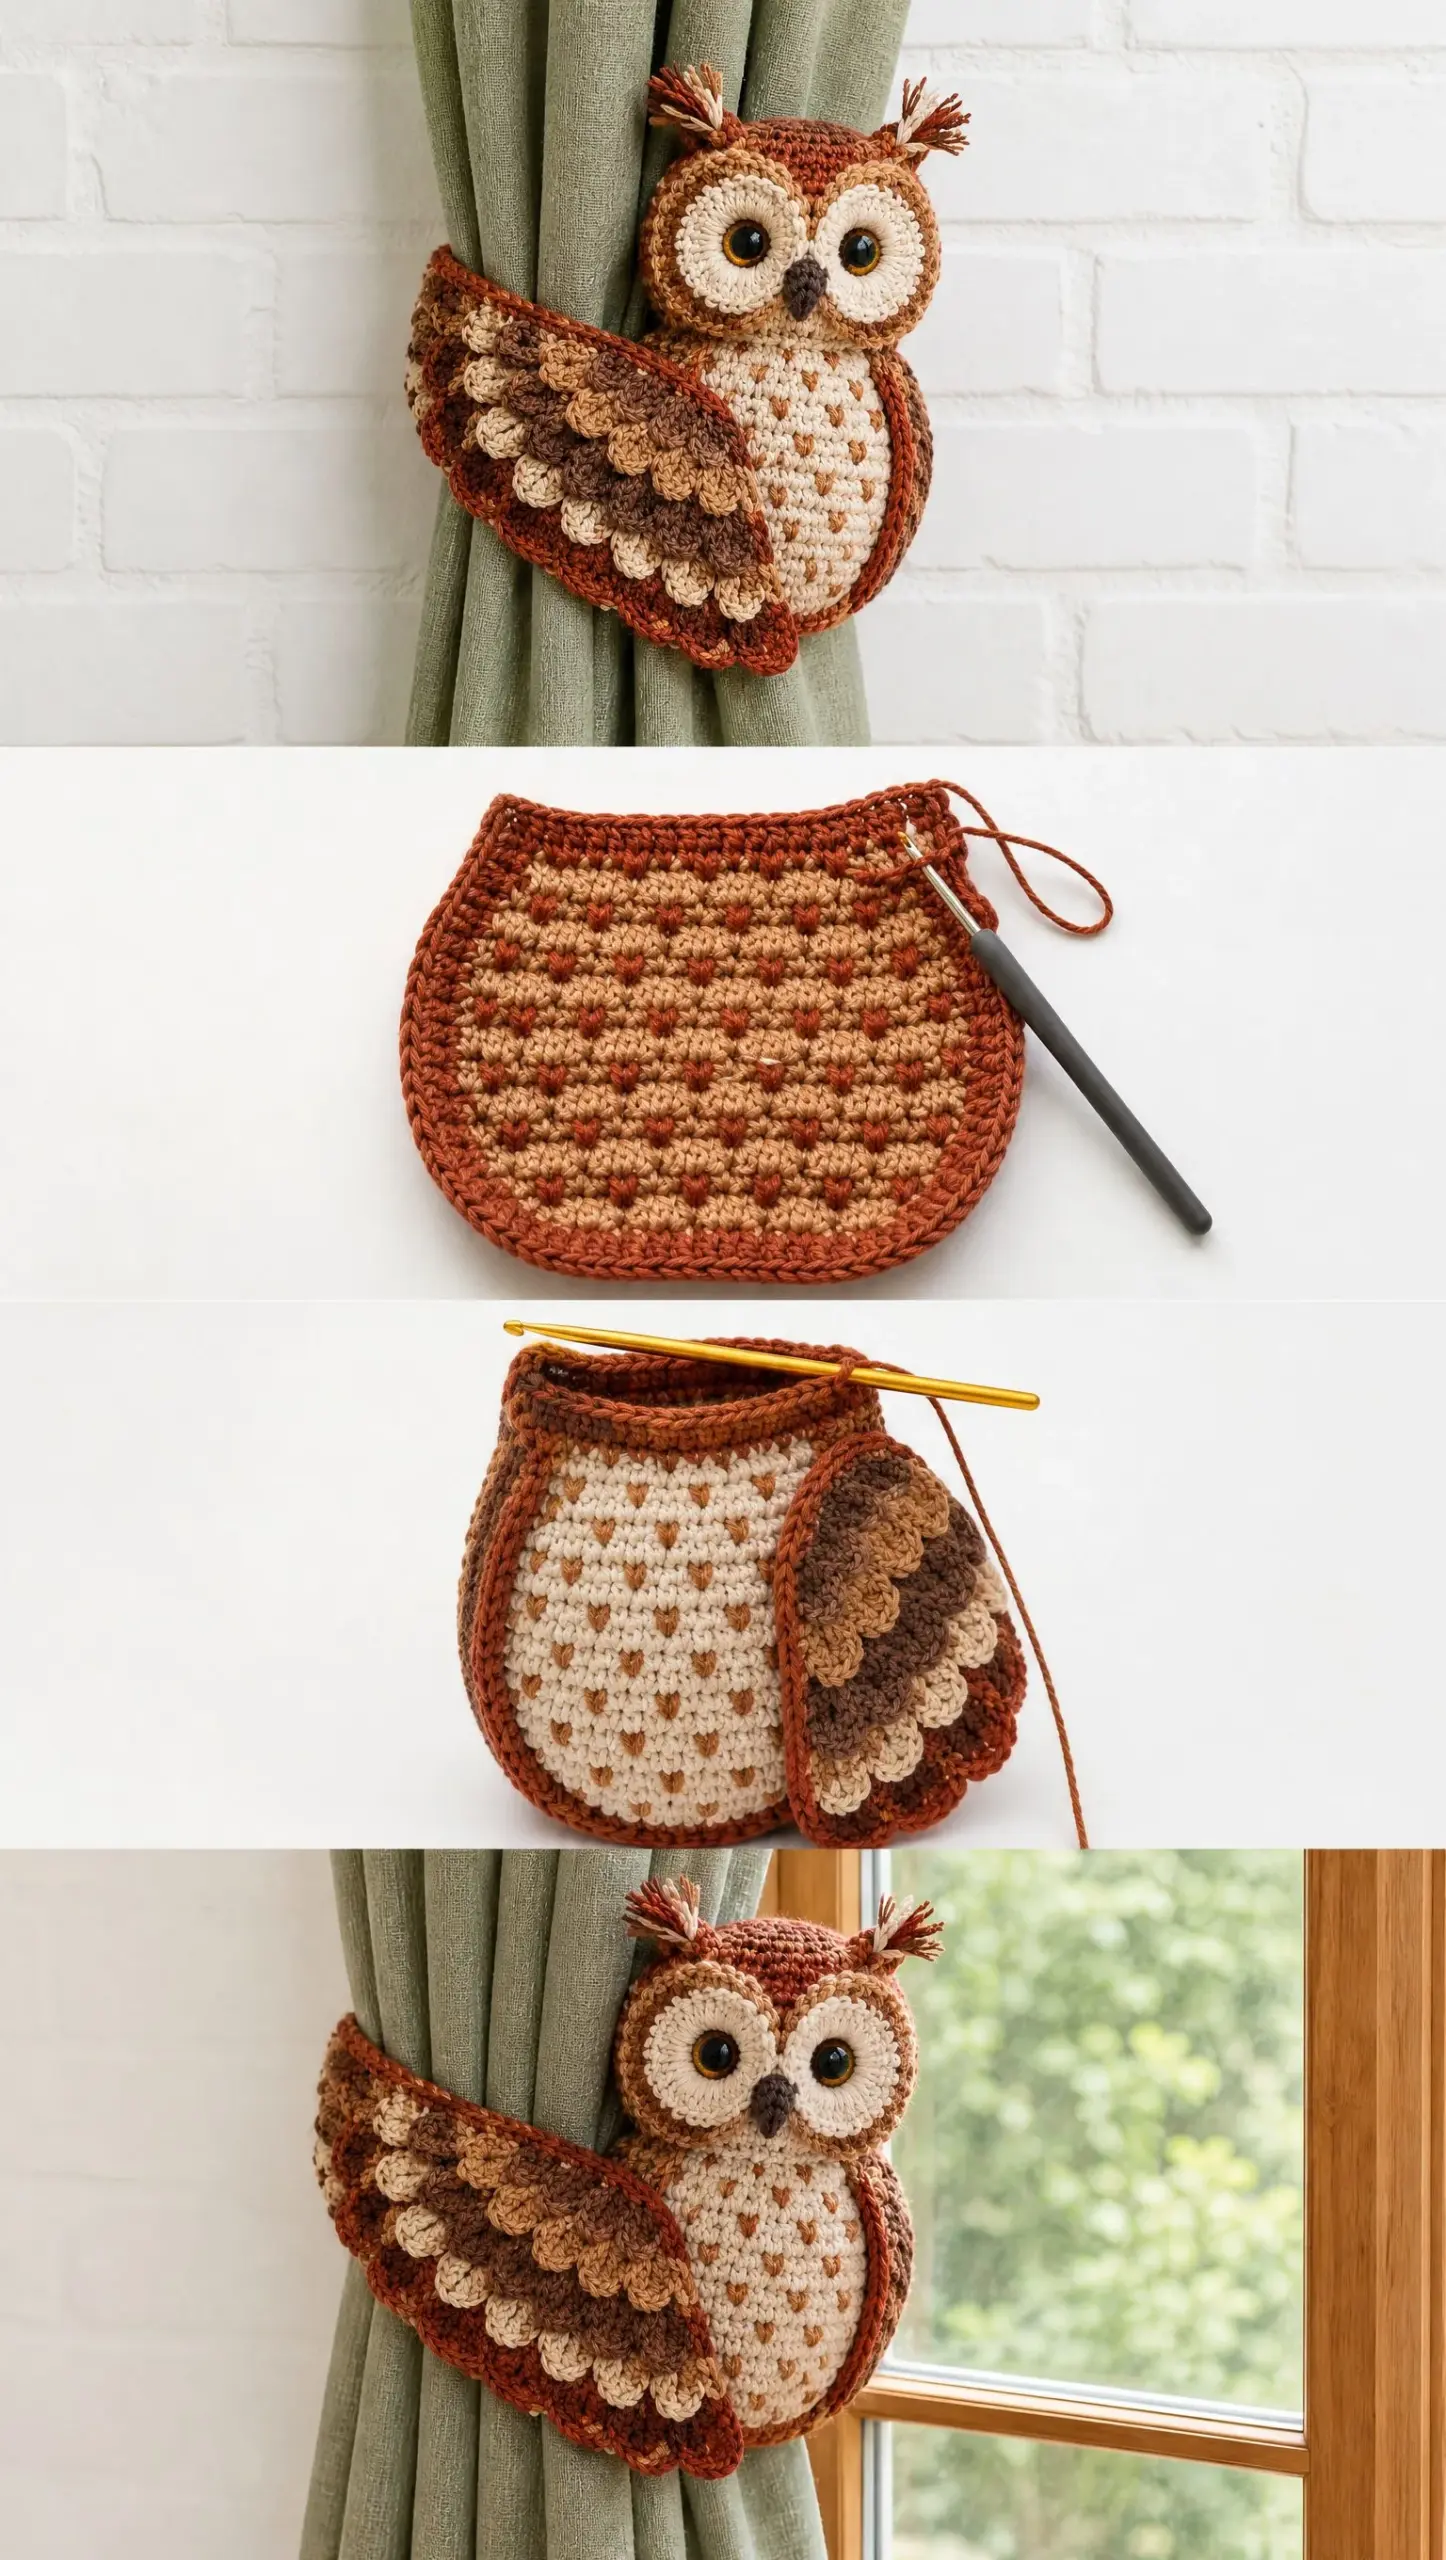
This crochet owl tieback features a rounded face with raised cream eye circles, stitched pupils, a small pointed beak, and ear tufts made from mixed yarn strands. The body includes a spotted cream belly panel, and the wings have beautiful layered feather texture created with bobble stitches (BO). Those wings wrap around your gathered curtain to hold it in place, with a hidden fastening loop at the back for extra security.
The finished owl measures approximately 18 to 22 cm tall and 30 to 35 cm wide with the wings open. This size works beautifully with medium-weight curtains like linen or cotton blends.
I’ve rated this pattern as intermediate level. You’ll need to be comfortable with basic crochet stitches plus some shaping, bobble stitches, sewing pieces together, and changing colors. If you’ve made a few amigurumi projects before, you’ll feel right at home here.
Materials You’ll Need
Gather these supplies before you start:
Yarn (cotton or acrylic):
Tools and Notions:
The exact hook size depends on your yarn weight and personal tension. I recommend making a small gauge swatch with your body yarn first to ensure your stitches are tight enough that stuffing won’t show through.
Stitch Abbreviations and Definitions
Let me define all the stitches you’ll use in this pattern:
MR = Magic ring. This is a technique for starting rounds that creates a tight, closed center with no hole. You wrap yarn around your fingers, pull up a loop, then work your first stitches into that ring before pulling it closed.
ch = Chain. The most basic crochet stitch. Yarn over, pull through the loop on your hook. That’s one chain.
sc = Single crochet. Insert hook into stitch, yarn over and pull up a loop (2 loops on hook), yarn over and pull through both loops. This creates a short, tight stitch.
hdc = Half double crochet. Yarn over, insert hook into stitch, yarn over and pull up a loop (3 loops on hook), yarn over and pull through all 3 loops at once.
dc = Double crochet. Yarn over, insert hook into stitch, yarn over and pull up a loop, yarn over and pull through 2 loops, yarn over and pull through remaining 2 loops. Taller than single crochet.
sl st = Slip stitch. Insert hook into stitch, yarn over and pull through both the stitch and the loop on your hook in one motion. Used for joining and moving yarn without adding height.
inc = Increase. Work 2 stitches into the same stitch. This adds one stitch to your total count.
dec = Decrease. Work 2 stitches together as one. This removes one stitch from your total count. For single crochet decrease, insert hook into first stitch and pull up a loop, insert hook into next stitch and pull up a loop (3 loops on hook), yarn over and pull through all 3.
BO = Bobble stitch. This creates a raised, bumpy texture. Work multiple double crochets partway into the same stitch (usually 4 or 5), leaving the last loop of each on your hook, then yarn over and pull through all loops at once to close the bobble.
st = Stitch.
Body Pattern
Use burnt orange yarn for the entire body.
Round 1: Make a MR, crochet 6 sc into the ring. (6 sts)
Round 2: Increase in each stitch around. (12 sts)
Round 3: 1 sc, inc repeat around. (18 sts)
Round 4: 2 sc, inc repeat around. (24 sts)
Rounds 5 through 12: Crochet even in sc. Work one sc in each stitch around without any increases or decreases. (24 sts)
Round 13: 2 sc, dec repeat around. (18 sts)
Round 14: 1 sc, dec repeat around. (12 sts)
Begin stuffing firmly at this point. You want the body to feel solid and hold its shape when used as a tieback.
Round 15: Dec around until the opening is closed.
Fasten off and weave in your ends securely.
Head Pattern
Use burnt orange yarn to start, then add caramel yarn for the face area.
Round 1: MR with 6 sc. (6 sts)
Round 2: Inc in each stitch around. (12 sts)
Round 3: 1 sc, inc repeat around. (18 sts)
Round 4: 2 sc, inc repeat around. (24 sts)
Rounds 5 through 8: Continue even in sc. (24 sts)
Round 9: Add caramel stitches around the face area. This creates the lighter facial disc that tawny owls have. You can work this by changing to caramel yarn for the front portion of the round, then switching back to burnt orange for the back of the head.
Round 10: Decrease gradually to create a rounded stuffed shape.
Stuff lightly and close the head. You want it to be firm but not overstuffed, as you’ll be sewing it to the body and attaching facial features.
Eye Circles
Make two using cream yarn.
Round 1: MR, work 8 sc into the ring. (8 sts)
Round 2: Increase in each stitch around. (16 sts)
Round 3: Add a final cream round for raised texture. This extra round gives the eyes dimension and makes them pop against the face.
Leave a long tail for sewing. Attach both eye circles symmetrically to the face, spacing them close enough that the beak will fit between them.
Pupils
Using espresso yarn, stitch small circular pupils in the center of each cream eye circle. Use tight embroidery stitches (like satin stitch or closely worked straight stitches) to create a handmade stitched appearance. The pupils in the reference images have a warm brown ring around them with a darker center, so you can layer your stitching for more depth if desired.
Beak
Using espresso yarn, create a small stuffed triangle shape.
Chain 4, work sc back across the chain, then add shaping rows until a small pointed beak forms. The beak should be compact and slightly downturned, like a real owl’s beak.
Sew the beak centered between the eyes, tucked slightly under the lower edge of the eye circles.
Ear Tufts
Cut short strands of rust, cream, and brown yarn, about 3 to 4 inches long each.
Attach two small tuft bundles above the head corners, roughly above the outer edges of the eyes. You can use a crochet hook to pull folded strands through the head and tie them off, similar to adding fringe.
Trim the tufts evenly to about 1 to 1.5 inches. The mixed colors create that realistic feathered look.
Belly Panel
Use cream yarn to create an oval crochet panel.
To start: Chain 10.
Work sc around both sides of the chain. When you reach the end of the chain, work 3 sc into the last chain to turn the corner, then continue down the opposite side of the starting chain. Work 3 sc into the first chain to complete the round.
Increase at both ends to form an oval shape. Continue working rounds until you reach your desired belly size. The belly should cover the front center of the body from just below where the head attaches down to the bottom third of the body.
Add small caramel embroidered feather flecks across the panel. These are small V-shaped or teardrop stitches scattered randomly to mimic the spotted chest feathers of a real tawny owl.
Wings
Make two matching wings. These are the functional part of your tieback, so take your time with them.
Wing Base
Use rust yarn to crochet an elongated oval.
Row 1: Chain 18.
Row 2: Sc across. (17 sts, working into second chain from hook)
Rows 3 through 5: Shape with increases at the edges. Add 1 to 2 stitches at the beginning and end of each row to widen the wing into a curved leaf shape.
Feather Texture
This is where your wings really come to life. Add alternating rows of bobble stitches using caramel, cream, and brown yarn.
Work across the wing surface, creating layered feather rows from top to bottom. Space your bobbles in offset rows so they look like overlapping feathers rather than straight lines. The reference images show beautiful gradient shading from lighter cream bobbles near the body to darker brown bobbles at the wing tips.
Wing Finish
Add a rust scalloped border around the lower wing edge. To create scallops, work skip 1 stitch, 5 dc in next stitch, skip 1 stitch, sl st in next stitch around the curved lower edge. This gives a finished, decorative look to the feather tips.
Assembly Instructions
Now comes the satisfying part: putting your owl together.
Step 1: Sew the head securely onto the body. Position it so the owl faces forward. Use a whip stitch or mattress stitch with matching yarn, going around the join twice for strength.
Step 2: Attach the cream eye circles to the face, spacing them evenly.
Step 3: Add the stitched pupils and sew the beak in place between the eyes.
Step 4: Sew the belly panel centered on the front of the body.
Step 5: Attach the wings so they extend outward from the sides of the body. Position them so they can wrap around a gathered curtain. The wings should attach at the shoulder area and extend backward.
Step 6: Add a hidden fastening loop or button attachment at the back. This is what keeps your tieback secure. You can crochet a simple chain loop, add a small button and corresponding loop, or use Velcro dots for easy adjustment.
Step 7: Check all joins carefully and weave in any remaining yarn ends. Use fabric glue on stubborn ends if needed.
Curtain Tieback Finishing Tips
To use your finished owl, gather your curtain to the side and position the owl around the gathered fabric. The wings should wrap around and meet at the back, with your hidden fastening holding everything in place.
The pattern mentions sage linen curtains, and that color combination is stunning. But this owl also looks beautiful against cream, gold, terracotta, or deep green curtains. The warm autumn palette is surprisingly versatile.
Pro tip: Reinforce your attachment points with extra stitches. The tieback will be adjusted frequently, so those wing attachments need to be sturdy.
Care Instructions
Hand wash your owl tieback gently in cool water. If you used acrylic yarn, it can handle gentle washing well. Cotton may shrink slightly.
Reshape the wings and body while the piece is still damp, then lay flat to air dry completely. Avoid hanging to dry, as the weight of the water can stretch the wings.
Pattern Notes and Customization Ideas
This design works beautifully as written, but you can easily customize it to fit your space.
For larger tiebacks: Use a bulkier yarn weight with a correspondingly larger hook. This will scale up the entire owl proportionally.
For smaller tiebacks: Use a finer weight yarn and smaller hook for a daintier version.
Color variations: Try snowy owl colors (white and gray), barn owl colors (golden and white), or even fantasy colors like purple and silver for a whimsical twist.
Make a pair: Most windows look best with matching tiebacks on each side. The second owl works up faster once you’ve made the first.
I hope you love making this autumn owl tieback as much as I enjoyed designing it. There’s something so satisfying about creating home decor that’s both beautiful and useful, especially when it involves cozy autumn colors and an adorable owl face.
If you make this pattern, I would absolutely love to see your finished owl. Tag me on Instagram or share a photo in my Facebook group. Seeing your creations is honestly one of my favorite parts of sharing patterns.
Don’t forget to save this pattern to your Pinterest boards so you can find it when you’re ready to start. And if you have any questions or want to share how yours turned out, drop a comment below. Happy crocheting!
Want a Quick & Easy Printable Version?
Get a clean, beautifully formatted PDF of this pattern — easy to follow step by step, ready to print or save on any device. No scrolling, no distractions, just the pattern.
Get the Printable PDF →