
When I sat down to design this bridal hair vine, I had a very specific vision. I wanted something that would flow naturally through a loose romantic braid, with roses that actually looked like roses, not lumpy yarn blobs. I needed it to work for different hair lengths and stay put without a hundred bobby pins poking into the bride’s scalp.
Get the Ad-Free PDF Pattern
You can find the free pattern below, or you can purchase the ad-free printable PDF from my shop.
Get the Printable PDF →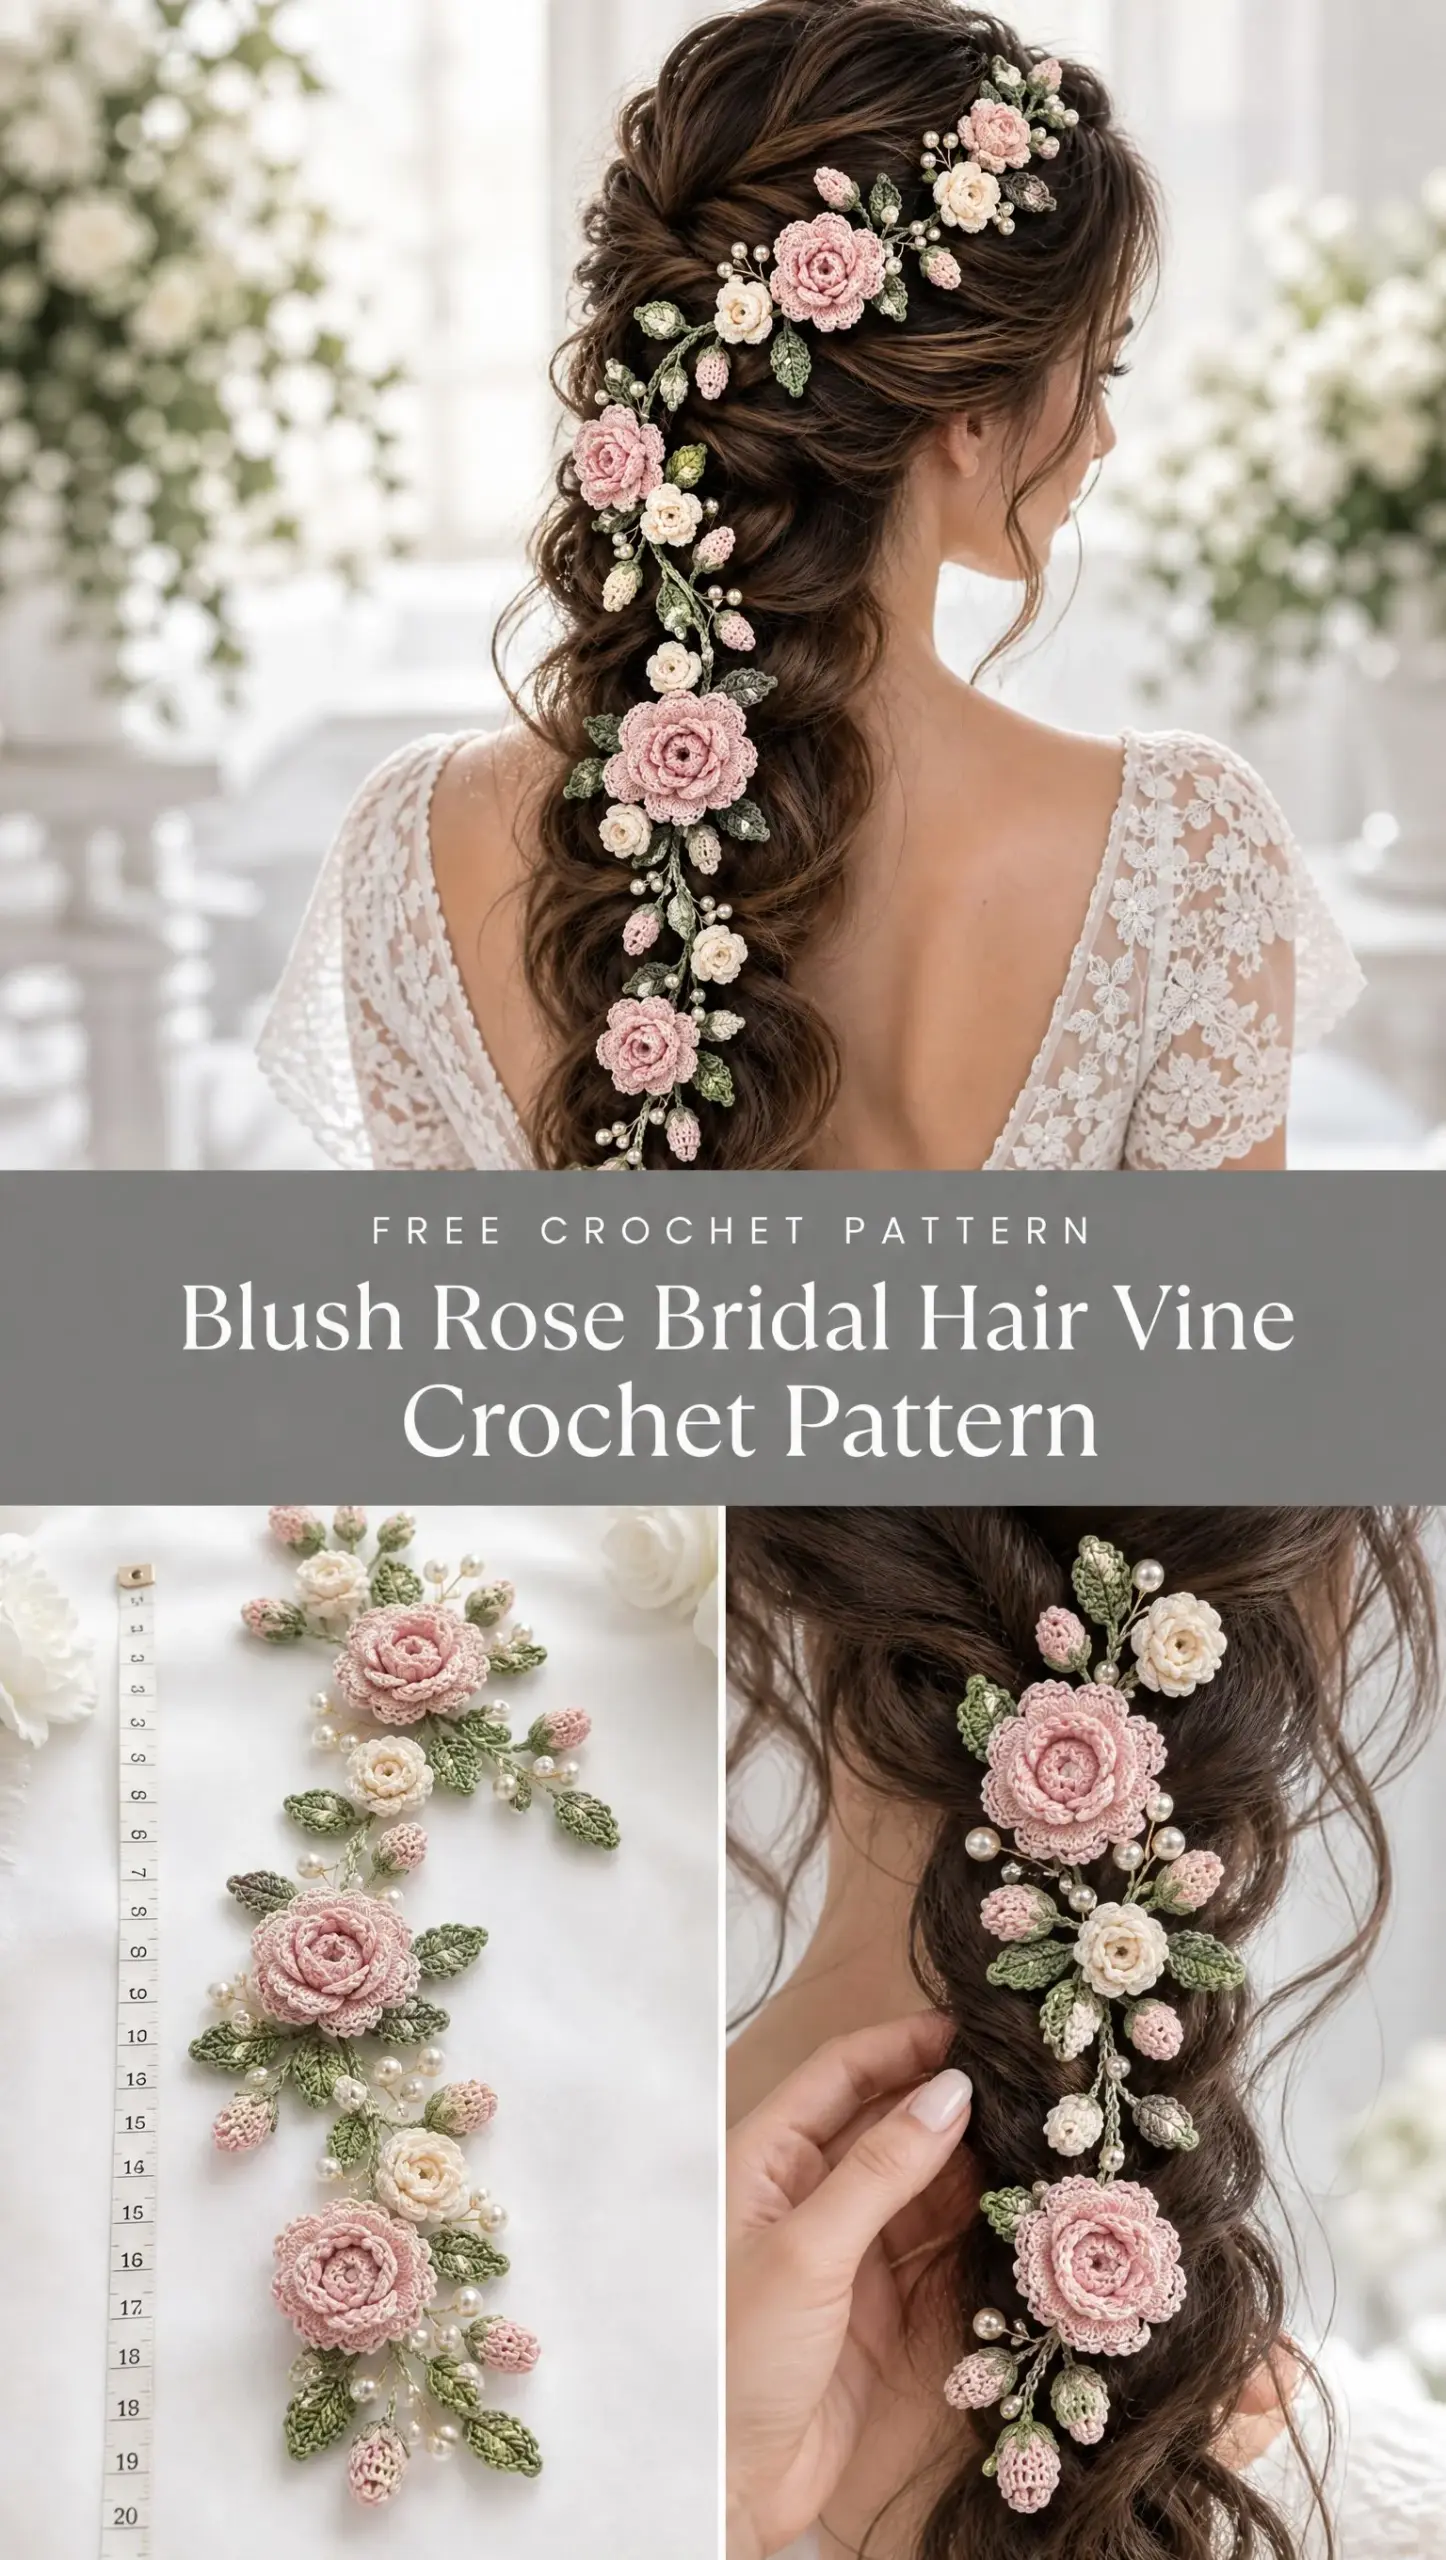
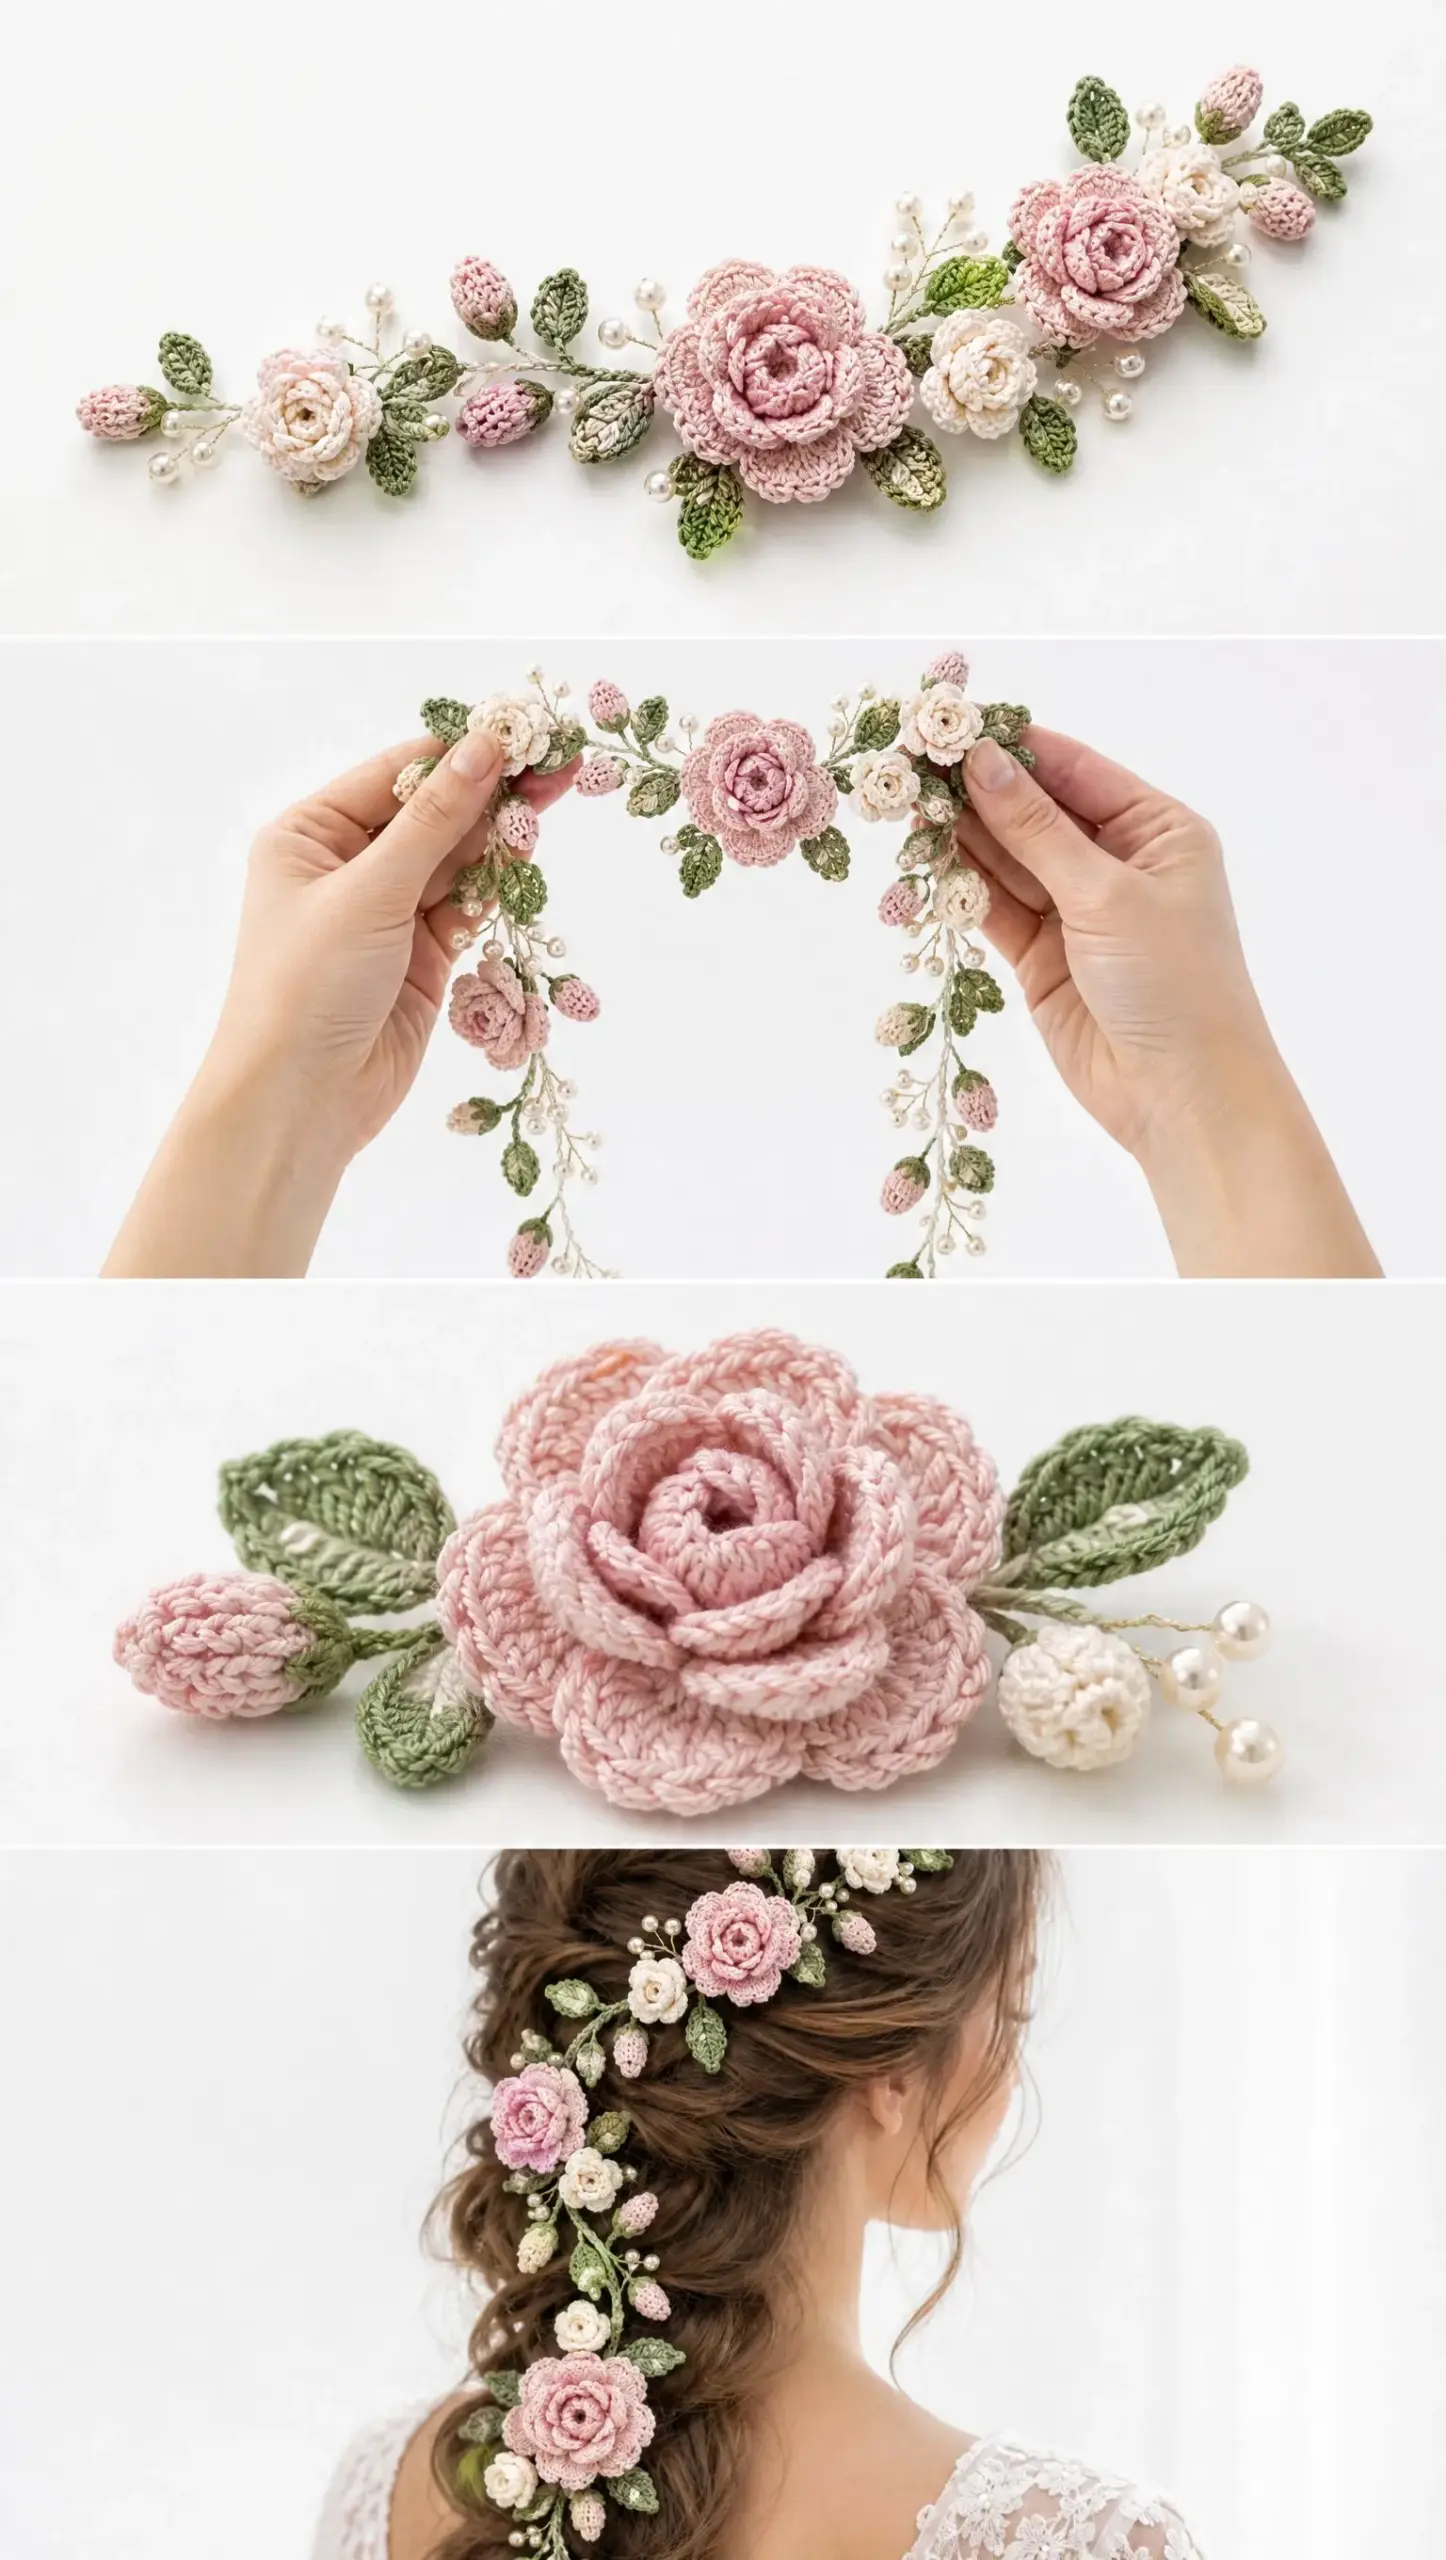
The result is this cascading vine with dimensional spiral roses, tiny rosebuds with pointed calyxes, and sage green leaves that curve and move like real foliage. Every element is crocheted separately, then assembled into clusters that get sewn to a flexible cord. The whole piece drapes from the crown down through a braid, with the largest roses concentrated toward the bottom for that gorgeous trailing effect.
I am SO pleased with how this turned out. The roses have actual depth and dimension. The leaves look botanical rather than cartoonish. And the pearl accents add just the right amount of sparkle without overwhelming the soft romantic vibe. Whether you are making this for your own wedding, a friend’s big day, or a formal event, this hair vine is a showstopper.
About This Crochet Pattern
Skill level: Intermediate. You should be comfortable working in the round, using back loops and front loops, small scale shaping, surface sewing, and neat assembly.
Finished vine length: Approximately 58 to 65 cm (23 to 25.5 inches), excluding optional hairpin loops.
Width: The main vine measures 0.4 to 0.7 cm. Floral clusters range from 3 to 8 cm depending on rose size.
Construction method: Individual roses, rosettes, buds, and leaves are crocheted separately, then sewn to a slim reinforced crochet cord with short branching stems. This approach gives you complete control over placement and lets you adjust the design to suit different hairstyles.
Visual balance note: The pattern places lighter, smaller motifs at the crown, medium roses through the transition area, and the largest blush roses concentrated lower on the braid. This creates that beautiful cascading effect you see in the reference images.
Materials You Will Need
| Material | Suggested Quantity | Notes |
|---|---|---|
| Fine cotton crochet thread, blush pink | 20 to 25 g | Size 10 crochet cotton or fine fingering cotton with matte finish |
| Fine cotton crochet thread, warm ivory | 10 to 15 g | For small rosettes, a few buds, and optional stem wrapping |
| Fine cotton crochet thread, muted sage | 15 to 20 g | Leaves, calyxes, main vine, and branch stems |
| Crochet hook | 1.50 to 1.75 mm | Choose size that gives firm miniature stitches with no visible gaps |
| Pearl-like beads | 12 to 18 beads | 3 to 4 mm, optional. Use sew-on or drilled craft pearls |
| Sewing needle | 1 | Sharp or fine tapestry needle suited to the thread |
| Optional flexible core | 70 cm (28 inches) | 0.3 to 0.4 mm jewelry wire, millinery wire, or nylon beading cord. Omit for an all-fiber vine |
| Hair fastenings | 4 to 7 | Brown or matching bobby pins or U-pins added during styling |
A note on yarn choice: Smooth mercerized cotton gives crisp petals with sharp stitch definition. Softer matte cotton creates the romantic look you see in the reference photos. Avoid fuzzy yarn because it hides the miniature stitch definition that makes these roses look so realistic.
Important safety note: This pattern is designed for a bridal or formal hair accessory. Keep all wire ends, bead stems, and fastenings completely covered. If making for a child, omit beads and wire entirely.
Abbreviations (US Terms)
Before we dive into the pattern, let me define all the stitches and abbreviations you will encounter. I am using US crochet terminology throughout.
ch = chain. Wrap yarn over hook and pull through the loop on your hook. This creates one chain stitch.
sl st = slip stitch. Insert hook into stitch, yarn over, pull through both the stitch and the loop on your hook in one motion.
sc = single crochet. Insert hook into stitch, yarn over, pull up a loop (2 loops on hook), yarn over, pull through both loops.
hdc = half double crochet. Yarn over, insert hook into stitch, yarn over, pull up a loop (3 loops on hook), yarn over, pull through all 3 loops.
dc = double crochet. Yarn over, insert hook into stitch, yarn over, pull up a loop (3 loops on hook), yarn over, pull through 2 loops, yarn over, pull through remaining 2 loops.
tr = treble crochet. Yarn over twice, insert hook into stitch, yarn over, pull up a loop (4 loops on hook), then yarn over and pull through 2 loops three separate times.
st(s) = stitch(es)
sp = space
MR = magic ring. Create an adjustable loop, work stitches into that loop, then pull the tail to close the center tight.
BLO = back loop only. Instead of inserting your hook under both loops of a stitch, insert it under only the back loop.
FLO = front loop only. Insert your hook under only the front loop of the stitch.
inc = increase. Work 2 stitches into the same stitch.
dec = decrease. Single crochet 2 together by inserting hook into first stitch, pulling up a loop, inserting hook into next stitch, pulling up a loop (3 loops on hook), yarn over, pull through all 3 loops.
rep = repeat
FO = fasten off. Cut yarn and pull tail through final loop.
Gauge and Size Control
Gauge is not critical for this project, but your miniature motifs must be firm enough to hold their shape. A 12 sc circle should measure about 12 to 15 mm across after light blocking.
Here are the target sizes for each motif:
If your motifs are coming out significantly larger or smaller, adjust your hook size. A smaller hook creates tighter, firmer stitches. A larger hook creates looser, softer stitches.
Motif Counts for the Full Vine
Here is everything you will need to crochet for the complete hair vine:
| Motif | Quantity | Use |
|---|---|---|
| Large blush rose | 3 | Lower cascade and main focal points |
| Medium blush rose | 3 | Crown transition and mid-vine |
| Small blush rose | 2 | Top cluster and optional filler |
| Small ivory rosette | 6 | Alternating light accents |
| Pink tapered bud | 8 | Branch tips and negative-space fillers |
| Ivory bud | 3 | Optional lighter transition accents |
| Small sage leaf | 14 | Crown and branch tips |
| Medium sage leaf | 12 | Around roses and lower cascade |
| Pearl accents | 12 to 18 | Use in groups of 1 to 3, never evenly spaced |
Customization tip: You can reduce the count by about 25% for a shoulder-length style or increase it by adding branchlets between the lower two large roses.
Part 1: Large Blush Spiral Rose
Make 3 of these roses. This rose is built as a spiral strip, rolled from the tight center outward, then stitched securely through the base. The alternating shell sizes create two to three visible petal tiers.
Foundation
Ch 57. Beginning in the 2nd ch from hook, sc in each ch across. Turn. (56 sc)
Row 2: Ch 1, sc in first st. Skip 1 st, 5 dc in next st, skip 1 st, sc in next st. Rep across as evenly as possible, ending with sc. Turn.
Row 3: Ch 1. Across each 5-dc shell work: sl st in first dc, sc in next dc, (hdc, dc, hdc) in center dc, sc in next dc, sl st in last dc. Sl st into the sc between shells. Continue across. FO with a 35 cm (14 inch) sewing tail.
Roll and Shape
Place the strip with the more sculpted Row 3 edge facing upward.
At the starting end, roll the first 1 to 1.5 shells tightly to create the rose center. Tack through the foundation edge 3 to 4 times with your sewing tail.
Continue rolling more loosely, allowing each shell to offset slightly from the previous petal. Keep the foundation edge aligned into a flat spiral base.
Every 2 shells, pass the sewing tail through the base from side to side. Do not stitch through the visible upper petal edges.
At the last shell, angle the final petal slightly outward, secure the foundation end underneath, and flatten only the base. The upper petals should remain dimensional.
Optional petal curl: Lightly pinch the top of each outer petal around a 2 to 3 mm knitting needle or the hook shaft for 5 to 10 seconds. Cotton will hold a gentle curve without stiffener.
Part 2: Medium and Small Blush Roses
Medium Rose (Make 3)
Ch 43. Sc in 2nd ch and across. (42 sc)
Next row: Repeat skip 1, 5 dc in next, skip 1, sc in next across.
Edge each shell as for the Large Rose. Roll tightly for the first shell, then gradually loosen. Finished diameter: about 3.5 to 4.2 cm.
Small Blush Rose (Make 2)
Ch 31. Sc in 2nd ch and across. (30 sc)
Next row: Skip 1, 4 dc in next, skip 1, sc in next across.
Do not add the extra edging row. Roll and sew. Finished diameter: about 2.5 to 3.2 cm.
Part 3: Ivory Mini Rosette
Make 6 of these rosettes. These are intentionally simpler and lighter than the blush roses, so the vine does not become visually heavy.
Ch 25. Beginning in 2nd ch, sc across. Turn. (24 sc)
Ch 2, work 3 dc in first st. Sl st in next st, 4 dc in next st. Rep across, finishing with sl st as needed. FO with a 20 cm (8 inch) tail.
Roll from the starting end. Keep the center snug and the outer 2 to 3 petals slightly open. Stitch the foundation edge into a flat disk.
For a tighter rosette: Use hdc instead of dc on the final two petals.
Part 4: Tapered Rosebuds
Make 8 blush and 3 ivory if desired. Buds are worked in the round, then capped with a sage calyx.
Bud
Rnd 1: With blush or ivory, 6 sc in MR. (6)
Rnd 2: Inc around. (12)
Rnd 3: BLO sc around. (12)
Rnd 4: Sc around. (12)
Rnd 5: Sc, dec around. (8)
Rnd 6: Dec around. (4). FO. Do not stuff firmly. A tiny pinch of thread ends is enough to round the tip.
Calyx
Join sage to any unused front loop from Bud Rnd 3.
Ch 4, sl st in 2nd ch, sc in next ch, hdc in next ch, sl st in next available front loop on bud. Repeat 4 to 5 times around to make pointed sepals.
FO, leaving a tail for attaching the bud to a branch stem.
Part 5: Pointed Sage Leaves
Small Leaf (Make about 14)
Ch 7. Beginning in 2nd ch: sl st, sc, hdc, dc, hdc, sc.
Ch 2 at the tip. Working down the opposite side of the foundation chain: sc, hdc, dc, hdc, sc, sl st.
Sl st into first st. FO with a 15 cm (6 inch) sewing tail.
Medium Leaf (Make about 12)
Ch 9. Beginning in 2nd ch: sl st, sc, hdc, dc, tr, dc, hdc, sc.
Ch 2 at the tip. Work down the opposite side: sc, hdc, dc, tr, dc, hdc, sc, sl st.
Optional center vein: With the working yarn still attached, surface sl st loosely along the starting chain from base to tip. FO.
Shaping tip: Lightly steam or damp-block the leaves, curving some left and some right. Do not block every leaf flat. The reference design depends on varied angles and gentle movement.
Part 6: Narrow Branch Stems
Make a mixture of 5 to 10 cm (2 to 4 inch) branch stems. Most clusters use 2 or 3 branches.
All-fiber version: Ch the desired length, then sl st back through every chain. This makes a fine double-thickness cord.
Extra-flexible reinforced version: Hold a strand of 0.3 to 0.4 mm wire or nylon cord against the chain and work sl sts over it on the return pass. Leave no exposed ends.
At a branching point: Join yarn to a side sl st, ch 4 to 8, then sl st back down the new branch and continue along the original stem.
Assembly tip: Sew a bud, leaf, or pearl to the branch tip before attaching the branch to the main vine whenever possible. This keeps finishing knots concealed.
Part 7: Pearl Accent Sprigs
Pearls are optional. The sample effect uses tiny clusters that visually imitate bridal berry sprays.
Thread 1 to 3 beads onto strong sewing thread or fine beading wire. Space them 8 to 15 mm apart.
Twist or knot securely, then wrap the lower 15 to 20 mm of the stem with sage crochet thread using tight whip stitches.
Attach pearl sprigs beside flowers, never through the petals. Keep most sprigs to one side of a rose so they look naturally scattered.
Do not use a pearl at every cluster. Aim for about 12 to 18 pearls total along the entire vine.
Part 8: Main Flexible Vine
The main vine should be slim and pliable. For the pictured crown-to-back cascade, make it about 62 cm (24.5 inches) before adding motifs.
Fiber-Only Main Vine
Ch 145 to 160 with sage, or enough chains to reach 62 cm (24.5 inches) at your tension.
Sl st in 2nd ch and in every chain across. Keep the return row relaxed so the cord does not curl.
FO with a 30 cm (12 inch) tail at each end.
Reinforced Main Vine
Cut 68 to 70 cm (27 to 28 inches) flexible jewelry or millinery wire. Fold the final 8 to 10 mm at both ends back on itself so there are no sharp tips.
Ch 145 to 160. On the return pass, hold the wire along the chain and work sl sts over both chain and wire, fully covering it.
At both ends, wrap the folded wire tip with 8 to 10 extra tight stitches, then sew over it with the yarn tail.
Attachment loops: At approximately 5, 16, 28, 40, 51, and 60 cm from the crown end, create a tiny concealed loop on the back: ch 4, sl st to the same point. These accept bobby pins or U-pins when styling.
Part 9: Assemble the Floral Clusters
Build 7 to 9 small clusters first, then sew those clusters to the main vine. This gives a more natural botanical look than sewing every motif directly in a straight line.
| Cluster | Suggested Contents | Placement |
|---|---|---|
| A – Crown tip | 1 small blush rose, 1 ivory rosette, 2 small leaves, 1 bud | Near upper right crown |
| B – Crown light | 1 ivory rosette, 2 small leaves, 1 pearl sprig | 8 to 10 cm below A |
| C – Transition | 1 medium blush rose, 1 ivory rosette, 2 leaves, 1 bud | Back-left crown |
| D – Upper braid | 1 medium blush rose, 2 leaves, 2 buds, pearls | Beginning of cascade |
| E – Mid light | 1 ivory rosette, 2 leaves, 1 bud | Between focal roses |
| F – Lower focal | 1 large blush rose, 1 ivory rosette, 3 leaves, pearls | Upper-middle braid |
| G – Lower transition | 1 medium blush rose, 1 bud, 2 to 3 leaves | Below F |
| H – Main lower focal | 1 large blush rose, 1 ivory rosette, 3 leaves, 1 to 2 buds | Lower braid |
| I – Tail focal | 1 large blush rose, 1 small blush rose or ivory rosette, 2 leaves, 2 buds | Near lower end |
How to Build Each Cluster
Lay the chosen flower face down. Arrange leaves behind it so 40 to 70% of each leaf remains visible from the front.
Add one branch stem with a bud or pearl extending away from the flower at a 20 to 45 degree angle.
Sew through the base only of the rose and the lower 4 to 6 mm of each leaf. Make 4 to 6 firm passes so the cluster behaves as one unit.
Cover the back with several tight sage stitches. Keep the back as flat as possible so the cluster sits comfortably against hair.
Before knotting, hold the cluster upright. Adjust the leaf angles and ensure the branch can flex without pulling the rose open.
Part 10: Placement Map and Final Assembly
Orient the vine with the crown end at 0 cm and the lower tail at about 62 cm. The sample intentionally leaves visible gaps of vine between some motifs so the hair shows through.
| Distance from Crown End | Motif/Cluster | Orientation |
|---|---|---|
| 2 to 4 cm | Cluster A | Angle slightly upward/right |
| 8 to 11 cm | Cluster B | Light and airy, pearl sprig outward |
| 14 to 18 cm | Cluster C | Rose facing back/right, leaves left |
| 21 to 25 cm | Cluster D | Begin stronger downward flow |
| 29 to 32 cm | Cluster E | Small filler, leave visible vine on both sides |
| 35 to 39 cm | Cluster F | First large focal rose, face slightly outward |
| 43 to 47 cm | Cluster G | Narrower transition cluster |
| 49 to 54 cm | Cluster H | Largest visual mass, leaves fan diagonally |
| 57 to 61 cm | Cluster I | Finish with rose plus trailing bud/leaf branch |
Before permanent sewing: Pin or baste all clusters in place first. View the vine from 1 to 2 m away to judge balance.
Alternate the side from which leaves and buds emerge. A perfectly mirrored vine looks less natural.
Sew each cluster around the vine cord with 6 to 10 tight wraps, then pass the thread through the cluster base twice before knotting on the back.
After every 2 to 3 clusters, flex the vine into an S-curve. If a join becomes stiff, remove a few wrapping stitches and resew more loosely.
At the lower end, finish with a narrow bud/leaf tip rather than a blunt cord end. This creates the cascading bridal effect.
Part 11: Styling and Concealed Attachment
Create a loose half-up twisted braid or soft textured braid first. Secure the hairstyle before placing the vine.
Position the top of the vine at the upper right crown. Guide it diagonally toward the left back of the head, then curve it down through or alongside the braid.
Use the concealed crochet loops on the back of the vine with brown bobby pins or U-pins. Slide pins beneath the braid so the hardware is hidden.
For large roses, use an extra hairpin through the flat rose base and under a braid section. Do not pierce visible petals.
Let the lower 15 to 20 cm follow the braid naturally. Avoid pulling it completely straight. A slight flowing curve looks softer and more botanical.
After attaching, gently lift crushed petals with a tapestry needle or the back of the crochet hook.
Important: For bridal use, make a full practice fitting before the event. Hair texture, braid thickness, and hairstyle placement can change the number and location of pins required.
Part 12: Blocking and Finishing
Weave in every yarn tail at the back of each motif before final assembly, except the tails intentionally used for sewing.
Dampen roses very lightly. Shape only the outer petals. Do not flatten the center spiral.
Pin leaves into gentle curves and allow them to dry fully.
If the vine twists, lay it in the intended S-curve and lightly steam from a distance without touching the cotton with the iron.
Check every pearl, wire end, and knot by rubbing the back of the vine over your palm. Nothing should feel sharp or snaggy.
Store flat in a shallow box. Place tissue under the large roses so the petals are not crushed.
Customization Guide
| Look | Adjustment |
|---|---|
| More delicate | Use only 2 large roses, increase ivory rosettes, and space clusters 7 to 9 cm apart |
| Fuller bridal cascade | Add 2 medium blush roses and 4 leaves, keep the added fullness below the crown |
| No pearls | Replace pearl sprigs with 3 to 5 tiny ivory buds or picot-tipped branchlets |
| All-fiber, no wire | Use the fiber-only vine and steam it into a gentle curve, secure with more hairpins |
| Warmer palette | Shift blush to dusty peach and ivory to cream while keeping muted sage |
| Cooler palette | Use ballet pink, soft white, and eucalyptus green |
Troubleshooting Common Issues
Rose looks flat: Roll the first shells more tightly and tack the base more frequently. Keep the outer shells looser.
Rose is cone-shaped: The foundation edge is stacking instead of spiraling. Unroll and keep the base flat while sewing.
Leaf curls too much: Use a larger hook or work the stitches more loosely. Damp-block with the center chain straight.
Vine feels stiff: Use fewer wraps when attaching clusters and leave 3 to 6 cm of bare flexible vine between focal points.
Motifs rotate in hair: Add a hidden pin loop directly behind the cluster and anchor through the braid.
Pearls dominate: Reduce to single pearls or groups of two and place them beside, not above, focal roses.
Quick Make Checklist
Final Thoughts on This Bridal Hair Vine Crochet Pattern
The finished result is a soft, romantic blush and ivory crochet rose vine with muted sage foliage, tiny buds, and scattered pearl accents, flowing from the upper crown into a long braid cascade. It is absolutely stunning for weddings, formal events, or any occasion where you want to feel like a flower-crowned goddess.
Thank you so much for choosing this pattern. I hope you love making it as much as I loved designing it. If you create your own version, I would absolutely love to see it. Tag me on Instagram or share a photo in our Facebook group. There is nothing better than seeing these designs come to life in your hands.
If this pattern made your heart skip a beat, save it to your Pinterest boards so you can find it when you are ready to start. And if you make one, please leave a comment below. I read every single one and they truly make my day.
Want a Quick & Easy Printable Version?
Get a clean, beautifully formatted PDF of this pattern — easy to follow step by step, ready to print or save on any device. No scrolling, no distractions, just the pattern.
Get the Printable PDF →