
I pulled this design out of my old sketchbook last spring, and I still remember the afternoon I first dreamed it up. I was sitting in my grandmother’s garden, surrounded by cosmos flowers and climbing roses, scribbling notes about bell sleeves and peplum hems. I called it the Lavender Dream back then, and the name stuck.
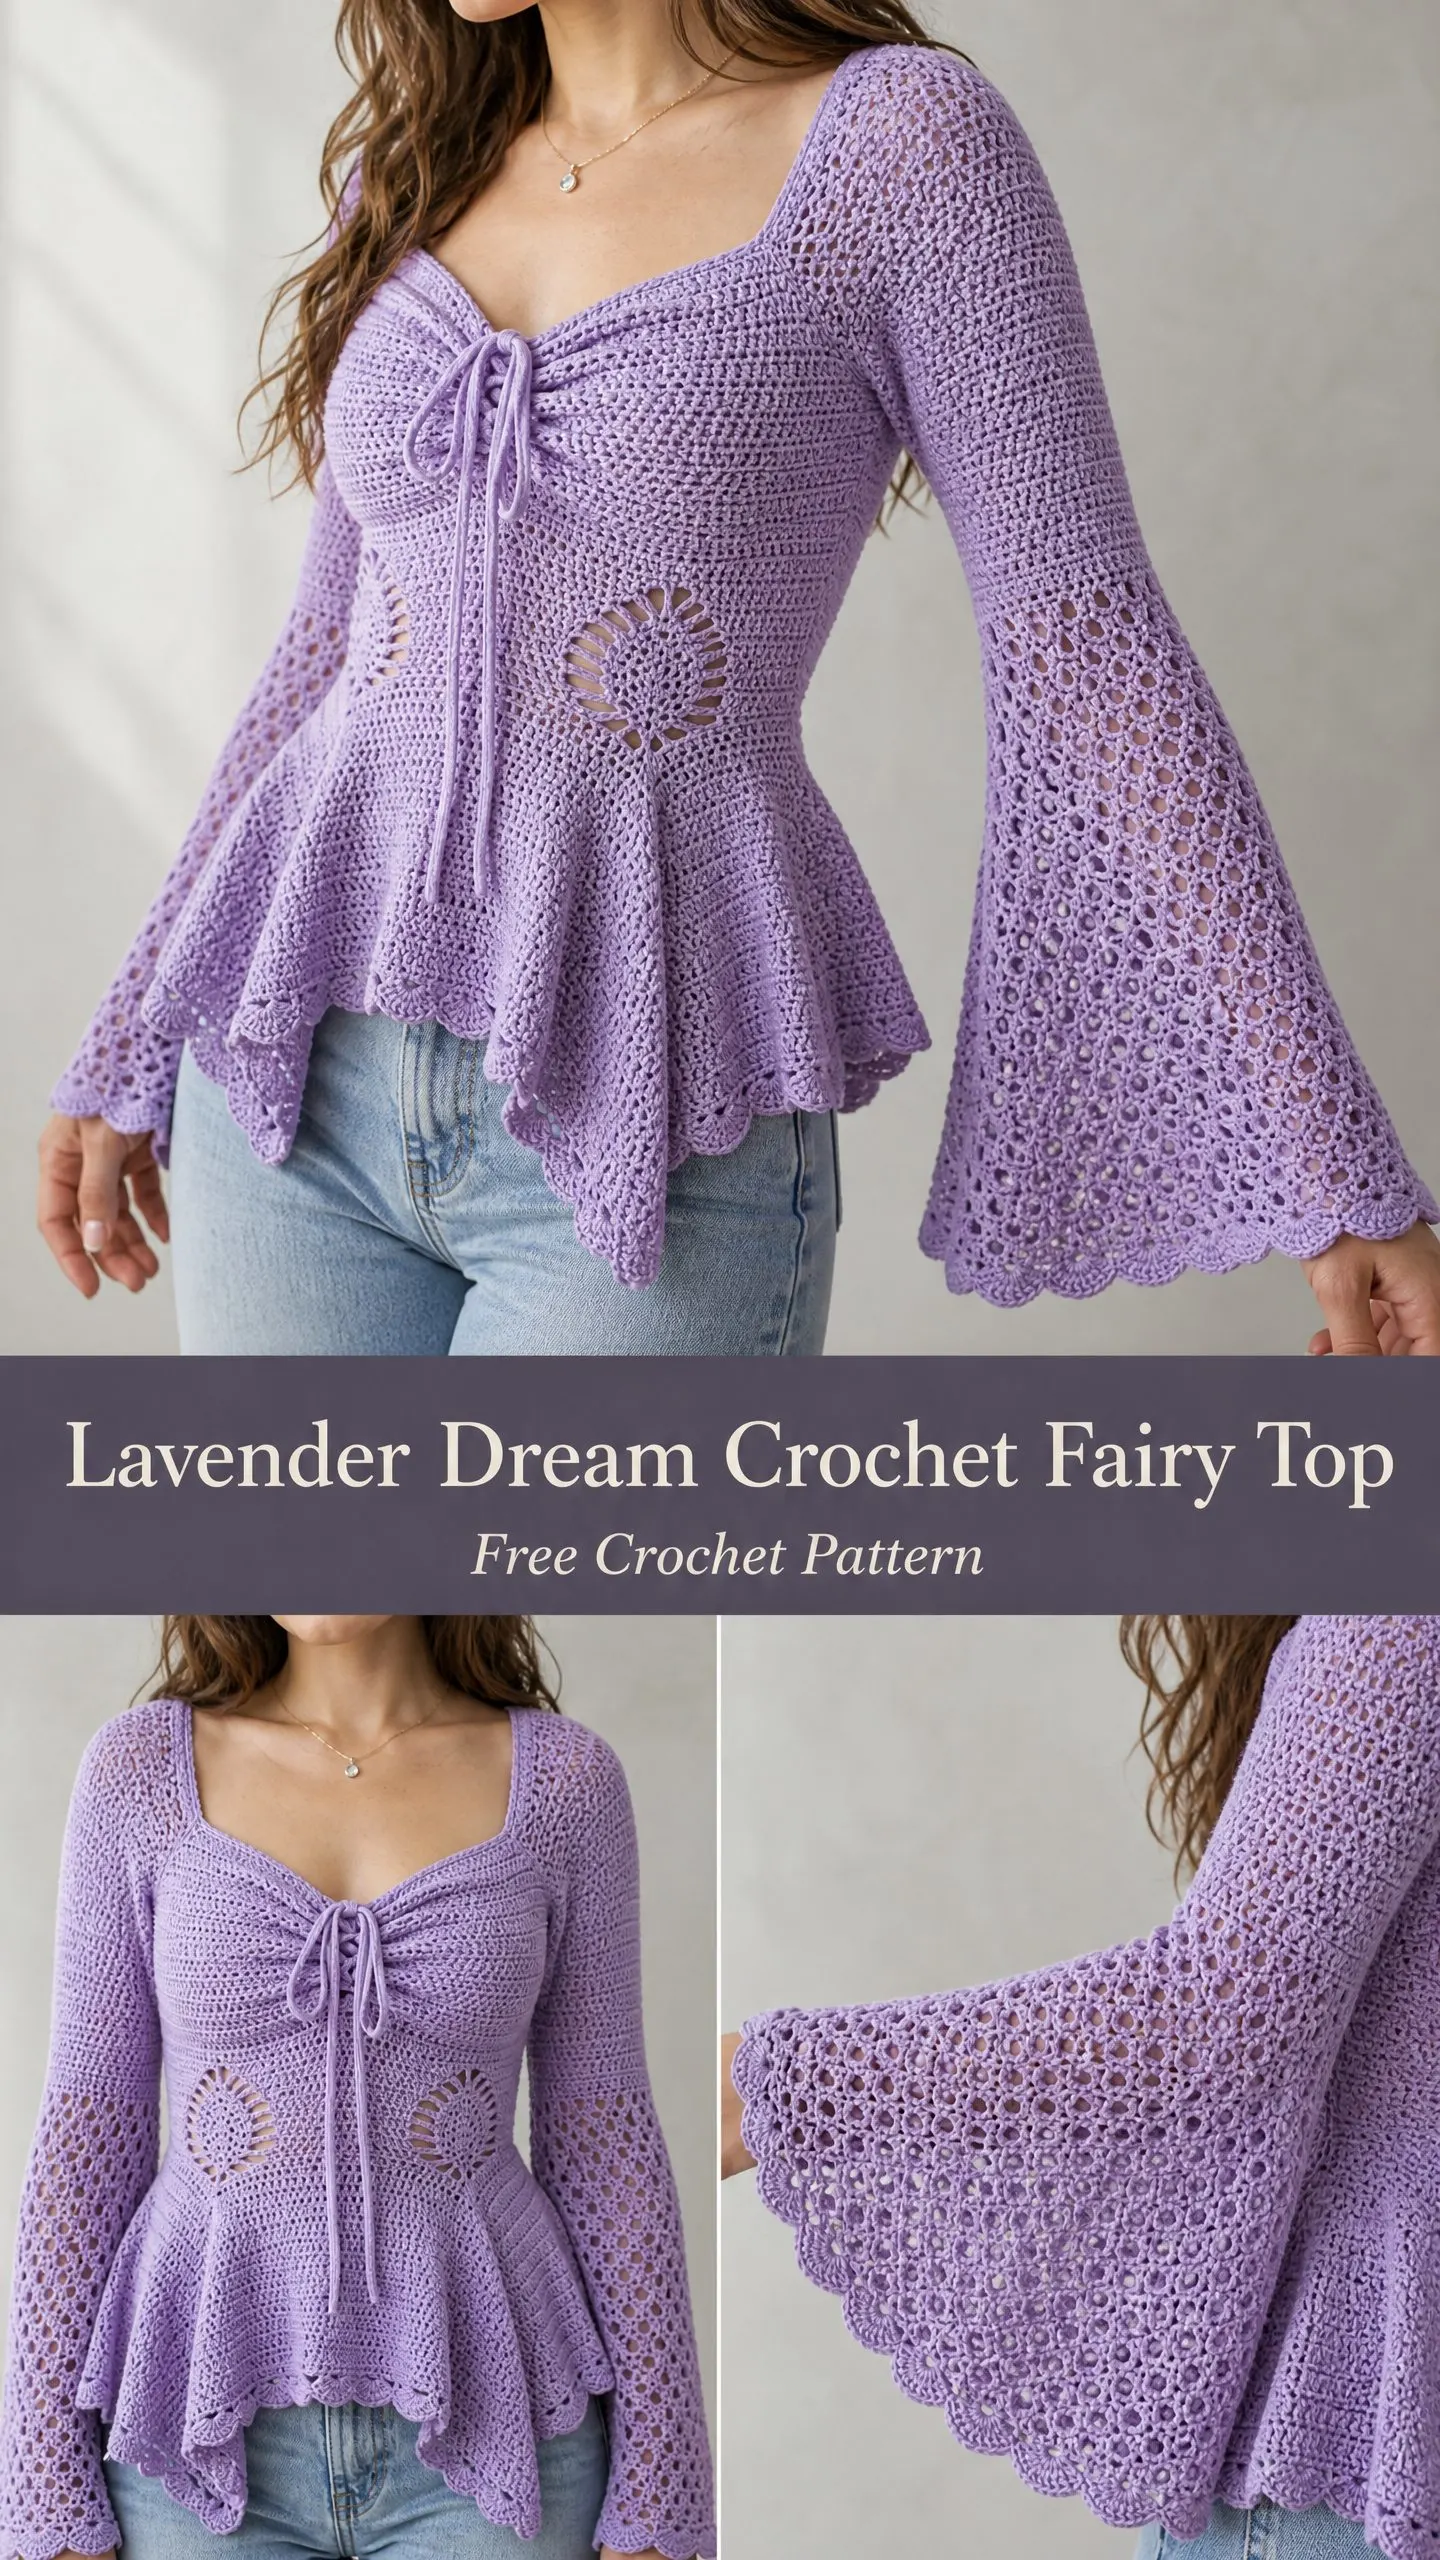
This top has been waiting patiently in my pattern drafts for nearly three years. I kept tweaking the shell motif placement, adjusting the waist shaping, fussing over the sweetheart neckline until it draped just right. Finally, it feels ready to share with you.
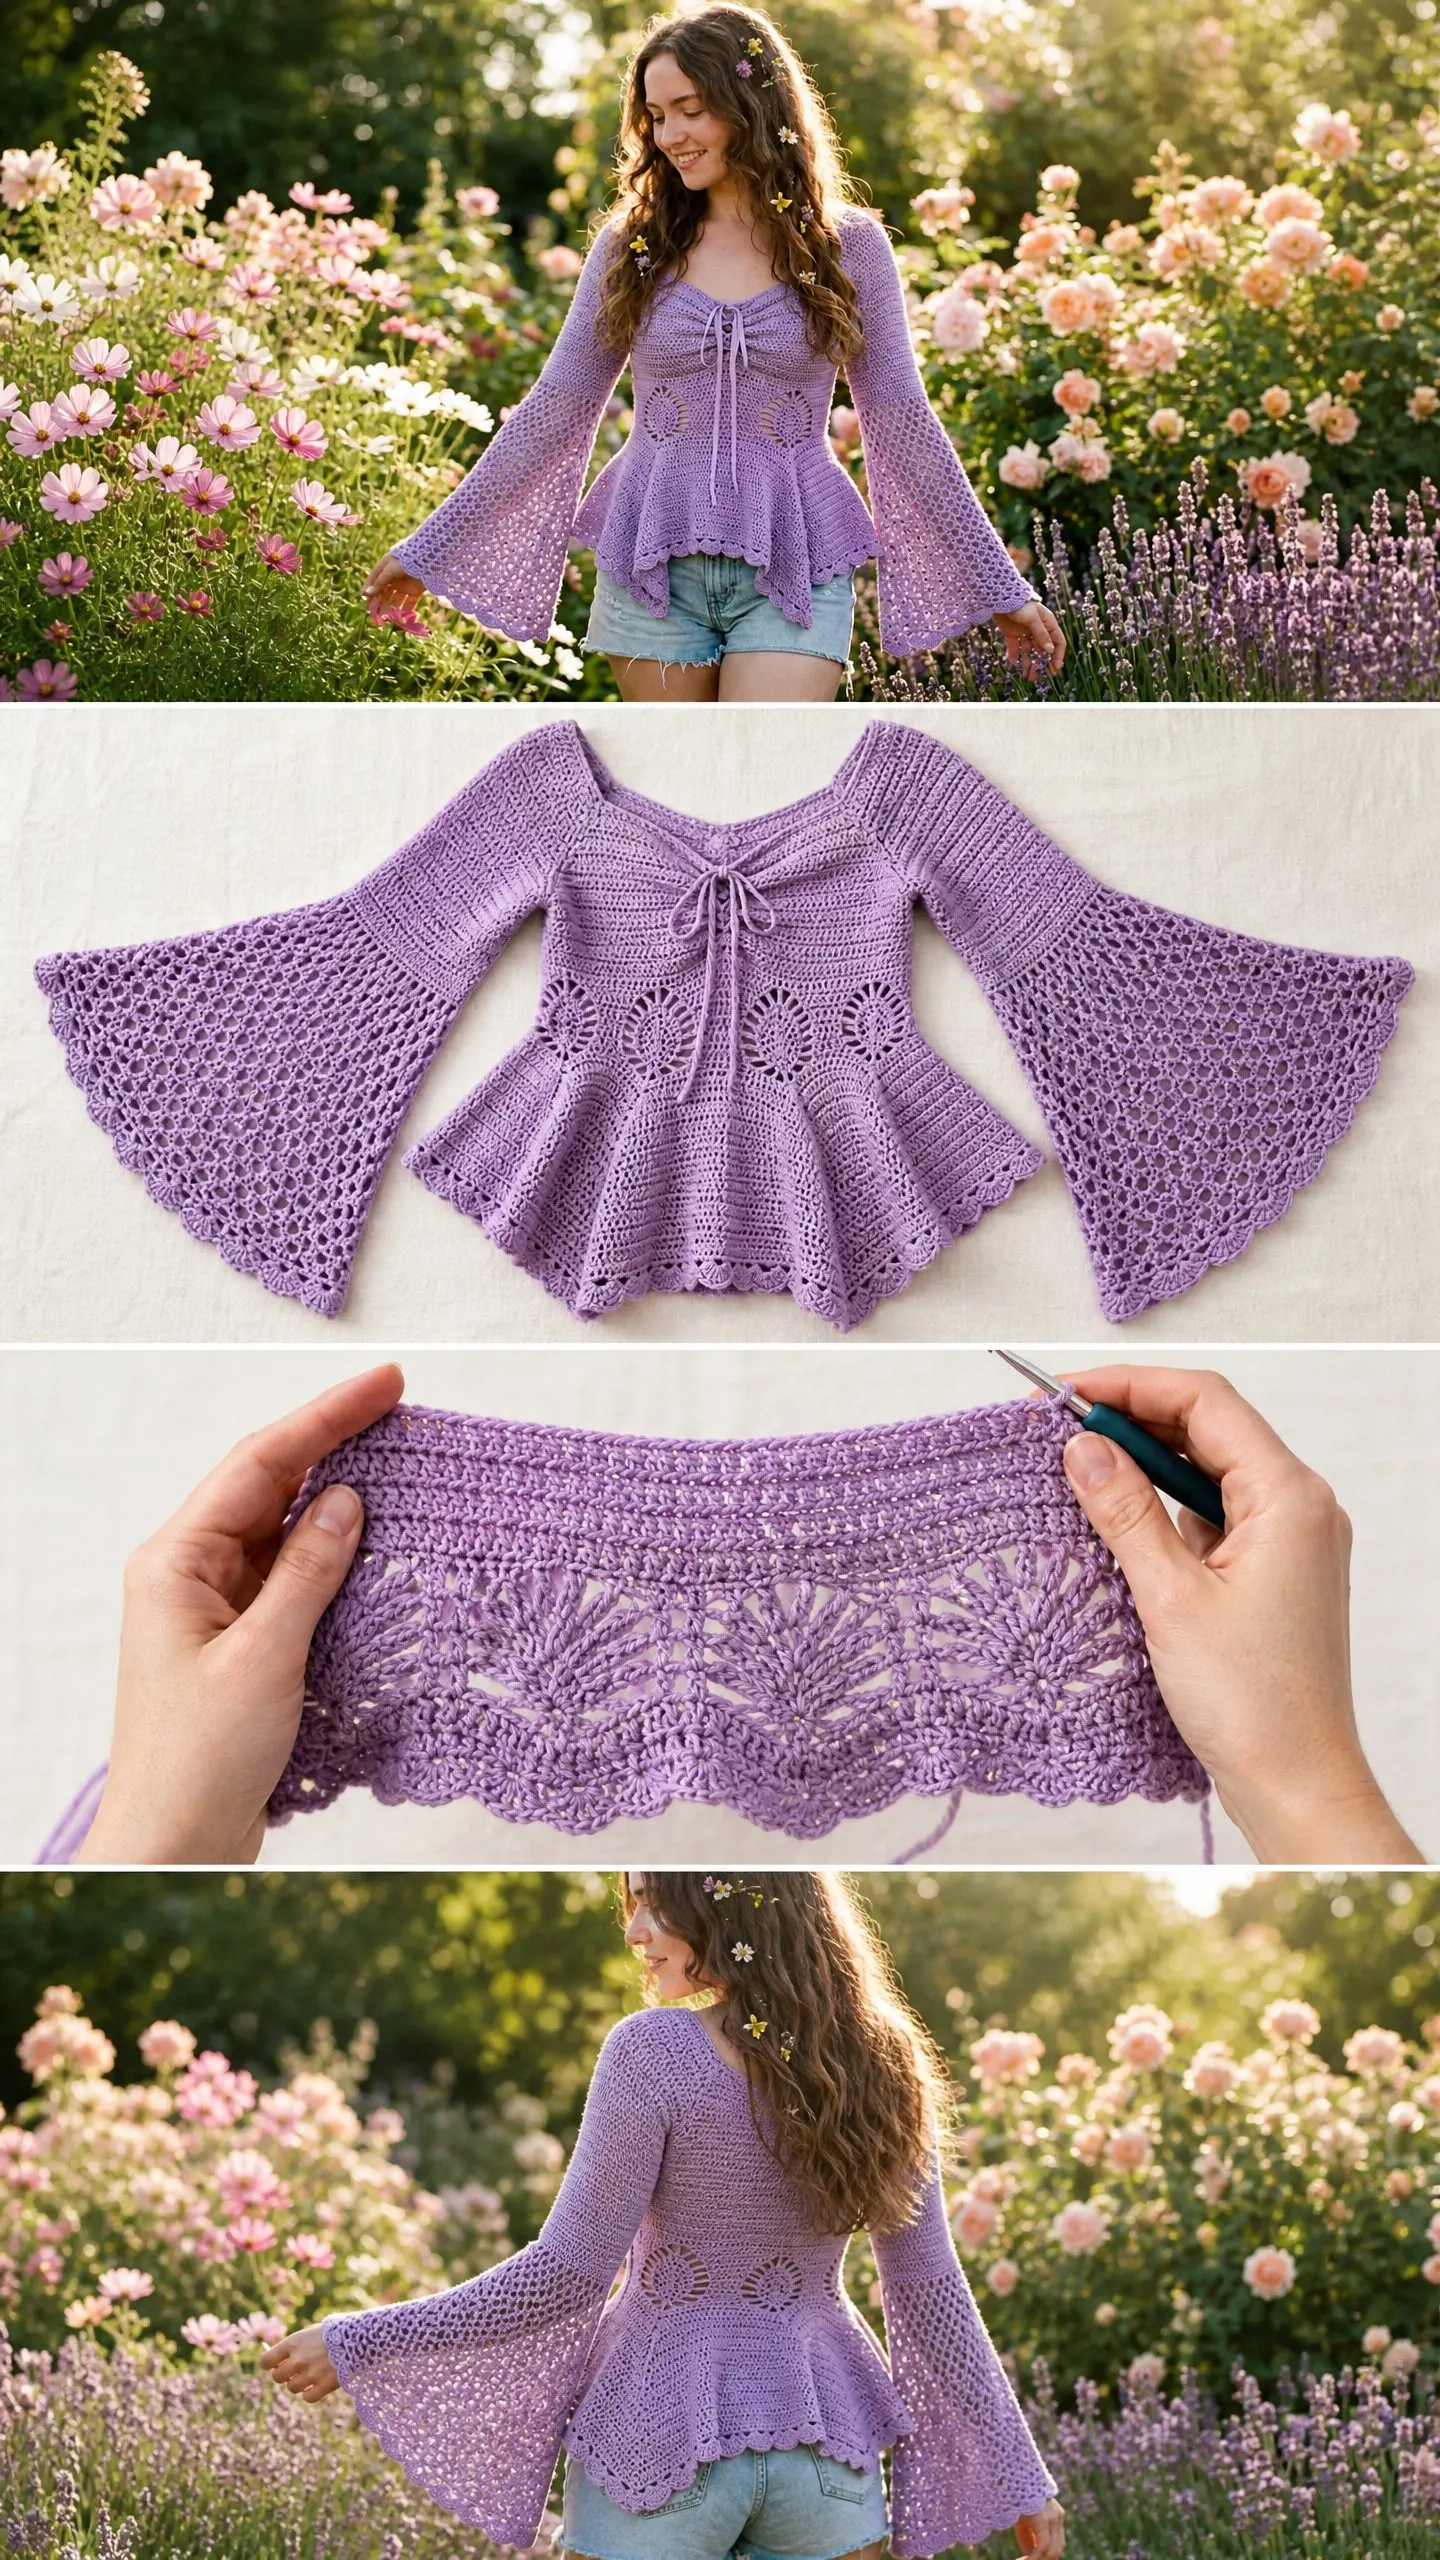
The finished piece is everything I wanted it to be. Romantic bell sleeves, a fitted bodice with that gorgeous center drawstring ruching, and a dramatic peplum that moves like water when you walk. If you have been looking for a statement piece that shows off your crochet skills, this is the one.
About This Bohemian Fairy Top Crochet Pattern
This Lavender Dream Crochet Fairy Top is a bohemian inspired peplum top featuring dramatic bell sleeves, decorative shell motifs, a sweetheart neckline with a center front drawstring, and a scalloped hem. The construction is top down, worked primarily in the round with separate sleeves that get seamed into the armhole openings.
The skill level is advanced intermediate. You will need comfort working in the round, reading stitch repeats, managing multiple construction zones, and understanding shaping logic. If you have made fitted garments before and feel confident with shell stitches, you are ready for this project.
Time estimate: 20 to 30 hours for an experienced crocheter. If this is your first fitted top or your first time working with shell motifs, add about 25 percent more time.
Finished Measurements
This pattern includes five sizes. All instructions are written for size S with changes for XS, M, L, XL in parentheses in the format XS (S, M, L, XL).
Size XS: Bust 32 in / 81 cm, Waist 26 in / 66 cm, Hip/Peplum sweep 44 in / 112 cm, Length (shoulder to hem) 22 in / 56 cm
Size S: Bust 34 in / 86 cm, Waist 28 in / 71 cm, Hip/Peplum sweep 46 in / 117 cm, Length 22.5 in / 57 cm
Size M: Bust 36 in / 91 cm, Waist 30 in / 76 cm, Hip/Peplum sweep 49 in / 124 cm, Length 23 in / 58 cm
Size L: Bust 38 in / 97 cm, Waist 32 in / 81 cm, Hip/Peplum sweep 52 in / 132 cm, Length 23.5 in / 60 cm
Size XL: Bust 40 in / 102 cm, Waist 34 in / 86 cm, Hip/Peplum sweep 55 in / 140 cm, Length 24 in / 61 cm
The finished top has about 2 inches of negative ease at the bust. This is achieved through the snug half double crochet bodice combined with the drawstring ruching.
Materials Needed
Yarn: Approximately 900 (950, 1050, 1150, 1250) yards / 823 (869, 960, 1052, 1143) meters of DK weight yarn (CYCA 3) in lavender
Hook: US size E-4 / 3.5 mm, or size needed to obtain gauge
Notions:
Yarn Suggestions
Paintbox Yarns Cotton DK (100% cotton; 273 yd / 250 m per 100 g skein). Use colorway Bluebell or Lilac. This yarn gives excellent stitch definition for the shell motifs and holds its shape after blocking. You will need 4 (4, 4, 5, 5) skeins.
Drops Safran (70% cotton, 30% viscose; 175 yd / 160 m per 50 g ball). The subtle sheen enhances the fairy aesthetic beautifully. You will need 6 (6, 7, 8, 8) balls.
WeCrochet Comfy DK (75% pima cotton, 25% acrylic; 230 yd / 210 m per 100 g skein). Soft and forgiving for beginners to DK lace work. You will need 4 (5, 5, 6, 6) skeins.
Substitution note: Choose a smooth, plied DK yarn with good stitch definition. Avoid overly fluffy or hairy fibers, which will obscure the open shell and mesh stitch work. Cotton or cotton blend yarns are strongly recommended for drape and breathability.
Gauge
18 stitches and 10 rows = 4 in / 10 cm in half double crochet worked in the round, after blocking.
Shell gauge: 1 complete 5-dc shell repeat (including chain-2 space and flanking single crochet) = approximately 1.5 in / 3.8 cm wide.
Always make a gauge swatch. A difference of even half a stitch per inch will affect fit significantly in a tailored top like this one.
Abbreviations (US Terms)
Special Stitches
Shell Stitch (Shell): Work 5 dc all into the same stitch or chain space. This creates a fan or shell shape used in the lower bodice motif panel and peplum.
Half Shell: Work 3 dc all into the same stitch or chain space. Used at the beginning and end of shell rows at edges.
Scallop Edge: Work (sc, ch 2, 3 dc) all into the same stitch or chain space, skip 2 sts, repeat across. This creates the decorative scalloped hem on the peplum and sleeve bells.
Puff Stitch (Puff): Yo, insert hook into stitch, draw up a loop to height of a dc. Yo, insert hook into same stitch, draw up a loop. Yo, insert hook into same stitch, draw up a loop. Yo, draw through all 7 loops on hook. Ch 1 to close. This creates the raised fan center of the waist motif panel.
Mesh Stitch (Mesh): (Dc, ch 1, skip 1 st) across or around. Used in the bell sleeve body.
V-Stitch: (Dc, ch 2, dc) all into the same stitch or chain space. Used in the peplum transition.
Shell Motif Panel: This is worked flat or in rounds and used in the lower bodice and peplum base.
Row/Rnd A: Ch 1, sc in first st, (ch 2, skip 2 sts, Shell in next st, ch 2, skip 2 sts, sc in next st) across/around.
Row/Rnd B: Ch 3 (counts as dc), 2 dc in same sc (half-shell), (ch 2, sc in center dc of Shell, ch 2, Shell in next sc) across; end ch 2, sc in center dc of last Shell, ch 2, half-shell in last sc.
Row/Rnd C: Ch 1, sc in first st, (ch 2, Shell in next sc, ch 2, sc in center dc of next Shell) across; end sc in last sc.
Repeat Rows/Rnds B and C for pattern.
Important Pattern Notes Before You Begin
The top is constructed in four main sections: the Sweetheart Bodice (worked flat from the center front outward then joined in the round), the Waist Band (worked in the round with a shell motif accent panel), the Peplum (worked in the round with increases and shell motif), and the Bell Sleeves (worked separately from the upper arm downward to the bell, then seamed into armhole openings).
All stitch counts assume the standard 6-stitch shell repeat unit: sc + ch 2 + Shell + ch 2 = 6 stitches consumed, producing one complete motif unit.
The sweetheart neckline is achieved by working two bodice cups separately and then joining them.
The drawstring is threaded through a chain-space eyelet row at the center-front bust.
When working in the round, do not turn unless specified. When working flat, turn at the end of every row.
The scallop edging is always worked on the right side.
Read all shaping notes for your size before beginning.
Pattern Instructions
Section 1: Right Bodice Cup (Worked Flat)
The bodice is worked as two mirror-image cups, joined at the center front, then worked in the round.
Foundation: Ch 19 (21, 23, 25, 27).
Row 1 (WS): Hdc in 3rd ch from hook and in each ch across. Turn.
XS: 17 hdc. S: 19 hdc. M: 21 hdc. L: 23 hdc. XL: 25 hdc.
Row 2 (RS): Ch 2 (does not count as st throughout bodice section), hdc in each st across. Turn.
XS: 17 hdc. S: 19 hdc. M: 21 hdc. L: 23 hdc. XL: 25 hdc.
Rows 3 to 4: Repeat Row 2.
End of Row 4: 17 (19, 21, 23, 25) hdc.
Row 5 (RS, inner curve shaping): Ch 2, hdc2tog, hdc to last 2 sts, hdc2tog. Turn.
15 (17, 19, 21, 23) hdc.
Row 6: Ch 2, hdc across. Turn.
15 (17, 19, 21, 23) hdc.
Row 7: Ch 2, hdc2tog, hdc to last 2 sts, hdc2tog. Turn.
13 (15, 17, 19, 21) hdc.
Row 8: Ch 2, hdc across. Turn.
13 (15, 17, 19, 21) hdc.
Rows 9 to 12: Repeat Row 2 four times.
End of Row 12: 13 (15, 17, 19, 21) hdc.
Do not fasten off. Set aside. This is the Right Cup.
Checkpoint: The right bodice cup should measure approximately 3.5 in / 9 cm wide and 5 in / 13 cm tall at the outer edge (5.5 in / 14 cm including the curved dip).
Section 2: Left Bodice Cup (Worked Flat)
Repeat Rows 1 to 12 of Section 1 exactly. Fasten off at end of Row 12. This is the Left Cup.
Section 3: Joining Cups and Working Bodice in the Round
With RS facing, place the Left Cup with its foundation edge (bottom) facing down and its live stitches (top of Row 12) at the top. Rejoin yarn at the right edge of Left Cup, Row 12.
Join Row: Ch 2. Hdc across Left Cup top (13 (15, 17, 19, 21) sts). At the center front, ch 2 (this creates the center drawstring gap; skip the ch-2 space when you return). Hdc across Right Cup top (13 (15, 17, 19, 21) sts). Continue around the back by chaining the back width.
Back width chain: After the right cup, ch 25 (27, 29, 31, 33) and sl st to top of Left Cup row-12 first hdc to join in the round. You now have a joined loop.
Rnd 1 (joining rnd): Ch 2, hdc across Left Cup (13 (15, 17, 19, 21) hdc), ch 2, hdc across Right Cup (13 (15, 17, 19, 21) hdc), hdc in each ch of back chain (25 (27, 29, 31, 33) hdc), sl st to top of first hdc of rnd to join.
Total: 54 (60, 66, 72, 78) sts including ch-2 gap counted as 2 sts.
The ch-2 at center front is a drawstring eyelet. Treat the 2 chains as 2 sts in all subsequent stitch counts.
Rnd 2: Ch 2, hdc in each st around, hdc in each ch of the drawstring ch-sp. Join. 54 (60, 66, 72, 78) hdc.
Rnds 3 to 8: Ch 2, hdc in each st around. Join.
End of Rnd 8: 54 (60, 66, 72, 78) hdc.
Checkpoint: After Section 3, the bodice tube should measure approximately 6 in / 15 cm tall from the joining row.
Section 4: Armhole Shaping and Separation
At the end of Rnd 8, you will mark and set aside armhole stitches. Place markers as follows:
For all sizes, the armhole spans 9 (9, 10, 10, 11) sts on each side.
Front panel: 18 (21, 23, 26, 28) sts.
Back panel: 18 (21, 23, 26, 28) sts.
Each armhole: 9 (9, 10, 10, 11) sts.
Rnd 9 (armhole setup): Ch 2, hdc across front 18 (21, 23, 26, 28) sts, ch 6 (6, 7, 7, 8) (armhole bridge chain, skip 9 (9, 10, 10, 11) sts for right armhole), hdc across back 18 (21, 23, 26, 28) sts, ch 6 (6, 7, 7, 8) (armhole bridge chain, skip 9 (9, 10, 10, 11) sts for left armhole), join to first hdc.
XS: 48 sts. S: 54 sts. M: 60 sts. L: 66 sts. XL: 72 sts.
Rnd 10: Ch 2, hdc in each hdc and in each ch around. Join.
XS: 48 hdc. S: 54 hdc. M: 60 hdc. L: 66 hdc. XL: 72 hdc.
Mark the center stitch of each bridge ch with a stitch marker. The sleeves will be attached here later.
Section 5: Waist Shaping
Rnds 11 to 14: Ch 2, hdc in each st around. Join.
End of Rnd 14: 48 (54, 60, 66, 72) hdc.
Rnd 15 (waist decrease rnd): Ch 2, (hdc in next 10 (11, 13, 14, 16) sts, hdc2tog) 4 times. Join.
XS: 44 hdc. S: 50 hdc. M: 56 hdc. L: 62 hdc. XL: 68 hdc.
Rnd 16: Ch 2, hdc in each st around. Join.
44 (50, 56, 62, 68) hdc.
Rnd 17 (waist decrease rnd): Ch 2, (hdc in next 9 (10, 12, 13, 15) sts, hdc2tog) 4 times. Join.
XS: 40 hdc. S: 46 hdc. M: 52 hdc. L: 58 hdc. XL: 64 hdc.
Rnds 18 to 20: Ch 2, hdc in each st around. Join.
End of Rnd 20: 40 (46, 52, 58, 64) hdc.
Checkpoint: After Rnd 20, your piece should measure approximately 10 in / 25 cm from the joining row.
Section 6: Shell Motif Waist Accent Panel
This section works 2 rounds of shell motif at the waist before the peplum increase begins. The stitch count must be divisible by 6 for the shell repeat.
Rnd 21 (adjustment rnd): Ch 2, hdc around, working 2 inc evenly spaced. Join.
42 (48, 54, 60, 66) hdc.
Rnd 22 (Shell Motif Panel, Row A): Ch 1, sc in first st, (ch 2, skip 2 sts, Shell in next st, ch 2, skip 2 sts, sc in next st) around. Join to first sc.
7 (8, 9, 10, 11) Shell repeats.
Rnd 23 (Shell Motif Panel, Row B): Sl st into ch-2 sp, ch 3 (counts as first dc), 2 dc in same ch-2 sp (half-shell), (ch 2, sc in center dc of next Shell, ch 2, Shell in next sc) around, end ch 2, sc in center dc of last Shell, ch 2, sl st to top of ch-3. Join.
7 (8, 9, 10, 11) full Shells plus 1 half-shell at beg.
Rnd 24 (Shell Motif Panel, Row C): Ch 1, sc in first dc (top of ch-3 beg), (ch 2, Shell in next sc, ch 2, sc in center dc of next Shell) around. Join to first sc.
7 (8, 9, 10, 11) Shell repeats.
Rnd 25: Ch 2, hdc into each dc, each ch, and each sc around, treating each ch-2 sp as 2 sts. Join.
42 (48, 54, 60, 66) hdc.
Section 7: Peplum
The peplum is worked in rounds with increases that flare the fabric dramatically into the bell shape. Increases are worked on alternate rounds to create a smooth, gradual flare.
Rnd 26 (inc rnd): Ch 2, (hdc in next 5 sts, inc in next st) 7 (8, 9, 10, 11) times. Join.
49 (56, 63, 70, 77) hdc.
Rnd 27: Ch 2, hdc around. Join.
49 (56, 63, 70, 77) hdc.
Rnd 28 (inc rnd): Ch 2, (hdc in next 6 sts, inc in next st) 7 (8, 9, 10, 11) times. Join.
56 (64, 72, 80, 88) hdc.
Rnd 29: Ch 2, hdc around. Join.
56 (64, 72, 80, 88) hdc.
Rnd 30 (inc rnd): Ch 2, (hdc in next 7 sts, inc in next st) 7 (8, 9, 10, 11) times. Join.
63 (72, 81, 90, 99) hdc.
Rnd 31 (adjustment and inc rnd):
XS: Ch 2, hdc around, inc 3 sts evenly. 66 hdc.
S: Ch 2, hdc around, inc 6 sts evenly. 78 hdc.
M: Ch 2, hdc around, inc 3 sts evenly. 84 hdc.
L: Ch 2, hdc around, inc 6 sts evenly. 96 hdc.
XL: Ch 2, hdc around, inc 9 sts evenly. 108 hdc.
Rnd 32: Ch 2, hdc around. Join.
66 (78, 84, 96, 108) hdc.
Rnd 33 (inc rnd):
XS: (hdc in next 10 sts, inc) 6 times. 72 hdc.
S: (hdc in next 12 sts, inc) 6 times. 84 hdc.
M: (hdc in next 13 sts, inc) 6 times. 90 hdc.
L: (hdc in next 15 sts, inc) 6 times. 102 hdc.
XL: (hdc in next 17 sts, inc) 6 times. 114 hdc.
Rnd 34: Ch 2, hdc around. Join.
72 (84, 90, 102, 114) hdc.
Rnd 35 (inc to final peplum shell count):
XS: (hdc in next 11 sts, inc) 6 times. 78 hdc.
S: (hdc in next 13 sts, inc) 6 times. 90 hdc.
M: (hdc in next 14 sts, inc) 6 times. 96 hdc.
L: (hdc in next 16 sts, inc) 6 times. 108 hdc.
XL: (hdc in next 18 sts, inc) 6 times. 120 hdc.
Rnd 36: Ch 2, hdc around. Join.
78 (90, 96, 108, 120) hdc.
Rnd 37 (Shell Motif Row A): Ch 1, sc in first st, (ch 2, skip 2 sts, Shell in next st, ch 2, skip 2 sts, sc in next st) around. Join to first sc.
13 (15, 16, 18, 20) Shell repeats.
Rnd 38 (Shell Motif Row B): Sl st into ch-2 sp, ch 3, 2 dc in same sp, (ch 2, sc in center dc of next Shell, ch 2, Shell in next sc) around, end ch 2, sc in center dc of last Shell, ch 2, sl st to top of ch-3. Join.
Rnd 39 (Shell Motif Row C): Ch 1, sc in first dc, (ch 2, Shell in next sc, ch 2, sc in center dc of next Shell) around. Join.
Rnd 40 (Shell Motif Row B again): Repeat Row B as worked in Rnd 38.
Rnd 41 (Scallop Edge): Sl st to center dc of first Shell, ch 1, sc in same dc, (ch 2, skip to next ch-2 sp, work (sc, ch 2, 3 dc) in sc, ch 2, sc in center dc of next Shell) around. Join to first sc. Fasten off and weave in end.
Checkpoint: After the peplum scallop edge, the total length from shoulder to hem should be approximately 14 to 15 in / 36 to 38 cm. The peplum should fan dramatically and measure 44 (49, 52, 58, 63) in / 112 (124, 132, 147, 160) cm at its widest sweep.
Section 8: Bell Sleeves (Make 2)
The sleeves are worked top-down from the armhole opening downward to the bell and scallop edge.
Join yarn to center bridge chain stitch of armhole. Ch 2.
Rnd 1 (pick up armhole sts): Hdc evenly around armhole opening, working into each hdc and each ch. Join.
XS: 15 hdc. S: 15 hdc. M: 17 hdc. L: 17 hdc. XL: 19 hdc.
Rnds 2 to 4: Ch 2, hdc in each st around. Join.
End of Rnd 4: 15 (15, 17, 17, 19) hdc.
Rnd 5 (inc rnd): Ch 2, (hdc in next 2 sts, inc) across, hdc in rem sts. Join.
20 (20, 22, 22, 25) hdc.
Rnds 6 to 8: Ch 2, hdc around. Join.
End of Rnd 8: 20 (20, 22, 22, 25) hdc.
Rnd 9 (inc rnd): Ch 2, (hdc in next 3 sts, inc) across, hdc in rem sts. Join.
25 (25, 27, 27, 30) hdc.
Rnds 10 to 12: Ch 2, hdc around. Join.
End of Rnd 12: 25 (25, 27, 27, 30) hdc.
Continue with mesh stitch section for the bell body, then finish with scallop edging to match the peplum hem.
Finishing Your Lavender Dream Top
Block your finished top gently using your blocking mat and pins. Lay flat, shape the peplum into a smooth circle, and allow to dry completely.
Thread your satin ribbon or I-cord through the center front ch-2 eyelet at the bust. Tie in a bow and adjust the ruching to your preference.
Weave in all remaining ends securely.
Tips for Success with This Crochet Pattern
Take your time with the bodice cups. Getting the shaping right here sets up the entire fit of the top.
Use stitch markers generously, especially when tracking your shell repeats.
Try the top on as you go if possible. The waist shaping section is a good checkpoint to ensure the fit is working for your body.
Block your gauge swatch before measuring. DK cotton yarns can relax significantly after blocking.
Thank you so much for choosing this pattern. I truly hope your Lavender Dream top turns out as magical as you imagined. If you make one, I would absolutely love to see it! Tag me on Instagram or share a photo in my Facebook group.
If you loved this bohemian fairy top crochet pattern, go ahead and save it to your Pinterest boards so you can find it when you are ready to start. And please drop a comment below if you give it a try. I read every single one and they honestly make my day.
