
You know that gorgeous skein of fingering weight cotton sitting in your stash? The one you’ve been saving for "something special"? This is the project it’s been waiting for.
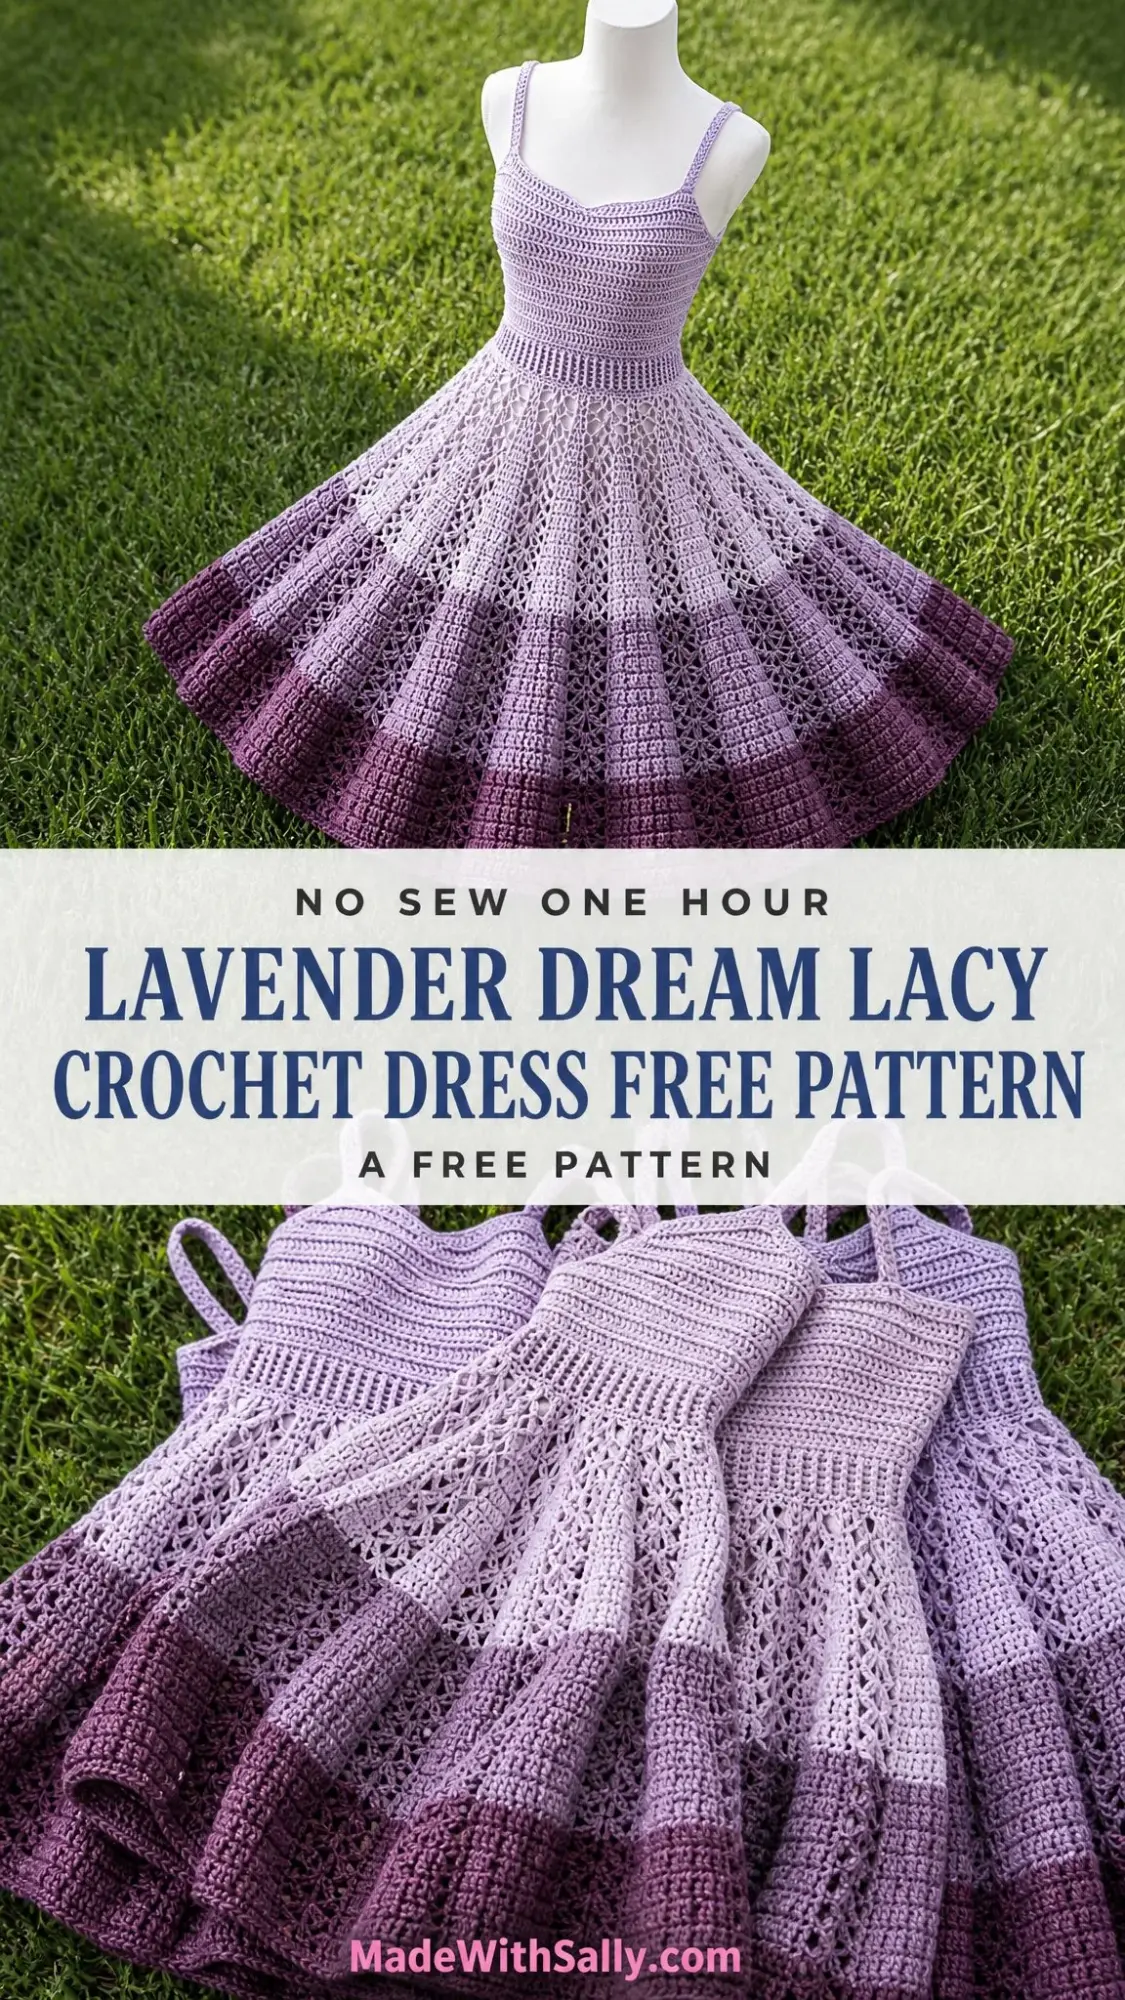
The Lavender Dream dress combines a fitted sweetheart bodice with a dramatically flared skirt that moves like a dream. The construction is genuinely interesting. You’ll work flat pieces for the bodice cups, join them to create that romantic neckline dip, then transition into rounds that flow all the way down to the hem. Three distinct stitch textures create visual panels across the skirt, and the ombre color shift from pale lilac to deep plum happens naturally as you work.
I’ll be honest with you. This is an intermediate to advanced project that takes real time and attention. We’re talking 60 to 90 hours of crochet. But if you’ve been wanting to challenge yourself with a true statement garment, something you’ll wear for years and feel amazing in, keep reading. I’ll walk you through every single step.
About This Crochet Dress Pattern
This top-down crochet dress tutorial creates a wearable work of art. The finished piece fits US dress sizes 4 to 8, with a 34-inch bust, 28-inch waist, and approximately 38 inches of total length from bodice to hem.
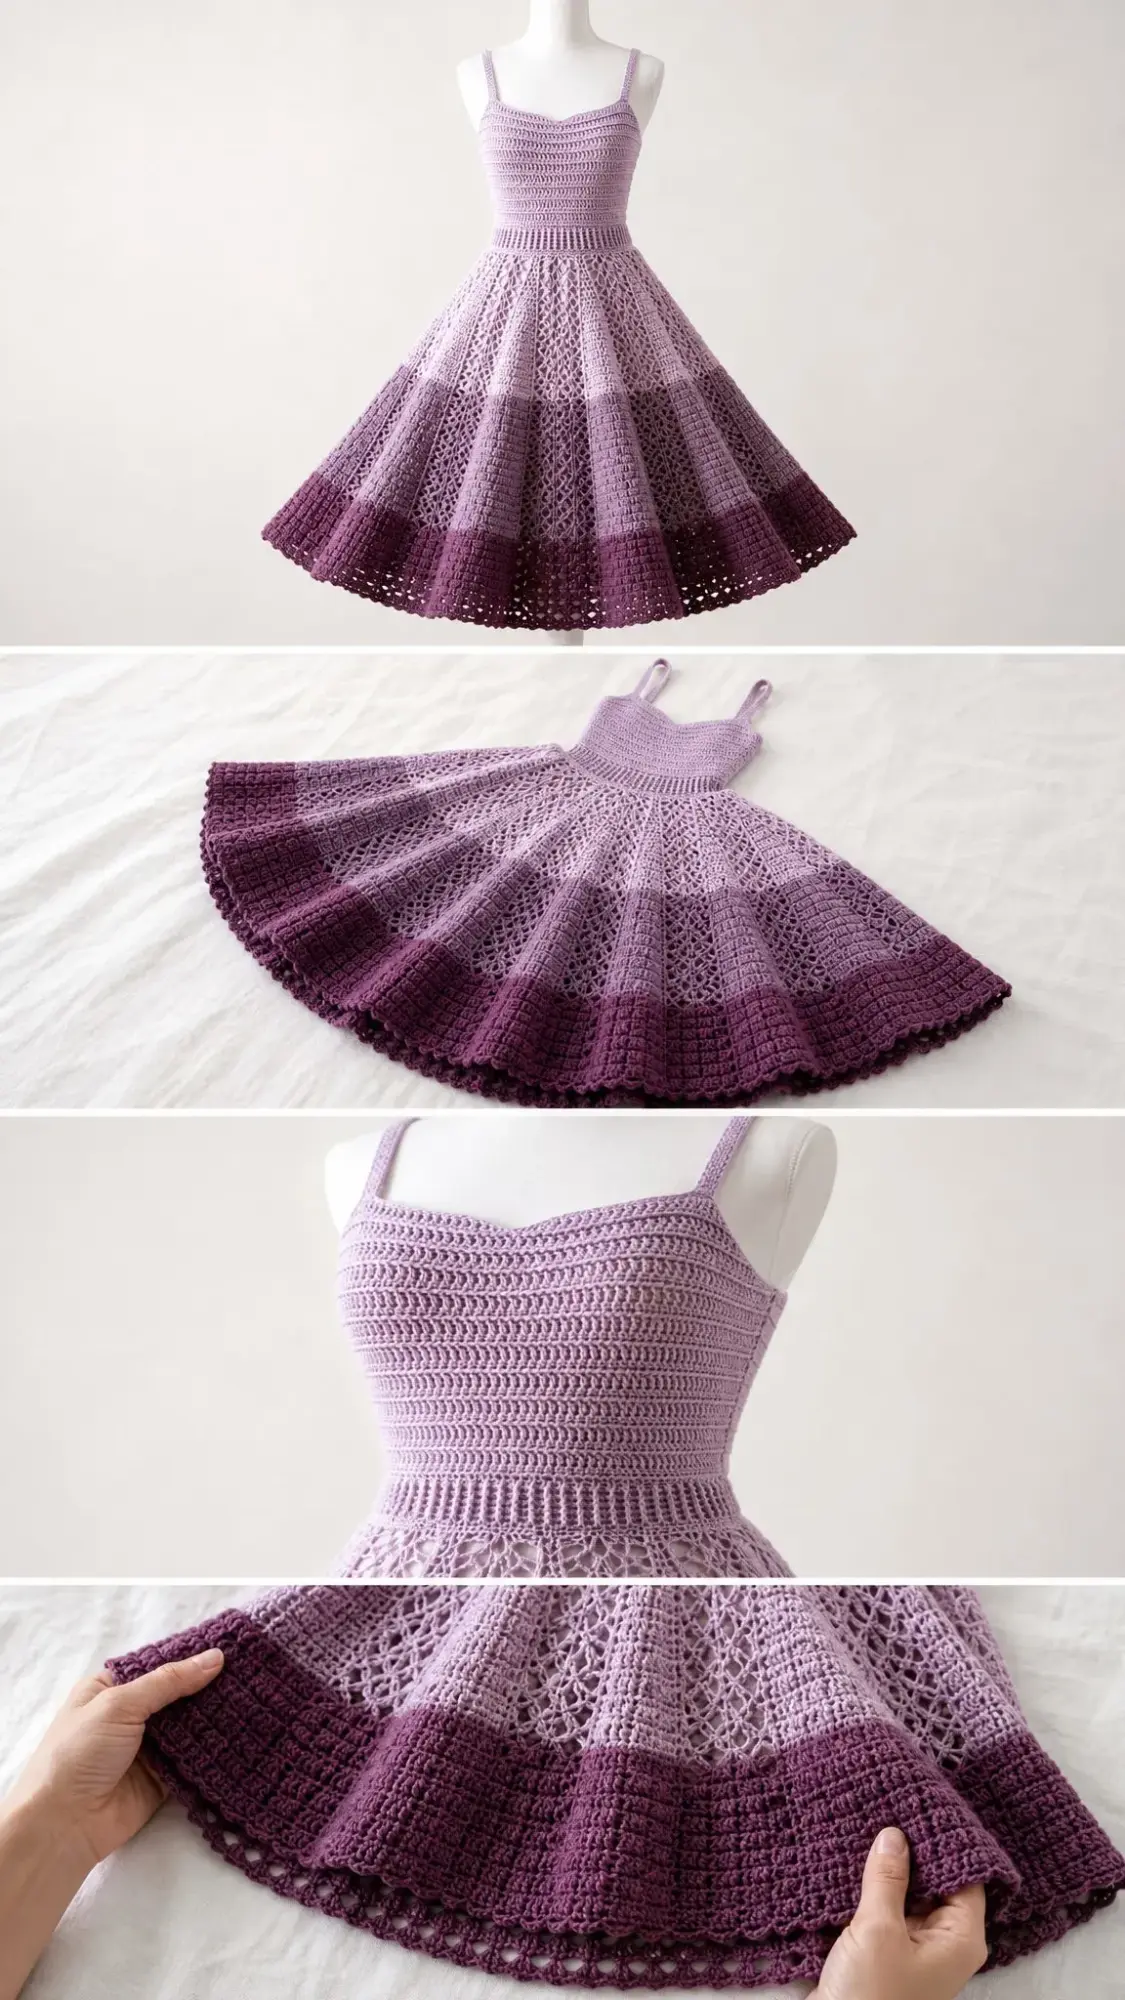
The magic of this design lies in its three-panel skirt construction. Panel 1 features lace fan stitches that open up beautifully when blocked. Panel 2 showcases diamond lace for an airy, romantic look. Panel 3 uses basket weave texture in the deepest plum shade, grounding the whole piece with visual weight at the hem.
What makes this dress special: The sweetheart neckline is created by working two separate cup sections flat, then joining them at a center point to create that signature dip. Spaghetti straps are added last, so you can customize the length perfectly for your body.
Materials You’ll Need
Yarn: Fingering weight yarn (CYCA 1) in three colors
Recommended Yarn Options:
1. Cascade Yarns Ultra Pima Fine (100% pima cotton, 218 yards per 50g skein). Purchase 3 skeins of Color A, 4 skeins of Color B, and 4 skeins of Color C.
2. Paintbox Yarns Cotton 4 Ply (100% cotton, 186 yards per 50g). A budget-friendly option with excellent color range.
3. Lion Brand Coboo (50% cotton, 50% bamboo) offers lovely sheen and drape in lilac shades.
Important substitution note: Choose yarn with low elasticity like cotton, cotton-bamboo blends, or linen blends. Avoid purely acrylic or wool yarns. They won’t provide the structured drape this dress needs.
Hooks:
Notions:
Gauge (Please Don’t Skip This)
With Color A and US B-1 / 2.25 mm hook:
Lace panel gauge with US C-2 / 2.75 mm hook:
Gauge is critical for this fitted garment. Work a swatch, wash it, block it, then measure. This step saves heartache later, I promise.
Abbreviations and Stitch Definitions
Let me walk you through every stitch you’ll need:
Special Stitches Explained
Shell Stitch: Work 5 double crochets into the same stitch or chain space. This creates a fan shape.
V-Stitch: Work (1 dc, ch 2, 1 dc) all into the same stitch. The chain-2 forms the center of the V.
Lace Fan Stitch: Skip 2 stitches, work 5 dc into the next stitch, skip 2 stitches, work 1 sc into the next stitch. This 6-stitch unit creates one lace fan repeat with the single crochet acting as the anchor between fans.
Basket Weave Stitch: Worked in alternating groups of front post and back post double crochets. On Group A rounds, work (FPdc, FPdc, FPdc, FPdc) over 4 stitches, then (BPdc, BPdc, BPdc, BPdc) over the next 4 stitches, alternating across. On Group B rounds, reverse the pattern to create the woven appearance.
Picot Stitch: Work 1 sc into the stitch, ch 3, sl st back into the first ch of the ch-3. This creates a small decorative loop at the hem.
Ribbing: Worked as BLO sc throughout. Working into the back loop only creates stretchy texture.
Step-by-Step Instructions
Section 1: Bodice Front Cup (Right Cup)
Using Color A and US B-1 / 2.25 mm hook, work flat.
Foundation: Ch 43.
Row 1 (RS): Sc in 2nd ch from hook and in each ch across. Turn. (42 sc)
Row 2 (WS): Ch 1, sc in each st across. Turn. (42 sc)
Row 3 (RS): Ch 1, sc in each st across. Turn. (42 sc)
Rows 4 through 8: Repeat Row 2. Turn after each row. (42 sc each row)
Row 9 (RS, begin upper curve shaping): Ch 1, sc2tog over first 2 sts, sc in each st to last 2 sts, sc2tog. Turn. (40 sc)
Row 10 (WS): Ch 1, sc in each st across. Turn. (40 sc)
Row 11 (RS): Ch 1, sc2tog, sc to last 2 sts, sc2tog. Turn. (38 sc)
Row 12 (WS): Ch 1, sc in each st across. Turn. (38 sc)
Row 13 (RS): Ch 1, sc2tog, sc to last 2 sts, sc2tog. Turn. (36 sc)
Row 14 (WS): Ch 1, sc in each st across. Turn. (36 sc)
Row 15 (RS): Ch 1, sc2tog, sc to last 2 sts, sc2tog. Turn. (34 sc)
Row 16 (WS): Ch 1, sc in each st across. Turn. (34 sc)
Row 17 (RS): Ch 1, sc2tog, sc to last 2 sts, sc2tog. Turn. (32 sc)
Row 18 (WS): Ch 1, sc in each st across. Turn. (32 sc)
Do not fasten off. Place a locking stitch marker in the last stitch. Set the Right Cup aside.
Section 2: Bodice Front Cup (Left Cup)
Using Color A and US B-1 / 2.25 mm hook, work flat.
Foundation: Ch 43.
Row 1 (RS): Sc in 2nd ch from hook and in each ch across. Turn. (42 sc)
Rows 2 through 8: Ch 1, sc across. Turn. (42 sc each row)
Row 9 (RS): Ch 1, sc2tog, sc to last 2 sts, sc2tog. Turn. (40 sc)
Row 10 (WS): Ch 1, sc across. Turn. (40 sc)
Row 11 (RS): Ch 1, sc2tog, sc to last 2 sts, sc2tog. Turn. (38 sc)
Row 12 (WS): Ch 1, sc across. Turn. (38 sc)
Row 13 (RS): Ch 1, sc2tog, sc to last 2 sts, sc2tog. Turn. (36 sc)
Row 14 (WS): Ch 1, sc across. Turn. (36 sc)
Row 15 (RS): Ch 1, sc2tog, sc to last 2 sts, sc2tog. Turn. (34 sc)
Row 16 (WS): Ch 1, sc across. Turn. (34 sc)
Row 17 (RS): Ch 1, sc2tog, sc to last 2 sts, sc2tog. Turn. (32 sc)
Row 18 (WS): Ch 1, sc across. Turn. (32 sc)
Do not fasten off.
Section 3: Joining the Two Front Cups
With RS facing, hold the Left Cup and Right Cup side by side. The inner center edges will be joined.
Joining Row: Working across the top of the Left Cup, ch 1, sc across all 32 sts of the Left Cup. At the end of the Left Cup, work 1 sc into the corresponding corner stitch of the Right Cup. This sc2tog join creates the sweetheart dip. Continue sc across all 32 sts of the Right Cup. Turn. (65 sc total: 32 + 1 join + 32)
Row 2 of joined bodice front (WS): Ch 1, sc across all 65 sts. Turn. (65 sc)
Row 3 (RS): Ch 1, sc across. Turn. (65 sc)
Rows 4 through 10: Repeat Row 2, working sc across all sts. Turn after each. (65 sc each row)
At the end of Row 10, do not turn and do not fasten off. The front bodice panel is complete. Set aside.
Section 4: Bodice Back Panel
Using Color A and US B-1 / 2.25 mm hook, work flat.
Foundation: Ch 85.
Row 1 (RS): Sc in 2nd ch from hook and in each ch across. Turn. (84 sc)
Row 2 (WS): Ch 1, sc across. Turn. (84 sc)
Rows 3 through 20: Ch 1, sc across. Turn. (84 sc each row)
At the end of Row 20, do not fasten off. Back panel is complete.
Checkpoint: The bodice back panel should measure approximately 14 inches / 35.5 cm wide and 3 inches / 7.5 cm tall. The front panel should measure approximately 11 inches / 28 cm wide and 4.5 inches / 11.5 cm tall.
Section 5: Joining Front and Back, Working Bodice in the Round
With RS facing, join the front and back panels at the side seams.
Setup: Place the front bodice panel and back bodice panel with RS facing outward. Join them at the side edges using slip stitches through both layers simultaneously, working 1 sl st per row end. Alternatively, use a mattress stitch seam for a cleaner finish.
After both side seams are joined, you have a tube.
Join yarn with a sl st to the first st of the back lower edge. Ch 1.
Rnd 1 (joining round): Sc evenly around the entire lower edge of the joined bodice tube. Place a stitch marker at the beginning of the round. Work 84 sc across the back lower edge, then 65 sc across the front lower edge. Join with sl st. (149 sc)
Mark the center of each side with locking markers for decrease placement.
Section 6: Bodice Lower Shaping (Waist Decreases)
Continue working in rounds with Color A and US B-1 hook.
Rnd 2: Sc in each st to 1 st before the right side marker, sc2tog over the st before and the st after the marker, sc in each st to 1 st before the left side marker, sc2tog, sc in each st to end of round. Join. (147 sc)
Rnd 3: Sc in each st around. Join. (147 sc)
Rnd 4: Sc to 1 st before right side point, sc2tog, sc to 1 st before left side point, sc2tog, sc to end. Join. (145 sc)
Rnd 5: Sc in each st around. Join. (145 sc)
Rnd 6: Sc to 1 st before right side point, sc2tog, sc to 1 st before left side point, sc2tog, sc to end. Join. (143 sc)
Rnd 7: Sc in each st around. Join. (143 sc)
Rnd 8: Sc to 1 st before right side point, sc2tog, sc to 1 st before left side point, sc2tog, sc to end. Join. (141 sc)
Rnd 9: Sc in each st around. Join. (141 sc)
Rnd 10: Sc to 1 st before right side point, sc2tog, sc to 1 st before left side point, sc2tog, sc to end. Join. (139 sc)
Rnd 11: Sc in each st around. Join. (139 sc)
Rnd 12: Sc to 1 st before right side point, sc2tog, sc to 1 st before left side point, sc2tog, sc to end. Join. (137 sc)
Rnd 13: Sc in each st around. Join. (137 sc)
Rnd 14: Sc to 1 st before right side point, sc2tog, sc to 1 st before left side point, sc2tog, sc to end. Join. (135 sc)
Rnd 15: Sc in each st around. Join. (135 sc)
Checkpoint: After Rnd 15, the bodice should be approximately 6.5 to 7 inches tall from the top edge. Total working stitches are 135.
Section 7: Waistband Ribbing
Switch to BLO sc for all rounds of the waistband.
Waistband Rnd 1: Ch 1, sc in BLO of each st around. Join with sl st. (135 sc)
Waistband Rnds 2 through 6: Ch 1, sc in BLO of each st around. Join with sl st. (135 sc each round)
The waistband consists of 6 rounds of BLO sc in Color A.
Checkpoint: The waistband should measure approximately 1.5 inches tall. The circumference should measure approximately 22.5 inches when relaxed, stretching to fit the 28-inch waist measurement.
Section 8: Waist-to-Skirt Increase Round
Work into both loops again from this point forward.
Increase Rnd 1: Ch 1, (sc in next st, 2 sc in next st) 67 times, then sc in last st to end of round. Join with sl st. (202 sc)
Increase Rnd 2: Ch 1, (sc in next 2 sts, 2 sc in next st) 67 times, sc in last st. Join. (269 sc)
Increase Rnd 3: Ch 1, (sc in next 3 sts, 2 sc in next st) 67 times, sc in remaining st. Join. (336 sc)
Note: 336 is divisible by 8, which sets up the lace fan repeat cleanly.
Checkpoint: After the three increase rounds, you should have 336 stitches. The skirt opening should measure approximately 44 inches in circumference.
Section 9: Skirt Panel 1 (Lace Fans, Color A into Color B)
Switch to US C-2 / 2.75 mm hook. Continue with Color A.
Setup Round: Ch 1, sc in each st around. Join. (336 sc)
Skirt Rnd 1 (begin lace fans): Ch 1, (sk 2 sts, 5 dc in next st, sk 2 sts, sc in next st) 56 times. Join with sl st to first sc. (336 sts as 56 fan repeats)
Skirt Rnd 2: (5 dc in sc from prev rnd, sc in 3rd dc of 5-dc fan from prev rnd) 56 times. Join. (336 sts)
Skirt Rnds 3 through 6: Continue alternating the fan and anchor positions each round. (336 sts each round)
Skirt Rnd 7 (increase round): (sk 2, 7 dc in next st, sk 2, sc in next st) 56 times. Join. (448 sts)
Skirt Rnds 8 through 10: Work 7-dc fans, placing sc in 4th dc of each fan. (448 sts each round)
At the end of Rnd 10, switch to Color B. Cut Color A.
Skirt Rnds 11 through 14 (Color B): Continue 7-dc fan pattern. (448 sts each round)
Checkpoint: After Skirt Rnd 14, Panel 1 is complete. The piece should measure approximately 16 to 17 inches from the top edge of the bodice.
Section 10: Skirt Panel 2 (Diamond Lace, Color B)
Transition Round: Ch 1, work sc evenly across, placing 1 sc per anchor and 3 sc across each 7-dc fan top. (224 sc)
Continue with the diamond lace pattern for Panel 2, working the V-stitch and chain-space diamond pattern according to your skill level and the visual reference.
Section 11: Skirt Panel 3 (Basket Weave, Color C)
Transition to Color C and work the basket weave stitch pattern as described in the special stitches section. Alternate the front post and back post double crochet groups every 2 rounds to create the woven texture.
Finishing
Hem Edging: Work picot stitch around the entire hem for a decorative finish.
Spaghetti Straps: Work crocheted chains or narrow slip-stitch cords. Attach after blocking when you can measure the exact length needed for your body.
Blocking: Wet block the entire dress on blocking mats, pinning out the lace panels to open the stitch patterns fully. This step is essential. The lace will not show its true beauty until blocked.
Tips for Success
Color changes: Don’t cut yarn between Color A and Color B if they’re only 2 to 3 rounds apart. Carry the unused color loosely up the inside. Cut and rejoin cleanly between Color B and Color C.
Waistband adjustment: If the ribbing feels too restrictive during assembly, add 4 to 6 stitches to the waistband round count.
Size customization: For a larger size, add stitches to the foundation chains in multiples that work with your pattern repeats. For a smaller size, reduce foundation chains accordingly. Always work a gauge swatch first.
You Did It!
This dress is a labor of love, and every hour you put into it shows in the finished piece. The ombre gradient, the lace panels, that perfect sweetheart neckline. You’ve created something truly special.
Thank you so much for choosing this pattern for your next big project. I’d love to see your finished dress! Share your photos on Instagram or Facebook and tag me so I can admire your beautiful work.
If you loved this lavender crochet dress pattern, save it to your Pinterest boards so you can find it when you’re ready to start. And please drop a comment below when you make yours. I absolutely love hearing which color combinations you choose and seeing how your version turns out!
