
I call this one the "Charlotte Dress" after my niece, who wore the very first version to her first birthday party three years ago. The original pattern lived in a spiral notebook for ages, scribbled between grocery lists and phone numbers I no longer recognize. I finally sat down to write it out properly because too many friends kept asking for it.
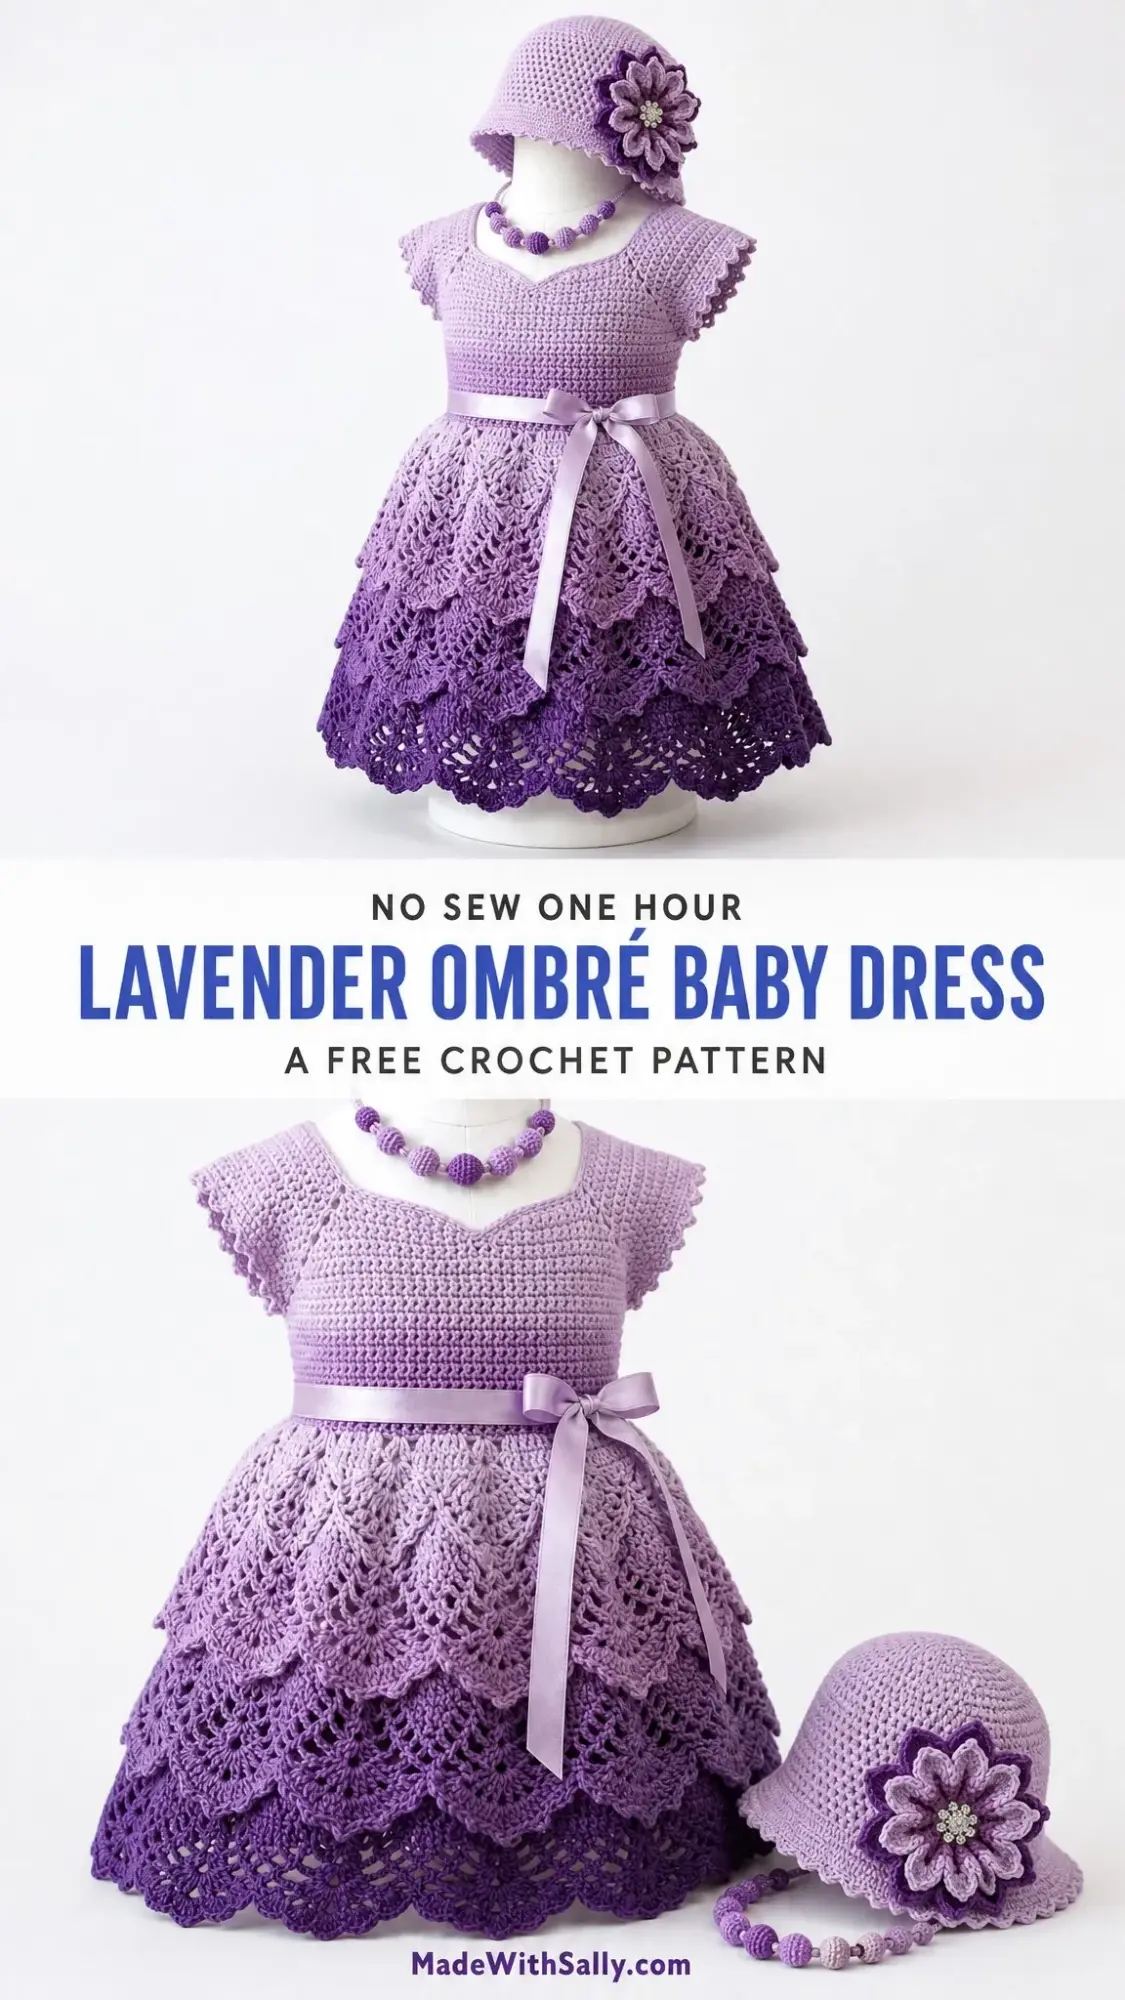
The ombré effect happened almost by accident. I had three partial skeins of purple in different shades and decided to use them all rather than buy more yarn. Sometimes the best designs come from working with what you have.
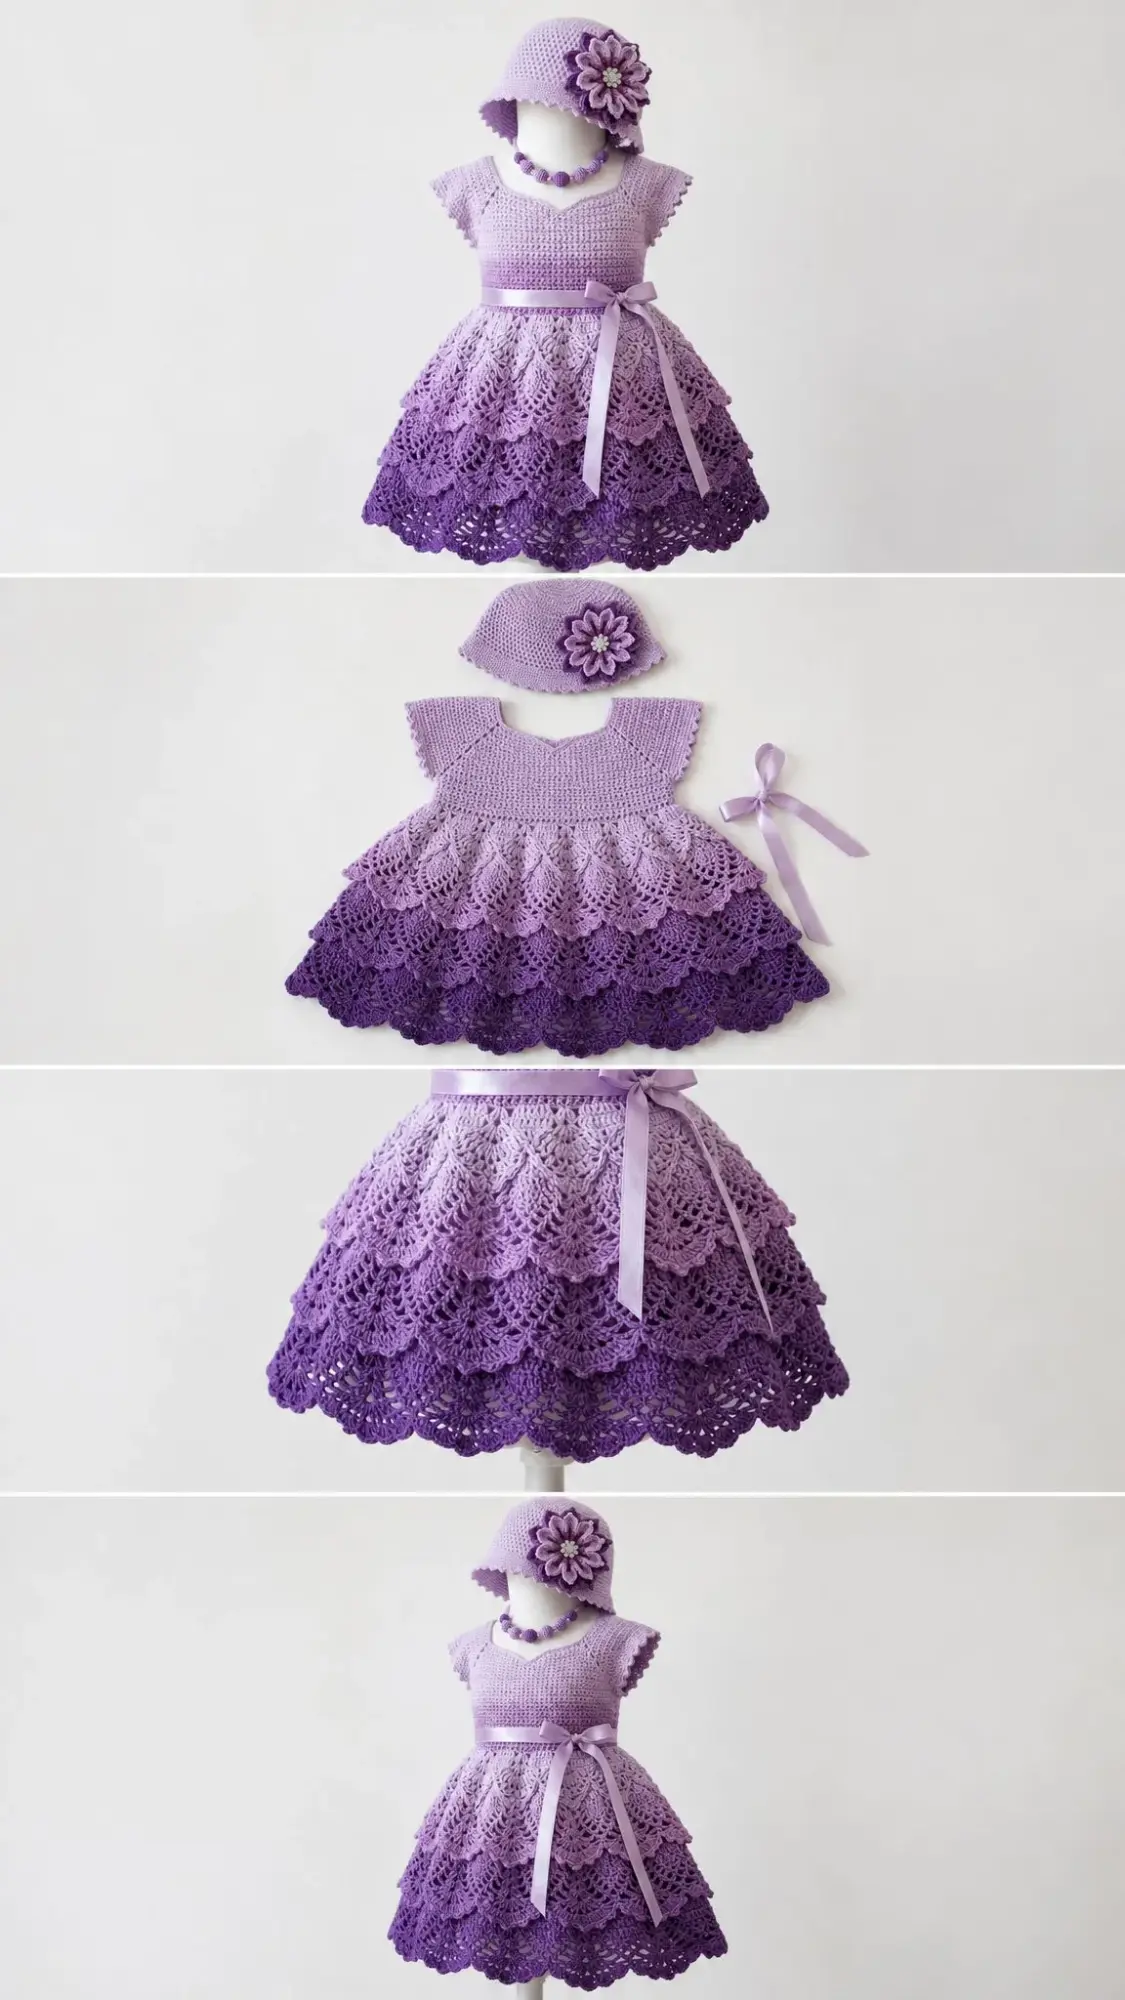
This complete set includes the tiered lace dress, a matching bucket hat with a crocheted flower, and a sweet beaded necklace. The whole ensemble works up beautifully for special occasions like christenings, birthday parties, or family photos. Let me walk you through every single step.
About This Crochet Pattern
This heirloom-quality baby dress features a simple single crochet (sc) bodice with a sweetheart neckline and an open back closed with buttons. The real showstopper is the skirt, which uses a pineapple fan lace stitch worked in three graduating shades of purple. Each tier attaches to create that gorgeous layered ruffle effect you see in the finished piece.
The construction flows logically. You work the bodice front flat, then the two back panels flat, join them at the shoulders, add the skirt in rounds from the waist down, and finish with the hat and necklace. Nothing too tricky if you take it one section at a time.
Skill Level: Advanced Beginner to Intermediate. If you can work basic stitches and have tried at least one simple lace project before, you will succeed with this pattern.
Time Estimate: Approximately 18 to 25 hours for the complete set. The skirt tiers take up roughly 10 hours of that total.
Finished Measurements
Dress:
Hat:
Necklace:
These measurements fit a toddler approximately 12 to 18 months old.
Materials Needed
Yarn (DK weight / light 3):
Hooks:
Notions:
Yarn Suggestions
Option 1: Lion Brand Pound of Love in Pastel Lavender (Color A), Lilac (Color B), and Purple (Color C). This 100% acrylic yarn is machine washable and gives clean stitch definition in lace patterns.
Option 2: Paintbox Yarns Simply DK in Dusty Lilac (Color A), Wisteria Purple (Color B), and Pansy Purple (Color C). Excellent stitch clarity and consistent yardage.
Option 3: We Are Knitters The Petite Wool in Lilac (Color A), Lavender (Color B), and Eggplant (Color C). This merino blend produces a softer drape and blocks beautifully.
Substitution note: Any smooth DK weight yarn works well. Avoid chenille, boucle, or heavily textured yarns because the lace pattern needs visible stitch structure.
Gauge
Bodice (E-4 hook, single crochet): 20 sc x 24 rows = 4 inches / 10 cm square, blocked.
Skirt lace (F-5 hook): One full fan repeat (12 stitches wide) = approximately 2.4 inches / 6 cm. Four rows of lace = approximately 1.5 inches / 3.8 cm.
Gauge matters a lot for bodice fit. Please swatch and adjust your hook size before starting.
Abbreviations
Special Stitches
Pineapple Fan Stitch
This stitch creates fans of double crochets with pineapple eyelets above them. Each repeat uses 12 stitches across and 4 rows in height.
Row/Rnd 1 (foundation row, RS): Sc across all stitches.
Row/Rnd 2 (fan base): Ch 3 (counts as dc), sk 2 sts, work 5 dc into next st (fan made), sk 2 sts, sc into next st, sk 2 sts, work 5 dc into next st, sk 2 sts, sc into next st. Rep across, ending dc in last st.
Row/Rnd 3 (fan top): Ch 1, sc in first dc, ch 3, sk 2 dc of fan, sc in center dc of fan, ch 3, sk 2 dc, sc in next sc. Rep across. This creates the pineapple arches.
Row/Rnd 4 (scallop): Ch 3, work 4 dc into first ch-3 sp, sc in next sc, 5 dc into next ch-3 sp, sc in next sc. Rep across, ending with sc in last st.
Shell Stitch (for hat brim)
Work 5 dc into the same stitch. Skip 2 stitches on either side of shell for spacing.
Beaded Ball (for necklace)
Ch 4, sl st to first ch to form ring. Rnd 1: 6 sc into ring. Rnd 2: 2 sc in each st (12 sc). Rnd 3: Sc2tog around (6 sc). Stuff lightly with yarn tail. Rnd 4: Sc2tog around, sl st to close (3 sc). Fasten off, leaving tail for sewing.
Flower Petal (for hat applique)
Ch 12, sl st to first ch to form ring. Working into ring: (ch 4, work 7 tr into ring, ch 4, sl st into ring) 6 times. Six petals made. Work second layer of petals on top by rotating slightly and repeating with Color C for contrast.
Pattern Notes Before You Begin
The bodice front and each back panel are worked flat from bottom to shoulder. Shoulder seams are joined by slip stitch with wrong sides together, creating a neat ridge on the right side.
The skirt attaches directly to the bodice waist in joined rounds. No seaming required.
Each skirt tier attaches by working into the unused loop of a specific row from the previous tier. The tiers overlap slightly for that beautiful layered ruffle effect.
Color changes happen at the beginning of each tier: Tier 1 uses Color A, Tier 2 uses Color B, Tier 3 uses Color C.
The back opening stays open throughout bodice construction. You will add a button band afterward.
When joining rounds, work a sl st into the first stitch of that round, not into the turning chain.
Bodice Front Instructions
Using Color A and E-4 hook.
Foundation: Ch 49.
Row 1 (RS): Sc in second ch from hook and in each ch across. Turn. (48 sc)
Row 2: Ch 1, sc in each st across. Turn. (48 sc)
Row 3: Ch 1, sc in each st across. Turn. (48 sc)
Rows 4 through 14: Rep Row 2. Turn at end of each row. (48 sc each row)
Armhole Shaping
Row 15 (RS): Ch 1, sc2tog, sc in each st to last 2 sts, sc2tog. Turn. (46 sc)
Row 16: Ch 1, sc2tog, sc in each st to last 2 sts, sc2tog. Turn. (44 sc)
Row 17: Ch 1, sc2tog, sc in each st to last 2 sts, sc2tog. Turn. (42 sc)
Rows 18 through 26: Ch 1, sc in each st across. Turn. (42 sc each row)
After Row 26, your armhole depth is approximately 2.4 inches / 6 cm.
Neckline Shaping
Row 27 (RS): Ch 1, sc in first 14 sts. Leave remaining sts unworked. Turn. (14 sc) This is the right shoulder section.
Row 28: Ch 1, sc2tog, sc in each st across. Turn. (13 sc)
Row 29: Ch 1, sc in each st to last 2 sts, sc2tog. Turn. (12 sc)
Row 30: Ch 1, sc2tog, sc in each st across. Turn. (11 sc)
Row 31: Ch 1, sc in each st across. Turn. (11 sc)
Row 32: Ch 1, sc in each st across. Fasten off. (11 sc)
Return to Row 27 stitches. The center 14 stitches (stitches 15 through 28 of Row 26) form the neckline opening. Skip these 14 sts.
Rejoin Color A in stitch 29 of Row 26 for left shoulder.
Row 27L: Ch 1, sc in each of remaining 14 sts. Turn. (14 sc)
Row 28L: Ch 1, sc in each st to last 2 sts, sc2tog. Turn. (13 sc)
Row 29L: Ch 1, sc2tog, sc in each st across. Turn. (12 sc)
Row 30L: Ch 1, sc in each st to last 2 sts, sc2tog. Turn. (11 sc)
Row 31L: Ch 1, sc in each st across. Turn. (11 sc)
Row 32L: Ch 1, sc in each st across. Fasten off. (11 sc)
Checkpoint: The bodice front should measure approximately 6.5 inches / 16.5 cm in total height and 9.6 inches / 24.4 cm in width at the waist. Each shoulder section is 11 stitches wide.
Bodice Back (Make 2 Panels)
Each back panel is half the bodice width plus 2 stitches for the center back edge overlap.
Right Back Panel
Using Color A and E-4 hook.
Foundation: Ch 27.
Row 1 (RS): Sc in second ch from hook and in each ch across. Turn. (26 sc)
Rows 2 through 14: Ch 1, sc in each st across. Turn. (26 sc each row)
Row 15 (RS, armhole side): Ch 1, sc in each st to last 2 sts, sc2tog. Turn. (25 sc)
Row 16: Ch 1, sc2tog, sc in each st across. Turn. (24 sc)
Row 17: Ch 1, sc in each st to last 2 sts, sc2tog. Turn. (23 sc)
Rows 18 through 32: Ch 1, sc in each st across. Turn. (23 sc each row)
Mark the outer (armhole side) 11 sts with a stitch marker for shoulder joining. Fasten off.
Left Back Panel
Work as Right Back Panel with mirror shaping. Armhole decrease is at the beginning of RS rows.
Foundation: Ch 27.
Row 1 (RS): Sc in second ch from hook and in each ch across. Turn. (26 sc)
Rows 2 through 14: Ch 1, sc in each st across. Turn. (26 sc each row)
Row 15 (RS): Ch 1, sc2tog, sc in each st across. Turn. (25 sc)
Row 16: Ch 1, sc in each st to last 2 sts, sc2tog. Turn. (24 sc)
Row 17: Ch 1, sc2tog, sc in each st across. Turn. (23 sc)
Rows 18 through 32: Ch 1, sc in each st across. Turn. (23 sc each row)
Fasten off.
Assembling the Bodice
Lay bodice front RS up. Place right back panel RS down on top, aligning armhole and shoulder edges. The outer 11 stitches of the back panel shoulder align with the 11 stitches of the bodice front right shoulder.
Using Color A and E-4 hook, join shoulder seam with sl st through both layers, working 11 sl sts across. Fasten off. (11 sl sts)
Repeat for left shoulder. (11 sl sts)
Weave in all ends at shoulder seams.
Armhole Edging
With RS facing, join Color A at bottom of right armhole opening with E-4 hook.
Rnd 1: Work sc evenly around armhole opening, approximately 1 sc per row end along straight edges and 1 sc per stitch along horizontal edges. Total approximately 48 sc. Join with sl st. (48 sc)
Rnd 2: Ch 1, sc in each sc around. Join with sl st. (48 sc)
Rnd 3: Ch 1, working from left to right (reverse sc, also called crab stitch), sc in each st around. Join with sl st. Fasten off. (48 sc)
Repeat for left armhole.
Neckline Edging
With RS facing, join Color A at top right back corner of neckline with E-4 hook.
Row 1: Work sc evenly around entire neckline opening, approximately 34 sc along front curve, across back neck shoulders, and along center back edges. Total approximately 80 sc. Do not join. Work flat from right back edge to left back edge. (80 sc)
Row 2: Ch 1, turn. Sc in each sc across. (80 sc)
Fasten off. Weave in ends.
Back Button Band
Right Center Back Edge
With RS facing, join Color A at bottom right center back edge.
Row 1: Work sc evenly along entire center back edge, 1 sc per row end, approximately 32 sc total. Turn. (32 sc)
Row 2: Ch 1, sc in each sc across. Turn. (32 sc)
Row 3 (buttonhole row): Ch 1, sc in first 4 sts, (ch 2, sk 2 sts, sc in next 8 sts) 3 times, sc in remaining sts to end. Turn. (32 sts including ch-2 sps)
Row 4: Ch 1, sc in each st and 2 sc into each ch-2 sp across. Turn. (32 sc)
Row 5: Ch 1, sc in each sc across. Fasten off. (32 sc)
Left Center Back Edge
Work 5 rows of sc without buttonholes. (32 sc per row)
Sew three buttons to left button band aligned with buttonholes. Space evenly: first button approximately 2 inches from top, last button approximately 2 inches from bottom.
Waist Ribbon Channel
With RS facing, join Color A at right side seam at Row 14 of bodice (the last row before armhole shaping). This is the natural waist.
Work sl st loosely in each stitch around the entire waist circumference, working through the front loop only. Total approximately 96 sl sts. Do not fasten off. Continue to skirt.
Checkpoint: The assembled bodice should measure approximately 6.5 inches from shoulder to waist edge. Chest circumference should be approximately 19 inches. The back has a full-height open slit closed with three buttons.
Skirt Tier 1 (Color A)
The waist has 96 working stitches. The pineapple fan repeat is 12 stitches. 96 divided by 12 equals 8 full repeats.
Switch to F-5 hook.
Rnd 1 (sc foundation): With Color A, ch 1, sc in each sl st around waist. Join with sl st to first sc. (96 sc)
Rnd 2 (inc round): Ch 1, (sc in 2 sts, inc in next st) across. Join with sl st. (128 sc)
Rnd 3 (inc to 136): Ch 1, (sc in 14 sts, inc in next st) 8 times. Join with sl st. (136 sc)
Rnd 4 (inc to 144): Ch 1, (sc in 16 sts, inc in next st) 8 times. Join with sl st. (144 sc)
144 divided by 12 equals 12 full repeats.
Lace Rnd 1 (fan base): Ch 3 (counts as dc), sk 2 sts, 5 dc in next st, sk 2 sts, sc in next st, (sk 2 sts, 5 dc in next st, sk 2 sts, sc in next st) 11 times, join with sl st to top of ch-3. (12 fans, 12 sc)
Lace Rnd 2 (arches): Ch 1, sc in top of ch-3 from previous rnd, ch 3, sk 2 dc, sc in center dc of fan, ch 3, sk 2 dc, (sc in next sc, ch 3, sk 2 dc, sc in center dc of fan, ch 3, sk 2 dc) 11 times. Join with sl st to first sc. (24 sc, 24 ch-3 sps)
Lace Rnd 3 (scallop): Ch 3 (counts as dc), 4 dc in first ch-3 sp, sc in next sc, (5 dc in next ch-3 sp, sc in next sc) 23 times. Join with sl st to top of ch-3. Fasten off Color A. (24 shells of 5 dc, 24 sc)
Checkpoint: After Tier 1, skirt measures approximately 3 inches below the waist edge.
Skirt Tier 2 (Color B)
Tier 2 attaches at the back loop only of stitches in Tier 1 Rnd 1 (the 144-st sc round).
Join Color B with F-5 hook in back loop of any st in Tier 1 Rnd 1.
Rnd 1: Ch 1, sc in back loop of each st around. Join with sl st. (144 sc)
Rnd 2 (inc round): Ch 1, (sc in 11 sts, inc in next st) 12 times. Join with sl st. (156 sc)
156 divided by 12 equals 13 repeats.
Lace Rnd 1 (fan base): Ch 3, sk 2, 5 dc in next st, sk 2, sc in next st, (sk 2, 5 dc in next st, sk 2, sc in next st) 12 times. Join with sl st to top of ch-3. (13 fans)
Lace Rnd 2 (arches): Ch 1, sc in top of ch-3, ch 3, sk 2 dc, sc in center dc of fan, ch 3, sk 2 dc, (sc in next sc, ch 3, sk 2 dc, sc in center dc, ch 3, sk 2 dc) 12 times. Join with sl st. (26 sc, 26 ch-3 sps)
Lace Rnd 3 (scallop): Ch 3, 4 dc in first ch-3 sp, sc in next sc, (5 dc in next ch-3 sp, sc in next sc) 25 times. Join with sl st to top of ch-3. Fasten off Color B. (26 shells, 26 sc)
Checkpoint: Tier 2 hangs below and slightly overlaps Tier 1. Skirt now measures approximately 6 inches below waist.
Skirt Tier 3 (Color C)
Join Color C with F-5 hook in back loop of any st in Tier 2 Rnd 1 (the 144-st sc round, before the increase round).
Rnd 1: Ch 1, sc in back loop of each st around. Join with sl st. (144 sc)
Rnd 2 (inc round): Ch 1, (sc in 5 sts, inc in next st) 24 times. Join with sl st. (168 sc)
168 divided by 12 equals 14 repeats.
Lace Rnd 1 (fan base): Ch 3, sk 2, 5 dc in next st, sk 2, sc in next st, (sk 2, 5 dc in next st, sk 2, sc in next st) 13 times. Join with sl st to top of ch-3. (14 fans)
Lace Rnd 2 (arches): Ch 1, sc in top of ch-3, ch 3, sk 2 dc, sc in center dc of fan, ch 3, sk 2 dc, (sc in next sc, ch 3, sk 2 dc, sc in center dc, ch 3, sk 2 dc) 13 times. Join with sl st. (28 sc, 28 ch-3 sps)
Lace Rnd 3 (scallop): Ch 3, 4 dc in first ch-3 sp, sc in next sc, (5 dc in next ch-3 sp, sc in next sc) 27 times. Join with sl st to top of ch-3.
Lace Rnd 4 (extended scallop): Ch 1, sc in top of each dc and each sc of previous rnd. Join. (168 sc)
Lace Rnd 5 (picot scallop hem): Ch 1, sc in first st, (ch 3, sl st in first ch of ch-3 just made, sk 2 sts, sc in next st) across. Join with sl st. Fasten off Color C. (56 picots, 56 sc)
Checkpoint: After all three tiers, skirt measures approximately 10.5 inches below waist. Total dress length from shoulder to hem is approximately 17 inches.
Ribbon Channel Finishing
Thread the 24 inch satin ribbon through the waist channel sl st row, entering at the right side seam, weaving in and out through the front loops, and exiting at the left side seam. Pull gently to create a slight gather. Tie in a bow at center front. Trim ribbon ends diagonally to prevent fraying.
Matching Bucket Hat
Using Color A and E-4 hook.
Crown
Foundation ring: Ch 4, join with sl st to form ring.
Rnd 1: Ch 1, 8 sc into ring. Join with sl st. (8 sc)
Rnd 2: Ch 1, 2 sc in each st around. Join with sl st. (16 sc)
Rnd 3: Ch 1, (sc in 1 st, 2 sc in next st) 8 times. Join with sl st. (24 sc)
Rnd 4: Ch 1, (sc in 2 sts, 2 sc in next st) 8 times. Join with sl st. (32 sc)
Rnd 5: Ch 1, (sc in 3 sts, 2 sc in next st) 8 times. Join with sl st. (40 sc)
Rnd 6: Ch 1, (sc in 4 sts, 2 sc in next st) 8 times. Join with sl st. (48 sc)
Rnd 7: Ch 1, (sc in 5 sts, 2 sc in next st) 8 times. Join with sl st. (56 sc)
Rnd 8: Ch 1, (sc in 6 sts, 2 sc in next st) 8 times. Join with sl st. (64 sc)
Rnd 9: Ch 1, (sc in 7 sts, 2 sc in next st) 8 times. Join with sl st. (72 sc)
Rnd 10: Ch 1, (sc in 8 sts, 2 sc in next st) 8 times. Join with sl st. (80 sc)
Rnd 11: Ch 1, (sc in 9 sts, 2 sc in next st) 8 times. Join with sl st. (88 sc)
Hat Body
Rnds 12 through 22 (hat sides): Ch 1, sc in each st around. Join with sl st. (88 sc each rnd)
Hat Brim
Rnd 23 (brim inc): Ch 1, (sc in 10 sts, 2 sc in next st) 8 times. Join with sl st. (96 sc)
Rnd 24: Ch 1, (sc in 11 sts, 2 sc in next st) 8 times. Join with sl st. (104 sc)
Rnd 25: Ch 1, (sc in 12 sts, 2 sc in next st) 8 times. Join with sl st. (112 sc)
Rnd 26 (shell brim): Ch 3 (counts as dc), sk 2 sts, 5 dc in next st, sk 2 sts, sl st in next st. Rep (sk 2, 5 dc in next st, sk 2, sl st in next st) around. Join with sl st to top of ch-3. (16 shells)
Rnd 27 (brim edging): Ch 1, sc in each dc and sl st around. Join with sl st. Fasten off Color A. (112 sc)
Optional: Apply Color C to brim edge with 1 round of sl st for contrast trim.
Hat Flower Applique
Using Color B and E-4 hook.
Ch 12, sl st to first ch to form ring.
Working into ring: (ch 4, work 7 tr into ring, ch 4, sl st into ring) 6 times. Six petals made.
Work second layer of petals on top by rotating slightly and repeating with Color C for contrast.
Sew rhinestone or pearl button to flower center. Attach flower to hat side with yarn needle and matching thread.
Beaded Necklace
Make 9 beaded balls following the Beaded Ball special stitch instructions using Color A and Color B alternately.
Thread completed balls onto the 18 inch craft cord, spacing evenly. Tie cord ends securely. Trim excess cord.
Finishing and Blocking
Weave in all remaining ends throughout the dress, hat, and necklace.
For blocking, wet the dress gently in lukewarm water with a drop of wool wash. Lay flat on a blocking mat or towel, shaping the skirt tiers to fan out evenly. Pin if needed. Allow to dry completely before handling.
The hat can be blocked over a balloon or bowl of similar size to maintain shape.
Tips for Success with This Crochet Tutorial
On the lace stitch: If you lose your place in the pineapple fan pattern, count your fans at the end of each round. The number should match what the pattern indicates.
On the ombré effect: The color transitions look most dramatic when your three purples have clear contrast. Hold all three skeins together before starting to make sure you like how they graduate.
On the back opening: Do not worry if the button band feels fiddly. Take your time with the buttonholes. They are small and can be tricky, but they get easier with practice.
On the tiers: The layering technique might feel strange at first. Trust the process. Once you see Tier 2 overlapping Tier 1, everything clicks into place.
Final Thoughts on This Lavender Ombré Baby Dress Crochet Pattern
This step by step crochet tutorial gives you everything you need to create a truly special heirloom piece. The combination of simple bodice construction with beautiful lace tiers makes this pattern achievable for adventurous beginners while still offering enough detail to keep intermediate crocheters engaged.
I hope you enjoy making this set as much as I enjoyed designing it. Every time I see a baby wearing one of these dresses, I remember sitting at my kitchen table three years ago, watching my niece twirl in the original version.
Thank you so much for choosing this pattern. If you make the Charlotte Dress, I would absolutely love to see it. Tag me on Instagram or share your finished project in my Facebook group. Your photos make my whole week.
If you want to find this pattern again later, go ahead and save it to your Pinterest boards. And please drop a comment below if you give it a try. I read every single one, and I am always here to help if you get stuck.
