
This anklet is HANDS DOWN one of the prettiest pieces of crochet jewelry I have ever made. Seriously, look at those cascading wisteria blossoms! The best part? It works up faster than you would think and makes an absolutely stunning gift for weddings, summer parties, or anyone who appreciates delicate handmade accessories.
Get the Ad-Free PDF Pattern
You can find the free pattern below, or you can purchase the ad-free printable PDF from my shop.
Get the Printable PDF →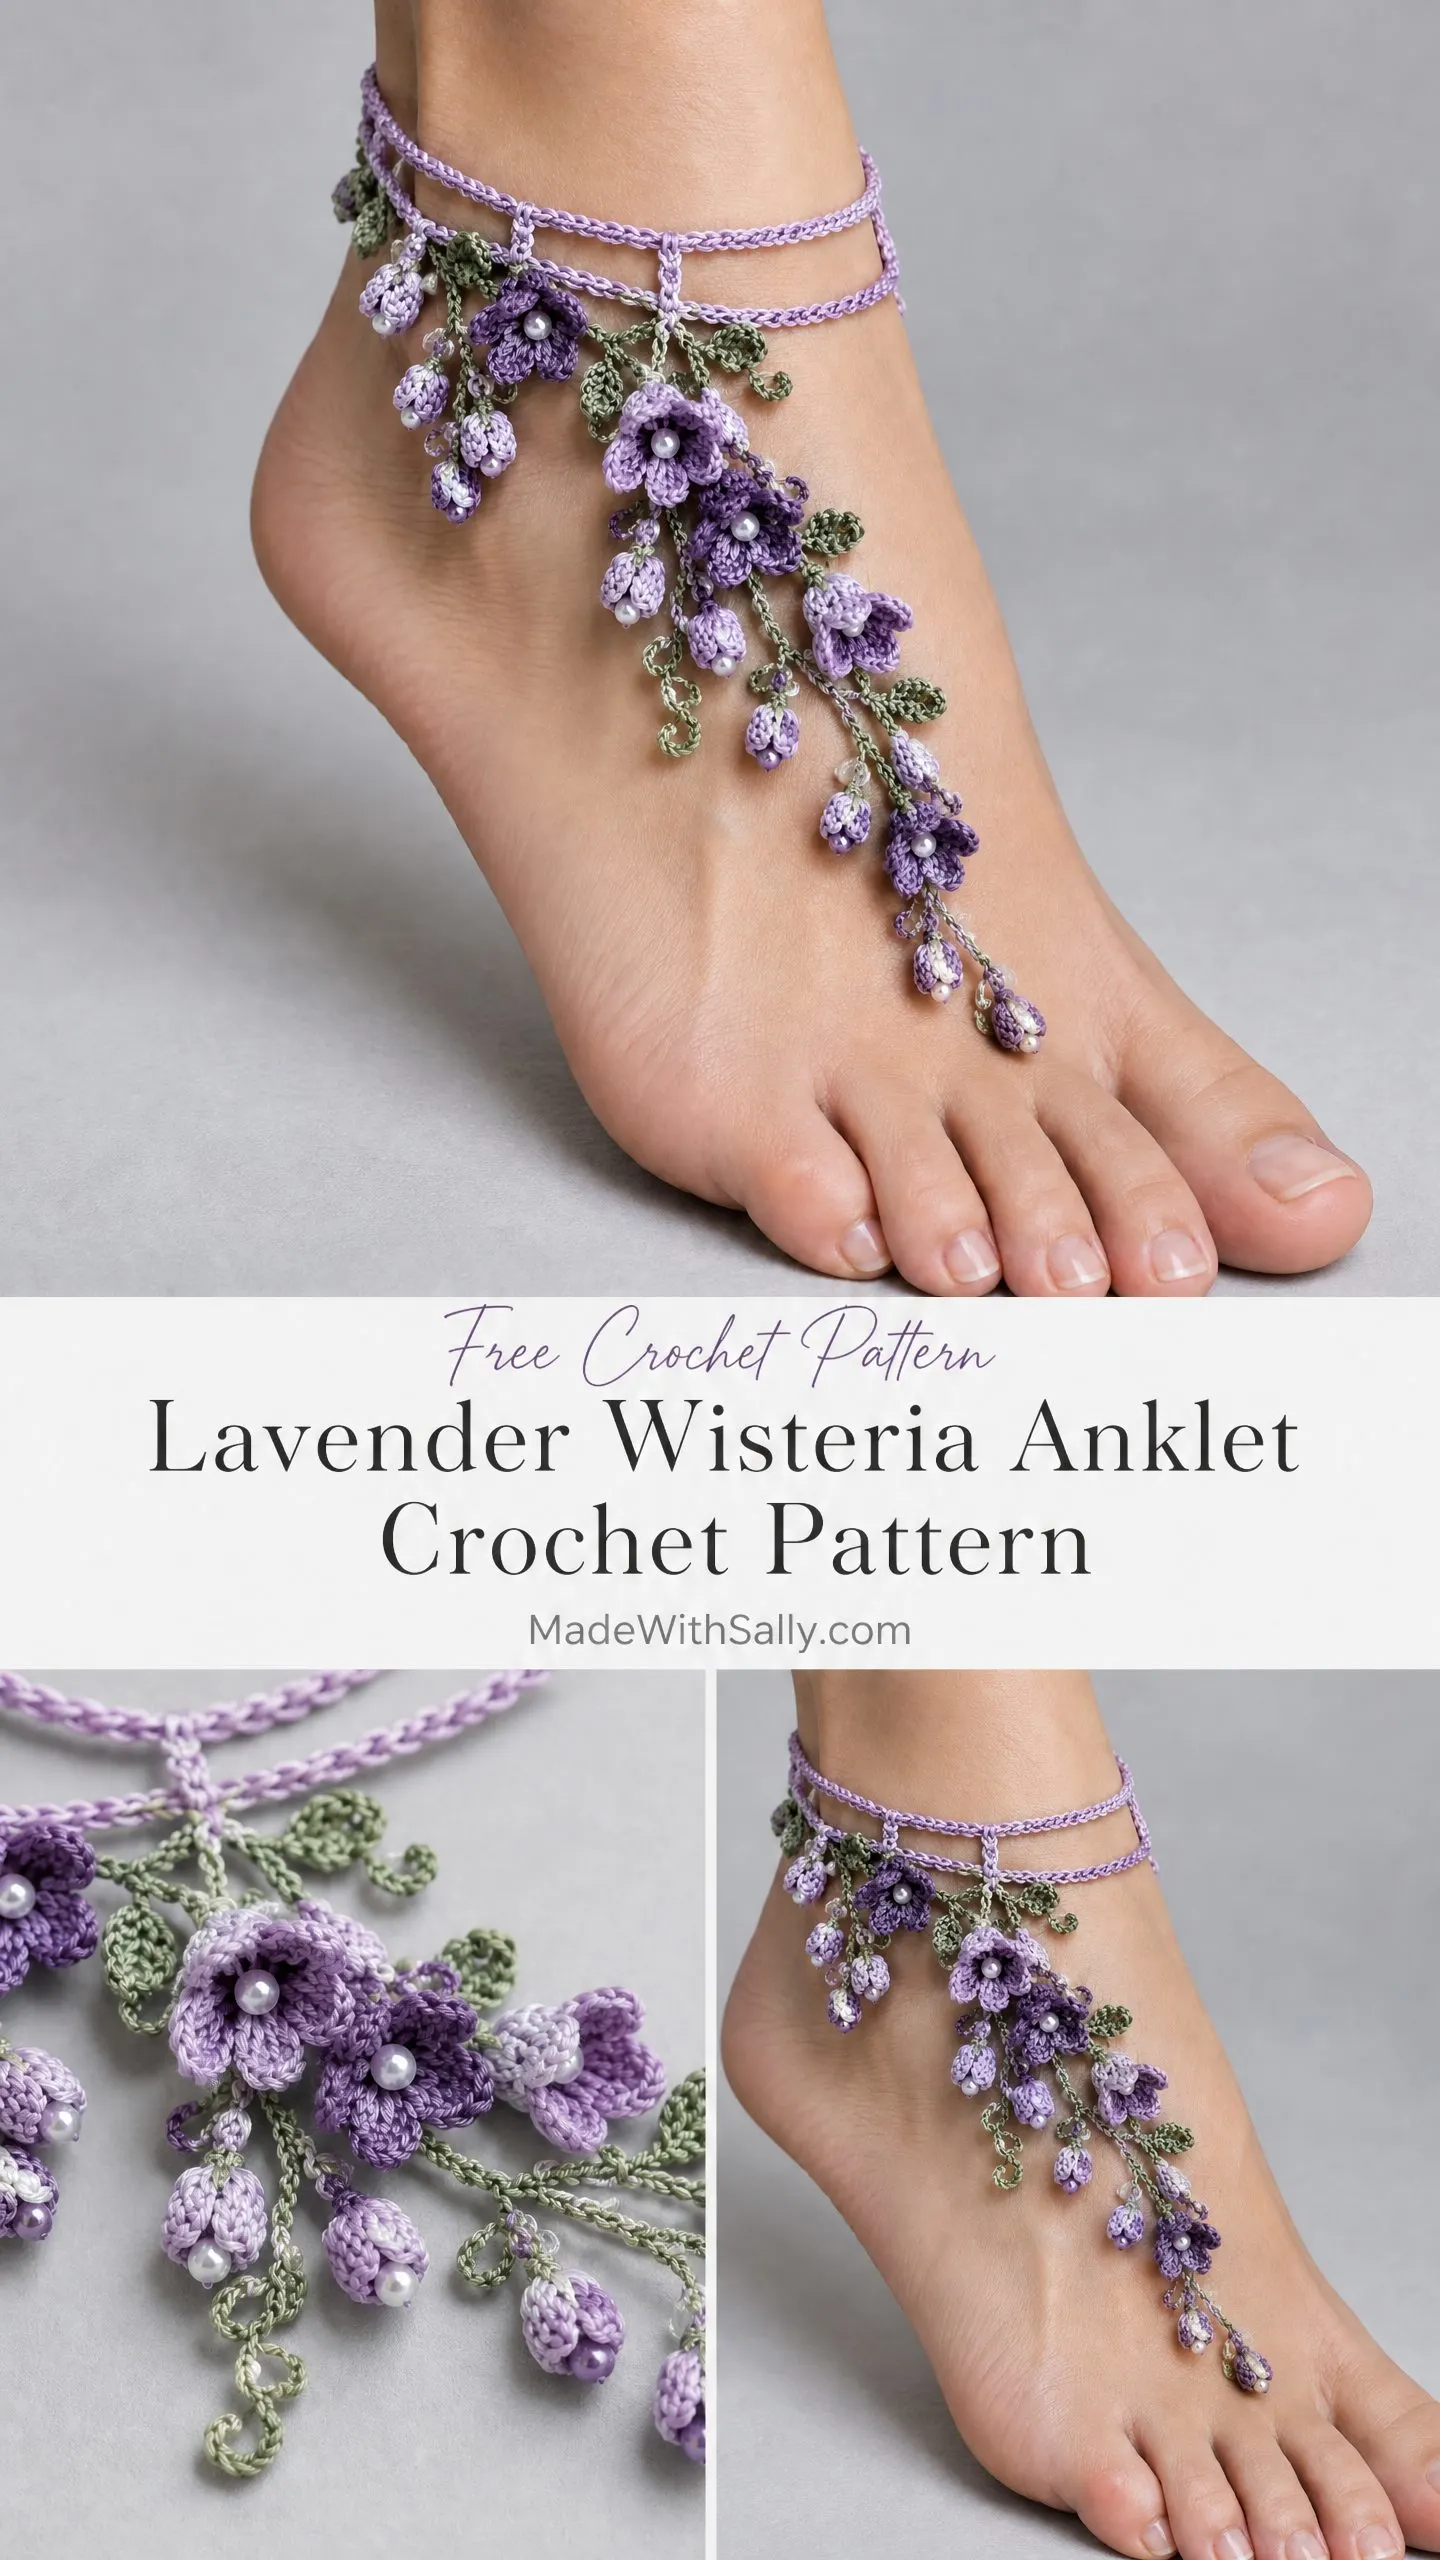
If you have been wanting to try your hand at tiny floral motifs, this is the project to do it. The construction is surprisingly straightforward once you break it down. You are basically making small individual pieces and then assembling them like a little botanical puzzle.
I am SO excited to walk you through every step of this pattern. By the end, you will have a gorgeous piece of wearable art that looks like it belongs in a fairy garden.
About This Lavender Wisteria Anklet Crochet Pattern
This anklet features a lightweight ladder-style ankle band with cascading wisteria blossoms, sage green vines, and pearl centers. The design is built in three layers: the delicate two-rail band, branching vines, and separately crocheted flowers that get sewn on during assembly.
The finished piece drapes beautifully over the upper arch of the foot without pulling the ankle band downward. It is romantic, feminine, and absolutely eye-catching.
Skill Level: Intermediate, though a confident beginner with some small-motif experience can absolutely tackle this project.
Finished Measurements:
Materials You Will Need
Gather these supplies before you start. Having everything ready makes the project flow so much smoother.
Yarn:
Hook:
Notions:
Color Placement Guide
Understanding which color goes where will help you plan your work and shop for the right shades.
Soft Lilac: Both ankle rails, some buds, 2 to 3 open blossoms
Amethyst or Deep Lavender: 3 to 4 open blossoms and several deeper buds
Sage Green: Main vine, branches, leaves, tendrils
Satin White: Pearl centers and closure button
Abbreviations
Let me walk you through every abbreviation used in this pattern. If you are newer to crochet, take a moment to familiarize yourself with these before diving in.
ch = chain (wrap yarn over hook and pull through the loop on your hook)
sl st = slip stitch (insert hook, yarn over, pull through both the stitch and the loop on your hook in one motion)
sc = single crochet (insert hook, yarn over, pull up a loop, yarn over, pull through both loops)
hdc = half double crochet (yarn over, insert hook, pull up a loop, yarn over, pull through all 3 loops)
dc = double crochet (yarn over, insert hook, pull up a loop, yarn over and pull through 2 loops, yarn over and pull through remaining 2 loops)
tr = treble crochet (yarn over twice, insert hook, pull up a loop, yarn over and pull through 2 loops three times)
st(s) = stitch(es)
sp = space
MR = magic ring (an adjustable loop that allows you to pull the center closed tightly)
BLO = back loop only
rep = repeat
Gauge
With size 10 cotton and a 1.50 mm hook, aim for about 31 to 33 foundation chains per 10 cm (4 inches). Measure the chain relaxed, not stretched.
The floral motifs do not require exact gauge, but the ankle band does. Take a moment to check your gauge before committing to the full band.
How to Measure and Size the Ankle Band
Getting the right fit is essential for this piece to sit properly.
Step 1: Wrap the measuring tape around the ankle exactly where you want the top rail to sit. Keep the tape snug but not tight.
Step 2: For cotton thread, subtract about 0.5 cm (1/4 inch) from the ankle measurement. If you prefer a looser jewelry fit, use the exact ankle measurement instead.
Step 3: The ladder uses a multiple of 6 chains plus 1. Chain until you reach the target length, then add or remove a few chains so the total equals 6x + 1.
Sample Count: For an ankle measuring about 22.5 to 23 cm (8.75 to 9 inches), start with 73 chains. This creates 12 ladder openings. Adjust by 6 chains for each additional or removed ladder opening.
Ankle Band Instructions
This creates the delicate two-rail ladder that wraps around your ankle.
Foundation / Lower Rail: With soft lilac, ch a multiple of 6 plus 1 to the required band length. Do not work back across this chain. This foundation chain becomes the lower rail.
First Vertical Bar: Turn. Ch 4. This ch-4 forms the first treble-height bar rising from the end of the lower rail.
Upper Rail and Bars: Ch 5, tr into the 6th foundation chain from the previous attachment point. Repeat across the foundation chain. The ch-5 spans form the upper rail, and the treble stitches form the spaced vertical bars. If your last repeat is slightly short or long, adjust the final ch span by 1 chain rather than forcing the band to pucker.
End Spine: At the final end, ch 1 and work 2 to 3 sc down the side edge to stabilize the two rails together. Fasten off, leaving a 12 cm (5 inch) tail for finishing.
Button Loop: Join lilac at the opposite end beside the upper rail. Ch 6 to 8, depending on button size, and sl st back into the same edge to form a small loop. Fasten off securely.
Closure Button: Sew the 6 to 8 mm pearl shank button to the other end of the band, centered between the two rails. Test the fit before knotting the sewing thread permanently.
Fit Check
Button the band around the ankle. The two rails should lie parallel and flat. The treble bars should be vertical, not twisted. If the band rotates or gaps, shorten the button loop before continuing.
Optional More Secure Band
If the wearer will walk or dance in the piece, work one round of slip stitches into the back bumps of the lower foundation chain before making the upper rail. This makes the lower rail slightly firmer while keeping the chain appearance.
Wisteria Blossoms and Buds
Make the motifs before assembling the vine so you can audition the color balance. For the photographed look, prepare approximately 6 open flowers, 12 bell buds, and 4 tiny tip buds.
Open Wisteria Flower (Make 6)
Center Ring: With lilac or amethyst, make an MR. Ch 1, work 5 sc into the ring, and pull the ring almost closed. Join with sl st to the first sc.
Petal Shells: For each of the 5 stitches around: sl st in the next sc, ch 2, work 3 dc into the same sc, ch 2, sl st into the same sc. Repeat around to create 5 compact shell petals.
Cup the Flower: Fasten off with a 12 cm (5 inch) tail. Thread the tail to the back and make one tiny anchoring stitch across the base of two opposite petals. Pull gently so the flower cups downward like a wisteria bell rather than lying completely flat.
Add Pearl: Using fine sewing thread, stitch one 3 to 4 mm pearl into the center. Pass through the pearl at least twice and knot securely on the back.
Compact Bell Bud (Make 12)
Base: Make an MR, ch 1, and work 5 sc into the ring. Pull closed and join.
Shell Round: Ch 2. Work 3 dc into each of the next 3 stitches only, placing a sl st between shells. Leave the remaining 2 stitches unused so the motif naturally folds into a bell shape.
Close Base: Fasten off with a long tail. Pinch the lower edge together and take 1 to 2 stitches through the base to hold the bell shape.
Pearl Accent: Sew a 3 mm pearl just inside the bell opening or at the very tip. Alternate the pearl position among buds for a less uniform, more botanical look.
Tiny Tip Bud (Make 4)
Cluster: Ch 3. In the 3rd chain from hook work 4 dc together as one cluster. Ch 1 to lock.
Shape: Fasten off. Wrap the starting tail once around the base of the cluster and knot to form a narrow teardrop bud.
Optional Pearl: Add a 2 to 3 mm pearl to the tip only if you want extra sparkle. Use these tiny buds at the ends of the longest branches.
Suggested Color Mix
| Motif | Soft Lilac | Amethyst | Total |
|---|---|---|---|
| Open flowers | 3 | 3 | 6 |
| Bell buds | 7 | 5 | 12 |
| Tiny tip buds | 3 | 1 | 4 |
Shaping Tip: The flowers should look dimensional. If a blossom lies too flat, lightly mist it, place it over the rounded end of a pen cap or small bead, and let it dry in a cupped shape.
Sage Leaves, Tendrils, and Floral Vines
These green elements bring the whole piece together and give it that natural, organic feel.
Tiny Pointed Leaf (Make 8)
Chain: With sage, ch 6.
First Side: Starting in 2nd ch from hook: sl st, sc, hdc, dc.
Tip: Work 5 dc into the final chain to turn around the tip.
Second Side: Working down the unused loops on the opposite side of the foundation chain: dc, hdc, sc, sl st. Fasten off with a tail for sewing.
Spiral Tendril (Make 6)
Chain: With sage, ch 10 to 14. Vary the lengths so the finished piece looks organic.
Curl: Work 2 sc into each chain back to the beginning. The strip will curl naturally. For a tighter curl, use 3 sc in every second chain.
Finish: Fasten off with an 8 cm (3 inch) tail.
Long Main Vine (Make 1)
Main Stem: With sage, ch 62. This should measure roughly 18 to 20 cm (7 to 8 inches). Adjust to your foot before fastening off.
Reinforce: Starting in 2nd ch from hook, sl st loosely in each chain back to the beginning. Do not tighten. The stem should remain flexible and smooth.
Create Side Branches: As you slip stitch back, pause at approximately 8, 18, 30, 41, and 51 chains from the tip. At each point, ch 6 to 12 for a side branch, then sl st back down the branch to the main stem before continuing. Make the longest branches near the upper third of the vine.
Anchor Tail: Leave a 20 cm (8 inch) tail at the ankle end so the vine can be sewn to the band securely.
Short Side Spray (Make 1)
Stem: With sage, ch 26 to 30. Sl st back along the chain.
Branches: Add 2 short branches of 5 to 8 chains while returning. Place them off-center so the spray looks asymmetrical.
Finish: Leave a long tail for attachment near the outer ankle.
Motif Placement Map
Use this guide to position your flowers along the vine for the most natural, beautiful result.
| Position on Long Vine | Recommended Decoration |
|---|---|
| Ankle anchor / first 2 cm | 1 open amethyst flower + 1 lilac bud + 1 leaf |
| About 4 to 5 cm down | 1 lilac open flower + 2 buds + 1 tendril |
| About 8 to 10 cm down | 1 amethyst open flower + 2 buds + 2 leaves |
| About 12 to 14 cm down | 1 lilac open flower + 2 buds + 1 tendril |
| Near lower tip | 1 amethyst open flower + 2 to 3 tiny buds + 1 leaf |
| Short side spray | 1 open flower + 2 to 3 buds + 1 tendril + 1 leaf |
Full Assembly Step by Step
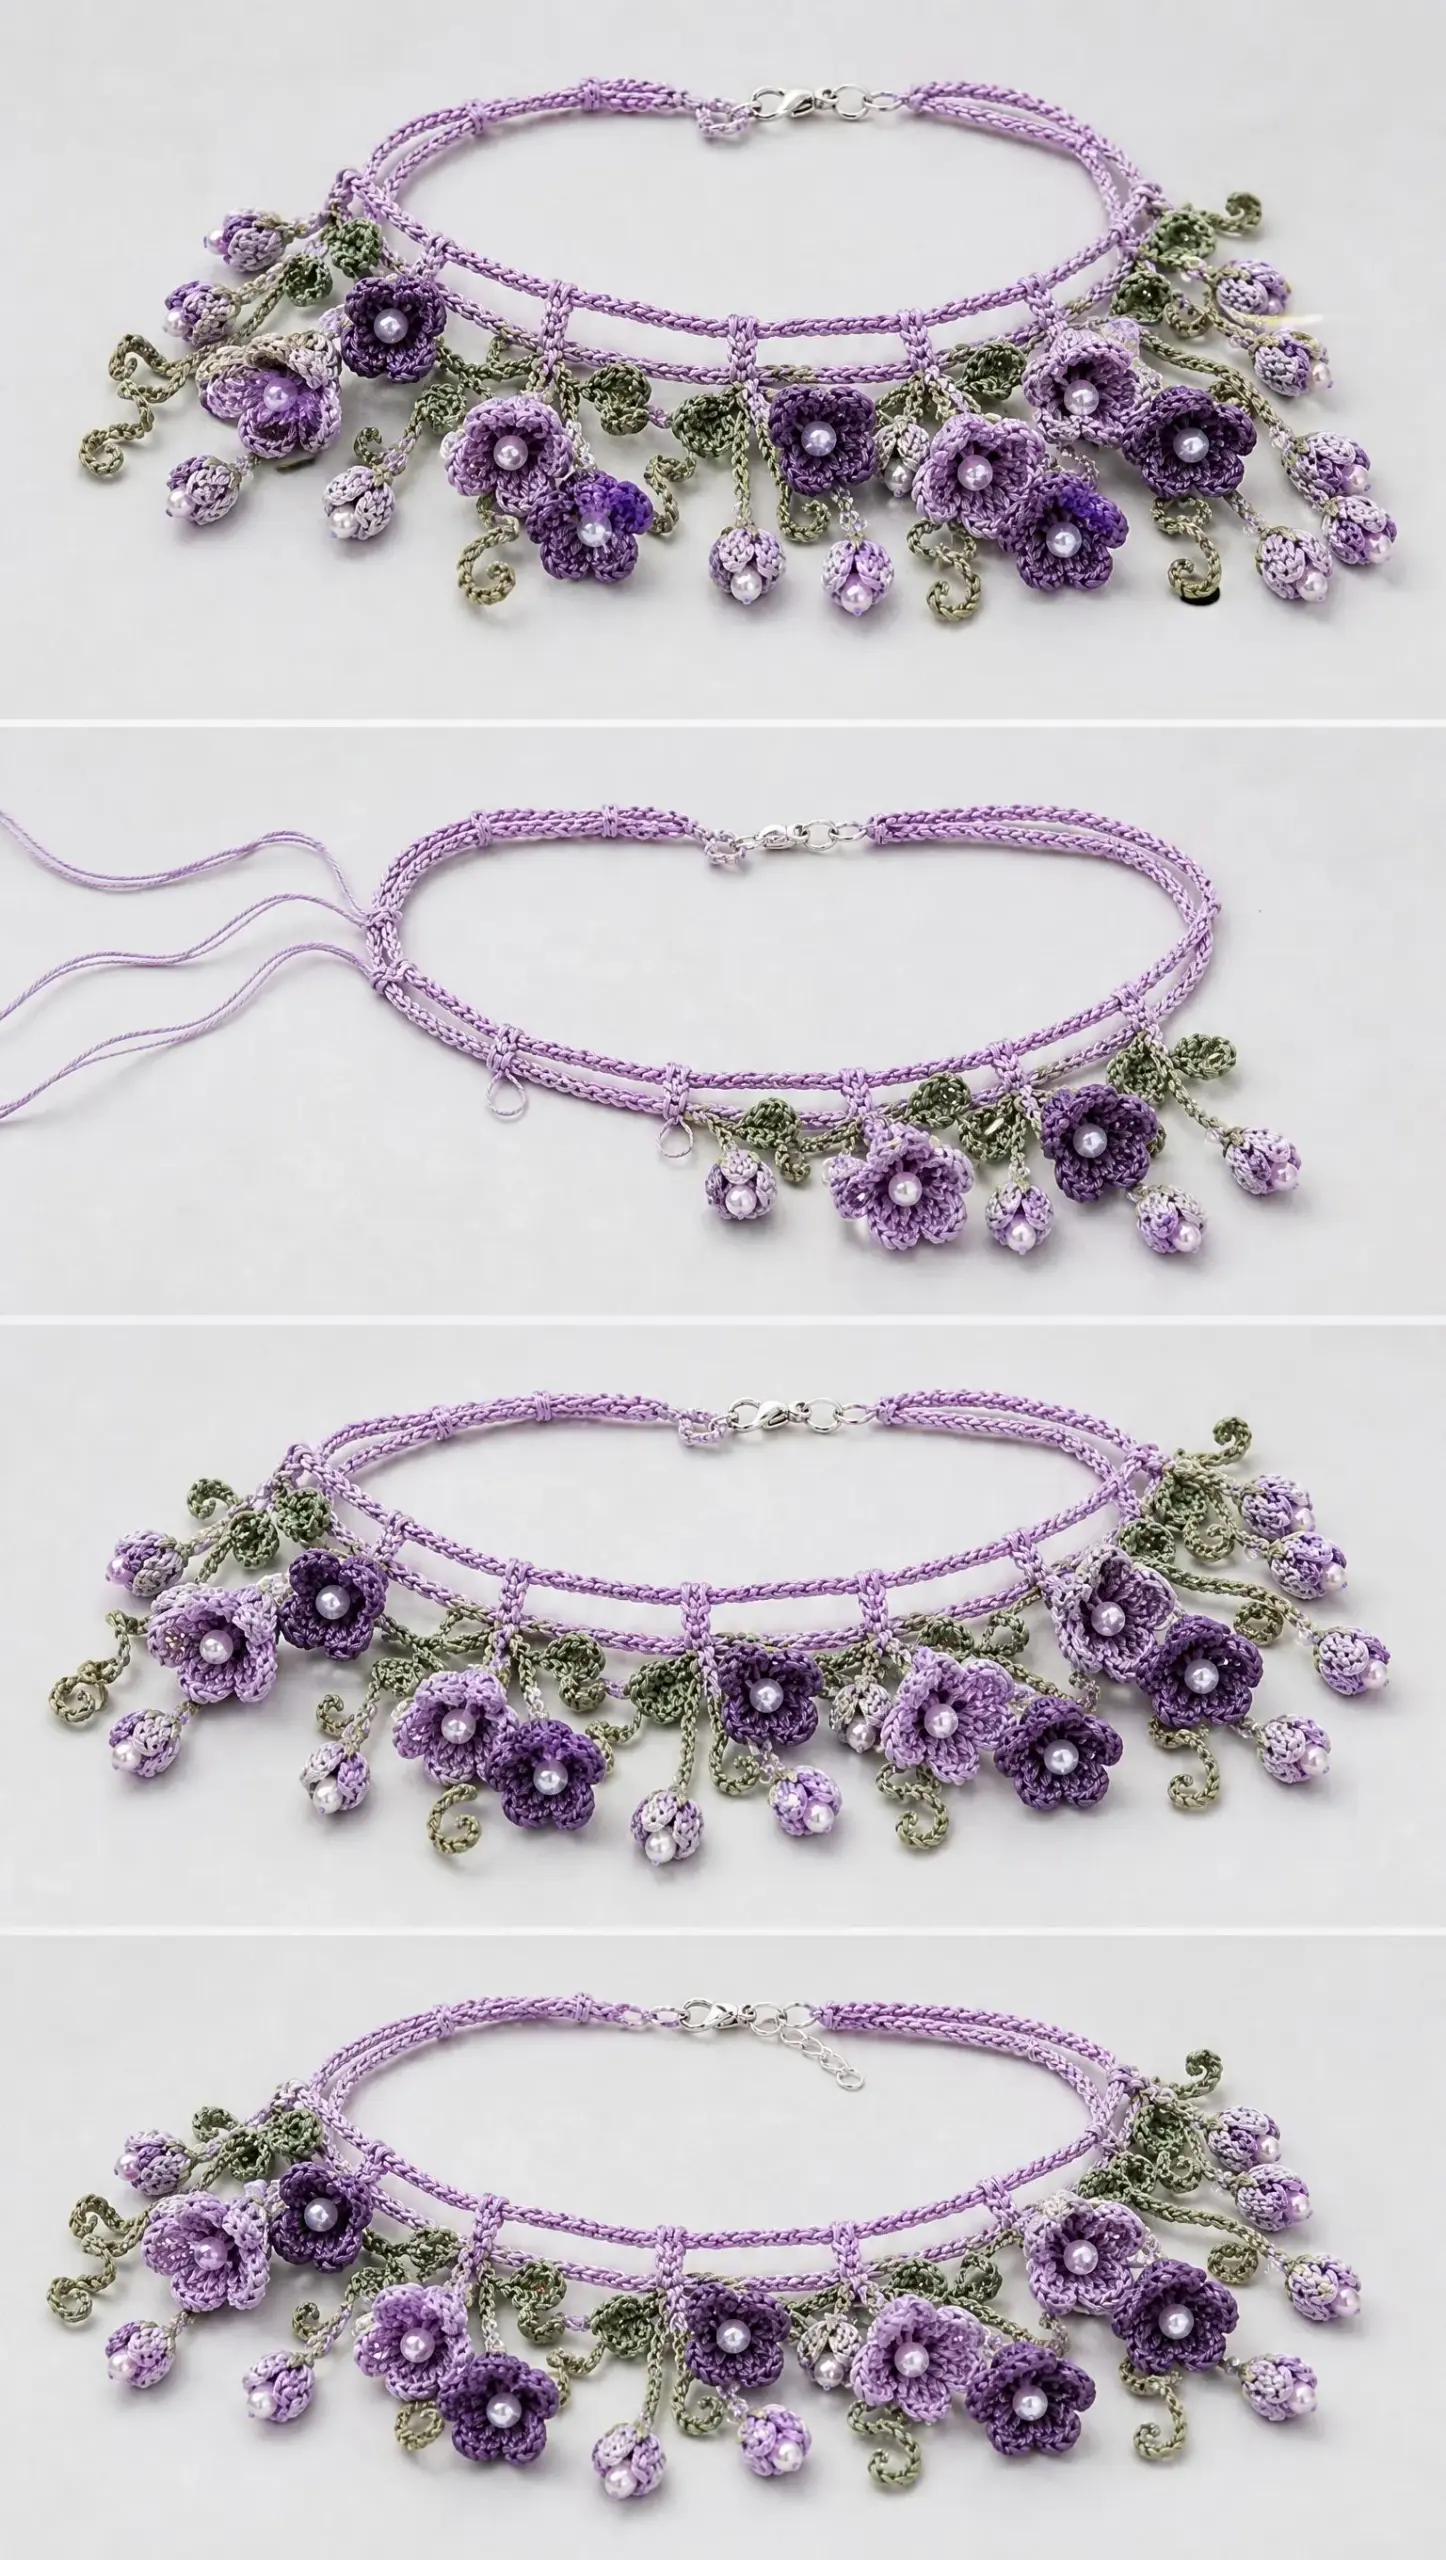
Before sewing, button the plain ankle band onto the wearer or a dress form. Pin the long vine diagonally from the outer ankle toward the center of the upper foot. The vine should rest on the skin rather than hang in the air. Mark the preferred anchor points, remove the anklet, then sew.
1. Block the Pieces: Lightly steam-block or wet-block the ankle band, vines, leaves, and flowers. Pin the band straight with the two rails parallel. Let everything dry completely.
2. Attach the Long Vine: Place the ankle end of the long sage vine under the lower lilac rail, slightly toward the outside/front of the ankle. Sew through the vine and both lilac rails at 2 to 3 neighboring points. Keep stitches tiny and hidden.
3. Create the Diagonal Curve: Lay the vine so it curves gently across the upper arch. Do not attach the lower half to the skin or add any elastic there. The floral weight should create the drape. If you want more stability, tack only the upper 3 to 4 cm of vine to the lower ankle rail.
4. Attach the Short Side Spray: Sew the short sage spray to the lower rail 2 to 3 cm to the side of the main vine anchor. Angle it outward and slightly downward so the two sprays form an asymmetrical V rather than a centered bouquet.
5. Sew the Largest Flowers First: Place the 6 open flowers according to the placement map. Sew each flower to the vine through the flower base only. Use 3 to 4 small stitches and keep petals free.
6. Fill with Bell Buds: Cluster the bell buds in groups of 2 or 3 around the open flowers. Mix lilac and amethyst. Some buds should point downward, and others can sit sideways against the vine.
7. Add the Tiny Tip Buds: Use the smallest buds at branch ends and near the lower tip of the cascade. These create the wisteria taper.
8. Add Leaves: Sew leaves at roughly one-third of the flower junctions. Avoid adding a leaf beside every blossom. The design looks more refined when greenery is sparse.
9. Add Tendrils: Sew spiral tendrils into 4 to 6 open spaces. Allow them to curl naturally away from the flower clusters.
10. Check Drape on the Foot: Put the anklet on. The main cascade should cross the arch diagonally without reaching the toes. If the tip is too long, fold the final 1 to 2 cm of vine back under and stitch it invisibly.
11. Final Reinforcement: At every major cluster, run the sewing thread once through the vine and the back of the flower base. Do not stitch through visible petals. Secure all knots on the underside.
12. Finish and Trim: Weave in all crochet tails for at least 2 cm (3/4 inch), split the yarn fibers once if possible, then trim. Re-shape the petals and tendrils with your fingers.
Pearl Distribution
For the most natural result, do not pearl every motif identically. A good distribution is: pearls in all 6 open flowers, pearls in 8 of the 12 bell buds, and optional pearls in 2 of the 4 tiny tip buds. This gives approximately 16 visible pearl accents plus the closure button.
How to Resize the Ankle Band
| Adjustment | What to Change |
|---|---|
| Need about 2 cm (3/4 inch) more length | Add 6 foundation chains and one extra ladder opening |
| Need about 2 cm (3/4 inch) less length | Remove 6 foundation chains and one ladder opening |
| Band is correct but button loop is loose | Shorten button loop by 1 to 2 chains |
| Band is correct but closure feels tight | Lengthen button loop by 1 to 2 chains |
| Want a wider ankle band | Use ch 5 instead of ch 4 for the first vertical rise and replace tr with dtr in the bars |
How to Resize the Floral Drape
Petite Foot: Begin the main vine with ch 50 to 54 and use 4 to 5 open flowers.
Average Foot: Ch 58 to 64 and use the full 6-flower arrangement.
Longer Foot or More Dramatic Jewelry: Ch 68 to 72 and add 2 to 4 more buds rather than adding many more large flowers.
If the floral curve falls too close to the toes, shorten the vine from the lower tip, not from the ankle anchor. This preserves the densest cluster near the ankle.
Comfort and Durability Tips
Use smooth mercerized cotton rather than fuzzy yarn. Fuzzy fibers can irritate bare skin and obscure the tiny stitches.
Keep all pearl knots and motif joins on the underside of the flowers so no hard thread ends touch the foot.
Do not over-starch. The vines should remain flexible enough to follow the foot.
For a piece intended for regular wear, add a tiny drop of clear flexible fabric glue to the hidden button-sewing knot only. Do not glue the crochet motifs.
Blocking Instructions
Wash: Soak the finished anklet for 5 minutes in cool water with a drop of mild soap. Rinse without wringing.
Dry: Roll in a towel to remove excess moisture.
Shape: Pin the ankle rails parallel and arrange the vine in a relaxed diagonal curve. Shape petals around the pearl centers and open the leaves.
Set: Allow to air dry completely before unpinning. Do not iron directly over pearls or synthetic bead coatings.
Care Instructions
Hand wash only. Store flat in a small box or fabric pouch so the tendrils and flower petals are not crushed. If the flowers flatten, reshape with damp fingertips and let them dry over a rounded form.
Quick Reference Checklist
| Component | Quantity | Color/Note |
|---|---|---|
| Two-rail ankle band | 1 | Soft lilac; adjustable multiple of 6 + 1 chains |
| Pearl closure | 1 | 6 to 8 mm pearl shank button + ch-6 to ch-8 loop |
| Long main vine | 1 | Sage; about 18 to 20 cm before shaping |
| Short side spray | 1 | Sage; about 7 to 9 cm |
| Open flowers | 6 | 3 lilac + 3 amethyst |
| Bell buds | 12 | 7 lilac + 5 amethyst |
| Tiny tip buds | 4 | Mostly lilac |
| Pointed leaves | 8 | Sage |
| Spiral tendrils | 6 | Sage |
| Pearl centers | About 16 to 18 | 3 to 4 mm satin white |
Assembly Order Summary
1. Fit and finish the ankle band.
2. Crochet and block both vines.
3. Make all flowers, buds, leaves, and tendrils.
4. Add pearl centers before attaching motifs to the vine.
5. Sew the long vine and short spray to the band.
6. Attach open flowers first, then buds, leaves, and tendrils.
7. Try on, correct the drape, reinforce joins, and weave ends.
Final Thoughts on This Crochet Tutorial
Aim for an airy upper ankle band with a denser cluster just below the outer ankle, then a tapered diagonal cascade across the upper foot. Leave small gaps between clusters so the sage vine remains visible and the pearls read as individual highlights.
The stitch counts in this pattern are intentionally measurement-based because fine thread, hook tension, ankle circumference, and foot length vary significantly. The repeat structure makes the band easy to resize without changing the overall design.
For the closest match to the reference photo, keep the ankle rails delicate, use high-twist smooth cotton, and resist overfilling the vine with leaves.
Thank you so much for choosing this Lavender Wisteria Anklet crochet pattern! I truly hope you enjoy making it as much as I enjoyed designing it. If you create one, I would absolutely love to see your finished piece. Tag me on Instagram or share a photo in my Facebook group.
If you loved this pattern, go ahead and save it to your Pinterest boards so you can find it easily when you are ready to start. And please drop a comment below if you make one. I love hearing about your projects and seeing how you put your own spin on things!
Want a Quick & Easy Printable Version?
Get a clean, beautifully formatted PDF of this pattern — easy to follow step by step, ready to print or save on any device. No scrolling, no distractions, just the pattern.
Get the Printable PDF →