
Last summer, my best friend announced she was expecting her first baby. A little girl. Due right at the end of sunflower season. I immediately knew what I wanted to make for her shower gift, but I couldn’t find exactly what I had pictured in my head anywhere online.
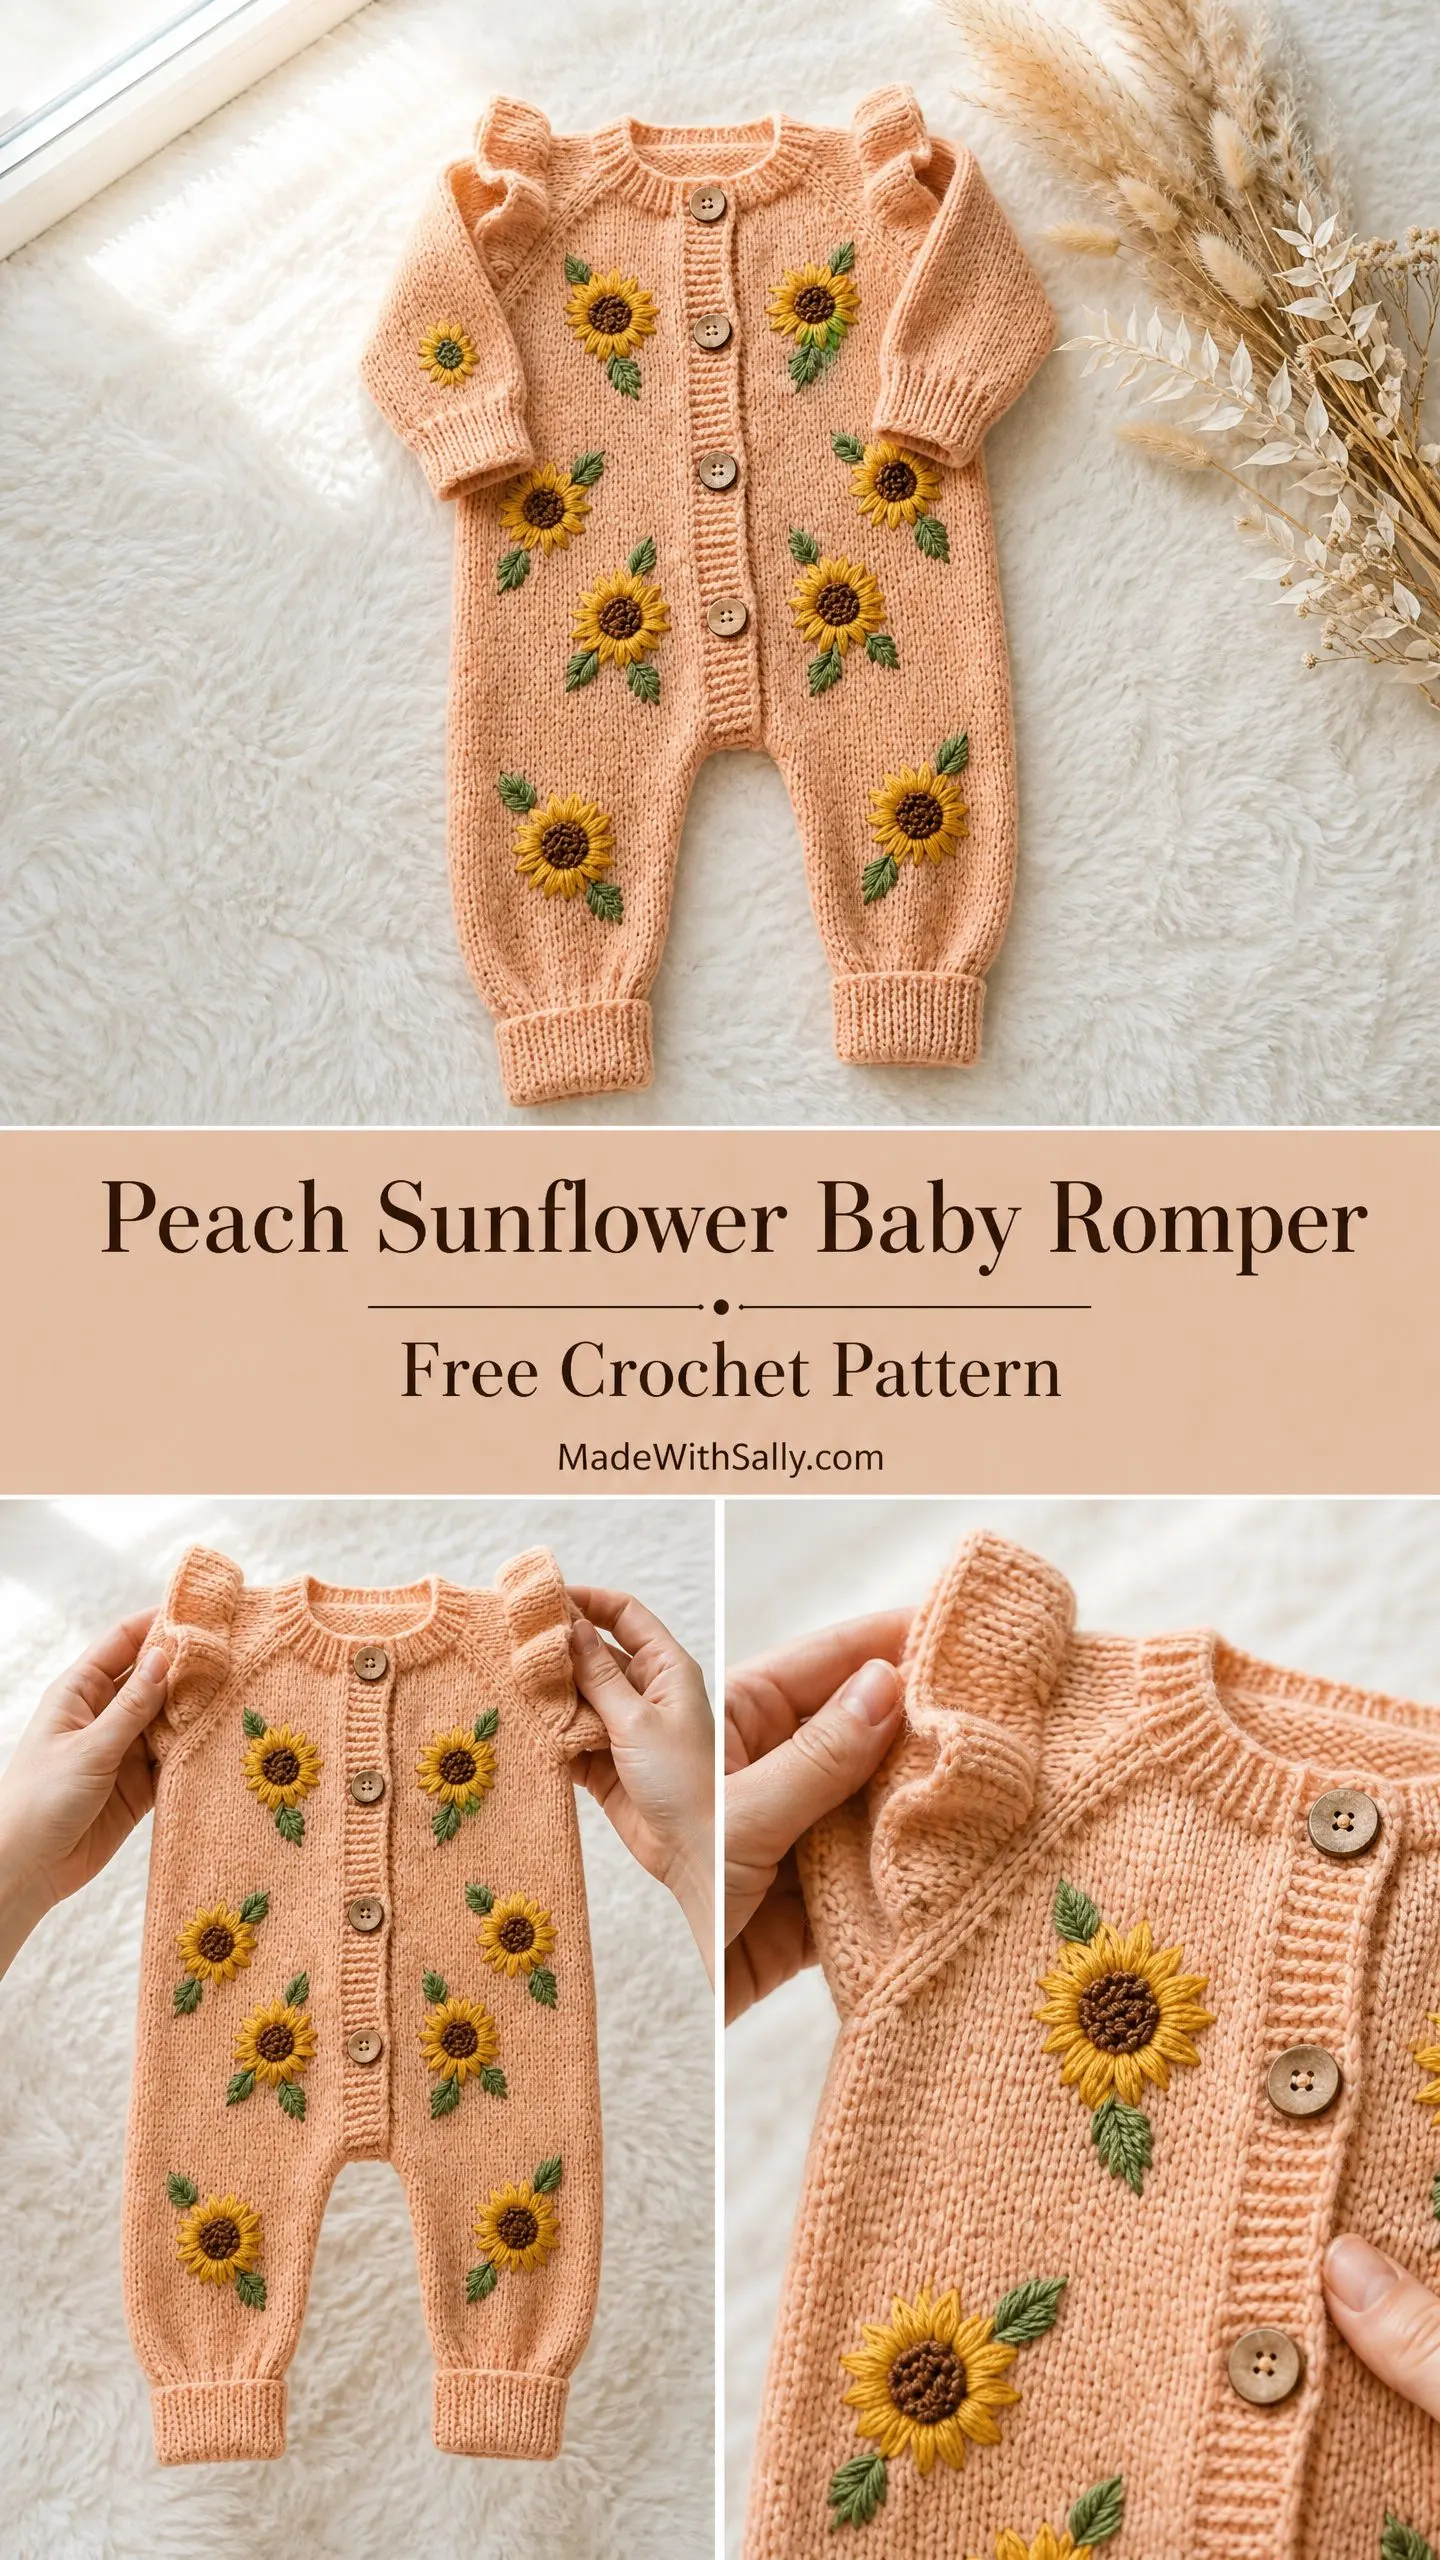
I wanted something soft and cozy for those early months. Something with that handmade warmth you just can’t get from a store. And I kept imagining cheerful sunflowers scattered across peachy fabric, like a tiny garden she could wear.
So I grabbed my hooks and got to work designing this romper from scratch. After several prototypes, a lot of frogging, and way too much coffee, I finally got it right. Now I get to share it with you, and honestly, I’m still a little emotional about how sweet it turned out.
About This Baby Romper Crochet Pattern
This cozy little romper is worked in moss stitch (sometimes called linen stitch or granite stitch), which creates that beautiful dense, knit-look texture you see in the photos. The fabric it produces is sturdy enough to hold its shape but still soft against delicate baby skin.
The construction might look intimidating at first glance, but I promise it’s totally manageable if you take it section by section. You’ll start at the neckline and work your way down to the toes, then add the sleeves separately and finish with those adorable sunflower appliques.
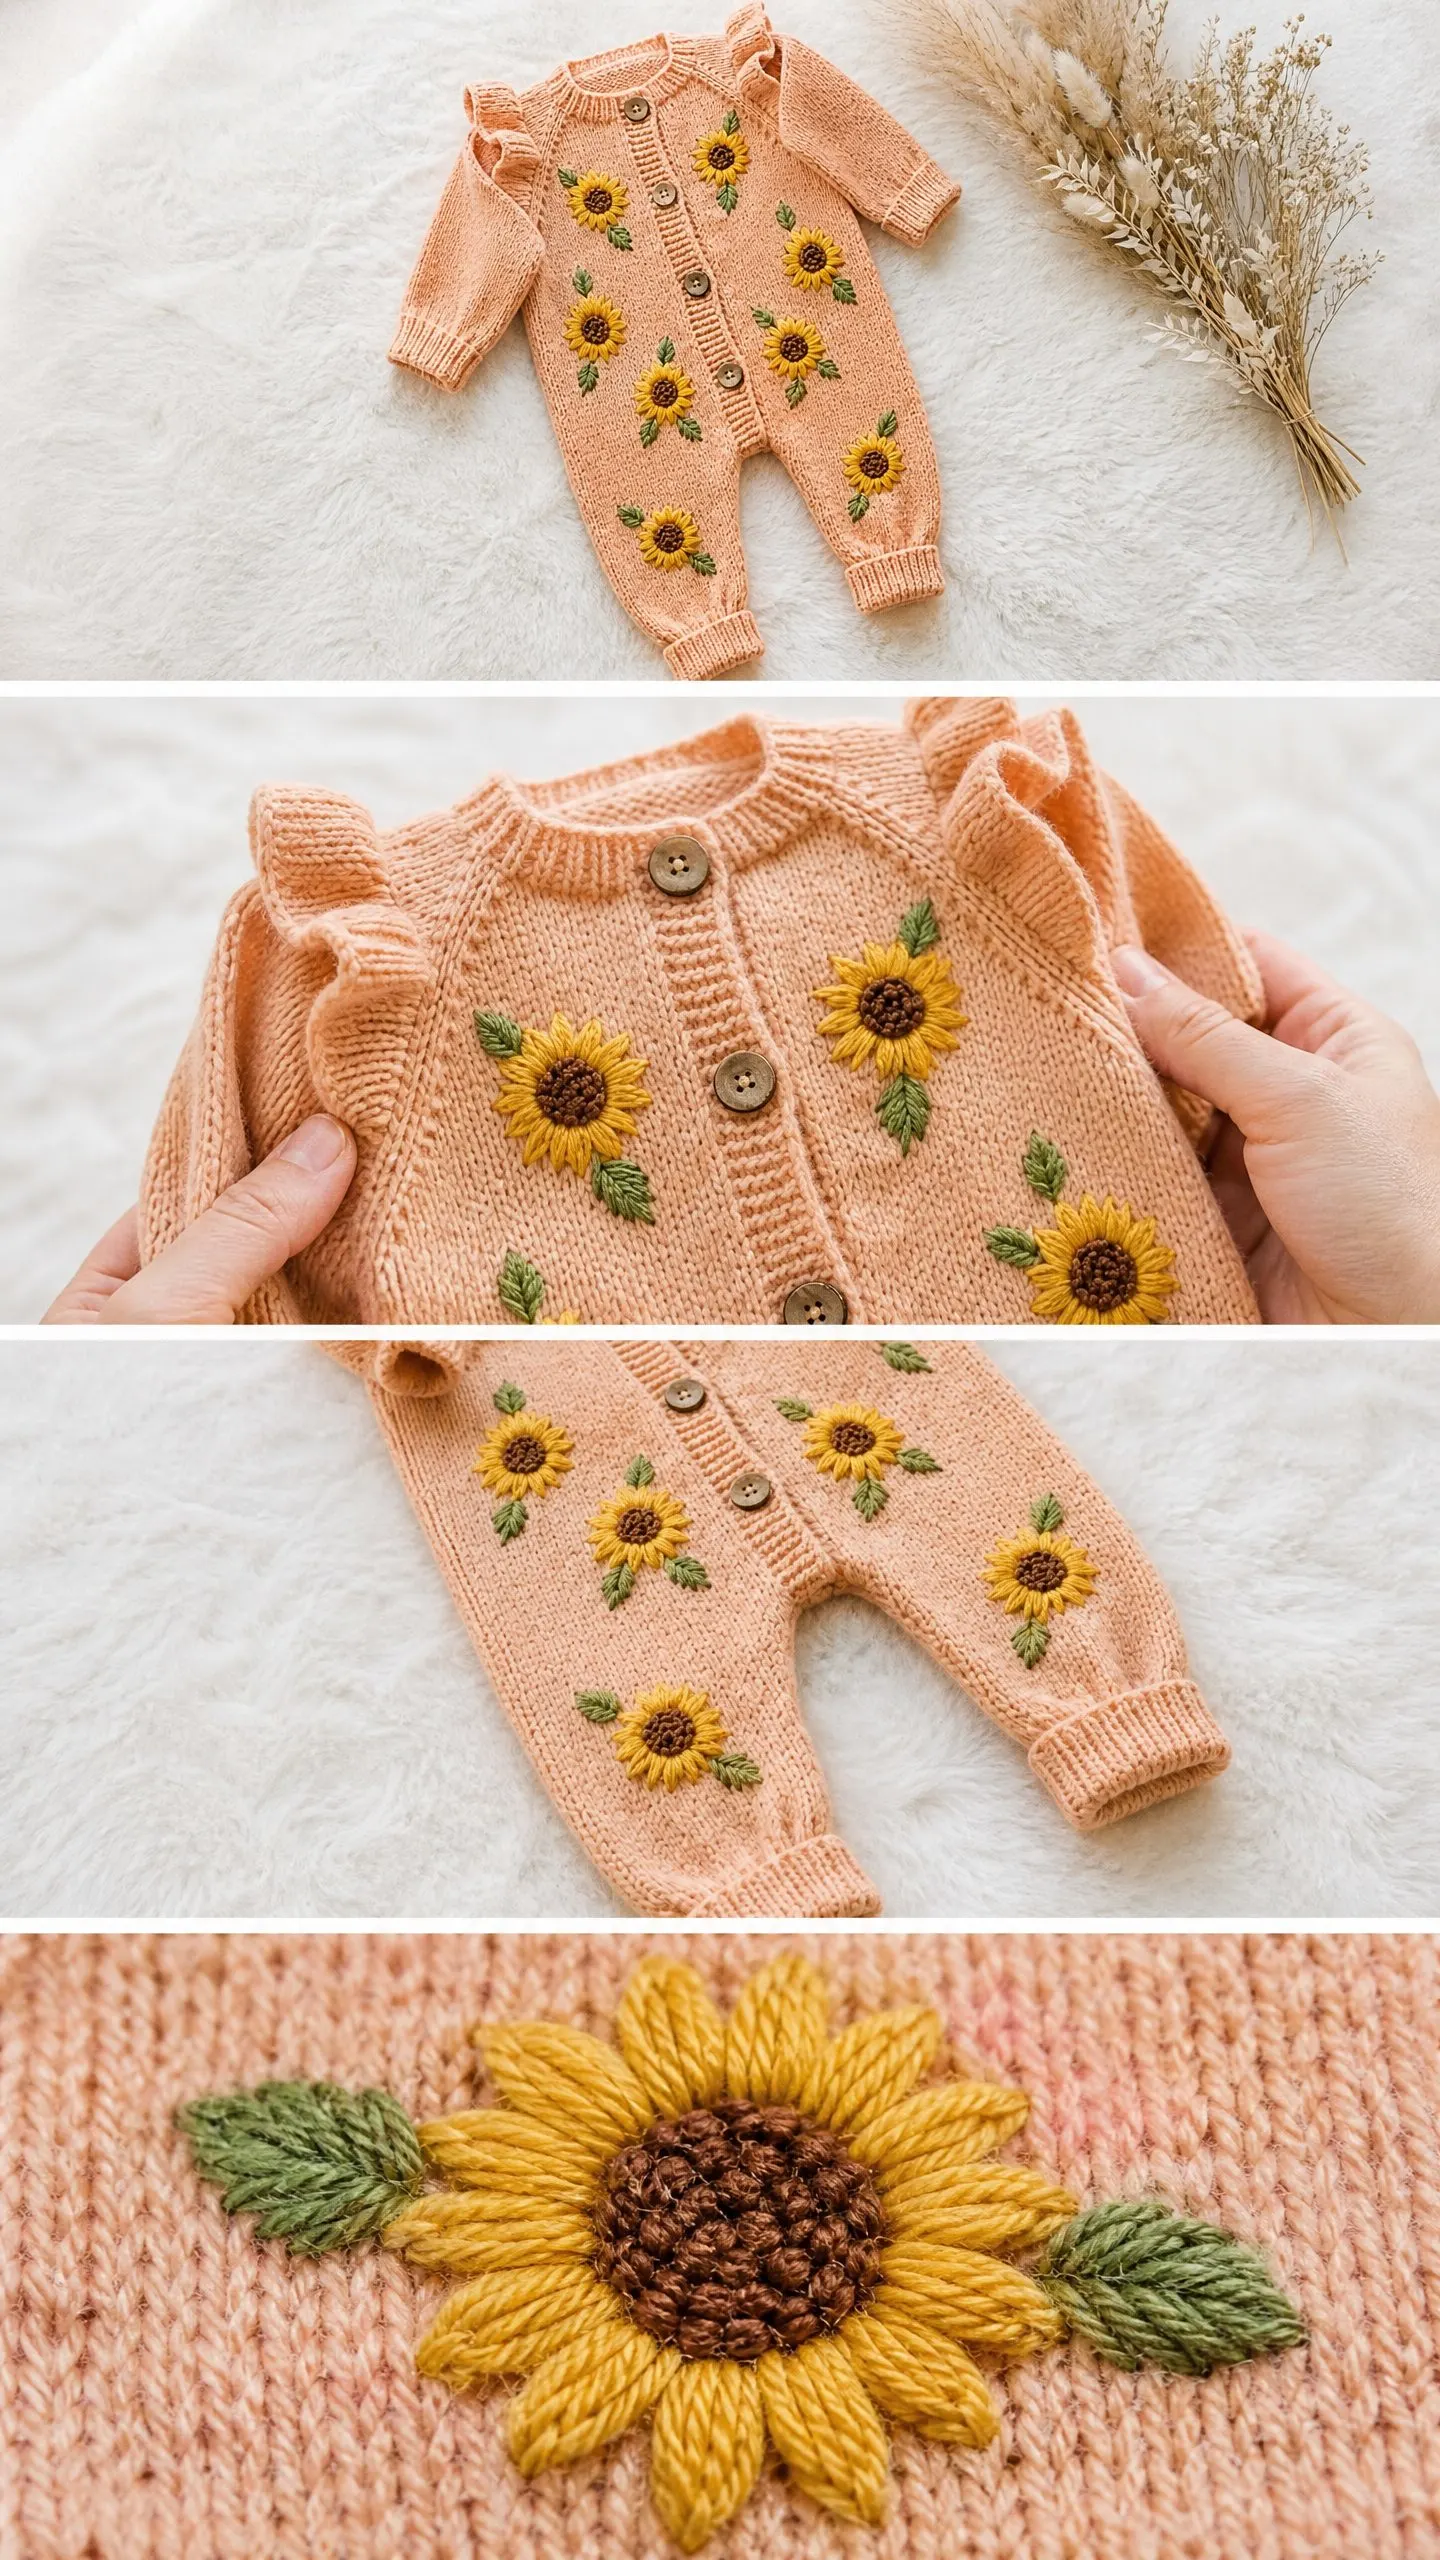
The finished romper features a front button band with six natural wooden buttons, sweet ruffle trim at the shoulders and neckline, ribbed cuffs at the wrists and ankles, and of course, those cheerful sunflowers scattered across the front. The back stays plain, which actually makes it more comfortable for baby to lie down.
Skill Level
I’m rating this one as intermediate. You should be comfortable with working in joined rounds and flat rows, maintaining consistent moss stitch tension, seaming garment pieces together, making button bands, picking up stitches along edges, and assembling appliques.
If you’ve made a few garments before, you’ll be fine here. If this is your first wearable project, maybe bookmark this one for later and practice on something simpler first. No shame in building skills gradually!
Finished Measurements
This pattern is written for three sizes:
0-3 months: chest 16 in / 40.5 cm, length neck to ankle 20 in / 51 cm, sleeve length 7 in / 18 cm
3-6 months: chest 17.5 in / 44.5 cm, length neck to ankle 22 in / 56 cm, sleeve length 7.75 in / 19.5 cm
6-12 months: chest 19 in / 48.5 cm, length neck to ankle 24 in / 61 cm, sleeve length 8.5 in / 21.5 cm
Throughout the pattern, instructions for 3-6 months and 6-12 months appear in parentheses in that order wherever three sizes are given.
Time Estimate
Plan for about 12 to 18 hours if you’re an experienced crocheter. Allow extra time for blocking and assembling all those sweet sunflower appliques.
Materials Needed
Yarn: DK weight (CYCA 3), approximately 550 (625, 710) yards / 503 (572, 649) meters in main color peach. Small amounts of golden yellow, dark brown, and medium green for sunflower appliques.
Hooks: US size G-6 / 4.0 mm for main body, US size F-5 / 3.75 mm for ribbing, cuffs, and button band
Notions:
Yarn Suggestions
Here are three excellent options that will give you beautiful results:
Paintbox Yarns Simply DK (100% acrylic, 137 yards / 125 m per 50 g skein) in shade Peach Sorbet. This yarn gives excellent stitch definition for moss stitch at this gauge and is machine washable, making it ideal for baby garments. You will need 4 (5, 6) skeins for the main color.
Drops Safran (100% cotton, 175 yards / 160 m per 50 g skein) in shade Powder. Cotton provides a slightly heavier drape and softer hand against baby skin. You will need 4 (4, 5) skeins. Note that cotton has less elasticity, so swatch carefully.
Lion Brand Feels Like Butta DK (100% polyester microfiber, 230 yards / 210 m per 100 g skein) in shade Peach. This yarn gives the soft, almost fuzzy halo visible in the finished garment and is an excellent match for the photo texture.
You can substitute any DK weight yarn that achieves the stated gauge. Avoid slippery or stiff yarns. Baby-safe and machine-washable fibers are strongly recommended. If using a plant-based fiber, purchase one additional skein as an insurance buffer.
Gauge (Please Don’t Skip This!)
With G-6 / 4.0 mm hook in moss stitch:
18 stitches and 20 rows = 4 in / 10 cm, blocked
I know gauge swatches aren’t the fun part, but this one is mandatory for a wearable garment. A difference of even one stitch per inch will change the chest measurement by over an inch, and then you’ll have a romper that doesn’t fit.
Make a swatch of at least 24 stitches and 24 rows, wash and block it as you would the finished garment, and measure before proceeding. Your future self will thank you.
Abbreviations (US Terms)
beg = beginning
ch = chain
ch-sp = chain space
dc = double crochet (yarn over, insert hook, pull up loop, yarn over and pull through 2 loops twice)
dec = decrease
hdc = half double crochet (yarn over, insert hook, pull up loop, yarn over and pull through all 3 loops)
inc = increase (2 sc in same stitch)
MS = moss stitch (see Special Stitches)
pm = place marker
rem = remaining
rep = repeat
rnd = round
RS = right side
sc = single crochet (insert hook, pull up loop, yarn over and pull through both loops)
sk = skip
sl st = slip stitch
sm = slip marker
sp = space
st(s) = stitch(es)
tch = turning chain
WS = wrong side
yo = yarn over
Special Stitches
Moss Stitch (MS) Worked Flat
The moss stitch creates a dense, grid-like texture by alternating single crochet stitches and chain-1 spaces. On each row, the single crochets fall over the chain spaces of the previous row, which creates that beautiful woven look.
Row 1 (foundation): Ch an even number. Sc in second ch from hook, ch 1, sk 1 ch, (sc in next ch, ch 1, sk 1 ch) across, sc in last ch. Turn.
Row 2: Ch 1, sc in first ch-sp, ch 1, (sc in next ch-sp, ch 1) across, sc in last st. Turn.
Row 3: Ch 1, sc in first ch-sp, ch 1, (sc in next ch-sp, ch 1) across, sc in last st. Turn.
Repeat Row 2 and Row 3 for pattern. Note: every sc falls into a ch-sp from the previous row except the two edge stitches.
Counting tip: When counting stitches in moss stitch, the stitch count refers to the number of sc plus the number of ch-1 spaces, treated as pairs. A row described as 36 MS sts contains 18 sc and 18 ch-1 spaces, for a working count of 36 positions total.
Moss Stitch Worked in the Round
Rnd 1: Ch 1, sc in first st, ch 1, sk 1, (sc in next st, ch 1, sk 1) around, sl st to first sc to join.
Rnd 2: Ch 1, sc in first ch-sp, ch 1, (sc in next ch-sp, ch 1) around, sl st to first sc to join.
Repeat Rnd 2 for pattern in the round.
Moss Stitch Increase
Work (sc, ch 1, sc) in the same stitch or space. This adds one sc-ch pair, increasing the stitch count by 2 positions.
Moss Stitch Decrease
Work sc2tog over the next two sc (inserting hook into each sc and skipping the ch-sp between them), ch 1. This reduces the stitch count by 2 positions.
Ribbing (Worked Flat)
Row 1: Ch 6 (or as instructed). Sc in second ch from hook and each ch across. Turn. (5 sc)
Row 2: Ch 1, sc in back loop only (BLO) of each sc across. Turn. (5 sc)
Repeat Row 2 for ribbing pattern.
Pattern Notes Before You Begin
Step-by-Step Instructions
Section 1: Neckline Ribbing
With F-5 / 3.75 mm hook and peach yarn, ch 6.
Row 1: Sc in second ch from hook and in each ch across. Turn. (5 sc)
Rows 2 through 72 (80, 88): Ch 1, sc in BLO of each sc across. Turn. (5 sc)
At the end of the last row, do not fasten off. Fold the ribbing strip so the short ends meet and sl st the ends together to form a ring, working through corresponding BLO stitches of both ends. This creates a neckline band of 72 (80, 88) rows around the neck circumference.
Checkpoint: The neckline ribbing ring should measure approximately 16 in / 40.5 cm (17.75 in / 45 cm, 19.5 in / 49.5 cm) around the outer edge.
Section 2: Yoke
Switch to G-6 / 4.0 mm hook.
The yoke is worked flat in two halves (right front and left front open at center), picking up stitches along the long outer edge of the neckline ribbing band.
With RS facing, attach yarn at the right front opening edge of the neckline band. Working along the outer edge of the ribbing band, pick up and work sc evenly: 72 (80, 88) sc total around the outer neck edge.
Yoke Set-Up Row (RS): Ch 1, work in MS across all 72 (80, 88) sts. Turn. (72, 80, 88 MS positions)
Place markers as follows to divide the yoke into 5 sections:
Total: 72 (80, 88) MS positions
Raglan Increases
Each increase row adds 8 MS positions total: 2 at each of the 4 raglan points.
Increase Row (RS): Ch 1, work MS to 1 st before raglan marker, MS inc in next st, sm, MS inc in st after marker, (work MS to 1 st before next marker, MS inc in next st, sm, MS inc in st after marker) 3 times, MS to end. Turn.
Plain Row (WS): Ch 1, work MS across all sts. Turn.
Work these two rows alternately 10 (11, 12) times total.
After all increase rows:
Checkpoint: The yoke should measure approximately 4 in / 10 cm (4.5 in / 11.5 cm, 5 in / 12.5 cm) from neckline to underarm.
Section 3: Separate Bodice Pieces
Divide for armholes on the next RS row as follows:
Work 23 (25, 28) MS across right front. Place the next 30 (34, 36) sleeve sts on a holder. Ch 4 (4, 4) for underarm. Work 46 (50, 56) MS across back. Place the next 30 (34, 36) sleeve sts on a second holder. Ch 4 (4, 4) for underarm. Work 23 (25, 28) MS across left front. Turn.
Next row (WS): Ch 1, work 23 (25, 28) MS across left front, work 4 MS across left ch-bridge, work 46 (50, 56) MS across back, work 4 MS across right ch-bridge, work 23 (25, 28) MS across right front. Turn. (100, 108, 120 MS positions)
Continue working flat in MS on all 100 (108, 120) MS positions for 8 (9, 10) more rows.
Checkpoint: The bodice from underarm to current row should measure approximately 2 in / 5 cm.
Now seam the sides. Fold the bodice RS together so that the side edges align. Sl st or sc seam the two side edges together, working from underarm down to the bottom edge of the bodice rows. When seamed, the bodice forms a tube with an open front.
Section 4: Torso (In the Round)
Join yarn at the bottom edge of the bodice with G-6 / 4.0 mm hook.
Rnd 1: Ch 1, work 100 (108, 120) MS positions evenly around bottom of bodice, sl st to first sc to join. (100, 108, 120 MS positions)
Work even in MS in the round for 14 (16, 18) rnds.
Checkpoint: The torso section from the underarm to here should measure approximately 4.5 in / 11.5 cm (5 in / 12.5 cm, 5.5 in / 14 cm).
Section 5: Crotch Shaping
Mark the center front MS position and the center back MS position.
Decrease Rnd 1: Work MS to 2 positions before center front marker, MS dec over next 2 sc, ch 1, work MS to 2 positions before center back marker, MS dec over next 2 sc, ch 1, work MS to end of rnd, sl st to join. (96, 104, 116 MS positions)
Work 1 plain rnd.
Decrease Rnd 2: Work MS to 2 positions before center front marker, MS dec, ch 1, work MS to 2 positions before center back marker, MS dec, ch 1, work to end, sl st to join. (92, 100, 112 MS positions)
Work 1 plain rnd.
Decrease Rnd 3: Repeat decrease rnd. (88, 96, 108 MS positions)
Work 1 plain rnd.
You will now split for the two legs.
Section 6: Leg Tubes
Split the 88 (96, 108) MS positions into two equal halves: 44 (48, 54) MS positions for each leg.
For the right leg:
Join yarn at the inner leg edge. Work 44 (48, 54) MS positions for the first leg, sl st to join into a round.
Work even in MS in the round for 22 (26, 30) rnds.
Calf Taper (Optional): Work 2 decrease rnds spaced 6 rnds apart, each removing 2 MS positions total (1 at each side): 40 (44, 50) MS positions after both decreases.
Ankle Ribbing: Switch to F-5 / 3.75 mm hook. Ch 1, work 40 (44, 50) sc evenly around (collapsing the MS pairs into single sc). Join to work ribbing in the round in BLO for 6 rnds. Fasten off and weave in end.
Checkpoint: Each leg tube from crotch split to ankle ribbing edge should measure approximately 5.5 in / 14 cm (6.5 in / 16.5 cm, 7.5 in / 19 cm).
Repeat all leg instructions for the left leg using the remaining 44 (48, 54) MS positions.
Section 7: Sleeves
Pick up the 30 (34, 36) held sleeve sts with G-6 / 4.0 mm hook, joining yarn at the underarm center. Pick up 4 additional MS positions from the underarm ch-bridge: 34 (38, 40) MS positions total in the sleeve round.
Rnd 1: Work 34 (38, 40) MS positions in the round, sl st to join.
Work even in MS for 10 (12, 14) rnds.
Sleeve Taper:
Decrease Rnd 1: Work MS to 1 position before beg of rnd marker, MS dec over next 2 sc, work MS to 1 position before other side, MS dec, work to end, sl st to join. (30, 34, 36 MS positions)
Work 4 plain rnds.
Decrease Rnd 2: Repeat decrease rnd. (26, 30, 32 MS positions)
Work 4 plain rnds.
Decrease Rnd 3: Repeat decrease rnd. (22, 26, 28 MS positions)
Continue even until sleeve measures 6.5 in / 16.5 cm (7.25 in / 18.5 cm, 8 in / 20.5 cm) from underarm.
Wrist Ribbing: Switch to F-5 / 3.75 mm hook. Work 22 (26, 28) sc evenly around collapsing MS pairs. Join and work 6 rnds of BLO sc ribbing in the round. Fasten off.
Checkpoint: Each sleeve from underarm to end of ribbing should measure approximately 7 in / 18 cm (7.75 in / 19.5 cm, 8.5 in / 21.5 cm).
Repeat for second sleeve.
Section 8: Button Band and Neckline Finish
Right Front Button Band (worked flat):
With RS facing and F-5 / 3.75 mm hook, attach yarn at the top right front opening edge. Working down the right front opening from neck to hem:
Row 1 (RS): Ch 1, work 1 sc in each row end evenly down the right front edge. Count the stitches and adjust so you have an even number, approximately 60 (66, 72) sc. Turn.
Row 2: Ch 1, sc in BLO of each sc across. Turn.
Row 3: Ch 1, sc in BLO of each sc across. Turn.
Fasten off. This is the plain right band (button side, no buttonholes).
Left Front Buttonhole Band:
With RS facing and F-5 / 3.75 mm hook, attach yarn at the bottom left front opening edge. Working upward:
Row 1 (RS): Ch 1, work 60 (66, 72) sc evenly up the left front edge. Turn.
Row 2: Ch 1, sc in BLO of each sc across. Turn.
Row 3 (Buttonhole Row): Ch 1, sc in first 4 (5, 6) sts BLO, (ch 2, sk 2 sts, sc in next 8 (9, 10) sts BLO) 5 times, ch 2, sk 2 sts, sc in last 4 (5, 6) sts BLO. Turn.
Row 4: Ch 1, sc in BLO across, working 2 sc into each ch-2 sp. Turn. (60, 66, 72 sc)
Row 5: Ch 1, sc in BLO of each sc across. Turn.
Fasten off. Sew 6 wooden buttons onto the right front band aligning with buttonholes.
Section 9: Neckline Ruffle
With G-6 / 4.0 mm hook and peach yarn, attach yarn at the center back of the neckline ribbing outer edge. Work in sc along the neckline outer edge all the way around, picking up 1 sc per rib row: 72 (80, 88) sc total.
Ruffle Row 1: Ch 1, 2 sc in each sc around. (144, 160, 176 sc)
Ruffle Row 2: Ch 1, 2 sc in each sc around. (288, 320, 352 sc)
Sl st to first sc. Fasten off. This creates a full, ruffled neckline trim.
Section 10: Shoulder Ruffle
The shoulder ruffle runs along the raglan seam line at the top of each sleeve, from neckline to underarm.
With G-6 / 4.0 mm hook and peach yarn, attach at the neck edge along the left raglan line. Pick up sc along the entire raglan increase line, approximately 20 (22, 24) sc across the raglan line from neck to underarm. Turn.
Row 1: Ch 1, 2 sc in each sc across. (40, 44, 48 sc)
Row 2: Ch 1, 2 sc in each sc across. (80, 88, 96 sc)
Fasten off. Repeat for the right raglan shoulder ruffle.
Sunflower Appliques
Make 10 (10, 12) sunflower appliques. Each sunflower has a center disc and outer petals, and is accompanied by 2 small leaf shapes.
Center Disc
With dark brown yarn and F-5 / 3.75 mm hook.
Magic ring or ch 2.
Rnd 1: Work 6 sc in ring, sl st to join. (6 sc)
Rnd 2: Ch 1, 2 sc in each sc around, sl st to join. (12 sc)
Rnd 3: Ch 1, (sc in next sc, 2 sc in next sc) around, sl st to join. (18 sc)
Fasten off leaving a long tail. Do not flatten. This forms a small domed disc.
Petal Ring
With golden yellow yarn and F-5 / 3.75 mm hook.
Magic ring.
Rnd 1: Work 12 sc in ring, sl st to join. (12 sc)
Rnd 2: (Ch 6, sl st in second ch from hook, hdc in next ch, dc in next 2 ch, hdc in last ch, sl st in next sc on ring) 12 times. (12 petals made)
Fasten off leaving a long tail.
Center the disc on top of the petal ring and sew in place through both layers using the dark brown tail.
Leaf (Make 2 Per Flower)
With green yarn, ch 6.
Row 1: Sc in second ch from hook, hdc in next ch, dc in next ch, hdc in next ch, sc in last ch. Do not turn. Working along the other side of the foundation ch: sc in first ch, hdc in next ch, dc in next ch, hdc in next ch, sc in last ch. Sl st to first sc to close. Fasten off leaving a long tail. (10 sts, leaf shape)
Arrangement and Attachment
Following the finished garment layout: scatter sunflowers across the front bodice (3 above the waist) and down both legs (3-4 per leg), with leaves flanking each flower. The back is left plain.
Pin each sunflower and pair of leaves in position before sewing. Sew each element securely through all layers of the romper fabric using the tails and a yarn needle. Make several passes through the center of each flower to anchor firmly. Weave all ends to the WS.
Finishing and Blocking
Weave in all remaining ends on the WS, being thorough at the underarm joins and raglan seams.
Block the completed romper by soaking in cool water with a small amount of wool wash or gentle soap. Even if using acrylic, a light wet block will help even out moss stitch tension. Gently press out excess water in a towel. Lay flat on a blocking mat and pin to the finished measurements. Allow to dry completely.
After blocking, double check that your buttons are sewn on securely using strong thread or doubled yarn, positioned exactly opposite the 6 buttonholes.
Size Customization Tips
To lengthen the torso: Add rounds in Section 4 before beginning the crotch shaping. Each additional 2 rounds adds approximately 0.4 in / 1 cm.
To lengthen the legs: Add rounds in Section 6 before the ankle ribbing.
To adjust the chest: Change the number of MS positions in the body by multiples of 4 to maintain the stitch pattern repeat. Each additional 4 MS positions adds approximately 0.9 in / 2.2 cm to the chest circumference.
To widen the sleeves: Pick up 2 additional MS positions at the underarm bridge.
Always re-check your math after any changes. Stitch counts must remain even for the moss stitch repeat to work correctly.
Care Instructions
Machine wash cold on a gentle cycle inside a mesh laundry bag. Lay flat to dry. Do not tumble dry, iron, or dry clean. If using a cotton or natural fiber yarn, reshape while damp and dry flat to maintain fit. Store folded, not hung, to prevent stretching.
You Did It!
Thank you so much for making this little romper with me. I hope whoever receives it feels all the love you stitched into every single row. There’s something really special about dressing a baby in something you made with your own hands, and those sunflowers are going to make everyone smile.
If you make this peach sunflower baby romper crochet pattern, I would absolutely love to see it! Tag me on Instagram or share it in our Facebook group. Seeing your finished projects honestly makes my whole week.
Before you go, save this pattern to your Pinterest boards so you can find it again when you need a baby shower gift or just want to make something beautiful. And if you have any questions or just want to say hi, drop a comment below. I read every single one!
