
Crochet garments scare people. I hear it all the time. "I could never make a whole dress." "Lace patterns are too complicated." "I would mess up the sizing." Let me stop you right there. Yes, this dress looks intricate. Yes, it has lace stitches and color changes and shaping. But here is the truth: if you can work a double crochet and count to twelve, you can make this dress.
The fan stitch in the bodice? It is just five double crochets clustered together. The chevron shells in the skirt? Same idea, just seven double crochets. The ombre effect? You are simply changing yarn colors at specific points. Nothing magical or mysterious happening here.
Whether you have been crocheting for years or you are ready to tackle your first wearable project, this Spring Garden Green Crochet Dress pattern breaks everything down into manageable sections. I will walk you through each part, explain the special stitches before you need them, and give you checkpoints along the way so you know you are on track.
About This Crochet Dress Pattern
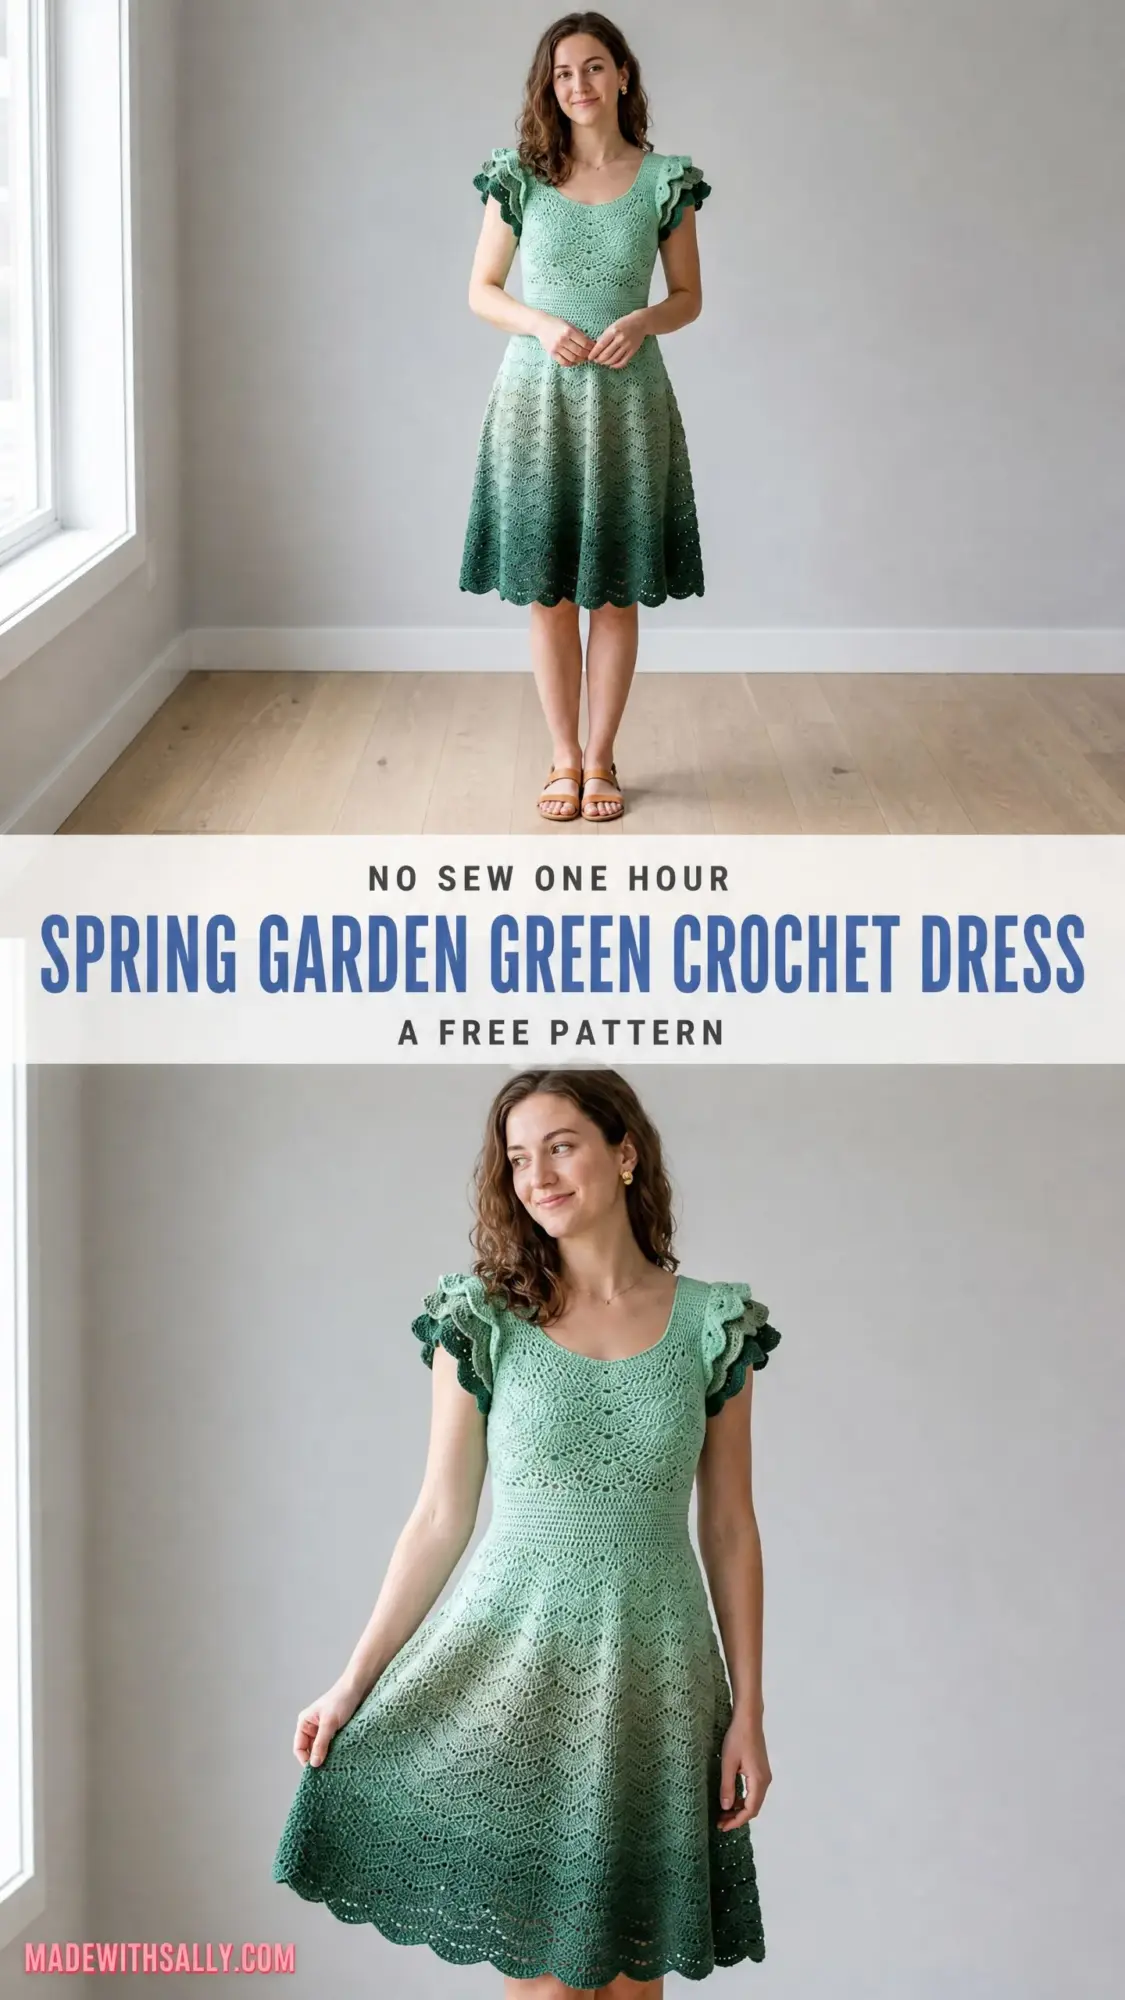
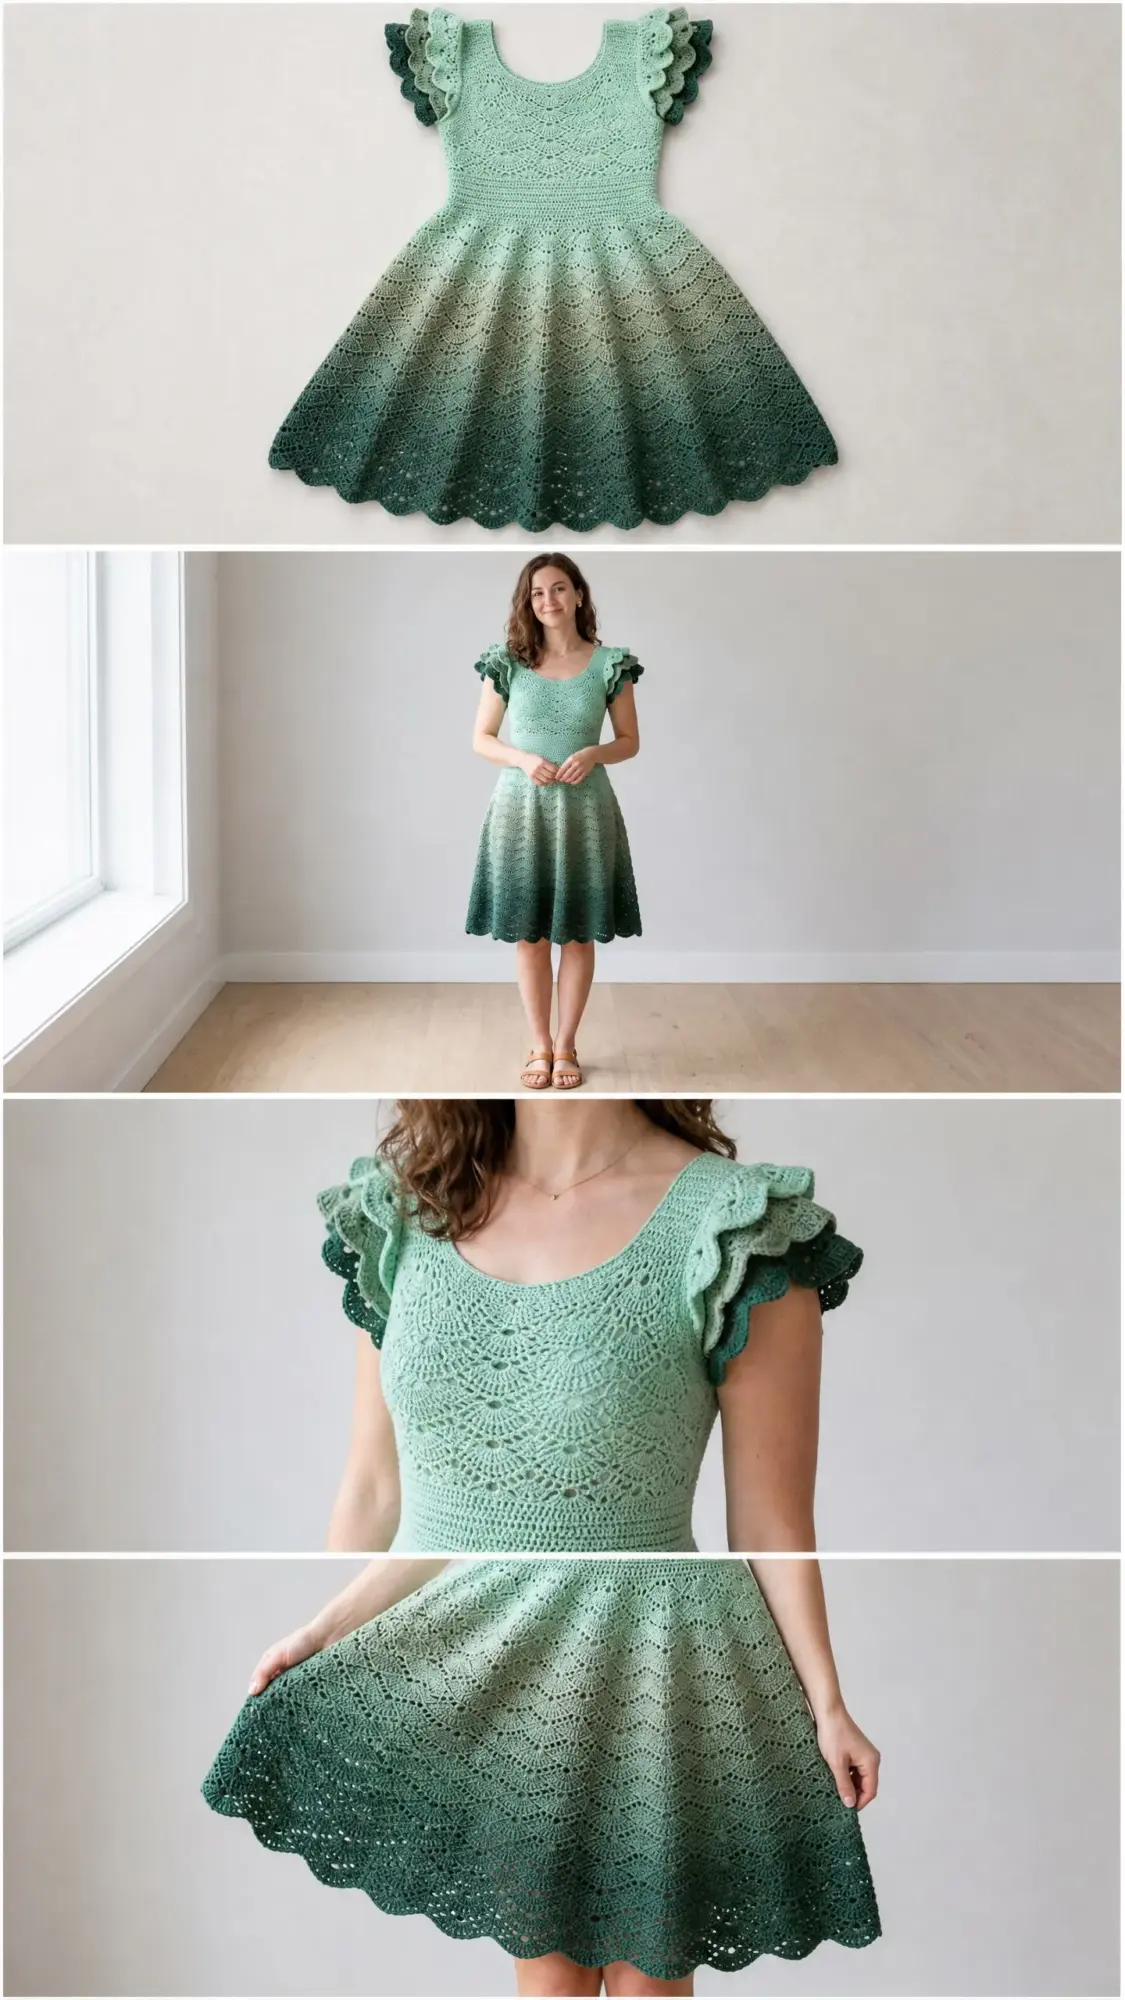
This stunning A-line dress features a fitted bodice, defined waist ribbing, and a flowing skirt that hits at or just below the knee. The gorgeous gradient moves from soft mint at the neckline through sage and medium green, ending in rich forest green at the hem. The double-layered ruffle cap sleeves add a feminine touch, and the scalloped edges at the hem and sleeves bring everything together beautifully.
The dress is constructed from the top down in joined rounds. You will work the bodice first using a fan stitch pattern, add stretchy waist ribbing worked in back loop only single crochet, then expand into the flowing skirt using a chevron shell stitch. The sleeves are added last as a finishing detail.
Skill Level: Intermediate to Advanced
Time Estimate: 40 to 60 hours depending on your hook speed and familiarity with lace stitches
Finished Measurements
This pattern is written for Size Small with notes for Medium, Large, and Extra Large.
Size S: Bust 34 in / 86 cm, Waist 27 in / 69 cm, Hip 38 in / 97 cm, Length from shoulder to hem 38 in / 97 cm
Size M: Bust 37 in / 94 cm, Waist 30 in / 76 cm, Hip 41 in / 104 cm, Length 38.5 in / 98 cm
Size L: Bust 40 in / 102 cm, Waist 33 in / 84 cm, Hip 44 in / 112 cm, Length 39 in / 99 cm
Size XL: Bust 43 in / 109 cm, Waist 36 in / 91 cm, Hip 47 in / 119 cm, Length 39.5 in / 100 cm
The finished measurements include 1.5 in / 4 cm of positive ease at the bust. Crochet lace garments look and fit best with a little breathing room.
Materials Needed
Yarn: Approximately 1,200 yd / 1,097 m total for Size S. Add approximately 100 yd / 91 m for each size up.
You will need four colors to create the ombre effect:
Yarn Weight: DK weight (CYCA 3), 100% cotton or cotton-blend recommended for drape and stitch definition
Hooks:
Notions:
Recommended Yarn Options
Lion Brand 24/7 Cotton offers excellent stitch definition and a subtle sheen that photographs beautifully. You would need 7 skeins in coordinating greens.
Paintbox Yarns Simply DK is a budget-friendly option with good drape. You need 9 balls across four green shades. Their color range includes Spearmint, Pistachio, Grass Green, and Racing Green for a natural gradient.
We Are Knitters The Petite Wool works well for cooler climates. Test your gauge carefully since wool behaves differently from cotton.
Choose a smooth yarn with good stitch definition. Fuzzy or textured yarns will hide the beautiful lace pattern.
Gauge Information
Getting gauge right is critical for this garment. A difference of even one stitch per 4 inches will significantly alter the bust circumference.
With E-4 / 3.5 mm hook (bodice):
With F-5 / 3.75 mm hook (skirt):
Always measure your gauge swatch after washing and blocking.
Abbreviations Used
Let me explain each abbreviation before we dive into the pattern. Understanding these terms will make the instructions much easier to follow.
Special Stitches Explained
Before starting, practice these special stitches on a small swatch. Understanding how they work will make the actual pattern much smoother.
Fan Stitch (used in bodice)
This stitch creates the beautiful shell-like pattern across the bodice. It is worked over a multiple of 12 stitches plus 1.
Step 1: Skip 2 stitches.
Step 2: Work 5 dc into the next stitch. This forms your fan.
Step 3: Skip 2 stitches.
Step 4: Sc into the next stitch. This anchors the fan.
Step 5: Repeat steps 1 through 4 across, ending with sc into the last stitch.
On the following row, you will alternate the fan placement by working fans into the anchor sc stitches and anchor sc stitches into the center dc of each fan.
Chevron Shell Stitch (used in skirt)
This creates the gorgeous wave pattern in the skirt. It is worked over a multiple of 16 stitches.
Step 1: Work 1 sc into the first stitch.
Step 2: Skip 3 stitches.
Step 3: Work 7 dc into the next stitch. This forms your shell.
Step 4: Skip 3 stitches.
Step 5: Work 1 sc into the next stitch.
Step 6: Continue the shell and sc pattern around.
Scallop Edging
This finishing technique creates the pretty wavy edge at the hem and sleeves.
Step 1: Sl st into first stitch, ch 1, sc in same stitch.
Step 2: Skip 2 stitches.
Step 3: Work 5 dc into next stitch.
Step 4: Skip 2 stitches.
Step 5: Sc into next stitch.
Step 6: Repeat steps 2 through 5 around.
BLO Ribbing
Working single crochet through the back loop only creates a stretchy, textured ribbing that mimics knit rib. Simply insert your hook under only the back loop (the loop farthest from you) instead of both loops.
Pattern Notes Before You Begin
Read through these notes carefully. They will save you confusion later.
1. The dress is worked from the top down. Bodice first, then waist ribbing, then skirt.
2. The ombre color transition works as follows:
3. Armhole openings are created by chaining over a set number of stitches. You will use these chain spaces later to add the ruffle sleeves.
4. The waist ribbing is worked separately in rows, seamed into a ring, then attached to the bodice.
5. All rounds are joined with sl st unless otherwise noted.
6. Stitch counts in parentheses at the end of a row or round show total working stitches.
7. Size adjustments appear in brackets as [M, L, XL]. Where only one number appears, it applies to all sizes.
8. Block your finished dress before wearing. Blocking opens up lace considerably and allows the skirt to achieve full drape.
9. Switch hooks from E-4 to F-5 at the beginning of the skirt section.
Step-by-Step Crochet Pattern Instructions
Section 1: Neckline Foundation
The neckline is a round scoop neck. Begin with Color A and E-4 / 3.5 mm hook.
Foundation Chain: Ch 101. [M: Ch 113. L: Ch 125. XL: Ch 137.]
Sl st to first ch to form a ring. Be careful not to twist your chain.
Round 1: Ch 1. Sc in each ch around. Sl st to first sc to join. (100 sc) [M: 112 sc. L: 124 sc. XL: 136 sc.]
Round 2: Ch 1. Sc in each sc around. Sl st to join. (100 sc) [M: 112. L: 124. XL: 136.]
Front Neckline Drop Shaping
This section creates a slightly deeper front neckline. It is worked in rows, not rounds.
Mark the center front 24 sts [M: 28. L: 30. XL: 32.] with stitch markers at each end.
Row 1 (WS): With RS facing, join yarn to the first marked st at left front. Ch 1. Sc across 24 sts of center front only. Turn. (24 sc) [M: 28. L: 30. XL: 32.]
Row 2 (RS): Ch 1. Sc across. Turn. (24 sc) [M: 28. L: 30. XL: 32.]
Row 3 (WS): Ch 1. Sc across. Turn. (24 sc) [M: 28. L: 30. XL: 32.]
Row 4 (RS): Ch 1. Sc across. Do not turn. Do not fasten off.
Rejoin the short-row section back into the round by working sl st evenly across the 3 row-end edges (approximately 3 sl sts).
Round 4: Ch 1. Sc in each st around the full neckline, working 3 sc into each corner of the neckline dip to keep edges smooth. Sl st to join.
Round 5: Ch 1. Sc in each sc around. At the two neckline dip corners, work sc2tog to decrease back to base count. Sl st to join. (100 sc) [M: 112. L: 124. XL: 136.]
Section 2: Upper Bodice and Armhole Shaping
Continue with Color A.
Adjustment Round (Round 6): Ch 1. Sc around, increasing 8 sts evenly spaced by working 2 sc into every 12th or 13th st. Sl st to join. (108 sc) [M: 120. L: 132. XL: 144.]
From this point forward, 108 [M: 120, L: 132, XL: 144] is your working stitch count for the bodice.
Round 7: Begin Fan Stitch. Ch 1. [Sk 2 sts, 5 dc in next st, sk 2 sts, sc in next st] repeat around. Sl st to join. (108 sts) [M: 120. L: 132. XL: 144.]
Round 8: Ch 3 (counts as dc). [Sc in center (3rd) dc of fan, 5 dc in next sc] repeat around. Sl st to top of beg ch-3. (108 sts) [M: 120. L: 132. XL: 144.]
Round 9: Ch 1. [Sk 2, 5 dc in next sc, sk 2, sc in next center dc] repeat around. Sl st to join. (108 sts) [M: 120. L: 132. XL: 144.]
Round 10: Repeat Round 8. (108 sts) [M: 120. L: 132. XL: 144.]
Armhole Placement (Round 11)
For Size S, each armhole spans 18 sts. The front spans 36 sts, the back spans 36 sts, and each underarm span is 9 sts.
Round 11: Work sc in each of next 9 sts (left underarm). Ch 18, skip 18 sts (right front armhole). Work sc in each of next 36 sts (front panel). Ch 18, skip 18 sts (left back armhole). Work sc in each of next 27 sts to end of round. Sl st to join.
[M: armhole ch 20, skip 20 sts; front and back panels each 40 sts. L: armhole ch 22, skip 22 sts; front and back panels each 44 sts. XL: armhole ch 24, skip 24 sts; front and back panels each 48 sts.]
Round 12: Ch 1. Sc in each st and each ch around, working 1 sc into each ch of the armhole chains. Sl st to join. (108 sc) [M: 120. L: 132. XL: 144.]
Section 3: Lower Bodice
Continue in Color A and Fan Stitch pattern for 8 more rounds.
Rounds 13 and 14: Fan Stitch Round A (as Round 7). (108 sts)
Rounds 15 and 16: Fan Stitch Round B (as Round 8). (108 sts)
Rounds 17 and 18: Fan Stitch Round A. (108 sts)
Rounds 19 and 20: Fan Stitch Round B. (108 sts)
Checkpoint: After Round 20, the bodice should measure approximately 7 in / 18 cm from the neckline edge. The armhole opening should span approximately 3.5 in / 9 cm wide and 4 in / 10 cm deep. The bodice tube should measure 34 in / 86 cm [M: 37 in, L: 40 in, XL: 43 in] in circumference at the bust.
Section 4: Waist Ribbing
Switch to Color B. Use E-4 hook.
The waist ribbing is worked separately as a strip in rows, then seamed into a circle.
Ribbing circumference needed: 27 in / 69 cm [M: 30 in. L: 33 in. XL: 36 in.]
Foundation Chain for ribbing: Ch 11.
Row 1: Sc in 2nd ch from hook and in each ch across. Turn. (10 sc)
Rows 2 through 135: Ch 1. BLO sc in each sc across. Turn. [M: work 150 rows. L: work 165 rows. XL: work 180 rows.]
After completing all rows, seam the first and last rows together with sl st to form a ribbing ring.
Attaching Ribbing to Bodice:
Hold the ribbing ring against the lower edge of the bodice with wrong sides together. The ridged edge of the ribbing aligns with the lower bodice edge.
Joining Round: With Color B, insert hook through both the bodice bottom edge st and the top edge of the ribbing. Sl st in each pair of sts around to join.
Checkpoint: After attaching the ribbing, the piece should measure approximately 9 to 10 in / 23 to 25 cm from shoulder to waist. The waist circumference should be approximately 27 in / 69 cm [M: 30 in. L: 33 in. XL: 36 in.].
Section 5: Skirt
Switch to F-5 / 3.75 mm hook. Continue with Color B for first 6 rounds.
Foundation Skirt Round: Join Color B to lower ribbing edge with sl st. Ch 1.
For Size S: Sc around all 135 sts, working 2 sc into approximately every 5th or 6th st until 25 increases are distributed evenly. Sl st to first sc. (160 sc)
For Size M: Sc around all 150 sts, working 2 sc into approximately every 15th st for 10 increases. Sl st to first sc. (160 sc)
For Size L: Sc around all 165 sts, working 2 sc into approximately every 15th st for 11 increases. Sl st to first sc. (176 sc)
For Size XL: Sc around all 180 sts, working 2 sc into approximately every 15th st for 12 increases. Sl st to first sc. (192 sc)
Skirt Round 1 (Color B): Ch 1. [Sc in next st, skip 3 sts, 7 dc in next st, skip 3 sts] 20 times around. Sl st to first sc. (20 shells established)
Skirt Round 2 (Color B): Ch 3 (counts as dc). Work 3 more dc into first sc. [Sc in center (4th) dc of next shell, 7 dc in next sc] repeat around, ending sc in center dc of last shell, 3 dc in same sc as beg ch-3. Sl st to top of ch-3.
Skirt Round 3: Ch 1. Sc in first dc. [Skip 3 dc, 7 dc in next sc, skip 3 dc, sc in center dc of shell] repeat around, ending sl st to first sc.
Skirt Round 4: Repeat Round 2.
Skirt Round 5: Repeat Round 3.
Skirt Round 6: Repeat Round 2. End Color B.
Begin Color C.
Skirt Rounds 7 through 14: Continue alternating Rounds 2 and 3 pattern.
Skirt Round 10 (Expansion Round in Color C): Work 9-dc shells instead of 7-dc shells. Ch 1. [Sc in center dc of previous shell, skip 3, 9 dc in next sc, skip 3] 20 times around. Sl st.
Continue with 9-dc shell rounds through Round 16. End Color C.
Begin Color D and continue chevron shell pattern for remaining rounds until skirt reaches desired length (approximately 14+ rounds).
Finishing the Hem
Work Scallop Edging around the bottom of the skirt in Color D.
Scallop Round: Sl st into first st. Ch 1, sc in same st. [Skip 2 sts, 5 dc in next st, skip 2 sts, sc in next st] repeat around. Sl st to first sc. Fasten off.
Section 6: Ruffle Cap Sleeves
Using Color A and E-4 hook, join yarn to the armhole edge with sl st.
Ruffle Tier 1:
Ch 3 (counts as dc). Work 2 dc into every st around the armhole opening. Sl st to top of beg ch-3 to join.
Ruffle Tier 2:
Ch 3. Work 2 dc into every st of previous tier around. Sl st to top of beg ch-3.
Work Scallop Edging around the ruffle edge. Fasten off.
Repeat for second armhole.
Finishing Your Dress
Weave in all ends securely using your yarn needle. Take extra care at color change points.
Blocking is essential for this garment. Wet block your dress by soaking it in lukewarm water for 15 to 20 minutes. Gently squeeze out excess water (do not wring). Lay flat on blocking mats and pin to measurements. Allow to dry completely.
Blocking opens up the lace pattern dramatically and gives the skirt its beautiful drape.
Tips for Success
Start with a gauge swatch. I know it feels tedious, but for a fitted garment like this, accurate gauge makes the difference between a dress that fits beautifully and one that does not.
Use stitch markers generously. Mark the beginning of each round, the center front and back, and the shell repeats if you find yourself losing count.
Try on as you go. After completing the bodice and before adding the waist ribbing, slip the piece over your head to check the fit. Adjustments are much easier at this stage.
Take breaks. This is a substantial project. Working in focused sessions prevents mistakes from fatigue.
If the lace pattern feels overwhelming, practice each special stitch on a small swatch first. Once the rhythm clicks, it becomes almost meditative.
Common Questions
Can I make this dress shorter? Yes. Simply work fewer rounds in the skirt section. Check length as you go by holding the piece up to your body.
What if I want less of an ombre effect? You can use just two colors instead of four, or work the entire dress in a single color for a classic look.
Is lining necessary? The lining is optional. The lace pattern does have some openness, so if you prefer more coverage, adding a simple slip lining underneath works well.
This Spring Garden Green Crochet Dress is absolutely worth the time investment. When you slip it on after blocking and see how the colors cascade from mint to forest green, you will understand why crocheters fall in love with handmade garments. The compliments you will receive? Just a bonus.
I hope you love making this dress as much as I enjoyed designing it. If you complete your own version, I would absolutely love to see it. Save this pattern to your Pinterest boards so you can find it when you are ready to start, and please leave a comment below to share your progress or ask any questions. Happy crocheting, friend!
