
If you have a baby shower coming up or a little one in your life who deserves something extra special, this dress set is exactly what you need. The Strawberry Blossom Baby Dress uses basic stitches like half double crochet and single crochet to create a stunning garden-inspired outfit that looks far more complicated than it actually is.
Get the Ad-Free PDF Pattern
You can find the free pattern below, or you can purchase the ad-free printable PDF from my shop.
Get the Printable PDF →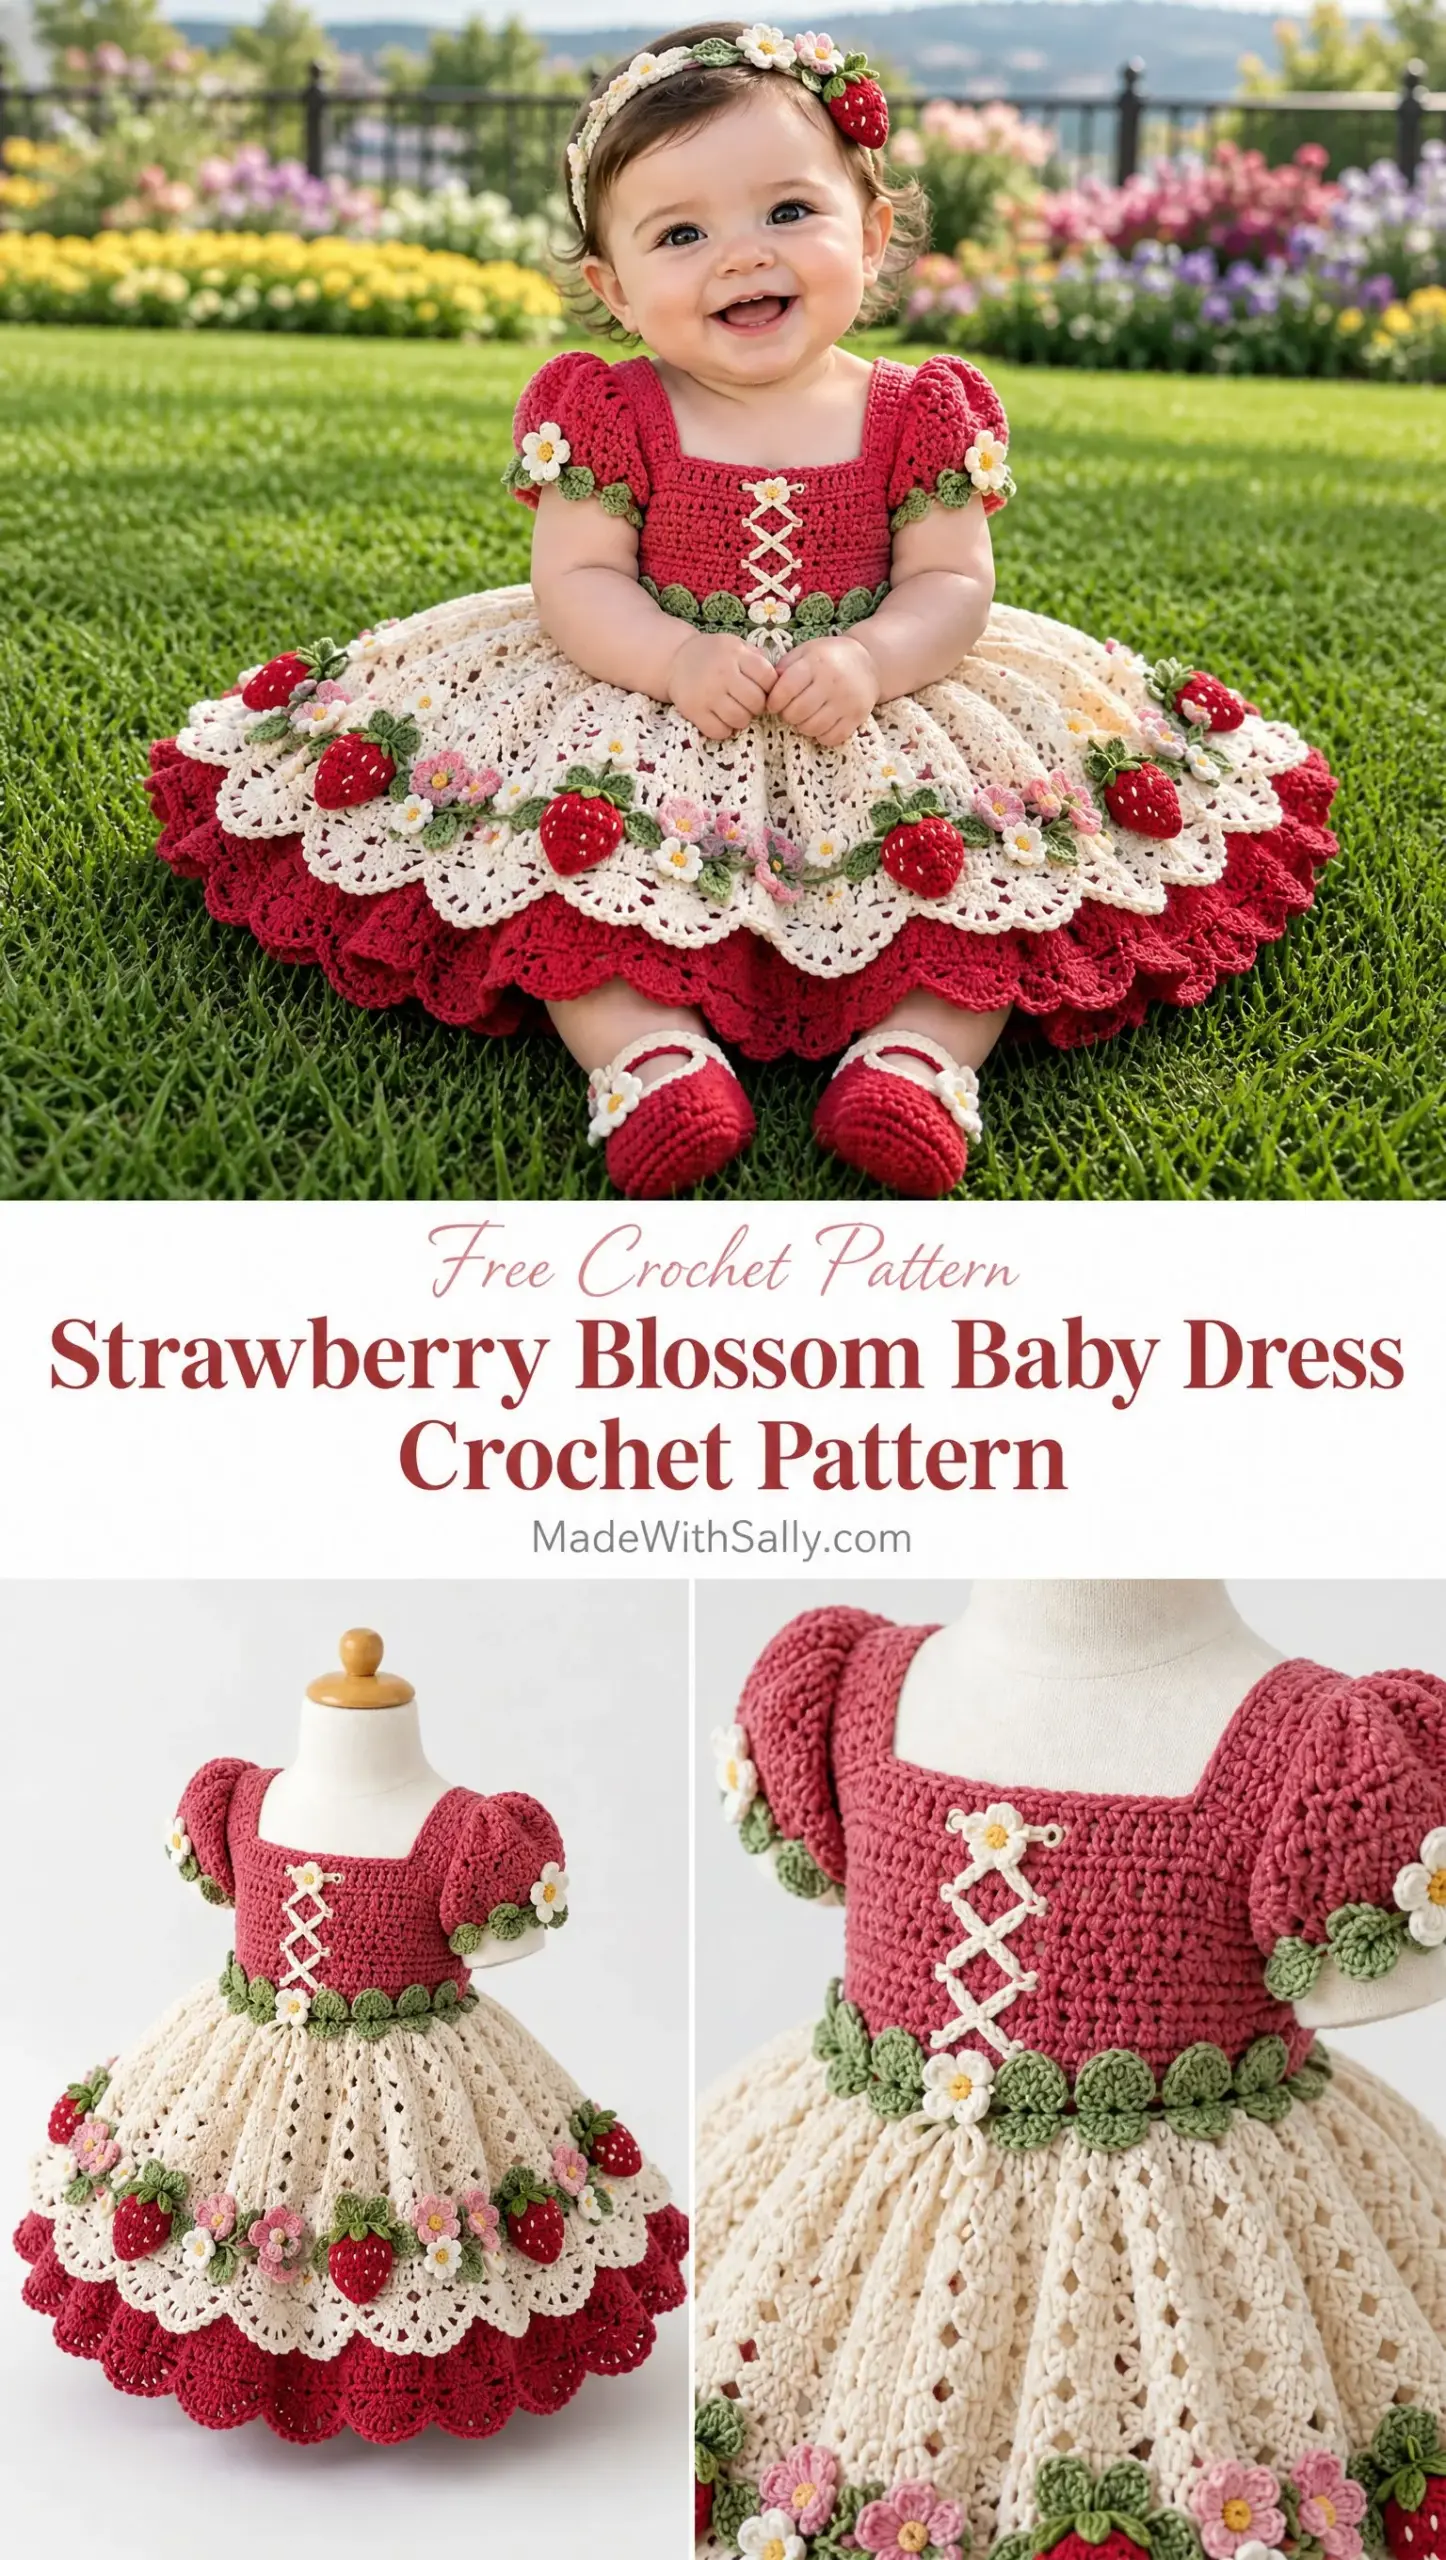
This pattern includes the dress, a matching headband, and adorable booties. The whole set works up beautifully in soft cotton yarn, making it perfect for warmer months or layered over a onesie in cooler weather.
I designed this with gift-giving in mind. The 6 to 12 month size fits that sweet spot where babies are sitting up for photos, and the adjustable construction means you can size up or down as needed. Whether you are making this for your own grandbaby or donating to a charity auction, it is guaranteed to make an impression.
About This Strawberry Baby Dress Pattern
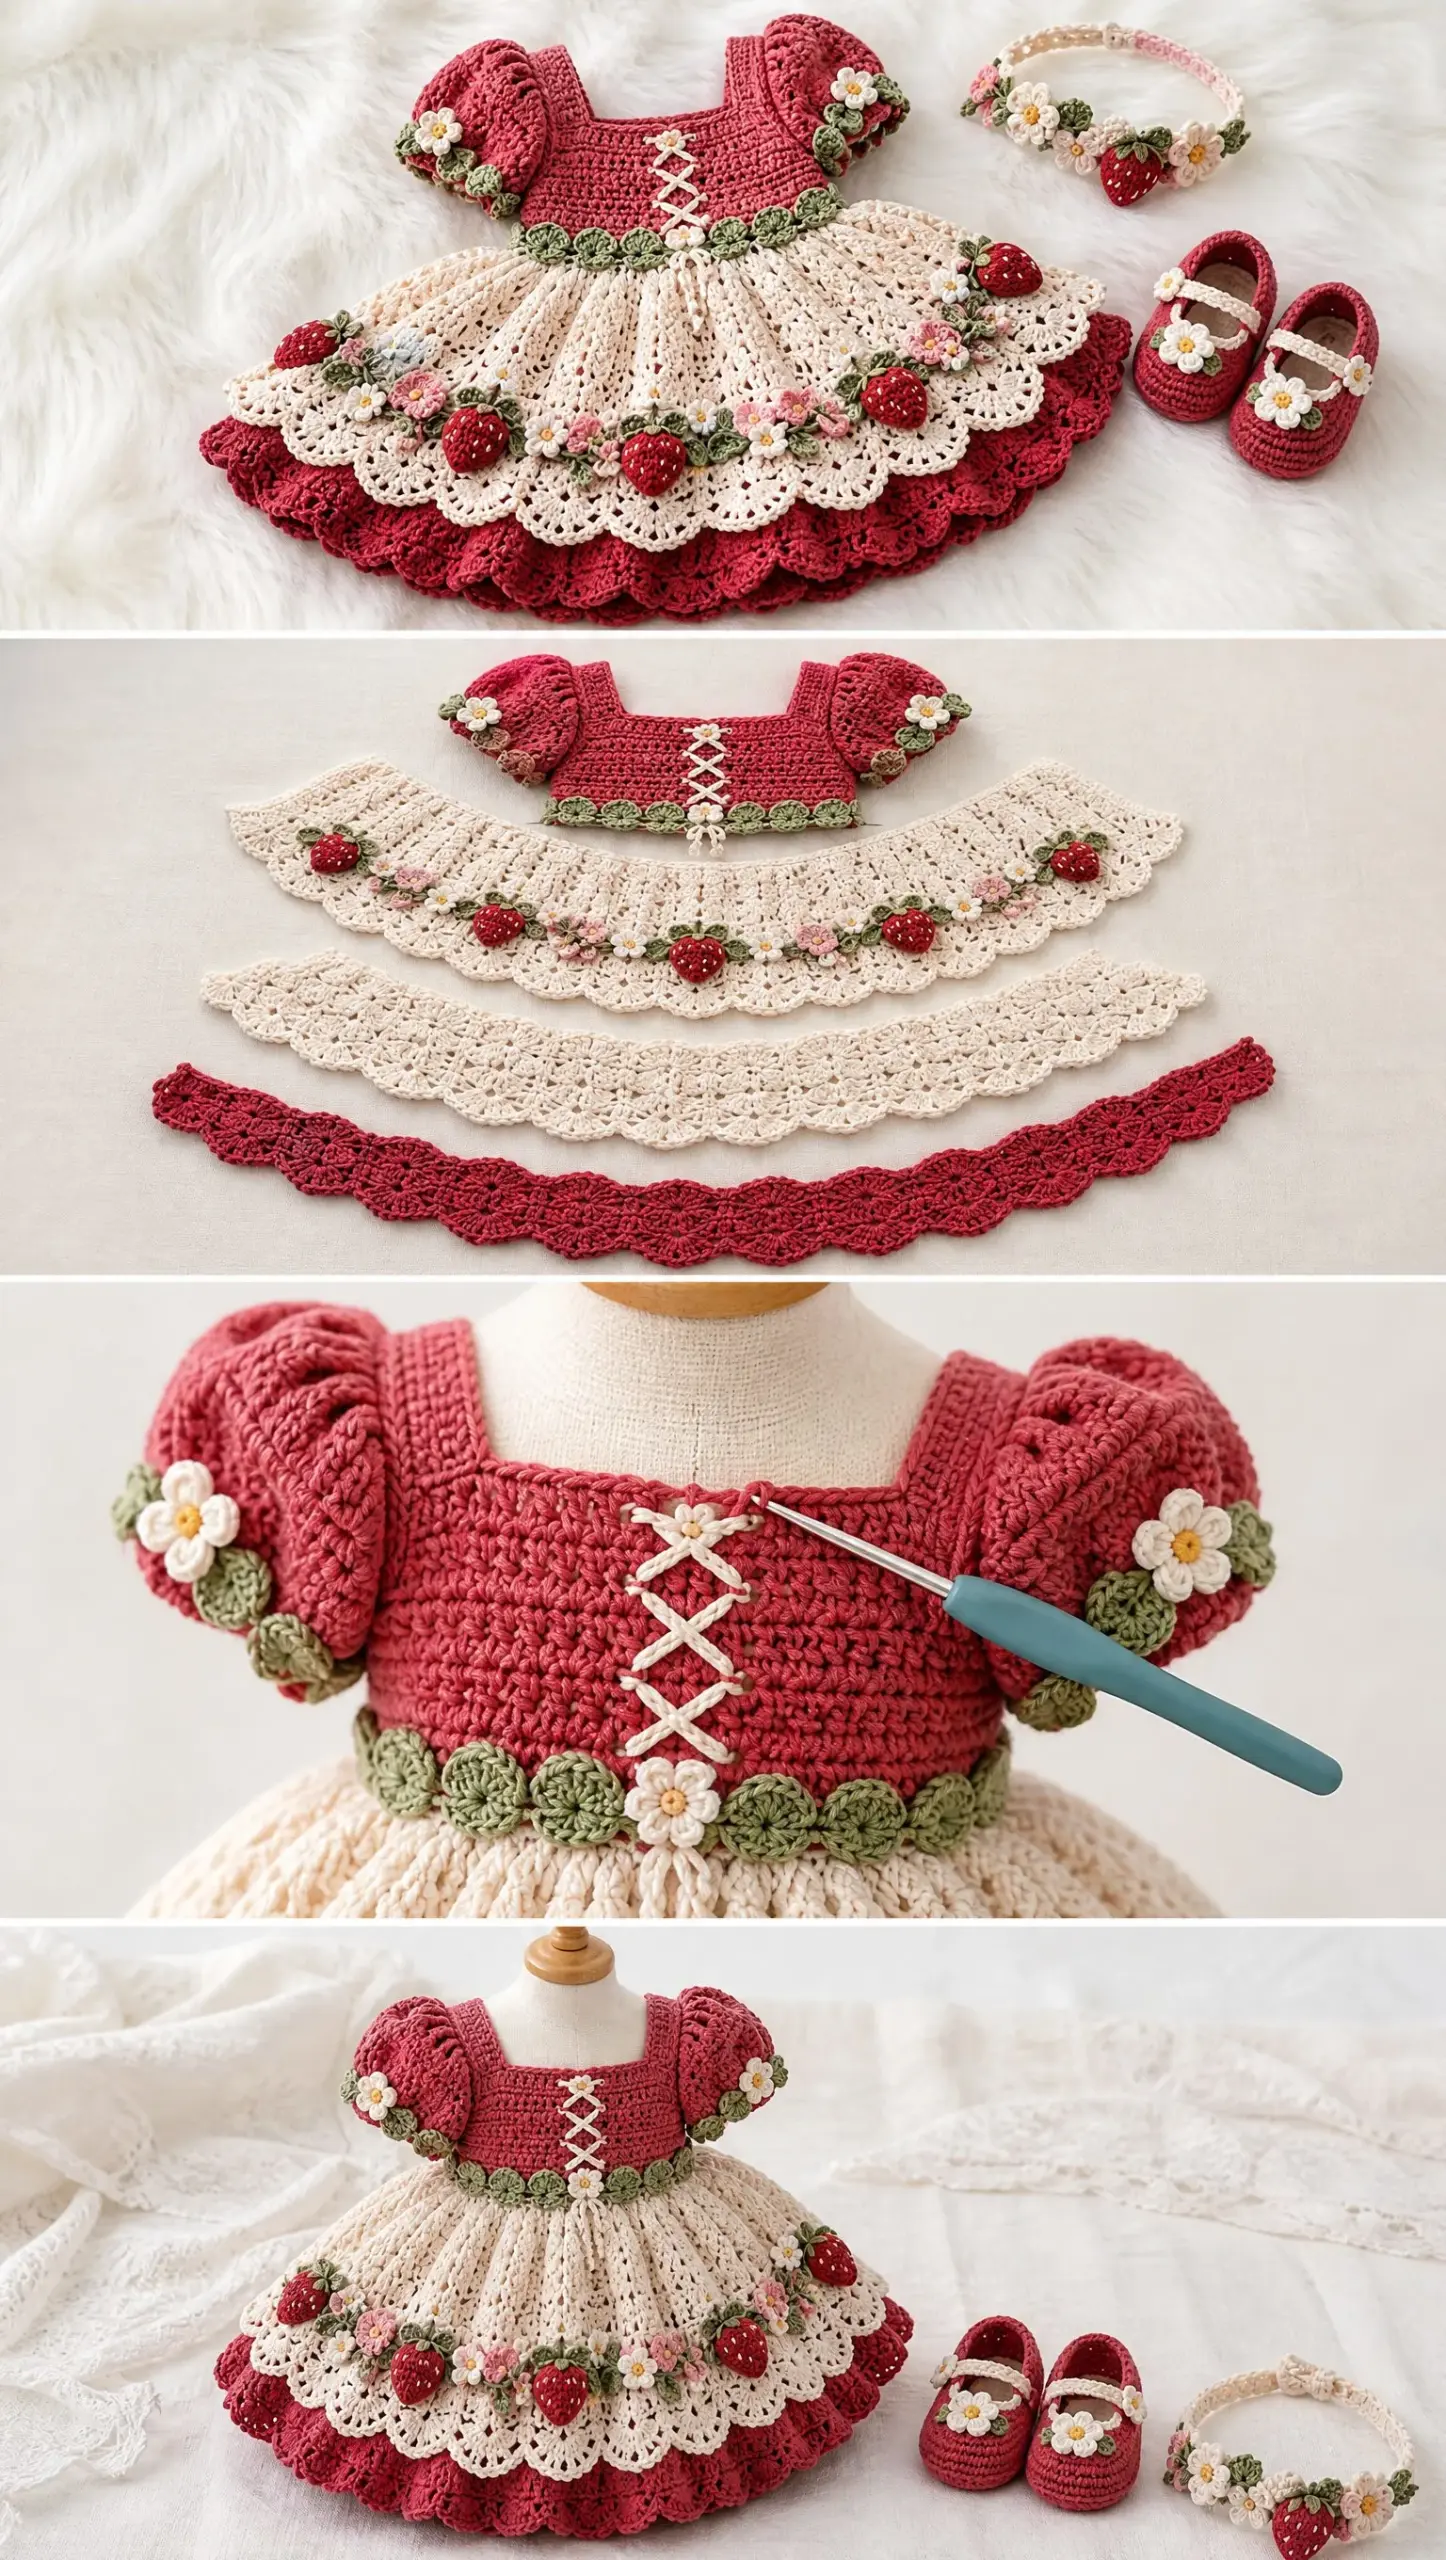
This crochet baby dress set features a rose pink square-neck bodice, a cream eyelet lace skirt, and gorgeous berry red layered ruffles at the hem. The real showstopper is the strawberry garden embellishment, complete with crocheted strawberries, white blossoms, pink flowers, and sage leaf accents scattered around the lower skirt edge.
The dress is worked from the top down, which makes fitting and length adjustments simple. You will start with the bodice, work the yoke with corner shaping for that beautiful square neckline, then transition into the flowing skirt. The construction method is logical and straightforward once you understand the basic structure.
Skill level: Intermediate. You should be comfortable with basic stitches, working in the round, and joining pieces together. The individual techniques are not difficult, but there are multiple components to assemble.
Materials You Will Need
Having everything ready before you start makes this project so much more enjoyable. Here is your complete supply list pulled directly from the pattern.
Yarn Requirements:
Tools:
I recommend using a soft cotton yarn specifically designed for baby garments. Cotton breathes well against baby skin and washes beautifully. Look for yarn labeled as baby-safe or with an Oeko-Tex certification for peace of mind.
Understanding Your Gauge
Gauge: 18 double crochet (dc) stitches x 10 rows = approximately 10 cm square
Checking your gauge matters enormously for garments. If your gauge is off, your dress will be too big or too small. Work a quick swatch before starting, and adjust your hook size if needed. If you get fewer stitches per 10 cm, go down a hook size. If you get more stitches, go up a hook size.
Stitch Abbreviations and Definitions
Let me walk you through every stitch abbreviation used in this pattern so there is no confusion as you work.
Chain (ch): The foundation stitch. Yarn over, pull through the loop on your hook. This creates the base for most crochet projects.
Slip stitch (sl st): Insert hook into stitch, yarn over, pull through both the stitch and the loop on your hook in one motion. Used for joining rounds and creating invisible seams.
Single crochet (sc): Insert hook into stitch, yarn over, pull up a loop (2 loops on hook), yarn over, pull through both loops. This is the shortest basic stitch and creates a dense, sturdy fabric.
Half double crochet (hdc): Yarn over, insert hook into stitch, yarn over, pull up a loop (3 loops on hook), yarn over, pull through all 3 loops. Slightly taller than single crochet with a nice drape.
Double crochet (dc): Yarn over, insert hook into stitch, yarn over, pull up a loop (3 loops on hook), yarn over, pull through 2 loops, yarn over, pull through remaining 2 loops. A taller stitch that works up quickly.
Increase (inc): Work 2 stitches into 1 stitch to add width to your fabric.
Stitch (st): Refers to a single stitch of any type.
Skip (sk): Pass over a stitch without working into it.
Dress Construction Overview
The dress is built in logical sections, and understanding this structure before you begin helps everything make sense. You will work the bodice first, then the sleeves, then the skirt, then the ruffles, and finally add the decorative elements.
Think of it as building a house. The bodice is your foundation, the skirt is the main structure, and the strawberries and flowers are the beautiful finishing touches that make it unique.
Bodice Pattern Instructions
The bodice creates that sweet square neckline you see in the photos. The corner increases shape the yoke perfectly to fit baby’s shoulders.
Foundation
Chain 52. Join carefully without twisting into a ring.
Take your time with this join. A twisted foundation chain is the most common mistake in circular projects, and it cannot be fixed without starting over. Lay your chain flat on a table and make sure all the stitches face the same direction before joining.
Row 1
Chain 2 (this counts as your turning chain), work half double crochet (hdc) across all stitches, join to complete the round.
Row 2
This row creates the square neckline shaping by placing increases at four corners. Work as follows:
At each corner space, work: 2 hdc, chain 1, 2 hdc.
Between corners, work hdc into each stitch.
Continuing the Yoke
Repeat these increase rows while continuing to increase at corners until the yoke measures approximately 10 cm deep.
The corner increases add 8 stitches per round (2 at each of the 4 corners), which creates the angled shaping you need for the square neckline. Place a stitch marker at each corner to help you keep track.
Sleeve Instructions
Once your yoke is complete, you will separate the sleeve sections to create those adorable puff sleeves.
Sleeve Round
Attach rose pink yarn at the arm opening. Work hdc evenly around the entire arm opening.
Next Round
Alternate puff stitch and single crochet around the sleeve. The puff stitch creates that gathered, feminine look.
To work a puff stitch: Yarn over, insert hook, pull up a loop (repeat this 3 to 5 times in the same stitch), yarn over and pull through all loops on hook, chain 1 to secure.
Finishing the Sleeves
Work a small scalloped edge to complete each sleeve. Scallops are typically worked as: skip 1 stitch, 5 dc in next stitch, skip 1 stitch, sl st. Repeat around.
Front Lacing Panel
This decorative element adds such a charming vintage touch to the bodice.
Using cream yarn, create small chain loops vertically down the center front of the bodice. Space them evenly, approximately 1 to 1.5 cm apart.
Once all loops are attached, sew or weave cream cord through the loops in a criss-cross pattern. You can use a simple crochet chain for the cord, or purchase ribbon if you prefer.
Leaf Waist Border
This border sits at the waistline and transitions beautifully into the skirt.
Row 1
With pale sage green yarn, work single crochet (sc) around the entire waist.
Row 2
Create small leaf motifs using clusters of double crochet (dc) stitches. Work the leaves by making 3 dc in one stitch, skip 1, sl st, skip 1, then repeat. This creates pointed leaf shapes around the waist.
Skirt Pattern Instructions
Now for the fun part. The skirt is where this dress really starts to take shape.
Round 1
Attach cream yarn at the waist. Work double crochet (dc) evenly around the bodice opening.
Round 2
Increase every fourth stitch to create fullness. This means: dc in 3 stitches, 2 dc in the next stitch. Repeat all the way around.
Eyelet Lace Rounds
Continue working in the eyelet lace pattern:
dc, ch 1, skip 1 stitch around.
This creates those beautiful open spaces you see in the photos. The eyelet pattern is simple but so effective.
Repeat the lace rounds until you reach your desired skirt length. For a 6 to 12 month size, aim for approximately 15 to 18 cm from waist to hem, but you can adjust based on the baby you are making this for.
Berry Red Layered Ruffles
The layered ruffles add drama and visual interest at the hem. They are attached underneath the cream skirt so they peek out beautifully.
Attaching the Ruffle
Attach berry red yarn underneath the cream skirt, working into the back loops or into a round slightly above where you want the ruffle to sit.
Ruffle Round
Work 3 dc into each stitch around for a gathered ruffle effect.
Working 3 stitches into every stitch creates that wonderful ruffled gathering. The fabric will naturally wave and ripple.
Repeat for additional ruffle layers if desired. The photos show multiple tiers of ruffles, each attached slightly above the last.
Strawberry Motifs
These tiny strawberries are my favorite part of the entire pattern. They are quick to make and impossibly cute.
Strawberry Body
Using berry red yarn, create a magic ring.
Round 1: Work 6 sc into the magic ring. Pull tight.
Round 2: Increase in every stitch around. (12 sts)
Rounds 3 through 5: Work sc around without increasing. (12 sts)
Fasten off, leaving a tail for sewing.
Add tiny cream seed stitches by using a yarn needle to make small straight stitches randomly across the strawberry surface.
Strawberry Leaves
Using sage green yarn:
Chain 5. Work a pointed leaf shape by working sc, hdc, dc, hdc, sc along the chain, then sl st to secure.
Make 2 to 3 small leaves for each strawberry. Sew the leaves to the top of each strawberry body.
Flower Motifs
The flowers add variety and visual interest alongside the strawberries.
White Strawberry Blossoms
Create a magic ring.
Work five petals using this sequence: (ch 3, dc, ch 3, sl st) repeated 5 times around the ring.
Pull the ring tight and fasten off.
Add yellow centers by stitching a small French knot or making a tiny yellow puff in the center of each blossom.
Pink Flowers
Make small five-petal flowers using the same technique as the white blossoms, but with soft pink yarn.
These add variety to your hem arrangement.
Hem Arrangement
Sew strawberries, white blossoms, pink flowers, and leaves around the lower skirt edge. Space them evenly and vary the elements for a natural garden look.
Secure each piece firmly with several stitches. Babies grab at everything, so you want these decorations attached well.
Matching Headband Pattern
The headband ties the whole set together beautifully.
Band
Chain a length long enough to fit comfortably around baby’s head. For 6 to 12 months, this is typically 35 to 40 cm, but measure if you can.
Work several rows of hdc until the band is approximately 2 to 3 cm wide.
Join the ends to form a circle, or leave ties at each end.
Decorations
Add the following elements to one side of the headband:
Sew all decorations securely to the headband. Position them slightly off-center for the most flattering look.
Matching Booties Pattern
These little booties complete the set perfectly.
Sole
Chain 10.
Work oval rounds of single crochet (sc) around the chain. This means working down one side of the chain, placing 3 sc in the end stitch, then working back up the other side, and placing 3 sc in the final end stitch. Join and continue working oval rounds until the sole measures approximately 8 to 9 cm long.
Upper
Continue working upward with sc rounds, working into the back loops only for the first upper round to create a defined edge.
Work 3 to 4 rounds of sc without increasing.
Add red yarn and continue working the upper section in berry red to match the dress ruffles.
Strap
Chain 12 and attach across the front of each bootie to create a Mary Jane style strap.
Decorate with a cream flower or small button.
Finishing Instructions for Your Crochet Baby Dress
Proper finishing makes all the difference in how professional your work looks.
Weave in all ends. Use your yarn needle to weave each tail through several stitches on the wrong side, then double back for security. Trim close to the fabric.
Block the dress gently to define the lace openings. Lay the dress flat on a blocking mat or clean towel, spray lightly with water, and pin into shape. Let it dry completely.
Check all decorations are securely attached. Give each strawberry, flower, and leaf a gentle tug to make sure nothing will come loose.
Wash gently by hand and air dry. Cotton yarn can be machine washed on gentle, but hand washing is always safest for delicate items with appliques.
Customization Notes
One of the best things about this pattern is how easily it adjusts to different sizes.
For a larger size: Increase the foundation chain by 4 to 6 stitches and add additional skirt rounds for length.
For a smaller size: Reduce the bodice foundation chain and shorten the skirt.
Always use soft cotton yarn suitable for baby garments. Avoid anything scratchy or with loose fibers that could irritate delicate skin.
Final Design Features Summary
When complete, your Strawberry Blossom Baby Dress set includes:
This crochet pattern creates a truly heirloom-quality outfit that any parent would treasure.
Tips for Success
Work a gauge swatch. I know it is tempting to skip this step, but taking 15 minutes to check your gauge will save you hours of frustration if the sizing is off.
Use stitch markers liberally. Mark your corners during yoke construction, mark the beginning of each round, and mark where you want to place decorations.
Make all your appliques first. Having all your strawberries, flowers, and leaves ready before you attach them lets you play with placement and achieve the most balanced arrangement.
Take photos as you go. Document your progress. You will want to remember how you made this, and the photos help if you ever need to troubleshoot or make another one.
Thank you so much for choosing this strawberry baby dress crochet pattern for your next project. I hope you love making it as much as I loved designing it. If you share your finished dress on Instagram or Facebook, please tag me so I can see your beautiful work.
If this pattern is calling your name, go ahead and pin it to your crochet board so you can find it when you are ready to start. And I would absolutely love to hear from you in the comments below once you make your own Strawberry Blossom Baby Dress. Happy crocheting!
Want a Quick & Easy Printable Version?
Get a clean, beautifully formatted PDF of this pattern — easy to follow step by step, ready to print or save on any device. No scrolling, no distractions, just the pattern.
Get the Printable PDF →