
Looking for a stunning summer dress that keeps you cool while turning heads? This Mint Meadow Crochet Daisy Dress combines a fitted bodice with a flowing pineapple lace skirt, making it perfect for garden parties, beach days, or any warm weather occasion. The cheerful daisy appliques at the neckline and hem add cottage charm without overwhelming the elegant silhouette.
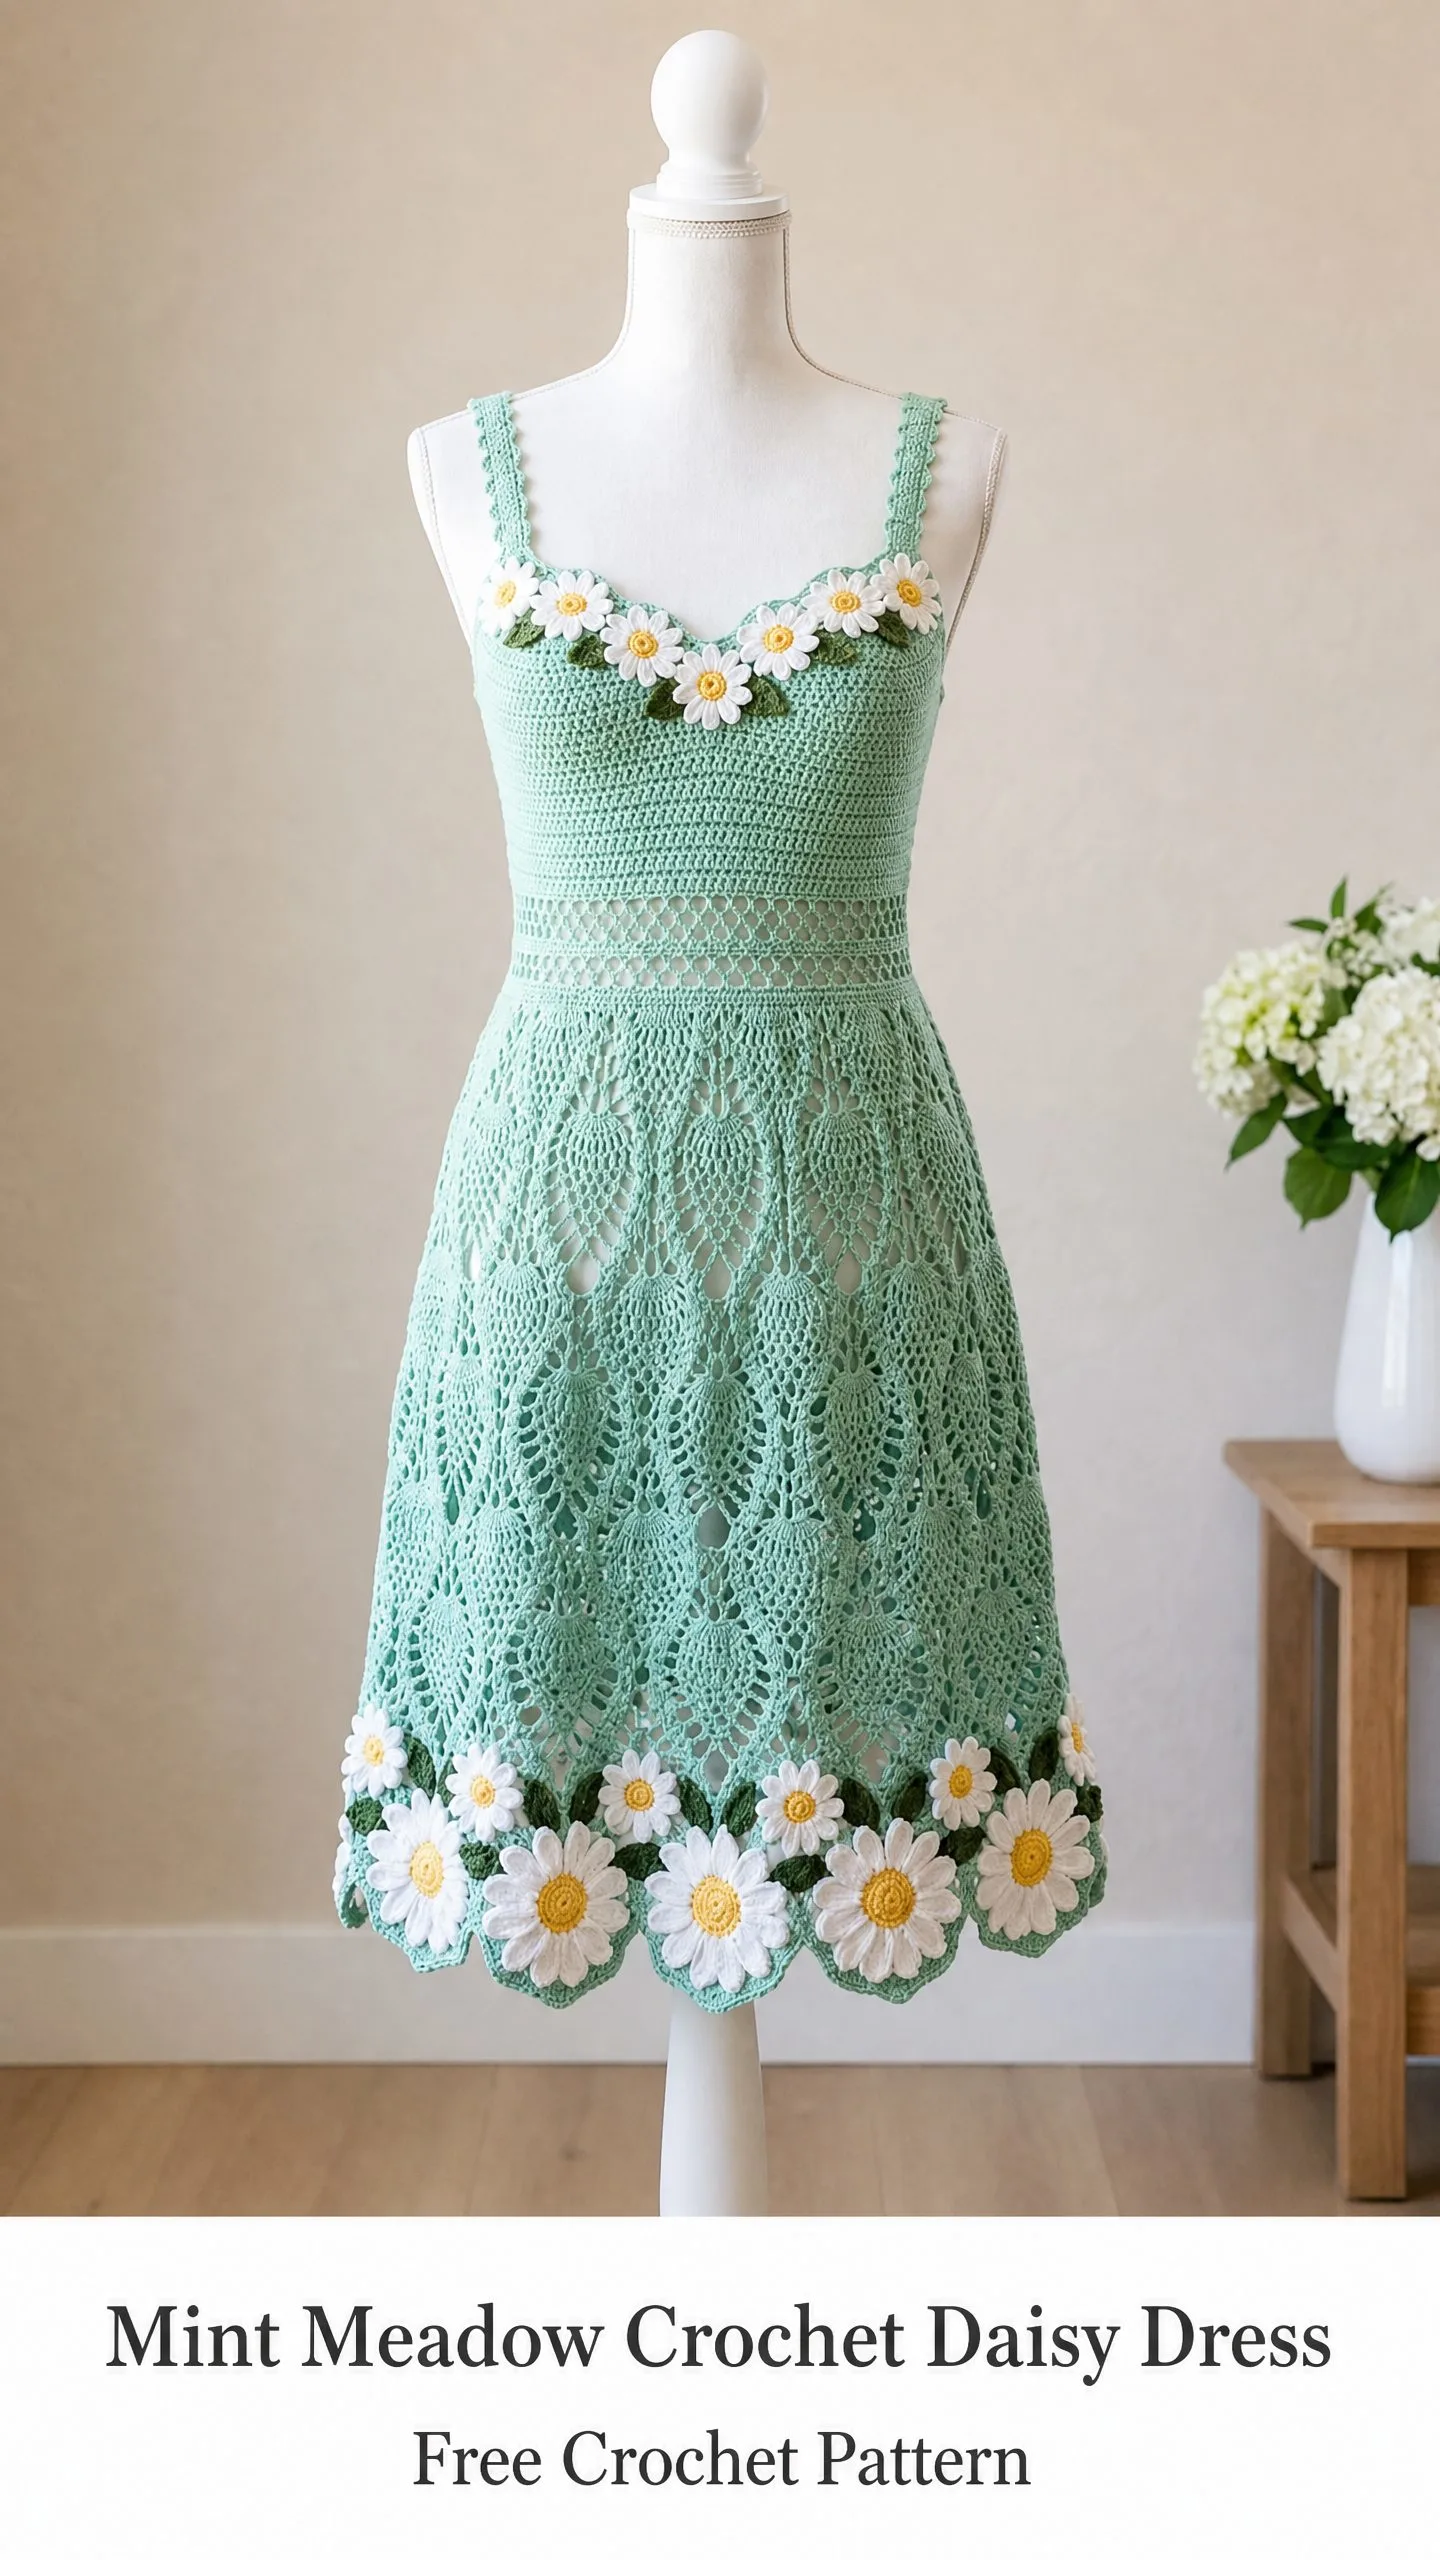
This crochet pattern uses single crochet for the structured bodice, a mesh waistband transition, and the classic pineapple lace stitch for that gorgeous A-line skirt. It works up beautifully in DK weight cotton yarn and makes an incredible handmade gift for yourself or someone special. Fair warning though: this is an intermediate to advanced project that takes 60 to 90 hours to complete.
Whether you are building your handmade wardrobe or crafting a one-of-a-kind piece for a special event, this dress delivers. The construction is more straightforward than it looks once you break it into sections. Let me walk you through everything you need to know.
Why You Will Love This Crochet Dress Pattern
This dress hits all the right notes for a summer garment. The fitted bodice provides structure and support while the lace skirt allows airflow and movement. The sweetheart neckline flatters most body types, and those adjustable shoulder straps mean you can customize the fit perfectly.
The pineapple lace stitch creates that beautiful open texture you see in the skirt. If you have never worked pineapple lace before, do not panic. I will explain every step. The stitch pattern looks complex but follows a logical sequence once you understand the rhythm.
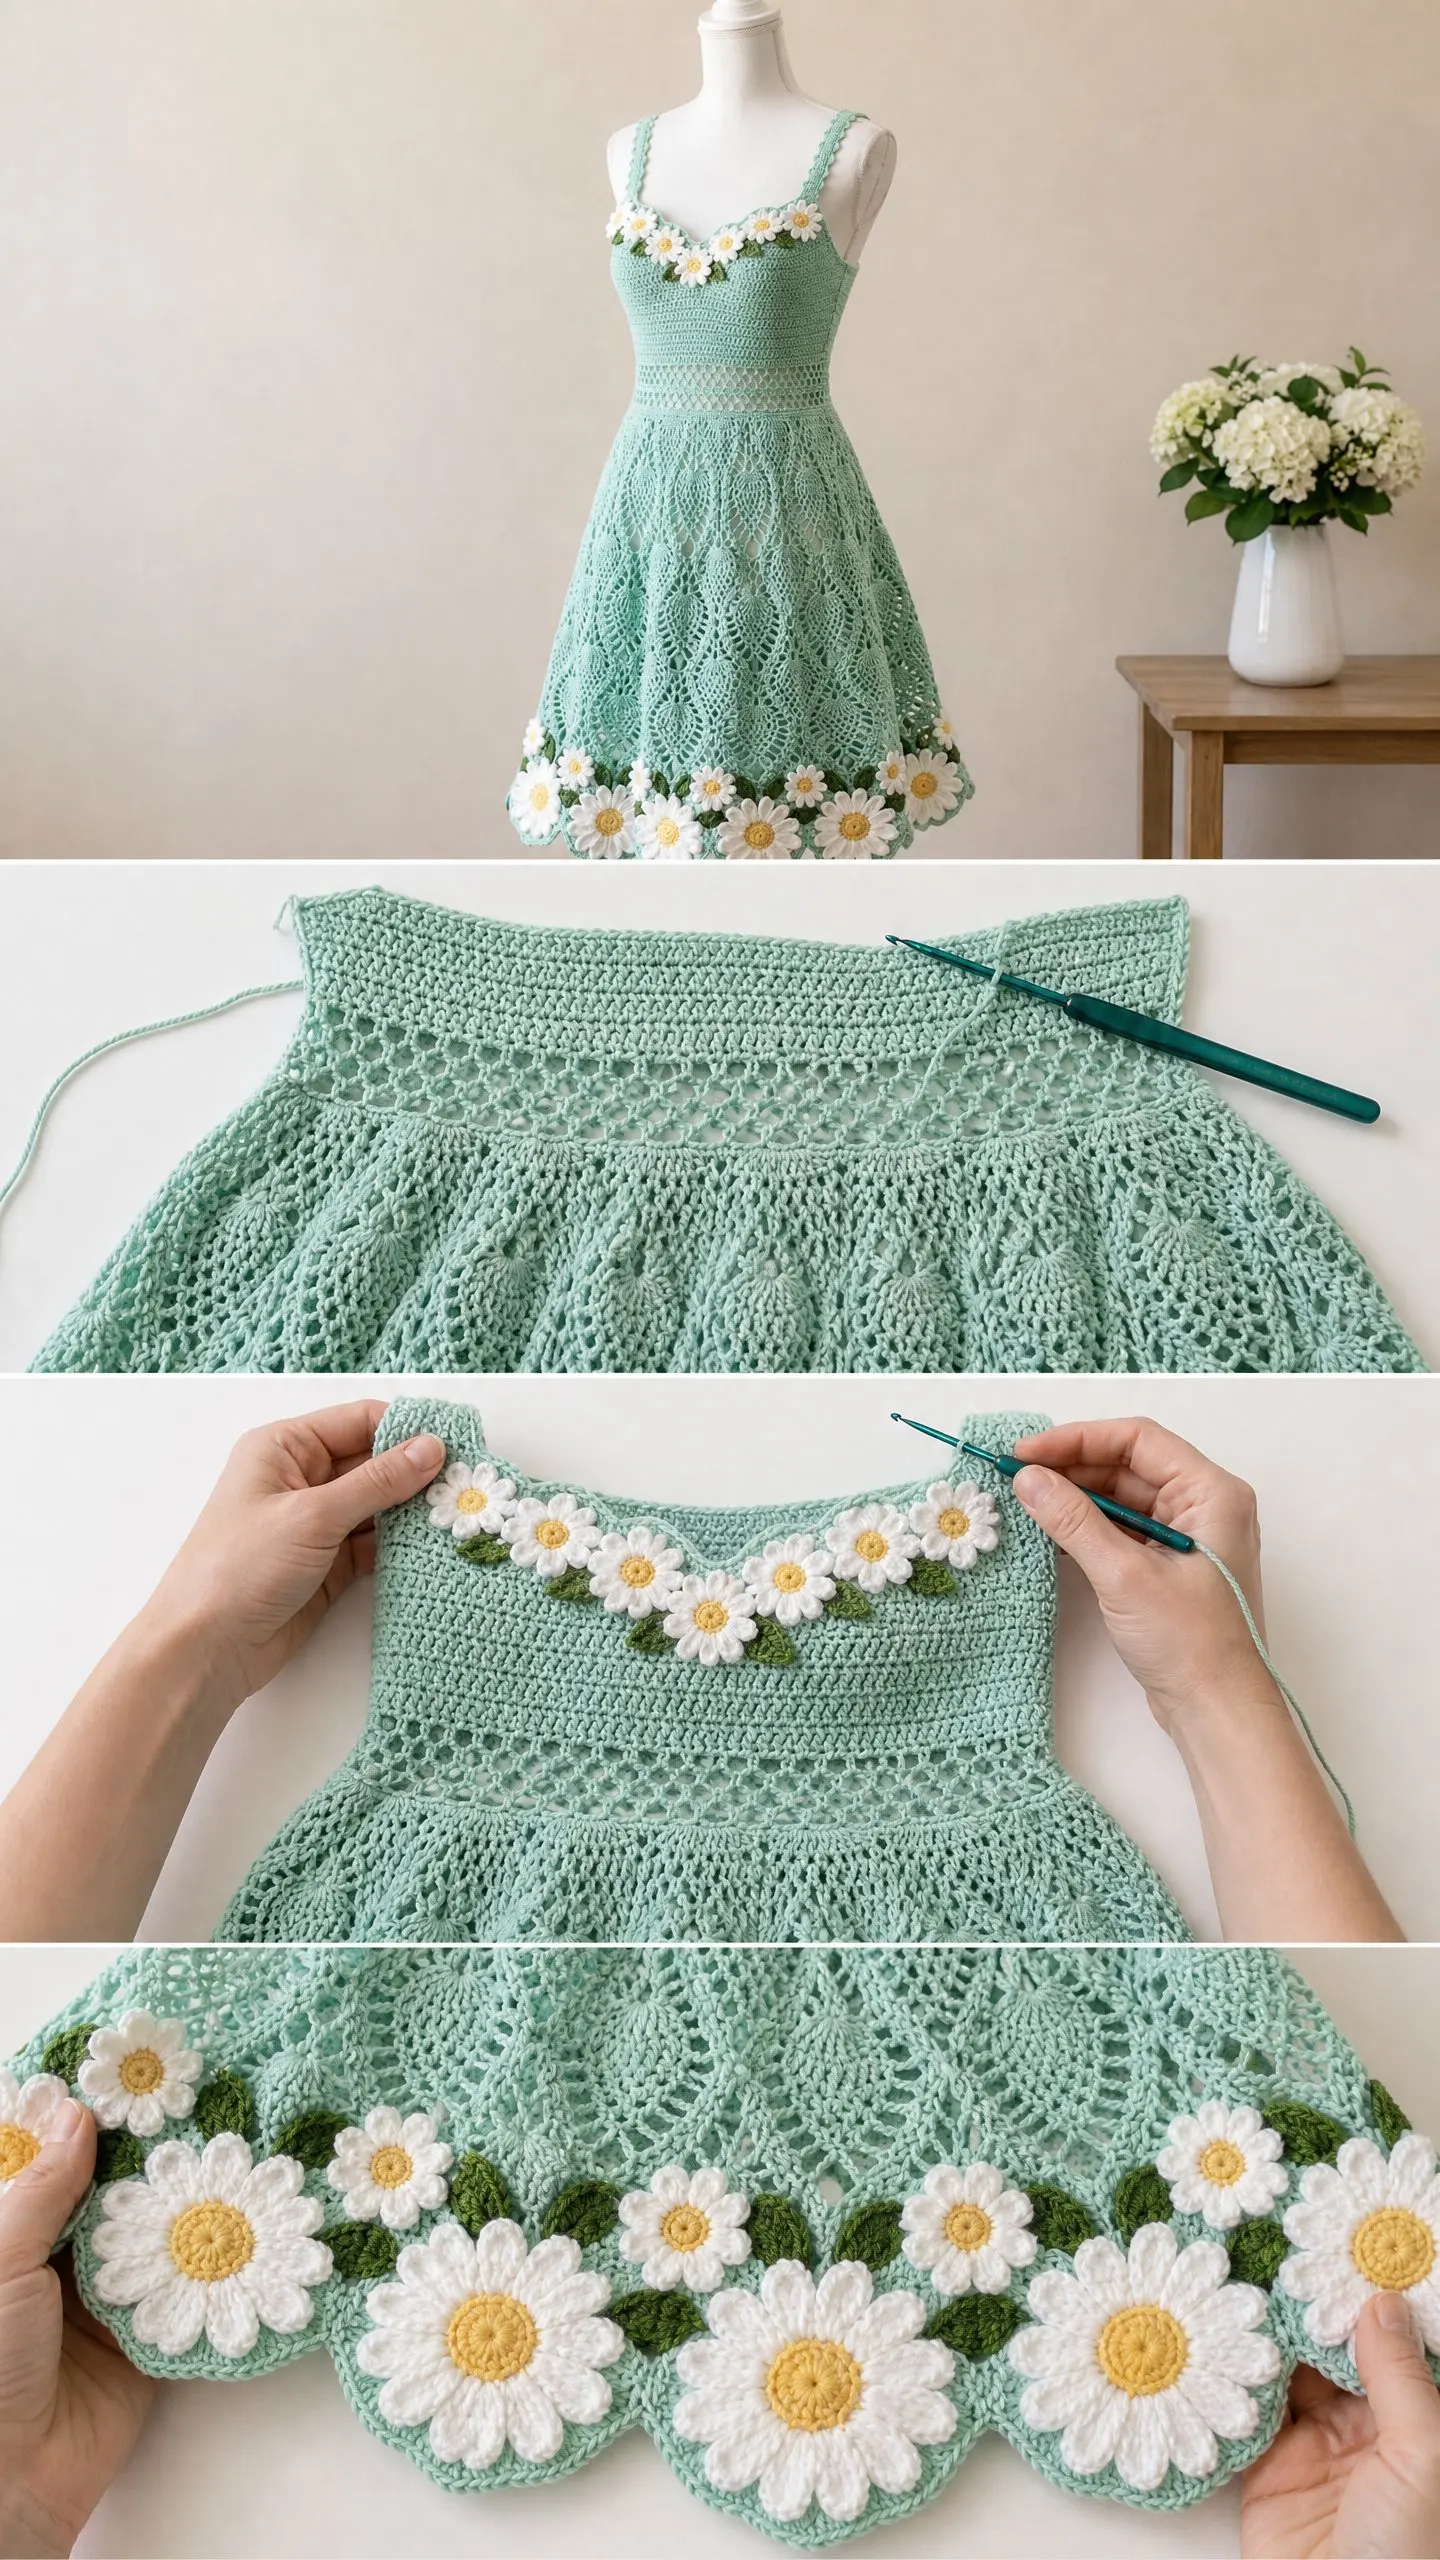
The daisy appliques are crocheted separately and sewn on at the end. This means you can adjust their placement or even change the colors to match your personal style.
Materials Needed
Yarn Requirements
Main Color (MC): Approximately 1,800 yards of DK weight 100 percent cotton yarn in mint green
Contrast Color 1 (CC1): Approximately 200 yards of DK weight 100 percent cotton yarn in white
Contrast Color 2 (CC2): Approximately 50 yards of DK weight 100 percent cotton yarn in yellow
Contrast Color 3 (CC3): Approximately 30 yards of DK weight 100 percent cotton yarn in sage or leaf green for daisy leaves and bases
Recommended Yarn Brands
Lion Brand 24/7 Cotton in Mint and White works beautifully for this project. It is 100 percent mercerized cotton with excellent stitch definition for lace work.
Paintbox Yarns Cotton DK in Spearmint and Paper White drapes well for garment construction and comes in a wide color range.
Drops Safran in Mint and Off White has a slightly matte finish that photographs beautifully and works perfectly for lace texture.
Choose a smooth, tightly plied DK weight cotton or cotton blend yarn with low stretch. Avoid wool or acrylic blends because the drape and stitch definition of cotton are essential for the pineapple lace pattern to open correctly.
Tools Required
Finished Measurements
This pattern is written for Women’s size Medium.
Gauge
Getting gauge right is absolutely critical for this garment. Even a small discrepancy will cause the dress to be significantly too large or too small.
With US E-4 / 3.5 mm hook and MC:
18 single crochet x 22 rows = 4 inches / 10 cm in single crochet
With US F-5 / 3.75 mm hook and MC:
One complete pineapple repeat (15 stitches wide) x 6 rows = approximately 3.5 inches / 9 cm wide and 2.5 inches / 6.4 cm tall
Daisy applique finished: approximately 3 inches / 7.5 cm in diameter
Work multiple swatches, wash and block them, then remeasure before beginning. This step saves heartache later.
Abbreviations and Stitch Definitions
Let me explain each abbreviation and stitch you will encounter in this crochet tutorial.
ch = chain: Yarn over, pull through loop on hook
sc = single crochet: Insert hook into stitch, yarn over, pull up a loop (2 loops on hook), yarn over, pull through both loops
dc = double crochet: Yarn over, insert hook into stitch, yarn over, pull up a loop (3 loops on hook), yarn over, pull through 2 loops, yarn over, pull through remaining 2 loops
hdc = half double crochet: Yarn over, insert hook into stitch, yarn over, pull up a loop (3 loops on hook), yarn over, pull through all 3 loops
tr = treble crochet: Yarn over twice, insert hook into stitch, yarn over, pull up a loop (4 loops on hook), yarn over, pull through 2 loops three times
sl st = slip stitch: Insert hook into stitch, yarn over, pull through both the stitch and the loop on hook
sk = skip: Pass over the indicated stitch without working into it
sp = space: The gap created by chain stitches in the previous row or round
st(s) = stitch(es)
rnd = round
rs = right side
ws = wrong side
pm = place marker
rep = repeat
beg = beginning
rem = remaining
Special Stitches Explained
sc2tog (single crochet 2 together): This is a decrease stitch. Insert hook into next stitch, yarn over, pull up a loop (2 loops on hook). Without completing the stitch, insert hook into following stitch, yarn over, pull up a loop (3 loops on hook). Yarn over, pull through all 3 loops. You have reduced by 1 stitch.
dc2tog (double crochet 2 together): Yarn over, insert hook into next stitch, yarn over, pull up a loop, yarn over, pull through 2 loops (2 loops on hook). Yarn over, insert hook into following stitch, yarn over, pull up a loop, yarn over, pull through 2 loops (3 loops on hook). Yarn over, pull through all 3 loops. One decrease made.
Extended Single Crochet (esc): Insert hook into stitch, yarn over, pull up a loop (2 loops on hook), yarn over, pull through first loop only (2 loops on hook), yarn over, pull through both loops. This stitch is slightly taller than a standard sc and is used in the waistband mesh section.
Shell Stitch: Work 5 dc into the same stitch or space. One shell made.
Reverse Single Crochet (rsc): Working from left to right (opposite normal direction), insert hook into stitch to the right, yarn over, pull up a loop, yarn over, pull through both loops. Used for strap edging.
Pineapple Cluster (PC): Insert hook into designated space or stitch, yarn over and pull up a loop, yarn over, pull through 2 loops. This completes one incomplete dc. Work 4 more incomplete dc into the same space (6 loops on hook total). Yarn over and pull through all 6 loops at once.
Pattern Notes Before You Begin
Read these notes carefully. They will save you confusion as you work through this step by step crochet pattern.
1. The bodice is worked flat in rows, seamed at one side, then joined for working the skirt in the round.
2. The sweetheart neckline is shaped with short row decreases at the center front. The back neckline is straight.
3. Straps are made separately and seamed or sewn to the inside top edge of the bodice.
4. The skirt increases are worked in defined increase rounds separated by plain rounds to create the gradual A-line flare.
5. The pineapple lace pattern begins at the waist after a short mesh transition section and continues to the hem.
6. Daisy appliques are crocheted separately and sewn on after the dress is complete and blocked.
7. The pineapple stitch repeat is a multiple of 15 stitches plus 6 for the foundation of the lace section.
8. Throughout the lace skirt, do not pull too tightly when working chain spaces or the lace will not open properly.
9. Do not use the F-5 hook until instructed. The bodice uses the E-4 hook exclusively.
10. All rounds are joined with a sl st to the first stitch unless otherwise noted. After joining, chain 1 for sc rounds or chain 3 for dc rounds to begin the next round.
Step by Step Instructions
Part One: The Bodice
The bodice is worked flat in rows, back and forth, beginning at the upper front edge. The sweetheart shaping creates a gentle V dip at center front.
Front Bodice Panel
With E-4 hook and MC, chain 83.
Foundation Row (ws): Sc in second ch from hook and in each ch across. Turn. (82 sc)
Sweetheart Shaping: You will work the right cup first (stitches 1 through 38), then the left cup (stitches 45 through 82), leaving stitches 39 through 44 unworked at center for the V shaping.
Right Front Cup
Row 1 (rs): Ch 1, sc in first 38 sts. Turn. (38 sc)
Row 2 (ws): Ch 1, sc2tog, sc to end. Turn. (37 sc)
Row 3 (rs): Ch 1, sc to last 2 sts, sc2tog. Turn. (36 sc)
Row 4 (ws): Ch 1, sc2tog, sc to end. Turn. (35 sc)
Row 5 (rs): Ch 1, sc in all sts across. Turn. (35 sc)
Row 6 (ws): Ch 1, sc in all sts across. Turn. (35 sc)
Cut yarn. Place sts on holder or leave on hook with stitch marker.
Left Front Cup
Rejoin MC at stitch 45 with rs facing.
Row 1 (rs): Ch 1, sc in each of the next 38 sts to end. Turn. (38 sc)
Row 2 (ws): Ch 1, sc to last 2 sts, sc2tog. Turn. (37 sc)
Row 3 (rs): Ch 1, sc2tog, sc to end. Turn. (36 sc)
Row 4 (ws): Ch 1, sc to last 2 sts, sc2tog. Turn. (35 sc)
Row 5 (rs): Ch 1, sc in all sts across. Turn. (35 sc)
Row 6 (ws): Ch 1, sc in all sts across. Turn. (35 sc)
Join Cups and Continue Front Bodice
Joining Row (rs): Ch 1, sc across left cup (35 sts), ch 6 across center gap, sc across right cup (35 sts). Turn. (76 sc + 6 ch = 82 working sts)
Row 8 (ws): Ch 1, sc in each st and each ch across. Turn. (82 sc)
Rows 9 through 42: Ch 1, sc in each st across. Turn. (82 sc each row)
This produces approximately 6.2 inches of bodice length below the cup shaping.
Waist Shaping
Row 43: Ch 1, sc2tog, sc 19, sc2tog, sc 18, sc2tog, sc 19, sc2tog, sc to end. Turn. (78 sc)
Row 44: Ch 1, sc in all sts. Turn. (78 sc)
Row 45: Ch 1, sc2tog, sc 18, sc2tog, sc 16, sc2tog, sc 18, sc2tog, sc to end. Turn. (74 sc)
Row 46: Ch 1, sc in all sts. Turn. (74 sc)
Row 47: Ch 1, sc2tog, sc 17, sc2tog, sc 14, sc2tog, sc 17, sc2tog, sc to end. Turn. (70 sc)
Row 48: Ch 1, sc in all sts. Turn. (70 sc)
Row 49: Ch 1, sc2tog, sc 16, sc2tog, sc 12, sc2tog, sc 16, sc2tog, sc to end. Turn. (66 sc)
Row 50: Ch 1, sc in all sts. Turn. (66 sc)
Row 51: Ch 1, sc2tog, sc 15, sc2tog, sc 10, sc2tog, sc 15, sc2tog, sc to end. Turn. (62 sc)
Row 52: Ch 1, sc in all sts. Turn. (62 sc)
Row 53: Ch 1, sc2tog, sc 14, sc2tog, sc 8, sc2tog, sc 14, sc2tog, sc to end. Turn. (58 sc)
Checkpoint: After Row 53 you should have 58 sts and the front bodice should measure approximately 11 inches from the top edge.
Rows 54 through 62: Ch 1, sc in all sts. Turn. (58 sc each row)
These 9 rows hold the waist narrow section.
Waist Expansion
Row 63: Ch 1, sc 14, 2 sc in next st, sc 28, 2 sc in next st, sc to end. Turn. (60 sc)
Row 64: Ch 1, sc in all sts. Turn. (60 sc)
Row 65: Ch 1, sc 14, 2 sc in next st, sc 29, 2 sc in next st, sc to end. Turn. (62 sc)
Row 66: Ch 1, sc in all sts. Turn. (62 sc)
Row 67: Ch 1, sc 14, 2 sc in next st, sc 31, 2 sc in next st, sc to end. Turn. (64 sc)
Row 68: Ch 1, sc in all sts. Turn. (64 sc)
Do not cut yarn. Set front bodice aside.
Back Bodice Panel
With E-4 hook and MC, chain 83.
Foundation Row (ws): Sc in second ch from hook and in each ch across. Turn. (82 sc)
Rows 1 through 42: Ch 1, sc in all sts across. Turn. (82 sc each row)
The back neckline is straight with no cup shaping.
Work waist shaping rows 43 through 68 exactly as written for the front bodice panel.
Cut yarn, leaving a 24-inch tail for seaming.
Seaming the Bodice
With wrong sides held together and using the long tail and tapestry needle, mattress stitch the left side seam from the bottom edge up to within 3 inches of the top. Leave the top 3 inches open for the armhole opening. Seam the second side identically.
The resulting tube will have:
Checkpoint: The bodice should measure approximately 12.5 to 13 inches in total height. The waist should be approximately 25 inches in circumference. The hip (bottom opening) should be approximately 28 inches in circumference.
Part Two: Neckline Edging
With E-4 hook and MC, join yarn at center back neck edge with rs facing.
Rnd 1: Sc evenly around entire neckline edge working approximately 1 sc per row end on the straight back and sides, following the sweetheart curve naturally at front. Approximate total: 148 sc. Join with sl st to first sc. (148 sc)
Rnd 2: Ch 1, sc in each st around. Join. (148 sc)
Mark strap positions: Front straps begin 12 sts from each armhole edge on the front neckline. Back straps begin 12 sts from each armhole edge on the back neckline.
Part Three: Shoulder Straps (Make 2)
With E-4 hook and MC, chain 7.
Row 1: Sc in second ch from hook and in each ch across. Turn. (6 sc)
Rows 2 through 80: Ch 1, sc in all sts. Turn. (6 sc each row)
This produces approximately 14.5 inches of strap length. Adjust for fit as needed.
Edging: Work 1 row rsc along each long edge of the strap.
Sew straps to bodice at marked positions.
Part Four: Armhole Edging
With E-4 hook and MC, join at bottom of armhole opening with rs facing.
Rnd 1: Sc evenly around armhole edge. Approximately 38 sc around each armhole. Join. (38 sc)
Rnd 2: Ch 1, sc in each st around. Join. (38 sc)
Cut yarn and weave in ends.
Part Five: Mesh Waistband Transition
Switch to F-5 hook. Join MC at any st of the bottom opening of the bodice with rs facing.
Rnd 1: Ch 1, sc in each st around the bottom opening of the bodice. Join. (128 sc)
Rnd 2 (mesh): Ch 4 (counts as dc + ch 1), skip 1 st, dc in next st, (ch 1, skip 1, dc in next st) around. Join to third ch of beg ch-4. (64 dc + 64 ch-1 sps)
Rnd 3 (mesh): Ch 4, dc in next ch-1 sp, (ch 1, dc in next ch-1 sp) around. Join to third ch of beg ch-4.
Rnd 4: Ch 1, sc in each dc and each ch-1 sp around. Join to first sc. (128 sc)
Rnd 5: Ch 1, sc in each st around, placing 2 sc in every 8th st to begin flaring. Join. (144 sc)
Rnd 6 (corrected): Ch 1, sc in each st around, working 2 sc into every 16th st until 6 extra sts are added. Join. (150 sc)
The pineapple repeat of 15 fits evenly 10 times around with 150 stitches.
Part Six: Pineapple Lace Skirt
All skirt rounds are worked with F-5 hook and MC.
Rnd 7 (setup for lace): Ch 5 (counts as dc + ch 2), skip 2 sts, dc in next st, (ch 2, skip 2, dc in next st) rep around to last 2 sts, ch 2, skip 2. Join to third ch of beg ch-5. (50 dc + 50 ch-2 sps)
Pineapple Lace Pattern
The pineapple motif is worked over a 15 stitch base and grows over 10 rounds before decreasing. The full skirt lace section uses 6 tiers of pineapples. Each tier equals 10 rounds.
Rnd 8: Sl st into first ch-2 sp, ch 3 (counts as dc), 2 dc in same sp, ch 1, (3 dc in next ch-2 sp, ch 1) around. Join to top of beg ch-3. (50 groups of 3 dc, 50 ch-1 sps)
Rnd 9: Ch 1, sc in space between dc groups, ch 5, (sc in next space between groups, ch 5) around. Join. (50 sc + 50 ch-5 sps)
Rnd 10 (begin pineapples): Sl st into first ch-5 sp, ch 3, 6 dc in same sp. (ch 2, sc in next ch-5 sp, ch 2, 7 dc in following ch-5 sp) rep around to last two sps, ch 2, sc in next sp, ch 2. Join to top of beg ch-3. (25 fans of 7 dc + 25 sc anchors)
Rnd 11: Sl st to top of fan, ch 3, 2 dc in same top dc. Ch 2, sk 2 dc, sc in next (center) dc, ch 2, sk 2 dc, 3 dc in last dc of fan, ch 1. Working over to next fan: ch 1, 3 dc in first dc of next fan, ch 2, sk 2, sc in center dc, ch 2, sk 2, 3 dc in last dc, ch 1. Rep around. Join.
Rnd 12: Sl st to top of 3-dc group, ch 3, dc in same st, ch 2, sc in next sc, ch 2, 2 dc in top of next 3-dc group, ch 3, 2 dc in top of following 3-dc group, ch 2, sc in sc, ch 2, 2 dc in 3-dc group, ch 3. Rep around. Join.
Rounds 13 through 17 (pineapple close): Each round, work the sc at the tip of each arch and continue reducing the dc count in each pineapple column by 1 dc on each side per round. By round 17 each pineapple has closed to a single sc at its tip.
Tier Increases and Remaining Tiers
Rnd 18 (Tier increase): Work 7 dc into each ch-5 arch around, ch 2 between fans, working 1 sc into arch separators. Add 10 extra arch spaces evenly. (60 arch spaces total)
Tier 2 (rounds 19 through 28): Repeat the pineapple lace sequence over 60 fan positions.
Rnd 29: Add 10 more arch spaces evenly. (70 arch spaces)
Tier 3 (rounds 30 through 39): Pineapple sequence over 70 fan positions.
Rnd 40: Add 10 more arch spaces evenly. (80 arch spaces)
Tier 4 (rounds 41 through 50): Pineapple sequence over 80 fan positions.
Rnd 51: Add 10 more arch spaces evenly. (90 arch spaces)
Tier 5 (rounds 52 through 61): Pineapple sequence over 90 fan positions.
Rnd 62: Add 10 more arch spaces evenly. (100 arch spaces)
Tier 6 (rounds 63 through 72): Pineapple sequence over 100 fan positions.
Checkpoint: The skirt section should measure approximately 20 inches in length. The hem circumference should measure between 50 and 56 inches.
Hem Arch Edging
Rnd 73: Into each ch-5 arch at hem: (sc, hdc, dc, hdc, sc), sc in each sc anchor between arches. Join. This creates a scalloped edge onto which daisy appliques will be sewn.
Cut yarn and weave in ends.
Part Seven: Daisy Appliques
The dress uses two sizes of daisy. Large daisies border the hem and smaller daisies decorate the neckline. Each daisy has white petals (CC1), a yellow center (CC2), and optional green leaves (CC3).
Work the daisy petals using the Daisy Petal special stitch: Chain 8, sl st into the first ch to form a ring. Into the ring: (sc, hdc, 3 dc, hdc, sc). This forms one petal.
Create approximately 15 to 20 large daisies for the hem border and 8 to 10 smaller daisies for the neckline.
Finishing
Block the entire dress before attaching appliques. Pin the dress to blocking mats, spray with water, and allow to dry completely.
Pin daisy appliques in position around the neckline and hem border. Use the reference images as a guide for spacing. Sew each daisy securely using matching thread and a tapestry needle.
Weave in all remaining ends. Add optional lining if desired for opacity.
Tips for Success
Take your time with gauge. This cannot be overstated. A garment that does not fit is heartbreaking after 60 plus hours of work.
Mark your rounds. The pineapple lace can become disorienting. Use stitch markers generously.
Block aggressively. Cotton yarn relaxes significantly when wet blocked. The lace pattern will open beautifully with proper blocking.
Try on as you go. After completing the bodice, try it on before moving to the skirt. Adjustments are easier at this stage.
I hope this Mint Meadow Crochet Daisy Dress brings you as much joy to make as it will to wear. The finished piece is truly stunning, and every hour you invest shows in the final result. Thank you so much for choosing this pattern for your next project.
If you make this dress, I would absolutely love to see your version. Tag me on Instagram or share a photo in my Facebook group. Seeing your creations is honestly the best part of sharing patterns.
Save this crochet dress pattern to your Pinterest boards so you can find it when you are ready to start. And please drop a comment below if you make it or have any questions along the way. Happy crocheting!
