
Oh my goodness, THIS SET. I cannot even begin to tell you how excited I am to share this pattern with you today! This adorable unicorn baby dress set works up faster than you might expect for something so detailed, and the finished result is absolutely STUNNING. We’re talking a complete outfit, including dress, headband, and booties, that will make every baby shower gift table jealous. If you’ve been looking for a showstopper project that actually comes together in a manageable timeframe, you’ve found it.
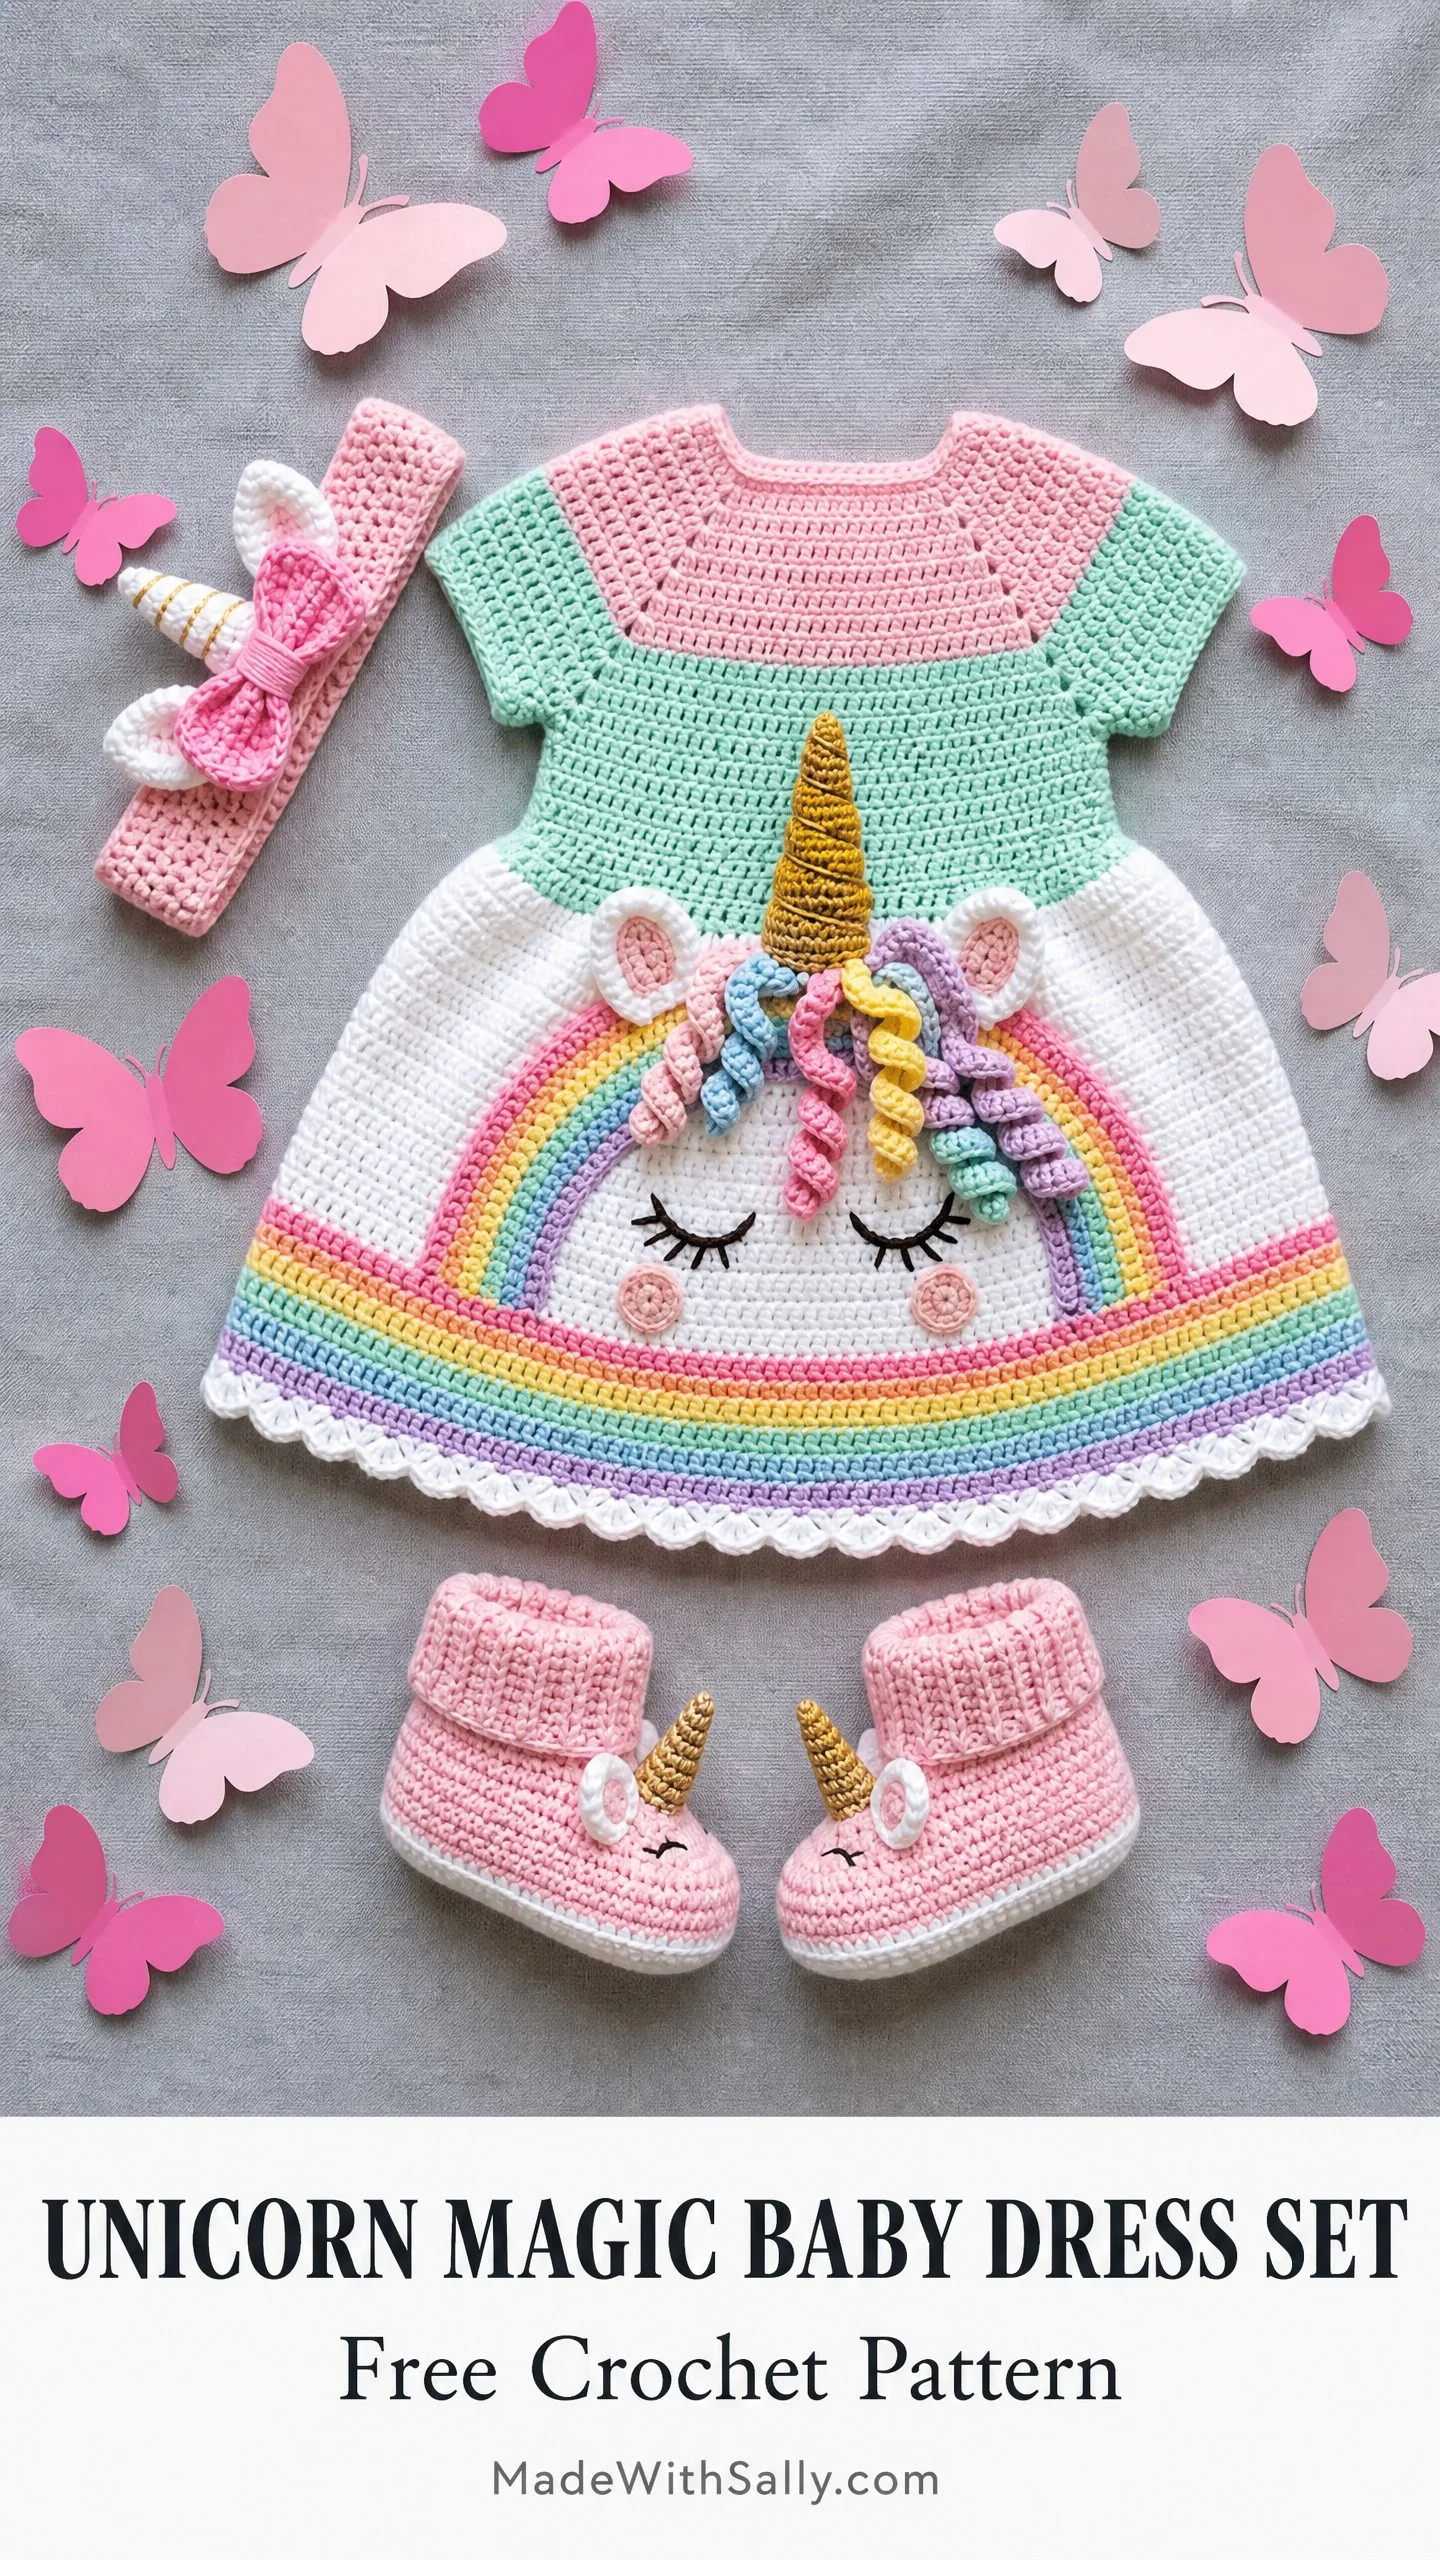
The total time investment is around 13 to 19 hours spread across all three pieces. That might sound like a lot, but trust me, once you get into the rhythm of the top-down construction, the rows fly by. The dress alone takes about 10 to 14 hours, while the accessories add just a few more.
This is an intermediate level pattern, but don’t let that scare you off if you’re a confident beginner. If you can work in the round, handle color changes, and follow stitch counts carefully, you can absolutely make this happen. I’ll walk you through every single step.
What Makes This Unicorn Baby Dress Set So Special
This pattern creates a complete three-piece set sized for 3 to 6 month old babies. The dress features a seamless top-down yoke construction with a gorgeous mint and pink color-blocked bodice. The full A-line skirt flares out beautifully and showcases that signature unicorn face applique right on the front. Pastel rainbow stripes arc across the lower skirt, framing the sweet sleeping unicorn face with its golden horn and curly mane.
The matching headband includes a mini unicorn horn and bow accent. The booties feature tiny unicorn horns of their own. Together, the set creates a cohesive gift that any new parent would treasure.
Finished measurements:
Materials You’ll Need
Yarn (all worsted weight):
Hooks:
Additional Supplies:
Recommended Yarn Brands:
Lion Brand Pound of Love works beautifully for this project. It’s machine washable (essential for baby items), has excellent stitch definition, and comes in all the pastel colors you need. Paintbox Yarns Simply DK is another great option with lovely softness against baby skin.
Gauge
This is important, so please don’t skip it!
16 single crochet (sc) x 18 rows = 4 inches in single crochet, blocked
18 half double crochet (hdc) x 13 rows = 4 inches in half double crochet, blocked
Being even one-eighth inch off per stitch adds up to over an inch difference in the finished chest circumference. For baby clothes, fit matters. Take time to swatch.
Abbreviations and Stitch Definitions
Let me break down every stitch you’ll encounter:
Special Stitch: Curled Mane Strand
Chain 12. Starting in second chain from hook, work 3 sc in each chain across. The strand naturally curls into a spiral. Fasten off leaving a 6-inch tail for sewing.
Pattern Note: Chain-1 at the beginning of sc rounds does NOT count as a stitch. Chain-2 at the beginning of hdc rounds does NOT count as a stitch.
The Dress Pattern
Yoke (Worked Flat in Rows)
The yoke starts at the neckline and works down, increasing to create the shoulder shaping. You’ll work flat here because the dress has a button closure at center back.
Foundation Chain: Using Color B (Pink), ch 42.
Row 1 (RS): Sc in second ch from hook and in each ch across. Turn. (41 sc)
Row 2 (WS): Ch 1, sc in each st across. Turn. (41 sc)
Row 3 (RS): Ch 1, sc in first 3 sts, [2 sc in next st, sc in next 3 sts] 9 times, 2 sc in next st, sc in last st. Turn. (51 sc)
Row 4 (WS): Ch 1, sc in each st across. Turn. (51 sc)
Row 5 (RS): Ch 1, sc in first 3 sts, [2 sc in next st, sc in next 4 sts] 9 times, 2 sc in next st, sc in last 2 sts. Turn. (61 sc)
Row 6 (WS): Ch 1, sc in each st across. Turn. (61 sc)
End of Row 6: Change to Color A (Mint) on last stitch.
Row 7 (RS, Color A): Ch 1, sc in first 3 sts, [2 sc in next st, sc in next 5 sts] 9 times, 2 sc in next st, sc in last 2 sts. Turn. (71 sc)
Row 8 (WS, Color A): Ch 1, sc in each st across. Turn. (71 sc)
Row 9 (RS, Color A): Ch 1, sc in first 4 sts, [2 sc in next st, sc in next 6 sts] 9 times, 2 sc in next st, sc in last 2 sts. Turn. (81 sc)
Row 10 (WS, Color A): Ch 1, sc in each st across. Turn. (81 sc)
Row 11 (RS, Color A): Ch 1, sc in first 4 sts, [2 sc in next st, sc in next 7 sts] 9 times, 2 sc in next st, sc in last 2 sts. Turn. (91 sc)
Row 12 (WS, Color A): Ch 1, sc in each st across. Turn. (91 sc)
Checkpoint: Your yoke should measure approximately 2.5 inches tall. Count your stitches. You should have exactly 91.
Divide for Body and Sleeves
Now you’ll separate the sleeves from the body. The 91 stitches divide as follows: 15 sts left back, 18 sts left sleeve, 25 sts front, 18 sts right sleeve, 15 sts right back.
Row 13 (RS, Division Row, Color A): Ch 1, sc in first 15 sts (left back), ch 4 (underarm bridge), skip 18 sts (left sleeve), sc in next 25 sts (front), ch 4 (underarm bridge), skip 18 sts (right sleeve), sc in last 15 sts (right back). Turn. (55 sc + 8 ch = 63 working positions)
Body (Worked Flat, Then Joined in the Round)
Row 14 (WS, Color A): Ch 1, sc in each sc and each ch across. Turn. (63 sc)
Row 15 (RS, Color A): Ch 1, sc in first 5 sts, [2 sc in next st, sc in next 6 sts] 8 times, 2 sc in next st, sc in last 2 sts. Turn. (72 sc)
Row 16 (WS, Color A): Ch 1, sc in each st across. Turn. (72 sc)
Now join to work in the round:
Rnd 17 (Color A): Ch 1, sc in each st around. Join with sl st to first sc. (72 sc)
Rnd 18 (Color A): Ch 1, sc in each sc around. Join. (72 sc)
Rnd 19 (Color A): Ch 1, sc in first 4 sts, [2 sc in next st, sc in next 8 sts] 7 times, 2 sc in next st, sc in last 4 sts. Join. (80 sc)
Rnd 20 (Color A): Ch 1, sc in each sc around. Join. (80 sc)
Rnd 21 (Color A): Ch 1, sc in each sc around. Join. (80 sc)
End of Rnd 21: Change to Color C (White).
Checkpoint: From shoulder to current row should measure approximately 4.5 inches. You should have 80 sc.
Skirt (Worked in the Round)
The skirt flares through a series of increase rounds, creating that beautiful A-line shape.
Rnd 22 (Color C): Ch 1, sc in first 4 sts, [2 sc in next st, sc in next 9 sts] 7 times, 2 sc in next st, sc in last 5 sts. Join. (88 sc)
Rnd 23 (Color C): Ch 1, sc in each sc around. Join. (88 sc)
Rnd 24 (Color C): Ch 1, sc in first 4 sts, [2 sc in next st, sc in next 10 sts] 7 times, 2 sc in next st, sc in last 6 sts. Join. (96 sc)
Rnd 25 (Color C): Ch 1, sc in each sc around. Join. (96 sc)
Rnd 26 (Color C): Ch 1, sc in first 5 sts, [2 sc in next st, sc in next 11 sts] 7 times, 2 sc in next st, sc in last 6 sts. Join. (104 sc)
Rnd 27 (Color C): Ch 1, sc in each sc around. Join. (104 sc)
Rnd 28 (Color C): Ch 1, sc in first 5 sts, [2 sc in next st, sc in next 12 sts] 7 times, 2 sc in next st, sc in last 7 sts. Join. (112 sc)
Rnd 29 (Color C): Ch 1, sc in each sc around. Join. (112 sc)
Rnd 30 (Color C): Ch 1, sc in first 6 sts, [2 sc in next st, sc in next 13 sts] 7 times, 2 sc in next st, sc in last 7 sts. Join. (120 sc)
Rnds 31 to 33 (Color C): Ch 1, sc in each sc around. Join. (120 sc)
Checkpoint: Skirt should measure approximately 4 inches from yoke join. Count 120 sc.
Rainbow Stripe Section
This is where the magic happens! Working in BLO creates raised ridges that define each colorful stripe.
Rnd 34 (Color E, Blush Pink): Ch 1, working in BLO, sc in each sc around. Join. (120 sc)
Rnd 35 (Color E): Ch 1, sc in each sc around (both loops). Join. (120 sc)
Cut Color E. Join Color D (Yellow).
Rnd 36 (Color D, Yellow): Ch 1, working in BLO, sc in each sc around. Join. (120 sc)
Rnd 37 (Color D): Ch 1, sc in each sc around. Join. (120 sc)
Cut Color D. Join Color G (Baby Blue).
Rnd 38 (Color G, Baby Blue): Ch 1, working in BLO, sc in each sc around. Join. (120 sc)
Rnd 39 (Color G): Ch 1, sc in each sc around. Join. (120 sc)
Cut Color G. Join Color F (Lavender).
Rnd 40 (Color F, Lavender): Ch 1, working in BLO, sc in each sc around. Join. (120 sc)
Rnd 41 (Color F): Ch 1, sc in each sc around. Join. (120 sc)
Cut Color F. Join Color C (White).
Rnd 42 (Color C): Ch 1, sc in each sc around. Join. (120 sc)
Hem Edging
Cut Color C. Join Color B (Pink).
Rnd 43 (Color B, Edging): Ch 1, [sc in next st, sk 2 sts, 5 dc in next st, sk 2 sts] 20 times. Join with sl st to first sc. (20 shells)
Fasten off. Weave all ends.
Sleeve Edging (Work Both)
Join Color B (Pink) to any sleeve stitch.
Rnd 1: Ch 1, sc in each of 18 held sleeve sts, sc in each of 4 underarm ch sts. Join. (22 sc)
Rnd 2: Ch 1, sc in each sc around. Join. (22 sc)
Rnd 3 (Picot Round): Ch 1, [sc in next 2 sts, ch 3, sl st in third ch from hook] 11 times. Join. (22 sts, 11 picots)
Fasten off. Repeat for second sleeve.
Button Band
Right Back Band (with buttonholes): With RS facing, join Color B to top right-back corner.
Row 1: Ch 1, work 36 sc evenly down right back edge. Turn. (36 sc)
Row 2: Ch 1, sc in first 3 sts, [ch 1, sk 1 st, sc in next 11 sts] 3 times. Turn. (33 sc + 3 ch-1 sp)
Row 3: Ch 1, sc in each st and each ch-sp across. Turn. (36 sc)
Fasten off.
Left Back Band: Join Color B to bottom left-back corner.
Rows 1 to 3: Ch 1, work 36 sc evenly up edge. Turn. Sc in each st across for all rows. (36 sc)
Fasten off. Sew buttons to left back band aligned with buttonholes.
Unicorn Face Applique
Face Oval
Using Color C (White) and smaller hook:
Rnd 1: MC, work 6 sc in ring. Pull tight. (6 sc)
Rnd 2: 2 sc in each sc around. (12 sc)
Rnd 3: [Sc in next sc, 2 sc in next sc] 6 times. (18 sc)
Rnd 4: [Sc in next 2 sc, 2 sc in next sc] 6 times. (24 sc)
Rnd 5: [Sc in next 3 sc, 2 sc in next sc] 6 times. (30 sc)
Rnd 6: [Sc in next 4 sc, 2 sc in next sc] 6 times. (36 sc)
Rnd 7: [Sc in next 5 sc, 2 sc in next sc] 6 times. (42 sc)
Rnd 8: Sc in each sc around. (42 sc)
Fasten off leaving a 24-inch tail.
Horn
Using Color H (Gold) and smaller hook:
Rnd 1: MC, 6 sc in ring. (6 sc)
Rnd 2: Sc in each sc around. (6 sc)
Rnd 3: [Sc in next 2 sc, 2 sc in next sc] twice. (8 sc)
Rnd 4: Sc in each sc around. (8 sc)
Rnd 5: [Sc in next 3 sc, 2 sc in next sc] twice. (10 sc)
Rnd 6: Sc in each sc around. (10 sc)
Rnd 7: [Sc in next 4 sc, 2 sc in next sc] twice. (12 sc)
Rnd 8: Sl st in each sc around. Fasten off.
Stuff lightly with fiberfill. Sew to top center of face oval.
Ears (Make 2)
Using Color C (White) and smaller hook:
Row 1: Ch 5. Sc in second ch from hook, sc in next 2 ch, 3 sc in last ch. Working back along opposite side: sc in next 2 sts, 2 sc in last st. Join with sl st. (10 sc)
Fasten off Color C. Join Color B (Pink).
Row 2: Sl st in first 2 sts, sc in next 2 sts, 3 sc in next st, sc in next 2 sts, sl st in last 3 sts. Fasten off.
Sew ears on each side of horn, angled outward.
Facial Features
Using black yarn, embroider two closed crescent eyes (sleeping expression) approximately 0.5 inch wide, positioned one-third down from the horn.
Using pink yarn, embroider small circular cheek blushes below and outside each eye.
Mane Curls
Make curled mane strands:
Arrange in a cascading cluster beside the horn, layering in rainbow gradient. Sew each strand securely at its base.
Assembly
Position completed face on skirt front, approximately 2 inches below yoke join. The horn tip will reach into the mint bodice section. Pin, then whipstitch around entire outer edge.
Headband
Using Color B (Pink) and main hook:
Foundation: Ch 65. Join with sl st to first ch, being careful not to twist.
Rnds 1 to 4: Ch 1, sc in each st around. Join. (65 sc)
Fasten off.
Mini Horn: Work dress horn pattern through Rnd 5 only. (10 sc) Stuff lightly, sew to front center.
Mini Ears: Using ch 4 base, work ear pattern. Make 2. Attach on each side of mini horn.
Bow: Ch 13. Sc in second ch from hook and each ch across. Turn. (12 sc) Work Rows 2 to 8 in sc. Fasten off. Pinch center to form bow shape, wrap tail around center, secure. Sew to headband left of horn.
Booties (Make 2)
Sole
Using Color B (Pink):
Rnd 1: Ch 10. Work 2 sc in second ch from hook, sc in next 7 ch, 4 sc in last ch. Working back along opposite side: sc in next 7 sts, 2 sc in first ch. Join. (22 sc)
Rnd 2: 2 sc in first sc, sc in next 7 sc, 2 sc in each of next 4 sc, sc in next 7 sc, 2 sc in last sc. Join. (28 sc)
Rnd 3: Sc in first sc, 2 sc in next sc, sc in next 7 sc, [sc in next sc, 2 sc in next sc] 4 times, sc in next 7 sc, sc in next sc, 2 sc in last sc. Join. (34 sc)
Sides
Rnd 4: Ch 1, working in BLO, sc in each sc around. Join. (34 sc)
Rnds 5 to 6: Ch 1, sc in each sc around. Join. (34 sc)
Toe Shaping
Rnd 7: Ch 1, sc in first 10 sc, [sc2tog] 7 times, sc in last 10 sc. Join. (27 sc)
Rnd 8: Ch 1, sc in first 8 sc, [sc2tog] 5 times, sc in last 9 sc. Join. (22 sc)
Cuff
Rnd 9: Ch 1, sc in each sc around. Join. (22 sc)
Rnd 10: Ch 1, working in BLO, sc in each sc around. Join. (22 sc)
Rnds 11 to 13: Ch 1, sc in each sc around. Join. (22 sc)
Fasten off.
Bootie Horns: Work mini horns as for headband. Sew to front of each bootie.
Tips for Success
Color changes: When switching colors, work your last stitch until 2 loops remain, then pull the new color through. This creates cleaner transitions.
Stitch markers are your best friend. Place them at yoke division points and move them up each round. Trust me on this one.
Block your finished pieces. A light steam blocking evens out your stitches and helps the skirt hold its A-line shape beautifully.
Safety note: The unicorn face applique is sewn flat to the dress. If using safety eyes, only use them on the applique before attaching. For the safest baby garment, embroider all features instead.
Wrapping Up Your Unicorn Magic Baby Dress Set
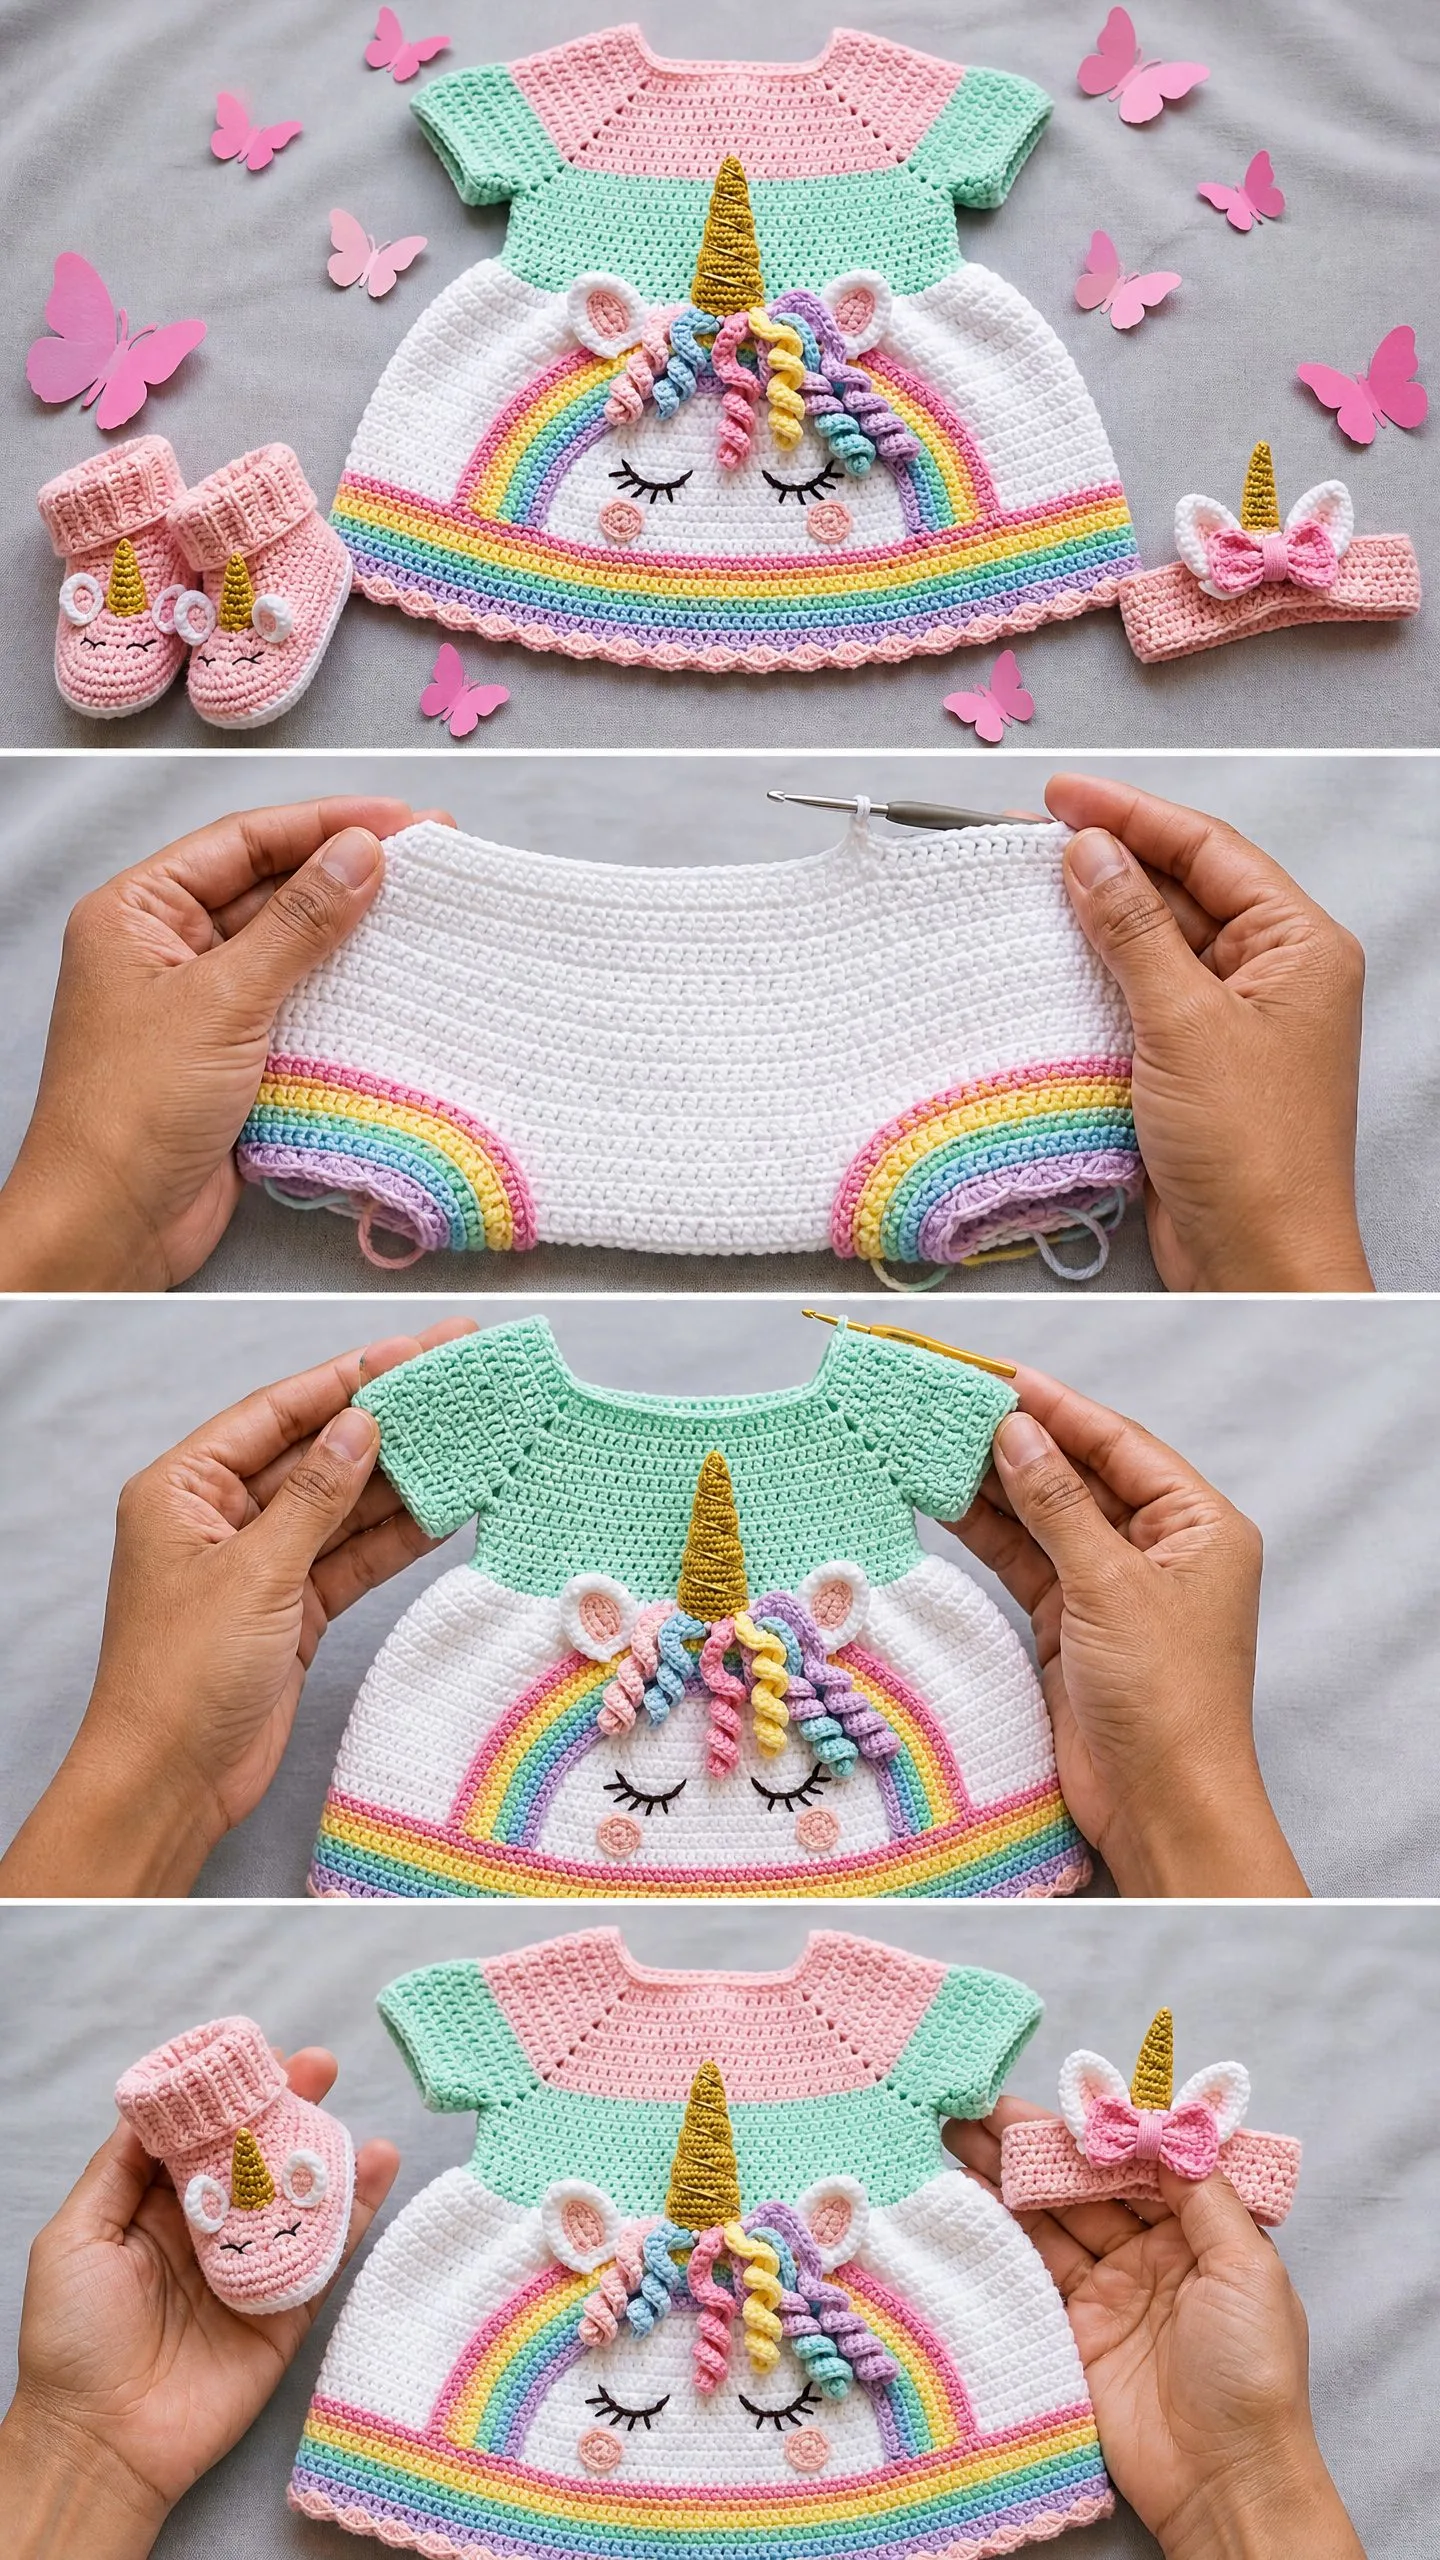
You did it! This crochet pattern creates an absolutely precious gift set that any new parent would adore. The combination of the color-blocked bodice, rainbow stripes, and that sweet sleeping unicorn face makes this dress truly special. Pair it with the matching headband and booties for a complete outfit that’s guaranteed to get compliments at every baby shower.
I hope you enjoyed working through this step by step crochet tutorial. The top-down construction makes fitting adjustments easy, and once you master the color changes, you’ll fly through those rainbow stripes.
Thank you so much for choosing this pattern for your next project. I absolutely love seeing your finished creations! If you make this set, please tag me on Instagram or share a photo in my Facebook group. Nothing makes my day like seeing these little unicorn dresses out in the world, bringing joy to new families.
Don’t forget to save this pattern to your Pinterest boards so you can find it again easily. And please leave a comment below if you make this set. I’d love to hear how it turned out and see photos of your adorable finished pieces!
