
Crocheting a full skirt sounds intimidating, right? I hear it all the time. The shaping feels complicated, the size seems overwhelming, and the thought of all those appliques might make you want to close this tab immediately. But here’s the truth: this skirt is built on simple single crochet worked in rounds. That’s it. If you can single crochet in a circle, you can make this skirt.
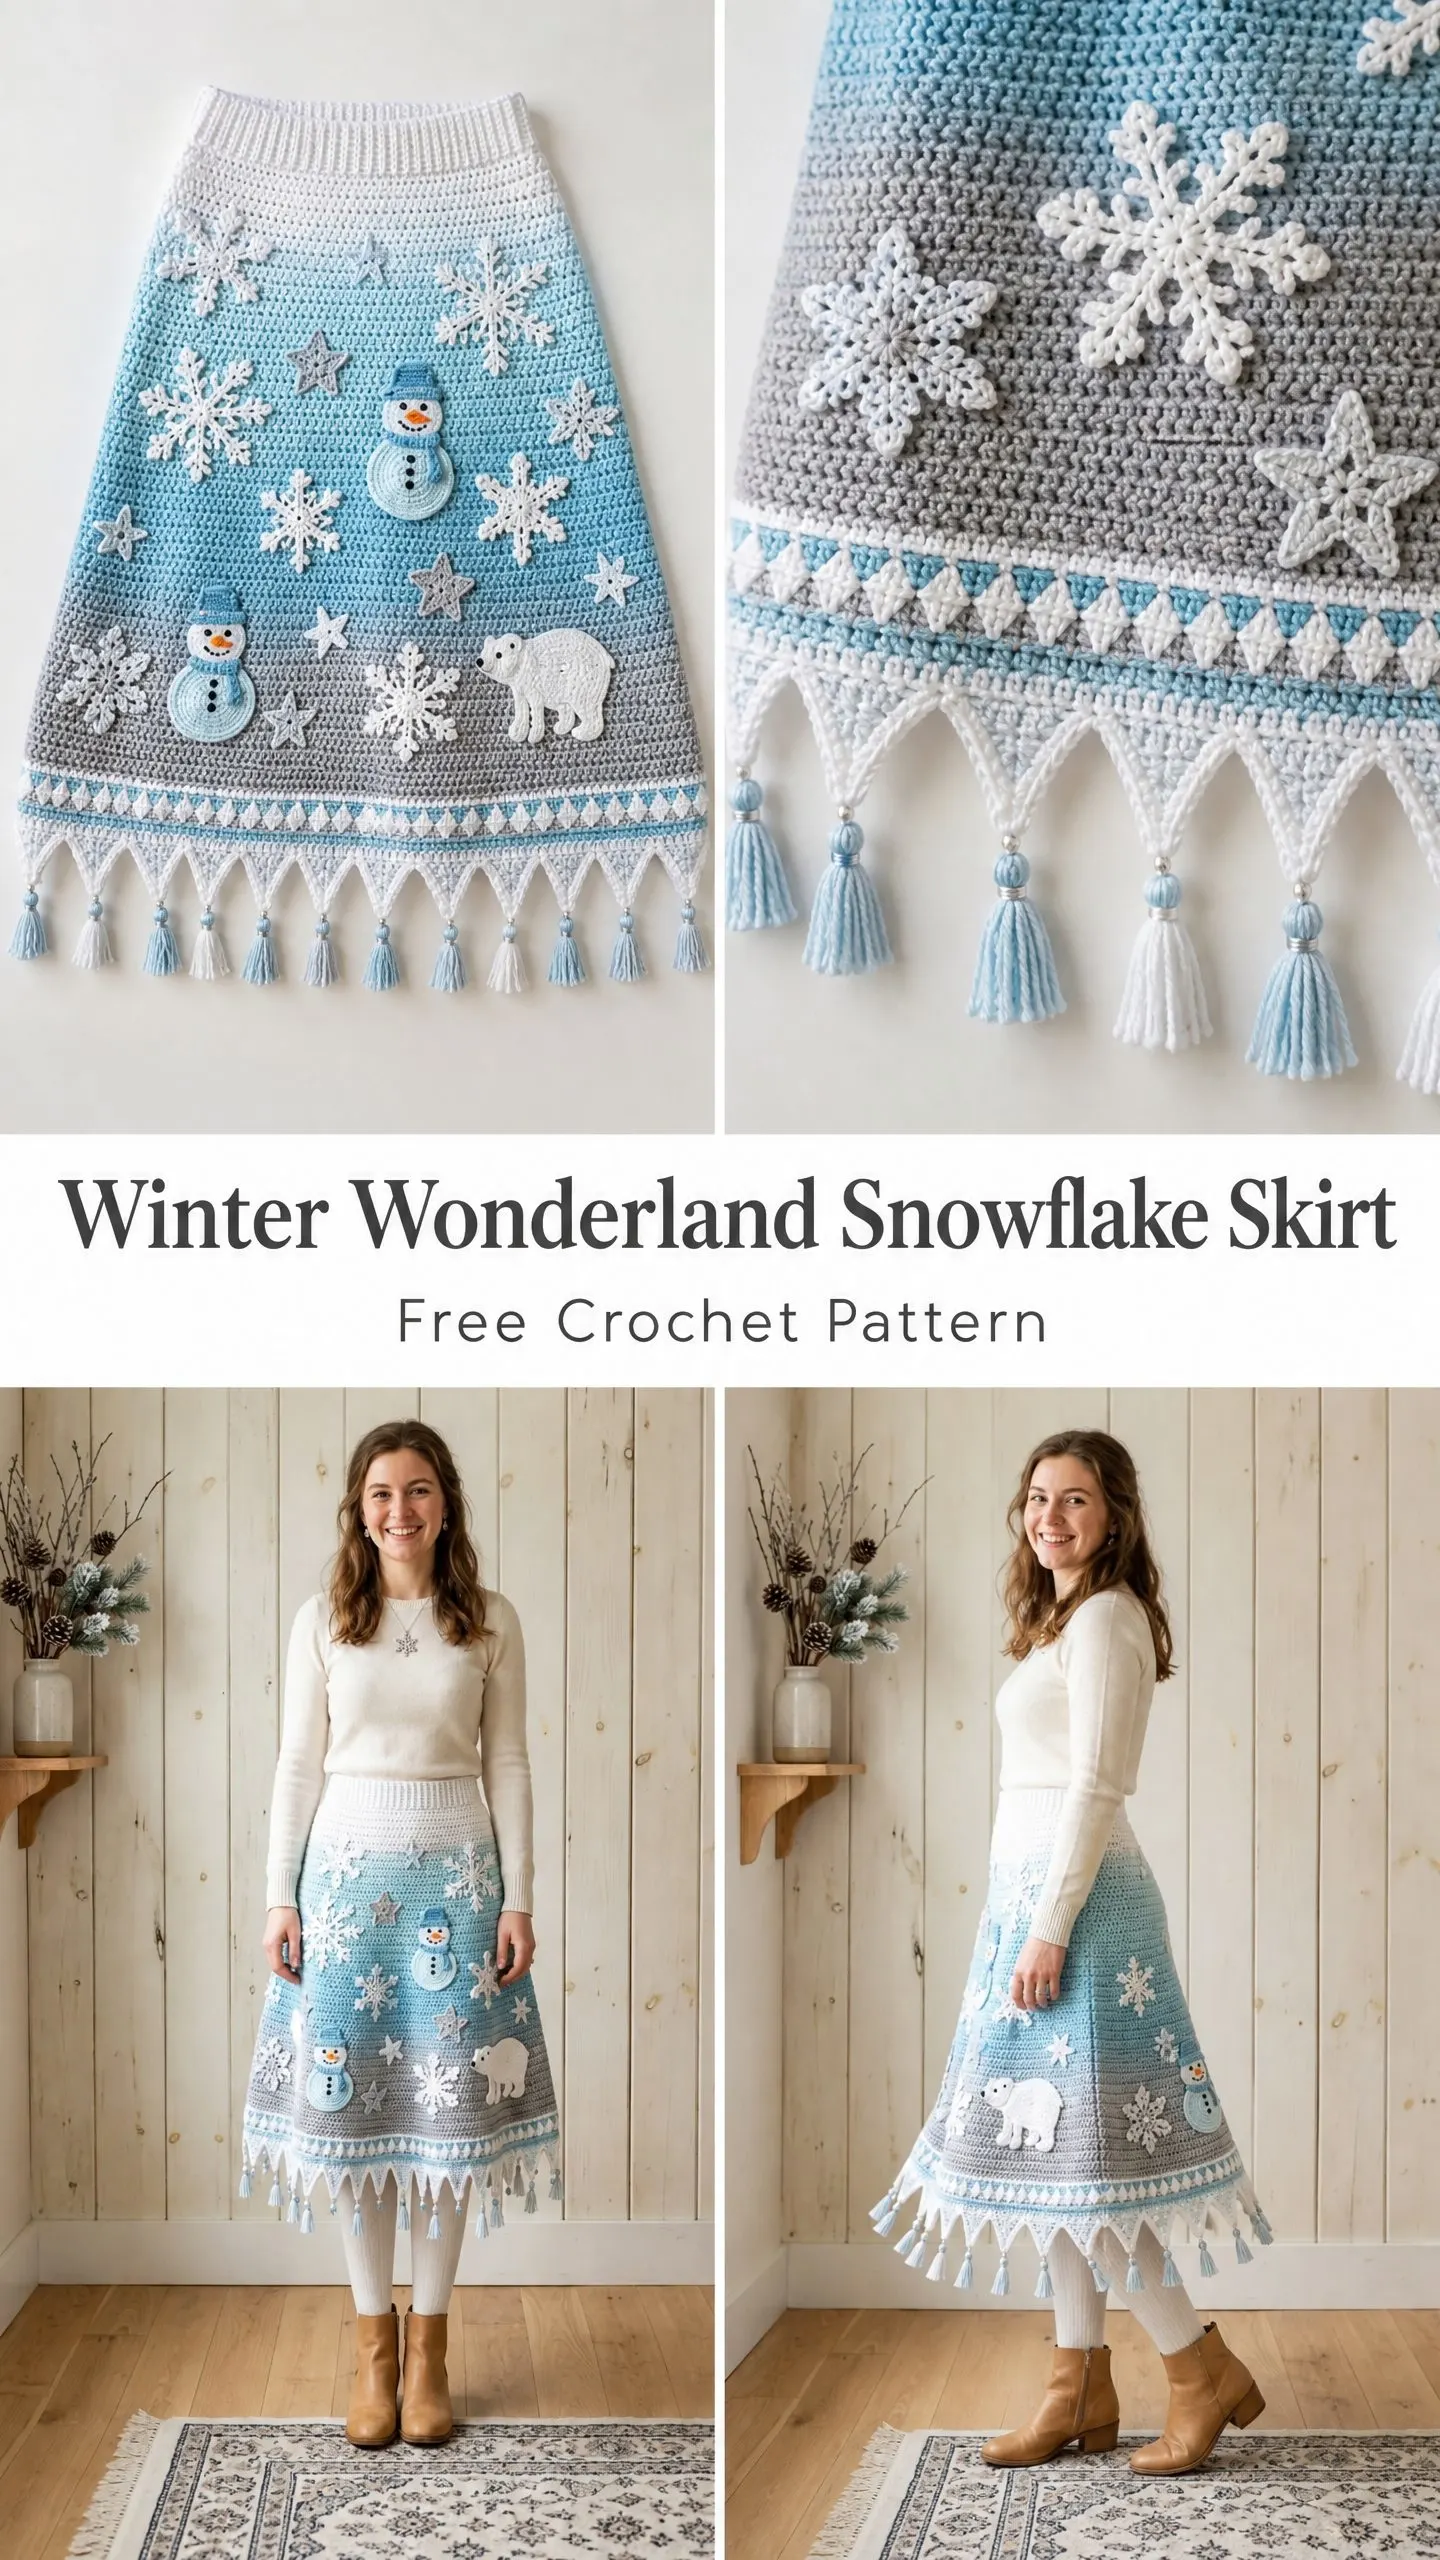
The fancy stuff? Those dimensional snowflakes, the cute snowmen, that adorable polar bear? They’re all made separately and sewn on at the end. You’re not juggling complicated colorwork while trying to shape a garment. You’re just crocheting one straightforward piece, then decorating it like a winter canvas.
Whether you’re an intermediate crocheter ready to tackle your first wearable or an advanced maker looking for a showstopping holiday project, this pattern breaks everything into manageable chunks. Let me walk you through every single step.
About This Winter Wonderland Crochet Pattern
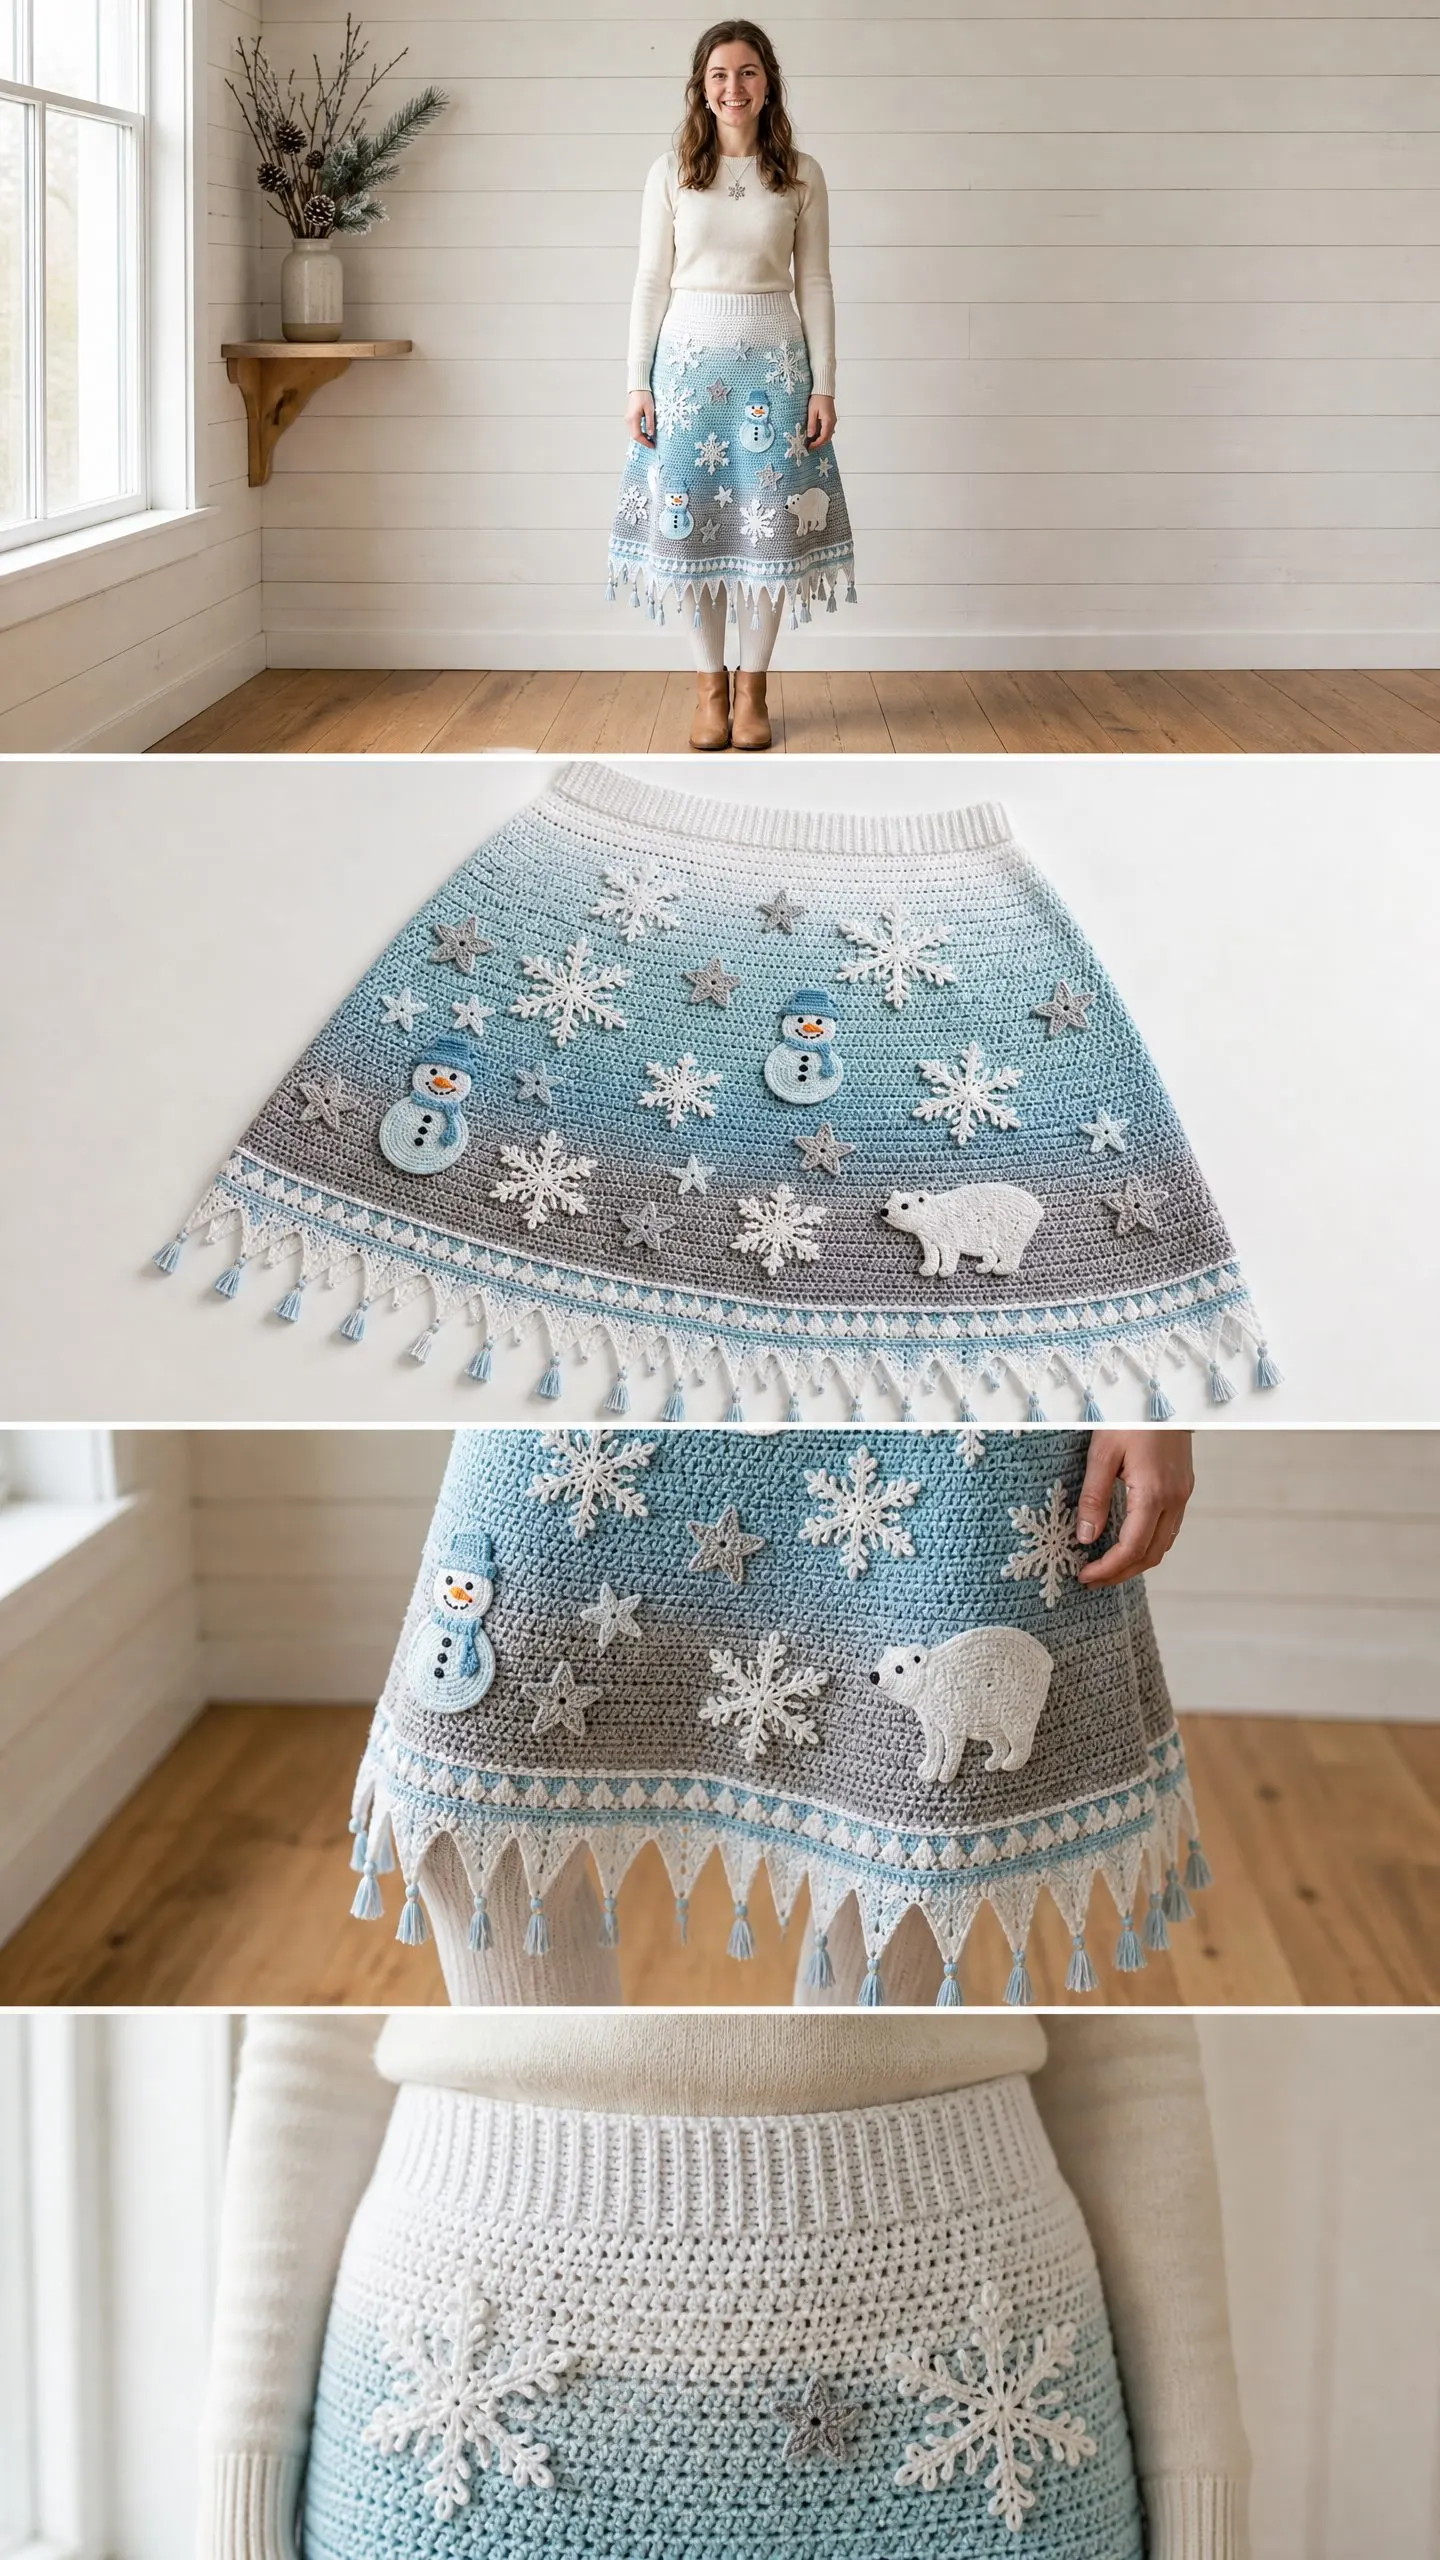
This midi-length A-line skirt features an ombre colorway that transitions from crisp white at the waist through soft sky blue in the middle and down to medium gray at the hem. The body is worked in continuous spiral rounds of single crochet, which creates a dense, structured fabric perfect for showcasing the applique embellishments.
The construction is simpler than it looks. You’ll start with a ribbed waistband worked flat, seam it into a tube, then pick up stitches along the bottom edge and work downward. Strategic increases at eight evenly spaced points create the flattering A-line silhouette without any complicated math on your part.
The decorative elements include large and small snowflakes, two cheerful snowmen with hats and scarves, scattered six-pointed stars, and one sweet polar bear. A picot-and-tassel hem adds movement and visual interest. Everything is worked separately and attached after the body is complete, so you can adjust placement to your preference.
Skill Level
This pattern is rated intermediate to advanced. The body construction itself is straightforward single crochet in the round with simple increases. However, the project requires comfort with several techniques: working in continuous spiral rounds without joining, managing yarn floats during color changes, executing a ribbed waistband with post stitches, completing multiple separate motif patterns, and attaching dimensional appliques neatly.
If you’ve completed garments before and feel comfortable with basic motifs, you’ll succeed with this project. The individual components aren’t difficult. There are just several of them.
Time Estimate
Plan for a significant time investment with this project. The skirt body alone takes approximately 20 to 25 hours depending on your tension and speed. Each large snowflake requires 45 to 60 minutes. Each snowman takes 1 to 1.5 hours. The polar bear takes approximately 2 hours. Small stars need about 20 minutes each.
Total project time including all finishing and assembly is estimated at 35 to 50 hours. This is a wonderful project to work on over several weeks while watching your favorite shows.
Finished Measurements
The pattern as written fits a finished waist measurement of 30 inches (76 cm) and stretches to fit hips up to 42 inches (107 cm) with the A-line flare.
Skirt length from waistband top to hem tip including tassel fringe is approximately 28 inches (71 cm). The skirt body excluding the waistband measures approximately 25 inches (63.5 cm) from the pick-up row to the base of the picot hem. The waistband depth is approximately 2 inches (5 cm). Tassels add approximately 2.5 to 3 inches (6.5 to 7.5 cm) at the hem points.
Materials Needed
Yarn
You’ll need worsted weight yarn in nine colors:
Recommended Yarn Brands
Lion Brand Pound of Love works beautifully for this project. It’s 100 percent acrylic, machine washable, and available in large skeins. The consistent worsted weight produces an even single crochet fabric.
Paintbox Yarns Simply DK can be used doubled on the larger hook for the body and single strand for motifs. The smooth finish showcases the applique placement beautifully.
Caron Simply Soft has a slight sheen that photographs wonderfully and is machine washable, making it ideal for a garment you’ll wear to holiday events.
Avoid overly fuzzy or textured yarns for the body since they’ll obscure the applique details. For motifs, a tightly spun cotton or smooth acrylic gives the clearest stitch definition.
Hooks
Additional Supplies
Gauge
Getting gauge right is critical for this garment. A difference of even half a stitch per inch will alter the waist circumference by several inches over the full round count.
Body gauge using Size J (6.0 mm) hook, worked in rounds of single crochet: 14 stitches and 16 rounds equals 4 inches (10 cm), blocked.
Individual motif gauge is not critical for exact size but should feel firm, not floppy, when complete.
Swatch, block your swatch, and re-swatch if needed before starting the body.
Abbreviations
Here are all the abbreviations used in this pattern with plain-English definitions:
Special Stitches
Picot-3: Chain 3, slip stitch into the first chain of the chain-3 just made. This creates a small raised decorative loop.
Picot-5: Chain 5, slip stitch into the first chain of the chain-5. Creates a larger loop used in large snowflake petal tips.
Standing sc: Begin with a slip knot on your hook. Insert hook into the designated stitch, yarn over, pull up a loop, yarn over, pull through both loops. This starts a new color without a joining slip stitch.
Joined color change: Work the last stitch of your current color until 2 loops remain on the hook. Drop the current color (don’t cut unless told to), pick up the new color, yarn over and pull through both loops.
Tassel: Cut 10 strands of yarn each 9 inches (23 cm) long. Fold the bundle in half. Using your crochet hook, pull the folded loop through the designated picot point at the hem. Draw the cut ends through the folded loop and pull tight. Trim to 2.5 inches (6.5 cm) below the knot.
Pattern Notes Before You Begin
The skirt body is worked in continuous spiral rounds. This means you won’t join at the end of each round or make a turning chain. Place a stitch marker in the first stitch of each round and move it up as you work. This keeps your color-change seam clean.
Color changes for the ombre effect are worked gradually. Each transition zone spans 6 rounds: 2 rounds of the outgoing color, 2 rounds alternating every other stitch (carrying the non-working yarn loosely inside), and 2 rounds of the incoming color. This creates a soft blended edge rather than a hard stripe.
All motifs should be blocked before sewing them on. Pin everything in place before sewing anything so you can confirm the layout and spacing looks right.
Waistband Instructions
The waistband is worked flat in rows using Color A and the J (6.0 mm) hook, then seamed to form a tube.
Foundation chain: Chain 10.
Row 1 (RS): Sc in 2nd ch from hook and in each ch across. Turn. (9 sc)
Row 2 (WS): Ch 1, FPsc around post of first st, BPsc around post of next st. Repeat FPsc, BPsc across to last st, FPsc in last st. Turn. (9 sts)
Row 3 (RS): Ch 1, BPsc around post of first st, FPsc around post of next st. Repeat BPsc, FPsc across to last st, BPsc in last st. Turn. (9 sts)
Repeat Rows 2 and 3 until the waistband strip measures 31 inches (78.5 cm) from the starting edge, ending after a WS row. This should be approximately 100 to 108 total rows depending on your tension. Do not cut yarn.
Hold the two short ends together with RS facing outward. Slip stitch through both layers across the 9 stitches to seam. Fasten off and weave in the end.
Checkpoint: Your waistband tube should measure 30.5 to 31 inches (77.5 to 78.5 cm) in circumference when slightly stretched. The tube height should be approximately 2 inches (5 cm).
Skirt Body Instructions
With RS of waistband facing outward, join Color A with a standing sc into the bottom long edge of the waistband, picking up through both loops of the edge row-end stitches. Place marker in this first stitch.
Pick-up Round: Work sc evenly around the bottom edge of the waistband, distributing increases as needed to reach exactly 112 sc. You’ll work approximately 1 sc into every other row-end along the bottom edge. Place marker. (112 sc)
Checkpoint: At gauge of 14 stitches per 4 inches, 112 stitches produce a circumference of approximately 32 inches (81 cm). This is slightly eased for comfort over the 30-inch waistband.
Color Sequence
Increase Schedule
Increase rounds occur at Rounds 3, 7, 11, 15, 19, 23, 27, 31, 35, 39, and 43. On each increase round, work 8 evenly spaced increases spread around the circumference.
Round-by-Round Instructions
Round 1: Sc in each st around. (112 sc)
Round 2: Sc in each st around. (112 sc)
Round 3 (increase): Work sc to 14 sts before marker, inc, sc 13, inc, sc 13, inc, sc 13, inc, sc 13, inc, sc 13, inc, sc 13, inc, sc 13, inc, sc to end. (120 sc)
Rounds 4-6: Sc in each st around. (120 sc)
Round 7 (increase): Work 8 inc evenly spaced, with each inc placed 15 sts after the previous. (128 sc)
Round 8: Sc in each st around. Begin ombre transition to Color B on final stitch. (128 sc)
Rounds 9-10: Work in Color B and Color A alternating every stitch for ombre blend. (128 sc)
Round 11 (increase): Work in Color B. Work 8 inc evenly spaced, approximately 16 sts apart. (136 sc)
Round 12: Work in Color B. Sc in each st around. (136 sc)
Rounds 13-14: Sc in each st around in Color B. (136 sc)
Round 15 (increase): Work 8 inc evenly spaced, approximately 17 sts apart. (144 sc)
Rounds 16-18: Sc in each st around. (144 sc)
Round 19 (increase): Work 8 inc evenly spaced, approximately 18 sts apart. (152 sc)
Rounds 20-22: Sc in each st around. (152 sc)
Round 23 (increase): Work 8 inc evenly spaced, approximately 19 sts apart. (160 sc)
Rounds 24-26: Sc in each st around. (160 sc)
Round 27 (increase): Work 8 inc evenly spaced, approximately 20 sts apart. (168 sc)
Round 28: Sc in each st around. Begin ombre transition to Color C on final stitch. (168 sc)
Rounds 29-30: Work in Color C and Color B alternating every stitch for ombre blend. (168 sc)
Round 31 (increase): Work in Color C. Work 8 inc evenly spaced, approximately 21 sts apart. (176 sc)
Round 32: Work in Color C. Sc in each st around. (176 sc)
Rounds 33-34: Sc in each st around in Color C. (176 sc)
Round 35 (increase): Work 8 inc evenly spaced, approximately 22 sts apart. (184 sc)
Rounds 36-38: Sc in each st around. (184 sc)
Round 39 (increase): Work 8 inc evenly spaced, approximately 23 sts apart. (192 sc)
Rounds 40-42: Sc in each st around. (192 sc)
Round 43 (increase): Work 8 inc evenly spaced, approximately 24 sts apart. (200 sc)
Rounds 44-46: Sc in each st around. (200 sc)
Checkpoint: After Round 46, your skirt body should measure approximately 22 to 23 inches (56 to 58 cm) from the pick-up row. The hem circumference should be approximately 57 inches (145 cm).
Hem Border Band
Switch to Color A for a clean visual break.
Round 47: Join Color A. In BLO, sc in each st around. (200 sc)
Rounds 48-50: Sc in each st around through both loops in Color A. (200 sc)
Picot-Tassel Hem
The hem creates pointed scallops. Each scallop uses 5 stitches. With 200 base stitches, you get 40 even scallop points.
Hem Round 1: Repeat (Sc in next 2 sts, Picot-3 in next st, sc in next 2 sts) 40 times around. (200 sts worked, 40 picot points created)
Fasten off Color A. Join Color F.
Hem Round 2: With Color F, sl st into the first Picot-3 loop, ch 1, sc into the same loop, Picot-5, sc into the same loop. Then sc in each of the 4 sc sts between this picot and the next. Repeat (sc into next Picot-3 loop, Picot-5, sc into same loop, sc in each of 4 sc sts between) around. (40 Picot-5 points created)
Fasten off Color F. Weave in ends.
Tassel Attachment: Attach a Color D tassel to every other Picot-5 point around the hem for a total of 20 tassels. Trim all tassels to a uniform length of 2.5 inches (6.5 cm) below the knot.
Large Snowflake Motif (Make 6)
Using Color E and Size H (5.0 mm) hook. Finished size: approximately 4 to 4.5 inches (10 to 11.5 cm) across.
Round 1: MC, ch 1, work 6 sc into ring, pull ring closed. Sl st to first sc to join. (6 sc)
Round 2: Ch 4 (counts as dc + ch 1), (dc in next st, ch 1) 5 times, sl st to 3rd ch of beg ch-4 to join. (6 dc, 6 ch-1 sps)
Round 3: Sl st into first ch-1 sp, ch 1, (sc, hdc, dc, Picot-3, dc, hdc, sc) in each ch-1 sp around, sl st to first sc to join. (6 petal sets)
Round 4: Working behind the petals of Round 3, sl st around the post of each dc of Round 2. From behind, (ch 5, sl st around post of next Round 2 dc) 6 times. (6 ch-5 loops)
Round 5: (Sc, hdc, dc, tr, Picot-5, tr, dc, hdc, sc) into each ch-5 loop. Sl st to first sc to join. (6 large outer petals)
Round 6: Working behind the outer petals, sl st to the nearest ch-5 loop base, ch 3, sl st to the base of the next loop, ch 3, repeat around. (6 ch-3 arches)
Round 7: (Sc, hdc, sc) in each ch-3 arch. Sl st to join. (6 small side arms)
Fasten off, leaving a long tail for sewing. Block before attaching.
Small Snowflake Motif (Make 8)
Using Color E and Size H hook. Finished size: approximately 2 to 2.5 inches (5 to 6.5 cm) across.
Work only Rounds 1 through 5 of the Large Snowflake pattern above. Fasten off after Round 5. Block before attaching.
Six-Pointed Star Motif (Make 8)
Using Color F and Size H hook. Finished size: approximately 1.75 to 2 inches (4.5 to 5 cm) across.
Round 1: MC, ch 1, work 6 sc into ring, pull ring closed. Do not join. Work in a spiral. (6 sc)
Round 2: 2 sc in each sc around. (12 sc)
Round 3: (Ch 3, sl st in 2nd ch from hook, sl st in next ch, sl st in next sc of Round 2, sl st in next sc of Round 2) 6 times. (6 star points)
Fasten off, leaving tail for sewing. Block flat before attaching.
Snowman Motif (Make 2)
Snowman Body
Using Color E and Size H hook.
MC, ch 1, work 8 sc into ring, pull closed, sl st to join. (8 sc)
Round 2: 2 sc in each st around. (16 sc)
Round 3: (Sc in next st, 2 sc in next st) around. (24 sc)
Rounds 4-5: Sc in each st around. (24 sc)
Round 6: (Sc in next 2 sts, sc2tog) around. (18 sc)
Stuff lightly with fiberfill if desired.
Round 7: (Sc in next st, sc2tog) around. (12 sc)
Sl st to join, fasten off, leave long tail.
Snowman Head
Using Color E and Size H hook.
MC, ch 1, work 6 sc into ring, pull closed, sl st to join. (6 sc)
Round 2: 2 sc in each st around. (12 sc)
Round 3: (Sc in next st, 2 sc in next st) around. (18 sc)
Round 4: Sc in each st around. (18 sc)
Round 5: (Sc in next st, sc2tog) around. (12 sc)
Stuff lightly. Sl st to join, fasten off, leave long tail.
Snowman Hat
Using Color I and Size H hook.
Brim: Ch 14, sl st to first ch to form ring. Ch 1, sc in each ch around. (14 sc)
Round 2: (Sc2tog, sc in next 5 sts) twice. (12 sc)
Rounds 3-5: Sc in each st around. (12 sc)
Fasten off. Pinch base to flatten brim.
Snowman Scarf
Using Color I, ch 30. Sc in 2nd ch from hook and in each ch across. Fasten off.
Snowman Assembly
Using yarn needle and Color G, embroider 2 small eyes and a curved mouth onto the head. With Color H, embroider a small triangular carrot nose. With Color G, embroider 3 button dots down the front of the body. Stack head on top of body, sewing securely. Attach hat to top of head. Wrap scarf around neck and tack ends.
Polar Bear Motif (Make 1)
Using Color E and Size H hook.
Body
MC, ch 1, work 6 sc into ring. (6 sc)
Round 2: 2 sc in each st around. (12 sc)
Round 3: (Sc, 2 sc in next) around. (18 sc)
Round 4: (Sc in 2 sts, 2 sc in next) around. (24 sc)
Rounds 5-7: Sc in each st around. (24 sc)
Do not stuff. Flatten the piece. Sl st through both layers across 6 sts to close body into a half-circle disc. Do not fasten off.
Legs
From the bottom edge of the closed body, join Color E, ch 4, sc in 2nd ch from hook and next 2 ch (3 sc), sl st to body edge 2 sts from join. Repeat 3 more times spaced evenly along bottom edge for 4 stubby legs. Fasten off.
Head
MC, ch 1, work 6 sc into ring. (6 sc)
Round 2: 2 sc in each st around. (12 sc)
Round 3: (Sc, 2 sc in next) around. (18 sc)
Round 4: Sc in each st around. (18 sc)
Continue shaping and attach to body. Embroider small black eyes and nose with Color G.
Finishing and Assembly
Elastic Casing
Fold the waistband down 1 inch to the inside. Slip stitch the edge in place, leaving a 2-inch opening. Thread elastic through the casing, overlap ends by 1 inch and sew securely, then close the casing.
Motif Placement
Pin all motifs in place before sewing any. Refer to the finished skirt photographs for placement guidance. The large snowflakes and small snowflakes are scattered across the upper blue section and into the gray section. Stars fill the spaces between snowflakes. One snowman is placed in the upper blue section, one in the lower gray section. The polar bear is positioned in the lower gray section, facing slightly right.
Using your yarn needle and matching yarn tails, whip stitch each motif securely to the skirt body. Weave in all remaining ends.
Blocking
Wet block the entire finished skirt by soaking in lukewarm water, gently squeezing out excess moisture, and laying flat to dry. This evens out your stitches and helps the motifs lay flat against the body.
Care Instructions
This skirt is machine washable if you’ve used acrylic yarn. Wash on gentle cycle in cold water, then lay flat to dry to maintain the shape. The tassels may need gentle finger-combing after washing to keep them neat.
Thank you so much for choosing this pattern for your winter wardrobe project! I absolutely love seeing your finished makes, so please tag me on Instagram or share in our Facebook group when your skirt is complete. There’s nothing better than seeing this design come to life in your chosen colors.
If you enjoyed working on this Winter Wonderland Snowflake Skirt crochet pattern, I’d love for you to save it to your Pinterest boards so you can find it again later or share it with fellow crochet lovers. And please drop a comment below if you make this skirt. I want to hear how it turned out and see which color combinations you chose!
